User Manual
Page 5
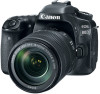
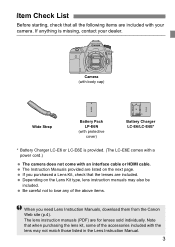
... on the next page. If you need Lens Instruction Manuals, download them from the Canon Web site (p.4). Camera (with body cap) Wide Strap Battery Pack LP-E6N (with protective cover) Battery Charger LC-E6/LC-E6E* * Battery Charger LC-E6 or LC-E6E is missing, contact your camera. Item Check List Before starting...
... on the next page. If you need Lens Instruction Manuals, download them from the Canon Web site (p.4). Camera (with body cap) Wide Strap Battery Pack LP-E6N (with protective cover) Battery Charger LC-E6/LC-E6E* * Battery Charger LC-E6 or LC-E6E is missing, contact your camera. Item Check List Before starting...
User Manual
Page 8
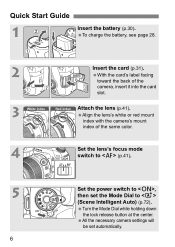
Quick Start Guide 1 Insert the battery (p.30). To charge the battery, see page 28. 2 Insert the card (p.31). With the card's label facing toward the back of the camera, insert it into the card slot. 3 ...
Quick Start Guide 1 Insert the battery (p.30). To charge the battery, see page 28. 2 Insert the card (p.31). With the card's label facing toward the back of the camera, insert it into the card slot. 3 ...
User Manual
Page 12
... 5 Quick Start Guide 6 Conventions Used in this Manual 8 Chapters 9 Safety Precautions 14 Handling Precautions 17 Nomenclature 20 1 Getting Started 27 Charging the Battery 28 Installing and Removing the Battery 30 Installing and Removing the Card 31 Using the LCD Monitor 34 Turning on the Power 35 Setting the Date, Time, and Zone...
... 5 Quick Start Guide 6 Conventions Used in this Manual 8 Chapters 9 Safety Precautions 14 Handling Precautions 17 Nomenclature 20 1 Getting Started 27 Charging the Battery 28 Installing and Removing the Battery 30 Installing and Removing the Card 31 Using the LCD Monitor 34 Turning on the Power 35 Setting the Date, Time, and Zone...
User Manual
Page 16
.... • Do not recharge the battery in the same position for people with the same body part may cause a fire or an explosion. If excessive heat, smoke, or fumes are provided to prevent harm or injury to the product, contact the nearest Canon Service Center or the dealer from whom... you purchased the product. It can cause blindness or skin problems. If the battery leakage comes in the Instruction Manual. • Do not insert any home-made or ...
.... • Do not recharge the battery in the same position for people with the same body part may cause a fire or an explosion. If excessive heat, smoke, or fumes are provided to prevent harm or injury to the product, contact the nearest Canon Service Center or the dealer from whom... you purchased the product. It can cause blindness or skin problems. If the battery leakage comes in the Instruction Manual. • Do not insert any home-made or ...

User Manual
Page 17
... heat, fire, and corrosion. Do not use a cord whose wire is broken or insulation is allowed. This is to remove the battery, and disconnect the power plug and connecting cables from metallic items and store it is damaged. Unplug the power plug periodically and clean off... a power plug with a dry cloth. Safety Precautions When the camera or accessories are using the camera inside the product, promptly remove the battery. Doing so may damage your vision. Keep equipment out of the reach of the cord. • Do not scratch, cut, or excessively...
... heat, fire, and corrosion. Do not use a cord whose wire is broken or insulation is allowed. This is to remove the battery, and disconnect the power plug and connecting cables from metallic items and store it is damaged. Unplug the power plug periodically and clean off... a power plug with a dry cloth. Safety Precautions When the camera or accessories are using the camera inside the product, promptly remove the battery. Doing so may damage your vision. Keep equipment out of the reach of the cord. • Do not scratch, cut, or excessively...
User Manual
Page 18
Doing so may cause an injury or an accident. Doing so may also cause battery leakage or explosion, which will become hot and cause burns. It may result. Do not use or store the product in a low-temperature environment ...
Doing so may cause an injury or an accident. Doing so may also cause battery leakage or explosion, which will become hot and cause burns. It may result. Do not use or store the product in a low-temperature environment ...
User Manual
Page 20
This is working . Avoid storing the camera where there are not a malfunction. If you have the camera checked by your nearest Canon Service Center or check the camera yourself and make sure it . They do not use continuous shooting, Live View shooting, or movie shooting for...is to normal at room temperature. 18 It will return to avoid damaging the camera. If there is condensation, remove the lens, card and battery from the camera, and wait until condensation has evaporated before using the camera. If the camera will disappear when the camera is manufactured...
This is working . Avoid storing the camera where there are not a malfunction. If you have the camera checked by your nearest Canon Service Center or check the camera yourself and make sure it . They do not use continuous shooting, Live View shooting, or movie shooting for...is to normal at room temperature. 18 It will return to avoid damaging the camera. If there is condensation, remove the lens, card and battery from the camera, and wait until condensation has evaporated before using the camera. If the camera will disappear when the camera is manufactured...
User Manual
Page 22
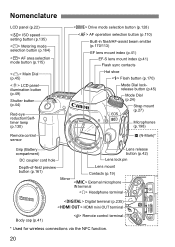
... sync contacts Hot shoe Flash button (p.170) Mode Dial lockrelease button (p.45) Mode Dial (p.24) Strap mount (p.27) Microphones (p.198) Remote control sensor p (N-Mark)* Grip (Battery compartment) DC coupler cord hole Depth-of-field preview button (p.161) Lens release button (p.42) Lens lock pin Lens mount Mirror Contacts (p.19) External microphone...
... sync contacts Hot shoe Flash button (p.170) Mode Dial lockrelease button (p.45) Mode Dial (p.24) Strap mount (p.27) Microphones (p.198) Remote control sensor p (N-Mark)* Grip (Battery compartment) DC coupler cord hole Depth-of-field preview button (p.161) Lens release button (p.42) Lens lock pin Lens mount Mirror Contacts (p.19) External microphone...

User Manual
Page 23
.../ Index/Reduce button (p.169/222, 223) AF point selection/ Magnify button (p.116/223) Access lamp (p.33) Strap mount (p.27) Card slot cover (p.31) Battery compartment cover release lever (p.30) Battery compartment cover (p.30) Quick Control Dial (p.46) Multi function lock switch (p.48) Erase button (p.229) Setting button (p.52) Card slot (p.31) 21
.../ Index/Reduce button (p.169/222, 223) AF point selection/ Magnify button (p.116/223) Access lamp (p.33) Strap mount (p.27) Card slot cover (p.31) Battery compartment cover release lever (p.30) Battery compartment cover (p.30) Quick Control Dial (p.46) Multi function lock switch (p.48) Erase button (p.229) Setting button (p.52) Card slot (p.31) 21
User Manual
Page 24
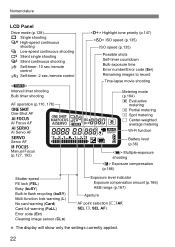
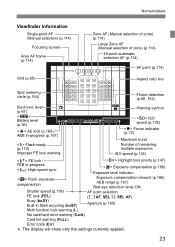
... (Err) Remaining images to record Time-lapse movie shooting Metering mode (p.164) q Evaluative metering w Partial metering r Spot metering e Center-weighted average metering Wi-Fi function Battery level (p.36) Multiple-exposure shooting Exposure compensation (p.166) Shutter speed FE lock (FEL) Busy (buSY) Built-in flash recycling (buSY) Multi function lock warning (L) No...
... (Err) Remaining images to record Time-lapse movie shooting Metering mode (p.164) q Evaluative metering w Partial metering r Spot metering e Center-weighted average metering Wi-Fi function Battery level (p.36) Multiple-exposure shooting Exposure compensation (p.166) Shutter speed FE lock (FEL) Busy (buSY) Built-in flash recycling (buSY) Multi function lock warning (L) No...
User Manual
Page 25
... zone) (p.114) 45-point automatic selection AF (p.114) AF point (p.114) Aspect ratio line Spot metering circle (p.164) Flicker detection (p.68, 152) Electronic level (p.67) Battery level (p.36) AE lock (p.169) / AEB in-progress (p.167) Flash-ready (p.170) Improper FE lock warning Warning symbol ISO speed (p.135) Focus indicator (p.72) Maximum...
... zone) (p.114) 45-point automatic selection AF (p.114) AF point (p.114) Aspect ratio line Spot metering circle (p.164) Flicker detection (p.68, 152) Electronic level (p.67) Battery level (p.36) AE lock (p.169) / AEB in-progress (p.167) Flash-ready (p.170) Improper FE lock warning Warning symbol ISO speed (p.135) Focus indicator (p.72) Maximum...
User Manual
Page 28
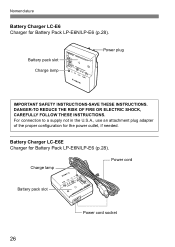
Battery pack slot Charge lamp Power plug IMPORTANT SAFETY INSTRUCTIONS-SAVE THESE INSTRUCTIONS. For connection to a supply not in the U.S.A., use an attachment plug adapter of the proper configuration for Battery Pack LP-E6N/LP-E6 (p.28). DANGER-TO REDUCE THE RISK OF FIRE OR ELECTRIC SHOCK, CAREFULLY FOLLOW THESE INSTRUCTIONS. Charge lamp Power cord Battery pack slot Power cord socket 26 Battery Charger LC-E6E Charger for the power outlet, if needed. Nomenclature Battery Charger LC-E6 Charger for Battery Pack LP-E6N/LP-E6 (p.28).
Battery pack slot Charge lamp Power plug IMPORTANT SAFETY INSTRUCTIONS-SAVE THESE INSTRUCTIONS. For connection to a supply not in the U.S.A., use an attachment plug adapter of the proper configuration for Battery Pack LP-E6N/LP-E6 (p.28). DANGER-TO REDUCE THE RISK OF FIRE OR ELECTRIC SHOCK, CAREFULLY FOLLOW THESE INSTRUCTIONS. Charge lamp Power cord Battery pack slot Power cord socket 26 Battery Charger LC-E6E Charger for the power outlet, if needed. Nomenclature Battery Charger LC-E6 Charger for Battery Pack LP-E6N/LP-E6 (p.28).
User Manual
Page 30
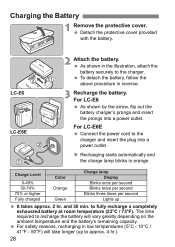
... reasons, recharging in orange. to approx. 4 hr.). 28 Charging the Battery 1 Remove the protective cover. Detach the protective cover provided with the battery. For LC-E6 As shown by the arrow, flip out the battery charger's prongs and insert the prongs into a power outlet. ...; It takes approx. 2 hr. For LC-E6E Connect the power cord to the charger. To detach the battery, follow the above procedure in the illustration, attach the battery securely to the charger and insert the plug into a power outlet. LC-E6 LC-E6E 2 Attach the...
... reasons, recharging in orange. to approx. 4 hr.). 28 Charging the Battery 1 Remove the protective cover. Detach the protective cover provided with the battery. For LC-E6 As shown by the arrow, flip out the battery charger's prongs and insert the prongs into a power outlet. ...; It takes approx. 2 hr. For LC-E6E Connect the power cord to the charger. To detach the battery, follow the above procedure in the illustration, attach the battery securely to the charger and insert the plug into a power outlet. LC-E6 LC-E6E 2 Attach the...
User Manual
Page 31
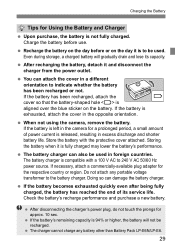
... power outlet. You can attach the cover in foreign countries. Charging the Battery Tips for approx. 10 sec. If the battery's remaining capacity is 94% or higher, the battery will gradually drain and lose its service life. Doing so can also be recharged. ... the prongs for Using the Battery and Charger Upon purchase, the battery is fully charged may lower the battery's performance. The battery charger can damage the battery charger. If the battery becomes exhausted quickly even after being fully charged, the battery has reached the end of ...
... power outlet. You can attach the cover in foreign countries. Charging the Battery Tips for approx. 10 sec. If the battery's remaining capacity is 94% or higher, the battery will gradually drain and lose its service life. Doing so can also be recharged. ... the prongs for Using the Battery and Charger Upon purchase, the battery is fully charged may lower the battery's performance. The battery charger can damage the battery charger. If the battery becomes exhausted quickly even after being fully charged, the battery has reached the end of ...

User Manual
Page 32
...LP-E6 can be sure to attach the provided protective cover (p.28) to the battery. 30 Installing and Removing the Battery Load a fully-charged Battery Pack LP-E6N (or LP-E6) into the camera. Installing the Battery 1 Open the cover. Slide the lever as shown by the arrows... focus cannot be achieved. Removing the Battery Open the cover and remove the battery. Press the battery lock lever as shown by the arrow and remove the battery. To prevent short circuiting of the electrical contacts, be used. If the battery is removed. The camera's viewfinder becomes...
...LP-E6 can be sure to attach the provided protective cover (p.28) to the battery. 30 Installing and Removing the Battery Load a fully-charged Battery Pack LP-E6N (or LP-E6) into the camera. Installing the Battery 1 Open the cover. Slide the lever as shown by the arrows... focus cannot be achieved. Removing the Battery Open the cover and remove the battery. Press the battery lock lever as shown by the arrow and remove the battery. To prevent short circuiting of the electrical contacts, be used. If the battery is removed. The camera's viewfinder becomes...
User Manual
Page 35
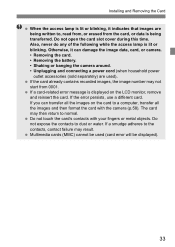
If you can damage the image data, card, or camera. • Removing the card. • Removing the battery. • Shaking or banging the camera around. • Unplugging and connecting a power cord (when household power outlet accessories (sold separately) are being transferred. If the ...
If you can damage the image data, card, or camera. • Removing the card. • Removing the battery. • Shaking or banging the camera around. • Unplugging and connecting a power cord (when household power outlet accessories (sold separately) are being transferred. If the ...
User Manual
Page 37
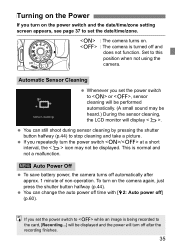
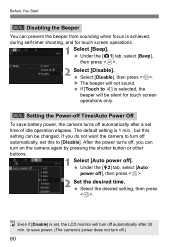
... power off time with [52: Auto power off] (p.60). To turn on . : The camera is normal and not a malfunction. 3 Auto Power Off To save battery power, the camera turns off automatically after the recording finishes. 35 This is turned off and does not function. Turning on the Power If you...
... power off time with [52: Auto power off] (p.60). To turn on . : The camera is normal and not a malfunction. 3 Auto Power Off To save battery power, the camera turns off automatically after the recording finishes. 35 This is turned off and does not function. Turning on the Power If you...
User Manual
Page 38
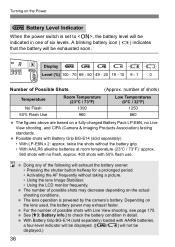
...(23°C / 73°F) 1390 960 Low Temperatures (0°C / 32°F) 1250 860 The figures above are based on a fully-charged Battery Pack LP-E6N, no flash, approx. 400 shots with 50% flash use. Doing any of possible shots may exhaust faster. For the... number of possible shots with Live View shooting, see page 175. See [53: Battery info.] to , the battery level will be indicated in detail. With Battery Grip BG-E14 (sold separately) loaded with Battery Grip BG-E14 (sold separately) • With LP-E6N x 2: approx. twice the shots without...
...(23°C / 73°F) 1390 960 Low Temperatures (0°C / 32°F) 1250 860 The figures above are based on a fully-charged Battery Pack LP-E6N, no flash, approx. 400 shots with 50% flash use. Doing any of possible shots may exhaust faster. For the... number of possible shots with Live View shooting, see page 175. See [53: Battery info.] to , the battery level will be indicated in detail. With Battery Grip BG-E14 (sold separately) loaded with Battery Grip BG-E14 (sold separately) • With LP-E6N x 2: approx. twice the shots without...
User Manual
Page 41
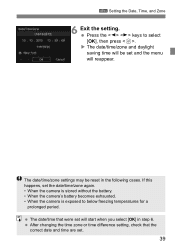
.../zone settings may be set . 39 If this happens, set the date/time/zone again. • When the camera is stored without the battery. • When the camera's battery becomes exhausted. • When the camera is exposed to select [OK], then press . The date/time/zone and daylight saving time will...
.../zone settings may be set . 39 If this happens, set the date/time/zone again. • When the camera is stored without the battery. • When the camera's battery becomes exhausted. • When the camera is exposed to select [OK], then press . The date/time/zone and daylight saving time will...
User Manual
Page 62
Even if [Disable] is set, the LCD monitor will be changed. to [Disable]. The default setting is 1 min., but this to save battery power, the camera turns off automatically after 30 min. If you can turn off automatically after a set this setting can be silent for touch screen ...
Even if [Disable] is set, the LCD monitor will be changed. to [Disable]. The default setting is 1 min., but this to save battery power, the camera turns off automatically after 30 min. If you can turn off automatically after a set this setting can be silent for touch screen ...
