
Quick Start Guide
Page 1
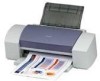
BUBBLE JET PRINTER Quick Start Guide Table of Contents Preface 1 Shipping Materials 1 Introduction 1 Setting Up 2 Preparing the Printer 2 Connecting the Printer to the Computer 2 Installing the Print Head 4 Loading Paper 7 Installing the Printer Driver 8 Aligning the Print Head 14 Basic Operations 18 Printing with Windows 18 Printing with Macintosh 20 Print Head Maintenance 22 Notes on Handling the USB Interface (for Windows Users) 23 For Further Details... 23 BE QA7-2692-V01
BUBBLE JET PRINTER Quick Start Guide Table of Contents Preface 1 Shipping Materials 1 Introduction 1 Setting Up 2 Preparing the Printer 2 Connecting the Printer to the Computer 2 Installing the Print Head 4 Loading Paper 7 Installing the Printer Driver 8 Aligning the Print Head 14 Basic Operations 18 Printing with Windows 18 Printing with Macintosh 20 Print Head Maintenance 22 Notes on Handling the USB Interface (for Windows Users) 23 For Further Details... 23 BE QA7-2692-V01

Quick Start Guide
Page 3
...; is a registered trademark of this publication may be purchased separately according to your Canon Authorized Dealer or Sales Representative. ‰ Printer ‰ Setup Software & User's Guide CD-ROM ‰ Quick Start Guide ‰ Print Head ‰ 4 Ink Tanks * Cables should be transmitted or copied in the U.S. For details on cable types and specifications, refer... in this guide refer to indicate important information. and other countries. • All other countries. • Apple, Mac and Macintosh are exactly the same with i6100.
...; is a registered trademark of this publication may be purchased separately according to your Canon Authorized Dealer or Sales Representative. ‰ Printer ‰ Setup Software & User's Guide CD-ROM ‰ Quick Start Guide ‰ Print Head ‰ 4 Ink Tanks * Cables should be transmitted or copied in the U.S. For details on cable types and specifications, refer... in this guide refer to indicate important information. and other countries. • All other countries. • Apple, Mac and Macintosh are exactly the same with i6100.

Quick Start Guide
Page 6
3 Installing the Print Head • Never attempt to operate. Do NOT turn on the printer. Do not touch internal parts other than the lock lever. 4 Using the incorrect voltage and frequency could cause a fire or electric shock. • Always push ...; Never damage, modify, stretch, or excessively bend or twist the power cord. The POWER lamp flashes and the printer begins to plug the power cord into the power outlet. „ Installing the Print Head 1 Plug the printer in the country of purchase. Wait until the POWER lamp remains fully lit. 3 Open the front cover...
3 Installing the Print Head • Never attempt to operate. Do NOT turn on the printer. Do not touch internal parts other than the lock lever. 4 Using the incorrect voltage and frequency could cause a fire or electric shock. • Always push ...; Never damage, modify, stretch, or excessively bend or twist the power cord. The POWER lamp flashes and the printer begins to plug the power cord into the power outlet. „ Installing the Print Head 1 Plug the printer in the country of purchase. Wait until the POWER lamp remains fully lit. 3 Open the front cover...

Quick Start Guide
Page 7
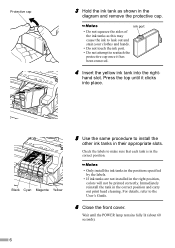
... protective cap from the print head. • Do not touch the print print head nozzles head nozzles or electrical contacts. • Do not attempt to touch any parts inside the printer. Do not touch the lock lever once the print head has been installed. „ Installing the Ink Tanks • For ... orange tape in the holder. Be careful not to reattach the protective cap once it has been removed. print head holder 7 Lock the print head into place by lowering the lever. electrical contacts 6 Place the print head in the direction of the arrow and remove the clear film. 5
... protective cap from the print head. • Do not touch the print print head nozzles head nozzles or electrical contacts. • Do not attempt to touch any parts inside the printer. Do not touch the lock lever once the print head has been installed. „ Installing the Ink Tanks • For ... orange tape in the holder. Be careful not to reattach the protective cap once it has been removed. print head holder 7 Lock the print head into place by lowering the lever. electrical contacts 6 Place the print head in the direction of the arrow and remove the clear film. 5
Quick Start Guide
Page 8
Immediately reinstall the tank in the correct position and carry out print head cleaning. Press the top until the POWER lamp remains fully lit (about 60 seconds). 6 Check the labels to the User's Guide. 6 Close the front cover. ...; Only install the ink tanks in the positions specified by the labels. • If ink tanks are not installed in the right position, colors will not be printed correctly. Black Cyan Magenta Yellow 5 Use the same procedure to reattach the protective cap once it clicks into the right- Wait until it has...
Immediately reinstall the tank in the correct position and carry out print head cleaning. Press the top until the POWER lamp remains fully lit (about 60 seconds). 6 Check the labels to the User's Guide. 6 Close the front cover. ...; Only install the ink tanks in the positions specified by the labels. • If ink tanks are not installed in the right position, colors will not be printed correctly. Black Cyan Magenta Yellow 5 Use the same procedure to reattach the protective cap once it clicks into the right- Wait until it has...

Quick Start Guide
Page 9
... paper larger than B4, pull the output tray extension out one step beyond the position shown at the top of the print head holder to 100 sheets of the sheet feeder. print side 3 Load the paper, aligning it against the left side of the stack of paper. Close the front cover....load up to the left position. You now need to install the printer driver: Windows: Go to page 8 Macintosh: Go to the right when using thick paper. When printing on paper larger than A4. Open the paper rest extension when printing on loading envelopes and other media. Do not exceed this limit....
... paper larger than B4, pull the output tray extension out one step beyond the position shown at the top of the print head holder to 100 sheets of the sheet feeder. print side 3 Load the paper, aligning it against the left side of the stack of paper. Close the front cover....load up to the left position. You now need to install the printer driver: Windows: Go to page 8 Macintosh: Go to the right when using thick paper. When printing on paper larger than A4. Open the paper rest extension when printing on loading envelopes and other media. Do not exceed this limit....

Quick Start Guide
Page 11
... screen shown on the left is displayed, click Install. 5 When the screen shown on the left appears, turn the printer on page 14. 9 Before you can use the printer, you must carry out print head alignment on . ON 6 Click OK. For non-XP Windows, doubleclick My Computer in the CD-ROM drive. • If... the CD-ROM does not run automatically, click Start and My Computer, then double-click the CD-ROM icon. If the printer is not recognized...
... screen shown on the left is displayed, click Install. 5 When the screen shown on the left appears, turn the printer on page 14. 9 Before you can use the printer, you must carry out print head alignment on . ON 6 Click OK. For non-XP Windows, doubleclick My Computer in the CD-ROM drive. • If... the CD-ROM does not run automatically, click Start and My Computer, then double-click the CD-ROM icon. If the printer is not recognized...

Quick Start Guide
Page 13
Wait for the printer you must carry out print head alignment on page 16. If the above message appears, check that there are using this printer as a network printer. 11 If a document needs to the User's Guide when using and close Chooser. After saving the document, begin again from Step 4. 8 Click Restart. The computer .... 10 Click the icon for the installation to finish. Refer to be saved, click Cancel then save the document. 7 Click Install. Before you use the printer, you are no unsaved documents, then click the Continue button.
Wait for the printer you must carry out print head alignment on page 16. If the above message appears, check that there are using this printer as a network printer. 11 If a document needs to the User's Guide when using and close Chooser. After saving the document, begin again from Step 4. 8 Click Restart. The computer .... 10 Click the icon for the installation to finish. Refer to be saved, click Cancel then save the document. 7 Click Install. Before you use the printer, you are no unsaved documents, then click the Continue button.

Quick Start Guide
Page 15
... will start. 11 Software installation is complete. For instructions on the screen. Before you must carry out print head alignment. Read the message, then click Continue Installation. To view the Printer Driver Guide for Mac OS X, doubleclick the Manual folder and Additional Guide for Mac OS X. Restart your... computer appears on how to align the print head, refer to use the printer driver. 13 You can also refer to the Printer Driver Guide for Mac OS X for instructions on how to the Printer Driver Guide for OSX User's folder and select the language folder...
... will start. 11 Software installation is complete. For instructions on the screen. Before you must carry out print head alignment. Read the message, then click Continue Installation. To view the Printer Driver Guide for Mac OS X, doubleclick the Manual folder and Additional Guide for Mac OS X. Restart your... computer appears on how to align the print head, refer to use the printer driver. 13 You can also refer to the Printer Driver Guide for Mac OS X for instructions on how to the Printer Driver Guide for OSX User's folder and select the language folder...

Quick Start Guide
Page 16
... the Maintenance tab, and click the Print Head Alignment icon. 6 Check that paper is loaded in the color registration. „ Aligning the Print Head - Windows 1 Click Start and select Control Panel, Printers and Other Hardware, and then Printers and Faxes. Aligning the print head positions allows you not to print without shifts in the printer and click OK. For non-XP...
... the Maintenance tab, and click the Print Head Alignment icon. 6 Check that paper is loaded in the color registration. „ Aligning the Print Head - Windows 1 Click Start and select Control Panel, Printers and Other Hardware, and then Printers and Faxes. Aligning the print head positions allows you not to print without shifts in the printer and click OK. For non-XP...

Quick Start Guide
Page 18
Macintosh 1 Select Page Setup in the File menu. 2 Click Utilities. 3 Select Test Print from the menu and click the Print Head Alignment icon. 4 Check that paper is not printed successfully, open the front cover and ensure that the ink tanks are correctly installed. 5 Look at the print-out. From the patterns in the printer and click OK. If the pattern is loaded in Column A, select the most even, least irregular pattern and enter the number. 16 „ Aligning the Print Head -
Macintosh 1 Select Page Setup in the File menu. 2 Click Utilities. 3 Select Test Print from the menu and click the Print Head Alignment icon. 4 Check that paper is not printed successfully, open the front cover and ensure that the ink tanks are correctly installed. 5 Look at the print-out. From the patterns in the printer and click OK. If the pattern is loaded in Column A, select the most even, least irregular pattern and enter the number. 16 „ Aligning the Print Head -

Quick Start Guide
Page 24
... touch the lock lever. Print Head Maintenance „ If Blurring Occurs or If a Specific Color Does Not Print Perform print head cleaning to open the setting screen. • Macintosh Open the Page Setup dialog box and click the Utilities button. Click the Cleaning icon. „ When the Printer Runs out of Ink Replace... and click the Maintenance tab. For more details about maintenance, refer to the User's Guide. 22 Ensure that the printer is turned on how to improve the print quality. Click the Cleaning icon. lock lever 2 Install the new ink tank. Yellow BCI-3eY Magenta BCI-3eM Cyan...
... touch the lock lever. Print Head Maintenance „ If Blurring Occurs or If a Specific Color Does Not Print Perform print head cleaning to open the setting screen. • Macintosh Open the Page Setup dialog box and click the Utilities button. Click the Cleaning icon. „ When the Printer Runs out of Ink Replace... and click the Maintenance tab. For more details about maintenance, refer to the User's Guide. 22 Ensure that the printer is turned on how to improve the print quality. Click the Cleaning icon. lock lever 2 Install the new ink tank. Yellow BCI-3eY Magenta BCI-3eM Cyan...


