User Manual
Page 5
... Storage temperature: -10°C to prevent fire and shock. d. Exposure to install the projector yourself. The projector must be installed in a darkened room. 2. If a power cord is sufficient ventilation and that vents are unobstructed to prevent the build-up of heat inside your projector in any items such as a lens and... ensure the long life of the projector. Dropping or jarring can harm internal components. 5. Important Information For UK only: In UK, a BS approved power cord with moulded plug has a Black (five Amps) fuse installed for more information. b.
... Storage temperature: -10°C to prevent fire and shock. d. Exposure to install the projector yourself. The projector must be installed in a darkened room. 2. If a power cord is sufficient ventilation and that vents are unobstructed to prevent the build-up of heat inside your projector in any items such as a lens and... ensure the long life of the projector. Dropping or jarring can harm internal components. 5. Important Information For UK only: In UK, a BS approved power cord with moulded plug has a Black (five Amps) fuse installed for more information. b.
User Manual
Page 6
... in Fan mode if you continue to use your local regulations. If you continue to use the lamp after turning off the main power switch, disconnect the power cord and allow 60 minutes to cool the projector before attempting to use the projector for lamp replacement. • Allow a minimum of ...cause damage to your projector. 9. Do not place any objects, which are tight. (LV-7245/LV-7240 only) Insufficient tightening of glass may cause injury. Do not touch them as gripping the tilt-foot or hanging on a power supply of 100-240V AC 50/60 Hz. v If the projector is on page ...
... in Fan mode if you continue to use your local regulations. If you continue to use the lamp after turning off the main power switch, disconnect the power cord and allow 60 minutes to cool the projector before attempting to use the projector for lamp replacement. • Allow a minimum of ...cause damage to your projector. 9. Do not place any objects, which are tight. (LV-7245/LV-7240 only) Insufficient tightening of glass may cause injury. Do not touch them as gripping the tilt-foot or hanging on a power supply of 100-240V AC 50/60 Hz. v If the projector is on page ...
User Manual
Page 7
... 15 Connecting an External Monitor 16 Connecting Your DVD Player with Component Output 17 Connecting Your VCR or Laser Disc Player 18 Connecting the Supplied Power Cord 19 3. Projecting an Image (Basic Operation 20 ᕡ Turning on the Projector 20 Note on Startup Screen (Menu Language Select screen 21... 1 ᕡ What's in the Box? ...1 ᕢ Introduction to the Projector 2 ᕣ Part Names of the Projector 4 Attaching the Supplied Carrying Handle (LV-7245/LV-7240 only 5 Top Features ...6 Terminal Panel Features 7 ᕤ Part Names of Contents Important Information i 1.
... 15 Connecting an External Monitor 16 Connecting Your DVD Player with Component Output 17 Connecting Your VCR or Laser Disc Player 18 Connecting the Supplied Power Cord 19 3. Projecting an Image (Basic Operation 20 ᕡ Turning on the Projector 20 Note on Startup Screen (Menu Language Select screen 21... 1 ᕡ What's in the Box? ...1 ᕢ Introduction to the Projector 2 ᕣ Part Names of the Projector 4 Attaching the Supplied Carrying Handle (LV-7245/LV-7240 only 5 Top Features ...6 Terminal Panel Features 7 ᕤ Part Names of Contents Important Information i 1.

User Manual
Page 9
.... AUTO PC R-CLICKBACK RD-426E OFF NO SHOW PAGE POWER Remote control Batteries (AAAן2) GuidSetaQrtuick InfoIrmmpaotirotannt Quick Start Guide Important Information For LV-7245/LV-7240 only CD-ROM User's manual Warranty Remote mouse receiver... Carrying handle Screw (M4ן2) Flathead screwdriver 1 If any pieces are missing, contact your dealer. 1. Projector AUTO PC COMPUTER-1 COMPUTER-2 S-VIDEO POWEWRARLNAIMNPGREPLACE VIDEO +VOL -VOL ZOOM ZOOM FOCUS AC power cord...
.... AUTO PC R-CLICKBACK RD-426E OFF NO SHOW PAGE POWER Remote control Batteries (AAAן2) GuidSetaQrtuick InfoIrmmpaotirotannt Quick Start Guide Important Information For LV-7245/LV-7240 only CD-ROM User's manual Warranty Remote mouse receiver... Carrying handle Screw (M4ן2) Flathead screwdriver 1 If any pieces are missing, contact your dealer. 1. Projector AUTO PC COMPUTER-1 COMPUTER-2 S-VIDEO POWEWRARLNAIMNPGREPLACE VIDEO +VOL -VOL ZOOM ZOOM FOCUS AC power cord...
User Manual
Page 12
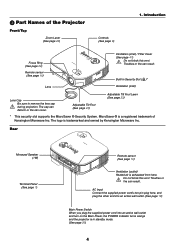
... Foot (See page 23) Adjustable Tilt Foot Lever (See page 23) * This security slot supports the MicroSaver ® Security System. AC Input Connect the supplied power cord's two-pin plug here, and plug the other end into an active wall outlet. (See page 19) Main... Power Switch When you plug the supplied power cord into an active wall outlet and turn on the Main Power, the POWER indicator turns orange and the projector is a registered trademark of the Projector Front/Top Zoom Lever (See...
... Foot (See page 23) Adjustable Tilt Foot Lever (See page 23) * This security slot supports the MicroSaver ® Security System. AC Input Connect the supplied power cord's two-pin plug here, and plug the other end into an active wall outlet. (See page 19) Main... Power Switch When you plug the supplied power cord into an active wall outlet and turn on the Main Power, the POWER indicator turns orange and the projector is a registered trademark of the Projector Front/Top Zoom Lever (See...
User Manual
Page 19
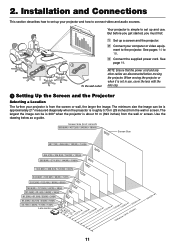
...your projector is roughly 0.73 m (29 inches) from the wall or screen. See pages 14 to the projector. NOTE: Ensure that the power cord and any other cables are disconnected before you get started, you must first: z Set up a screen and the projector. When moving the... 0" 0.732/9 1.0/38 1.35/ 1 2.0/78 2.6/104 3.3/130 4.0/157 5.0/196 6.0/236 6.6/262 Distance (Unit: 8.0/314 m/inch) 10.0/393 11 c Connect the supplied power cord. Installation and Connections This section describes how to set up your projector and how to set up and use , cover the lens with the lens...
...your projector is roughly 0.73 m (29 inches) from the wall or screen. See pages 14 to the projector. NOTE: Ensure that the power cord and any other cables are disconnected before you get started, you must first: z Set up a screen and the projector. When moving the... 0" 0.732/9 1.0/38 1.35/ 1 2.0/78 2.6/104 3.3/130 4.0/157 5.0/196 6.0/236 6.6/262 Distance (Unit: 8.0/314 m/inch) 10.0/393 11 c Connect the supplied power cord. Installation and Connections This section describes how to set up your projector and how to set up and use , cover the lens with the lens...
User Manual
Page 22
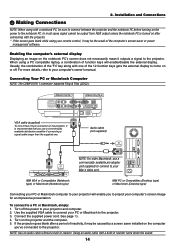
...Making Connections NOTE: When using a PC compatible laptop, a combination of the 12 function keys gets the external display to come on the power to the projector. 3. When using with one . To connect to the projector. Turn on the projector. Enabling the computer's external ...is recommended that you use a commercially available pin adapter (not supplied) to connect to your PHONE Mac's video port. Connect the supplied power cord. Connecting Your PC or Macintosh Computer NOTE: The COMPUTER 1 connector supports Plug & Play (DDC2). If the projector goes blank after ...
...Making Connections NOTE: When using a PC compatible laptop, a combination of the 12 function keys gets the external display to come on the power to the projector. 3. When using with one . To connect to the projector. Turn on the projector. Enabling the computer's external ...is recommended that you use a commercially available pin adapter (not supplied) to connect to your PHONE Mac's video port. Connect the supplied power cord. Connecting Your PC or Macintosh Computer NOTE: The COMPUTER 1 connector supports Plug & Play (DDC2). If the projector goes blank after ...
User Manual
Page 23
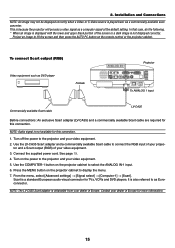
...LV-CA35) and a commercially available Scart cable are required for TVs, VCRs and DVD players. Contact your dealer in Europe for this connection. This is also referred to the projector and your video equipment. 5. Turn off the power to as a computer signal at the default setting. Connect the supplied power cord...upper black portion of your projec- NOTE: Audio signal is obtainable from your dealer in Europe. See page 19. 4. Turn on the power to fill the screen and then press the AUTO PC button on the projector cabinet to select the ANALOG IN-1 input. 6. From the...
...LV-CA35) and a commercially available Scart cable are required for TVs, VCRs and DVD players. Contact your dealer in Europe for this connection. This is also referred to the projector and your video equipment. 5. Turn off the power to as a computer signal at the default setting. Connect the supplied power cord...upper black portion of your projec- NOTE: Audio signal is obtainable from your dealer in Europe. See page 19. 4. Turn on the power to fill the screen and then press the AUTO PC button on the projector cabinet to select the ANALOG IN-1 input. 6. From the...
User Manual
Page 24
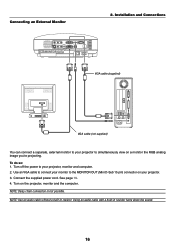
..., external monitor to your projector, monitor and computer. 2. See page 19. 4. To do so: 1. Using an audio cable with a built-in resistor. Turn off the power to your projector to the MONITOR OUT (Mini D-Sub 15 pin) connector on your projector. 3. Use an VGA cable to connect your monitor to simultaneously... a monitor the RGB analog image you're projecting. NOTE: Use an audio cable without a built-in resistor turns down the sound. 16 Connect the supplied power cord.
..., external monitor to your projector, monitor and computer. 2. See page 19. 4. To do so: 1. Using an audio cable with a built-in resistor. Turn off the power to your projector to the MONITOR OUT (Mini D-Sub 15 pin) connector on your projector. 3. Use an VGA cable to connect your monitor to simultaneously... a monitor the RGB analog image you're projecting. NOTE: Use an audio cable without a built-in resistor turns down the sound. 16 Connect the supplied power cord.

User Manual
Page 25
...composite VIDEO output of the DVD player to your DVD player's owner's manual for more information about your projector and DVD player. 2. Connect the supplied power cord. Turn on the projector. If not, from the menu, select [Advanced settings] → [Input signal select] → [Computer], and then place... to the Video Input of the projector. 3. to your DVD player's video output requirements. 17 RCA (female) ן3 cable (LV-CA32) Component video RCAן3 cable (not supplied) Audio Equipment AUDIO IN LR Y Cb Cr DVD player LR Component AUDIO OUT...
...composite VIDEO output of the DVD player to your DVD player's owner's manual for more information about your projector and DVD player. 2. Connect the supplied power cord. Turn on the projector. If not, from the menu, select [Advanced settings] → [Input signal select] → [Computer], and then place... to the Video Input of the projector. 3. to your DVD player's video output requirements. 17 RCA (female) ן3 cable (LV-CA32) Component video RCAן3 cable (not supplied) Audio Equipment AUDIO IN LR Y Cb Cr DVD player LR Component AUDIO OUT...
User Manual
Page 26
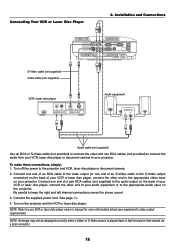
...audio from your VCR, laser disc player or document camera to your VCR or laser disc player owner's manual for stereo sound. 3. Connect the supplied power cord. NOTE: Refer to your equipment's video output requirements. To make these connections, simply: 1. Turn on the back of your projector. NOTE: An ... correctly when a Video or S-Video source is played back in fast-forward or fast-rewind via a scan converter. 18 Turn off the power to keep the right and left channel connections correct for more information about your projector. Be careful to the projector and VCR, laser disc ...
...audio from your VCR, laser disc player or document camera to your VCR or laser disc player owner's manual for stereo sound. 3. Connect the supplied power cord. NOTE: Refer to your equipment's video output requirements. To make these connections, simply: 1. Turn on the back of your projector. NOTE: An ... correctly when a Video or S-Video source is played back in fast-forward or fast-rewind via a scan converter. 18 Turn off the power to keep the right and left channel connections correct for more information about your projector. Be careful to the projector and VCR, laser disc ...
User Manual
Page 27
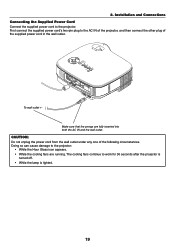
...PORT ANALOG IN-2 ACACININ To wall outlet ← Make sure that the prongs are running. CAUTION: Do not unplug the power cord from the wall outlet under any one of the supplied power cord in the wall outlet. Doing so can cause damage to work for 30 seconds after the projector is turned off.... • While the lamp is lighted. 19 2. Installation and Connections Connecting the Supplied Power Cord Connect the supplied power cord to the AC IN of the projector, and then connect the other plug of the following circumstances.
...PORT ANALOG IN-2 ACACININ To wall outlet ← Make sure that the prongs are running. CAUTION: Do not unplug the power cord from the wall outlet under any one of the supplied power cord in the wall outlet. Doing so can cause damage to work for 30 seconds after the projector is turned off.... • While the lamp is lighted. 19 2. Installation and Connections Connecting the Supplied Power Cord Connect the supplied power cord to the AC IN of the projector, and then connect the other plug of the following circumstances.
User Manual
Page 28
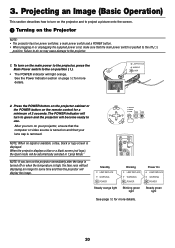
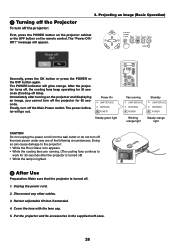
... black screen (not logo), the Quiet mode will display the image. Standby LAMP REPLACE WARNING POWER Steady orange light Blinking LAMP REPLACE WARNING POWER Blinking green light Power On LAMP REPLACE WARNING POWER Steady green light See page 52 for more details. 20 After you turn on the remote ...control for some time and then the projector will be automatically selected in or unplugging the supplied power cord, make sure that the computer or video source is removed. Projecting an Image (Basic Operation) This section describes how to turn ...
... black screen (not logo), the Quiet mode will display the image. Standby LAMP REPLACE WARNING POWER Steady orange light Blinking LAMP REPLACE WARNING POWER Blinking green light Power On LAMP REPLACE WARNING POWER Steady green light See page 52 for more details. 20 After you turn on the remote ...control for some time and then the projector will be automatically selected in or unplugging the supplied power cord, make sure that the computer or video source is removed. Projecting an Image (Basic Operation) This section describes how to turn ...
User Manual
Page 36
... other cables. 3. AC IN ᕨ After Use Preparation: Make sure that the projector is turned off time). Unplug the power cord. 2. The POWER indicator will glow orange. 3. After the projector turns off, the cooling fans keep operating for 30 seconds after turning on the...While the Hour Glass icon appears. • While the cooling fans are running LAMP REPLACE WARNING POWER Blinking orange light Standby LAMP REPLACE WARNING POWER Steady orange light CAUTION Do not unplug the power cord from the wall outlet or do not turn off . 1. Disconnect any one of the following ...
... other cables. 3. AC IN ᕨ After Use Preparation: Make sure that the projector is turned off time). Unplug the power cord. 2. The POWER indicator will glow orange. 3. After the projector turns off, the cooling fans keep operating for 30 seconds after turning on the...While the Hour Glass icon appears. • While the cooling fans are running LAMP REPLACE WARNING POWER Blinking orange light Standby LAMP REPLACE WARNING POWER Steady orange light CAUTION Do not unplug the power cord from the wall outlet or do not turn off . 1. Disconnect any one of the following ...
User Manual
Page 50
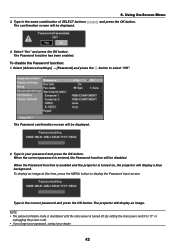
... a blue background. The Password function has been enabled. NOTE: • The password disable mode is maintained until the main power is turned off (by setting the main power switch to "O" or unplugging the power cord). • If you forget your password, contact your password and press the OK button. Using On-Screen Menu and...
... a blue background. The Password function has been enabled. NOTE: • The password disable mode is maintained until the main power is turned off (by setting the main power switch to "O" or unplugging the power cord). • If you forget your password, contact your password and press the OK button. Using On-Screen Menu and...

User Manual
Page 57
...* hours in Quiet mode) hours of glass may still be extremely hot. The following explanation uses drawings for replacement: • Replacement lamp LV-LP24 (LV-7245/LV-7240) or LV-LP25 (LV-X5) • Phillips screwdriver or equivalent NOTE: The two lamp houses are slightly different in Quiet mode. Turn the projector off, wait...lamp housing. The projector will appear. Place the projector on the bottom. 2. To replace the lamp: Optional lamp and tools needed for the lamp LV-LP24. 1. Keep finger prints off the main power switch and then disconnect the power cord.
...* hours in Quiet mode) hours of glass may still be extremely hot. The following explanation uses drawings for replacement: • Replacement lamp LV-LP24 (LV-7245/LV-7240) or LV-LP25 (LV-X5) • Phillips screwdriver or equivalent NOTE: The two lamp houses are slightly different in Quiet mode. Turn the projector off, wait...lamp housing. The projector will appear. Place the projector on the bottom. 2. To replace the lamp: Optional lamp and tools needed for the lamp LV-LP24. 1. Keep finger prints off the main power switch and then disconnect the power cord.

User Manual
Page 59
..., select the menu → [Factory default] → [Lamp counter] to zero. 6. Connect the supplied power cord, turn on the Main Power switch and turn on and the menu is reset to zero, the LAMP REPLACE indicator goes out. * LV-X5: 3100 hours (up to 4100 hours in Quiet mode) of service, the projector cannot...
..., select the menu → [Factory default] → [Lamp counter] to zero. 6. Connect the supplied power cord, turn on the Main Power switch and turn on and the menu is reset to zero, the LAMP REPLACE indicator goes out. * LV-X5: 3100 hours (up to 4100 hours in Quiet mode) of service, the projector cannot...
User Manual
Page 61
...* hours (up to light. In most cases signal cannot be sure to connect between the projector and screen is selected in and that the power cord is plugged in "Screen color". Picture is turned on the remote control to select your source (Video, SVideo or Computer). Indicator is no ...; The lamp may form on . See page 44. See page 27. • When "Off" is particularly warm, move the projector to a cooler location. * LV-X5: 3100 hours (up to correct the trapezoid distortion. If there is enabled. See page 46. • Enter your registered Password if the Password function...
...* hours (up to light. In most cases signal cannot be sure to connect between the projector and screen is selected in and that the power cord is plugged in "Screen color". Picture is turned on the remote control to select your source (Video, SVideo or Computer). Indicator is no ...; The lamp may form on . See page 44. See page 27. • When "Off" is particularly warm, move the projector to a cooler location. * LV-X5: 3100 hours (up to correct the trapezoid distortion. If there is enabled. See page 46. • Enter your registered Password if the Password function...

User Manual
Page 69
... into the wall outlet. Lamp cover is placed near a fluorescent light that can disturb the infrared remote controls. Shut down during operation. Power cord's plug is displayed from your dealer or service personnel, check the following pages. No image (blue background, logo, no image even though... button for a minimum of the 12 function keys turns the external display on or is not turned on or off. No sound. Power cord's plug is flickering. Image is active and available. Audio cable is turned off (only models with the Remote Sensor Selection function). Batteries...
... into the wall outlet. Lamp cover is placed near a fluorescent light that can disturb the infrared remote controls. Shut down during operation. Power cord's plug is displayed from your dealer or service personnel, check the following pages. No image (blue background, logo, no image even though... button for a minimum of the 12 function keys turns the external display on or is not turned on or off. No sound. Power cord's plug is flickering. Image is active and available. Audio cable is turned off (only models with the Remote Sensor Selection function). Batteries...
User Manual
Page 70
...Orientation: Ⅺ Ceiling mount Ⅺ Desktop Power outlet connection: Ⅺ Connected directly to wall outlet Ⅺ Connected to power cord extender or other (the number of connected equipment Ⅺ Connected to a power cord reel or other (the number of connected ...equipment Computer Manufacturer: Model number: Notebook PC Ⅺ / Desktop Ⅺ Native resolution: Refresh rate: Video adapter: Other: DVD player Signal cable Canon...
...Orientation: Ⅺ Ceiling mount Ⅺ Desktop Power outlet connection: Ⅺ Connected directly to wall outlet Ⅺ Connected to power cord extender or other (the number of connected equipment Ⅺ Connected to a power cord reel or other (the number of connected ...equipment Computer Manufacturer: Model number: Notebook PC Ⅺ / Desktop Ⅺ Native resolution: Refresh rate: Video adapter: Other: DVD player Signal cable Canon...

