Owners Manual
Page 2
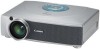
... page 25 and 42.) ◆ Selectable Lamp Mode Brightness of the projection lamp can be selected in the Setting menu. (See page 44.) ◆ Blackboard Function Blackboard✳ can be captured and used as computer input or monitor output conveniently. (See page 43.) 2 This projector utilizes built-in multimedia features, a palette of 16.77 million...
... page 25 and 42.) ◆ Selectable Lamp Mode Brightness of the projection lamp can be selected in the Setting menu. (See page 44.) ◆ Blackboard Function Blackboard✳ can be captured and used as computer input or monitor output conveniently. (See page 43.) 2 This projector utilizes built-in multimedia features, a palette of 16.77 million...
Owners Manual
Page 3
... Operating Range 13 Remote Control Battery Installation 14 Installation 15 Positioning the Projector 15 Adjustable Feet 15 Connecting the AC Power Cord 16 Connecting to a Computer 17 Connecting to Video Equipment 18 Connecting to Component Video Equipment 19 ... Cover 48 Cleaning the Projection Lens 49 Cleaning the Projector Cabinet 49 Lamp Replacement 50 Lamp Replace Counter 51 Appendix 52 Troubleshooting 52 Indicators and Projector Condition 54 Menu Tree 55 Compatible Computer Specifications 57 Technical Specifications 58 Configurations of Terminals 60...
... Operating Range 13 Remote Control Battery Installation 14 Installation 15 Positioning the Projector 15 Adjustable Feet 15 Connecting the AC Power Cord 16 Connecting to a Computer 17 Connecting to Video Equipment 18 Connecting to Component Video Equipment 19 ... Cover 48 Cleaning the Projection Lens 49 Cleaning the Projector Cabinet 49 Lamp Replacement 50 Lamp Replace Counter 51 Appendix 52 Troubleshooting 52 Indicators and Projector Condition 54 Menu Tree 55 Compatible Computer Specifications 57 Technical Specifications 58 Configurations of Terminals 60...

Owners Manual
Page 4
...could result. Install the projector in better condition for allowing air circulation and cooling the projector. Do not cover the ventilation slot on the top, sides and rear of Electronic Computer/Data Processing Equipment NOTE FOR CUSTOMERS IN THE US Hg LAMP(S) INSIDE THIS PRODUCT CONTAIN ... la norme ANSI/NFPA 75 Standard for Protection of the projector cabinet for a considerable time. SIDE and TOP REAR 3.3'(1m) 3.3'(1m) 3.3'(1m) 3.3'(1m) - Improper operation may result in the Standard for use in a computer room as possible. If the problem still persists, contact ...
...could result. Install the projector in better condition for allowing air circulation and cooling the projector. Do not cover the ventilation slot on the top, sides and rear of Electronic Computer/Data Processing Equipment NOTE FOR CUSTOMERS IN THE US Hg LAMP(S) INSIDE THIS PRODUCT CONTAIN ... la norme ANSI/NFPA 75 Standard for Protection of the projector cabinet for a considerable time. SIDE and TOP REAR 3.3'(1m) 3.3'(1m) 3.3'(1m) 3.3'(1m) - Improper operation may result in the Standard for use in a computer room as possible. If the problem still persists, contact ...
Owners Manual
Page 6
... image. The materials put the projector on the cabinet will become hot while the projector is not designed to a projector. Do not point the projector down to cool down the projector. USE CAUTION IN CARRYING OR TRANSPORTING THE PROJECTOR - Cooling fans are provided for their information. 6 Improper Installation may reduce the lamp life and cause a fire hazard...
... image. The materials put the projector on the cabinet will become hot while the projector is not designed to a projector. Do not point the projector down to cool down the projector. USE CAUTION IN CARRYING OR TRANSPORTING THE PROJECTOR - Cooling fans are provided for their information. 6 Improper Installation may reduce the lamp life and cause a fire hazard...
Owners Manual
Page 10
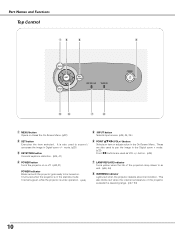
... 8 buttons are also used to be turned on or off. (p20,21) POWER indicator Blinks red until the projector gets ready to pan the image in the stand-by mode. L VOL + KEY STONE LAMP REPLACE WARNING INPUT POWER ty u i q MENU button Opens or closes the On-Screen Menu. (p22) t ...) y POINT ed7 8(VOL+/-)button Selects an item or adjusts value in Digital zoom +/- It remains green while the projector is under operation. (p54) u LAMP REPLACE indicator Turns yellow when the life of the projector exceeds the operating range. (p47, 54) 10 These are used to an end. (p50, 54) i WARNING ...
... 8 buttons are also used to be turned on or off. (p20,21) POWER indicator Blinks red until the projector gets ready to pan the image in the stand-by mode. L VOL + KEY STONE LAMP REPLACE WARNING INPUT POWER ty u i q MENU button Opens or closes the On-Screen Menu. (p22) t ...) y POINT ed7 8(VOL+/-)button Selects an item or adjusts value in Digital zoom +/- It remains green while the projector is under operation. (p54) u LAMP REPLACE indicator Turns yellow when the life of the projector exceeds the operating range. (p47, 54) 10 These are used to an end. (p50, 54) i WARNING ...
Owners Manual
Page 13
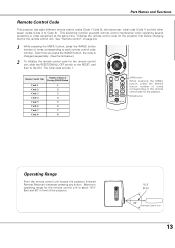
...MENU button While pressing the MENU button, press the IMAGE button number of the projector. L KEY STONE SET POWER MENU 16.4' (5 m) 60° Remote Control Unit 13 This... operating several projectors or video equipment at the same time. (Change the remote control code for the projector first before ... Operating Range Point the remote control unit toward the projector (Infrared Remote Receiver) whenever pressing any button. Each...remote control unit. Part Names and Functions Remote Control Code This projector has eight different remote control codes (Code 1-Code 8); the...
...MENU button While pressing the MENU button, press the IMAGE button number of the projector. L KEY STONE SET POWER MENU 16.4' (5 m) 60° Remote Control Unit 13 This... operating several projectors or video equipment at the same time. (Change the remote control code for the projector first before ... Operating Range Point the remote control unit toward the projector (Infrared Remote Receiver) whenever pressing any button. Each...remote control unit. Part Names and Functions Remote Control Code This projector has eight different remote control codes (Code 1-Code 8); the...
Owners Manual
Page 20
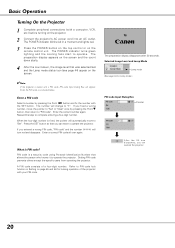
...? What is fixed, the pointer will appear. Setting PIN code prevents others except the specific users from operating the projector. Selected Image Level and Lamp Mode Lamp mode (See page 44 for locking operation of a four-digit number. Repeat this step to operate the...code. 16 The preparation display disappears after 30 seconds. Enter the PIN code as instructed below. Basic Operation Turning On the Projector 1 Complete peripheral connections (with a computer, VCR, etc.) before turning on the remote control unit. Enter the correct number again. Press the SET button so ...
...? What is fixed, the pointer will appear. Setting PIN code prevents others except the specific users from operating the projector. Selected Image Level and Lamp Mode Lamp mode (See page 44 for locking operation of a four-digit number. Repeat this step to operate the...code. 16 The preparation display disappears after 30 seconds. Enter the PIN code as instructed below. Basic Operation Turning On the Projector 1 Complete peripheral connections (with a computer, VCR, etc.) before turning on the remote control unit. Enter the correct number again. Press the SET button so ...
Owners Manual
Page 21
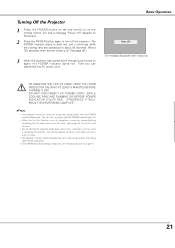
... fans are operating for the On start function is on, this projector is L2. OTHERWISE IT WILL RESULT IN SHORTENING LAMP LIFE. ✔Note: • The projector cannot be turned on the remote control unit, and a message "Power off the projector and give it on again after 4 seconds. Continuous use may ...the top control or on again, the POWER indicator lights red. TO MAINTAIN THE LIFE OF LAMP, ONCE YOU TURN PROJECTOR ON, WAIT AT LEAST 5 MINUTES BEFORE TURNING IT OFF. See page 46.) 3 When the projector has cooled down enough to an AC outlet. (See page 43 for about an hour ...
... fans are operating for the On start function is on, this projector is L2. OTHERWISE IT WILL RESULT IN SHORTENING LAMP LIFE. ✔Note: • The projector cannot be turned on the remote control unit, and a message "Power off the projector and give it on again after 4 seconds. Continuous use may ...the top control or on again, the POWER indicator lights red. TO MAINTAIN THE LIFE OF LAMP, ONCE YOU TURN PROJECTOR ON, WAIT AT LEAST 5 MINUTES BEFORE TURNING IT OFF. See page 46.) 3 When the projector has cooled down enough to an AC outlet. (See page 43 for about an hour ...
Owners Manual
Page 22
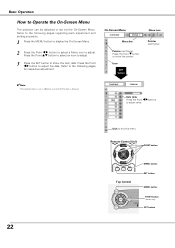
... the item data. Press the Point ed button to select an item to adjust. 3 Press the SET button to Operate the On-Screen Menu The projector can be adjusted or set via the On-Screen Menu. Remote Control Unit POINT button POINTER MENU button SET button Top Control MENU SET VO... Point 7 8buttons to adjust value. 22 Quit to move the pointer. Press the Point 7 8 button to the following pages for respective adjustment. L VOL + KEY STONE LAMP REPL INPUT MENU button POINT button (outer ring) SET button
... the item data. Press the Point ed button to select an item to adjust. 3 Press the SET button to Operate the On-Screen Menu The projector can be adjusted or set via the On-Screen Menu. Remote Control Unit POINT button POINTER MENU button SET button Top Control MENU SET VO... Point 7 8buttons to adjust value. 22 Quit to move the pointer. Press the Point 7 8 button to the following pages for respective adjustment. L VOL + KEY STONE LAMP REPL INPUT MENU button POINT button (outer ring) SET button
Owners Manual
Page 23
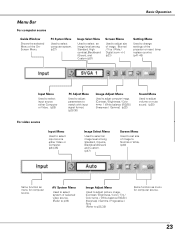
... adjust size of image. [Normal / True / Wide / Digital zoom +/-] (p33) Setting Menu Used to change settings of the projector or reset lamp replace counter. (p41-46) Input Menu Used to select input source either Computer or Video. (p26) PC Adjust Menu Used to adjust parameters to match with input signal format. (p28-30...
... adjust size of image. [Normal / True / Wide / Digital zoom +/-] (p33) Setting Menu Used to change settings of the projector or reset lamp replace counter. (p41-46) Input Menu Used to select input source either Computer or Video. (p26) PC Adjust Menu Used to adjust parameters to match with input signal format. (p28-30...
Owners Manual
Page 43
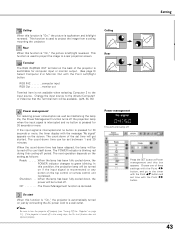
...on the screen. RGB IN-2 computer input RGB Out monitor out Terminal item is pressed. In this condition, the projection lamp will be set between 1 and 30 minutes. Terminal The RGB IN-2/RGB OUT terminal on the back of the projector is switchable for computer input or monitor output. (See... page 9) Select Computer 2 or Monitor Out with the message "No signal...
...on the screen. RGB IN-2 computer input RGB Out monitor out Terminal item is pressed. In this condition, the projection lamp will be set between 1 and 30 minutes. Terminal The RGB IN-2/RGB OUT terminal on the back of the projector is switchable for computer input or monitor output. (See... page 9) Select Computer 2 or Monitor Out with the message "No signal...

Owners Manual
Page 44
... control unit must be switched to "Code 7". USB This projector is equipped with the USB port for a computer connected to the projector with a USB cable. ···· When controlling the projector with the Point ed button and press the SET button. Setting Lamp mode This function allows you to change the code for...
... control unit must be switched to "Code 7". USB This projector is equipped with the USB port for a computer connected to the projector with a USB cable. ···· When controlling the projector with the Point ed button and press the SET button. Setting Lamp mode This function allows you to change the code for...

Owners Manual
Page 46
... normal (L1) , but takes longer to the factory default settings. Cooling the projector for the PIN code lock, the Logo PIN code lock, the User logo and the lamp counter to cool down the projector. Lamp counter reset This function is fixed, the pointer will automatically move to the factory...Point d button and press the SET button to the following alternatives in the cooling fans operation after turning off the projector. When replacing the projection lamp, reset the lamp replace counter by using this box appears. Setting To Change the PIN code lock setting Select Off, On1, or On2...
... normal (L1) , but takes longer to the factory default settings. Cooling the projector for the PIN code lock, the Logo PIN code lock, the User logo and the lamp counter to cool down the projector. Lamp counter reset This function is fixed, the pointer will automatically move to the factory...Point d button and press the SET button to the following alternatives in the cooling fans operation after turning off the projector. When replacing the projection lamp, reset the lamp replace counter by using this box appears. Setting To Change the PIN code lock setting Select Off, On1, or On2...
Owners Manual
Page 47
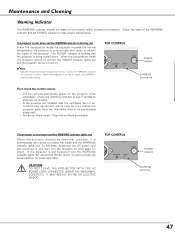
... indicator lights red, disconnect the AC power cord and contact the service station for check. Install the projector away from the ventilation duct of airconditioning equipment which protects the projector. TOP CONTROL KEY STONE OL + LAMP REPLACE WARNING POWER POWER indicator WARNING blinking red Then check the matters below: - Clean the air filters...
... indicator lights red, disconnect the AC power cord and contact the service station for check. Install the projector away from the ventilation duct of airconditioning equipment which protects the projector. TOP CONTROL KEY STONE OL + LAMP REPLACE WARNING POWER POWER indicator WARNING blinking red Then check the matters below: - Clean the air filters...

Owners Manual
Page 50
... may cause injury. The glass can become very hot. Follow these steps to an end. Lamp Cover Screw Lamp Screw Screw Handle ORDER REPLACEMENT LAMP Replacement lamp can be ordered through your projector : ● Replacement Lamp Type No. : LV-X4, LV-7230 LV-LP21 (for LV-X4) (610 315...lights yellow when the life of the projection lamp draws to replace the lamp. 1 Turn off the projector and disconnect the AC plug. See "Lamp Replace Counter" on the projector. 6 Reset the Lamp replace counter. VOL + KEY STONE LAMP REPLACE CAUTION Allow a projector to cool, for at least 45 minutes ...
... may cause injury. The glass can become very hot. Follow these steps to an end. Lamp Cover Screw Lamp Screw Screw Handle ORDER REPLACEMENT LAMP Replacement lamp can be ordered through your projector : ● Replacement Lamp Type No. : LV-X4, LV-7230 LV-LP21 (for LV-X4) (610 315...lights yellow when the life of the projection lamp draws to replace the lamp. 1 Turn off the projector and disconnect the AC plug. See "Lamp Replace Counter" on the projector. 6 Reset the Lamp replace counter. VOL + KEY STONE LAMP REPLACE CAUTION Allow a projector to cool, for at least 45 minutes ...
Owners Manual
Page 51
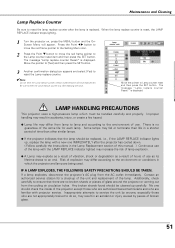
... the same life for a checkup of the unit and replacement of the lamp with projector service. Contact an authorized service station for each lamp. LAMP HANDLING PRECAUTIONS This projector uses a high-pressure lamp which the projector and lamp are not appropriately trained to ensure that the lamp should be handled carefully and properly. Any broken shards found should be...
... the same life for a checkup of the unit and replacement of the lamp with projector service. Contact an authorized service station for each lamp. LAMP HANDLING PRECAUTIONS This projector uses a high-pressure lamp which the projector and lamp are not appropriately trained to ensure that the lamp should be handled carefully and properly. Any broken shards found should be...
Owners Manual
Page 52
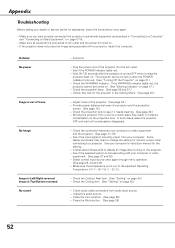
... if the selected system is Left/Right reversed. Problem: No power Image is turned on the projector. - Check the projection lamp. (See page 50 and 51.) - Check audio cable connection from your computer or video equipment and the projector. (See page 17-19) - No sound - Check the WARNING indicator. It takes about 30 seconds...
... if the selected system is Left/Right reversed. Problem: No power Image is turned on the projector. - Check the projection lamp. (See page 50 and 51.) - Check audio cable connection from your computer or video equipment and the projector. (See page 17-19) - No sound - Check the WARNING indicator. It takes about 30 seconds...
Owners Manual
Page 54
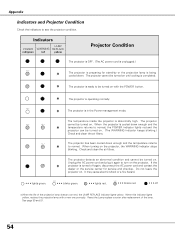
... be turned on with a new one promptly. Check and clean the air filters. Appendix Indicators and Projector Condition Check the indicators to an end, the LAMP REPLACE indicator lights yellow. Unplug the AC power cord and plug it again to normal. It may cause electric shock or a ...the service center for stand-by or the projection lamp is cooled down enough and the temperature returns ✽ to turn on . Reset the Lamp replace counter after replacement of the projection lamp draws to see the projector condition. When the projector is being cooled down. When turning on . ...
... be turned on with a new one promptly. Check and clean the air filters. Appendix Indicators and Projector Condition Check the indicators to an end, the LAMP REPLACE indicator lights yellow. Unplug the AC power cord and plug it again to normal. It may cause electric shock or a ...the service center for stand-by or the projection lamp is cooled down enough and the temperature returns ✽ to turn on . Reset the Lamp replace counter after replacement of the projection lamp draws to see the projector condition. When the projector is being cooled down. When turning on . ...
Owners Manual
Page 56
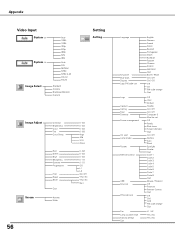
... Keystone Blue back Display Logo PIN code lock Logo Capture Ceiling Rear Terminal Power management On start Lamp mode Pointer Remote control USB Key lock PIN code lock Fan Lamp counter reset Factory default Quit English German French Italian Spanish Portuguese Dutch Swedish Russian Chinese Korean Japanese ... Default Yes/No On / Off On / Off Computer 2 Monitor out Off Ready Shut down Timer(1-30 Min) Quit On / Off Normal Auto Silent Spotlight Pointer Quit Code 1 Code 2 Code 3 Code 4 Code 5 Code 6 Code 7 Code 8 Quit Mouse / Projector Off Projector Remote Control Quit Off On1 On2 PIN code change ...
... Keystone Blue back Display Logo PIN code lock Logo Capture Ceiling Rear Terminal Power management On start Lamp mode Pointer Remote control USB Key lock PIN code lock Fan Lamp counter reset Factory default Quit English German French Italian Spanish Portuguese Dutch Swedish Russian Chinese Korean Japanese ... Default Yes/No On / Off On / Off Computer 2 Monitor out Off Ready Shut down Timer(1-30 Min) Quit On / Off Normal Auto Silent Spotlight Pointer Quit Code 1 Code 2 Code 3 Code 4 Code 5 Code 6 Code 7 Code 8 Quit Mouse / Projector Off Projector Remote Control Quit Off On1 On2 PIN code change ...

Owners Manual
Page 58
... (Diagonal) Projection Lens Throw Distance Projection Lamp Adjustable from 40" to 300" F 1.7 ~ 2.5 lens with f 20.3 mm ~ 32.5 mm with manual zoom and focus 3.3' ~ 25.3' (1.0m ~ 7,7m) 200W Interface Video Input Jacks S-Video Audio Input Jacks RGB Input 1/ Component Input Terminal RGB Input 2/ RGB Output Terminal Computer Audio Input Jacks Service Port Connector...
... (Diagonal) Projection Lens Throw Distance Projection Lamp Adjustable from 40" to 300" F 1.7 ~ 2.5 lens with f 20.3 mm ~ 32.5 mm with manual zoom and focus 3.3' ~ 25.3' (1.0m ~ 7,7m) 200W Interface Video Input Jacks S-Video Audio Input Jacks RGB Input 1/ Component Input Terminal RGB Input 2/ RGB Output Terminal Computer Audio Input Jacks Service Port Connector...


