
imageCLASS MF6500 Series Basic Guide
Page 13
...? 10 Remote UI (MF6580 Only 10-1 11 Maintenance 11-1 Cleaning the Machine 11-1 Exterior 11-1 Interior 11-2 Fuser Roller 11-4 Scanning area 11-5 Cleaning the ADF Automatically 11-8 Transcription Roller 11-9 Replacing the Toner Cartridge 11-10 Redistributing Toner 11-10 Replacing the Toner Cartridge 11-12 Recycling Used Cartridges...-20 Transporting the Machine 11-22 12 Troubleshooting 12-1 Clearing Jams 12-1 Document Jams 12-1 Paper Jams 12-3 LCD Messages 12-6 Error Codes (MF6550/MF6560/MF6580 Only 12-12 If a Power Failure Occurs 12-14 If You Cannot Solve a Problem 12-15 xi
...? 10 Remote UI (MF6580 Only 10-1 11 Maintenance 11-1 Cleaning the Machine 11-1 Exterior 11-1 Interior 11-2 Fuser Roller 11-4 Scanning area 11-5 Cleaning the ADF Automatically 11-8 Transcription Roller 11-9 Replacing the Toner Cartridge 11-10 Redistributing Toner 11-10 Replacing the Toner Cartridge 11-12 Recycling Used Cartridges...-20 Transporting the Machine 11-22 12 Troubleshooting 12-1 Clearing Jams 12-1 Document Jams 12-1 Paper Jams 12-3 LCD Messages 12-6 Error Codes (MF6550/MF6560/MF6580 Only 12-12 If a Power Failure Occurs 12-14 If You Cannot Solve a Problem 12-15 xi

imageCLASS MF6500 Series Basic Guide
Page 56
If the feeder rollers are being scanned. - Avoid using ADF to avoid paper jams. - When scanning is ready for scanning. The document is complete, remove the documents from scanning a ...
If the feeder rollers are being scanned. - Avoid using ADF to avoid paper jams. - When scanning is ready for scanning. The document is complete, remove the documents from scanning a ...
imageCLASS MF6500 Series Basic Guide
Page 130
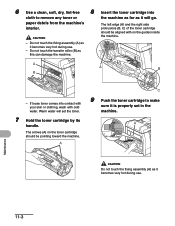
... cartridge into contact with your skin or clothing, wash with on the toner cartridge should be pointing toward the machine. Do not touch the transfer roller (B) as it becomes very hot during use . CAUTION The left edge (A) and the right side protrusions (B, C) of the toner cartridge should be aligned with cold...
... cartridge into contact with your skin or clothing, wash with on the toner cartridge should be pointing toward the machine. Do not touch the transfer roller (B) as it becomes very hot during use . CAUTION The left edge (A) and the right side protrusions (B, C) of the toner cartridge should be aligned with cold...

imageCLASS MF6500 Series Basic Guide
Page 131
Load a sheet of blank LTR paper into the multi-purpose tray and start cleaning. Should this occur, clean the fusing roller in the main unit may be cleaned each time the toner cartridge is properly set in the machine. 11 Reconnect the power cord ... - If you cannot close the left cover. Maintenance 11-4 NOTE Cleaning the roller takes approximately 100 seconds. 1 Press [Additional Functions]. 2 Press [ ] or [ ] to get your fingers caught. - Fuser Roller If black streaks appear with printing, the fuser roller in the following procedure. 10 Close the left cover, do not force it ...
Load a sheet of blank LTR paper into the multi-purpose tray and start cleaning. Should this occur, clean the fusing roller in the main unit may be cleaned each time the toner cartridge is properly set in the machine. 11 Reconnect the power cord ... - If you cannot close the left cover. Maintenance 11-4 NOTE Cleaning the roller takes approximately 100 seconds. 1 Press [Additional Functions]. 2 Press [ ] or [ ] to get your fingers caught. - Fuser Roller If black streaks appear with printing, the fuser roller in the following procedure. 10 Close the left cover, do not force it ...

imageCLASS MF6500 Series Basic Guide
Page 133
... the cloth too much, as this may tear the document or damage the machine. roller. 3 Close the platen glass cover. 3 Clean the rollers (A) inside the ADF with a cloth dampened with water. Clean the ADF scanning area, film, and roller. 1 Turn off the documents and onto the 4 Lift the document feeder tray. B Maintenance.... ADF, this may be caused by pencil lead rubbing off the main power switch and disconnect the power cord. 2 Open the ADF. 5 Clean the rollers (B) below the document feeder tray with a cloth dampened with water. Then wipe the area with a soft, dry cloth.
... the cloth too much, as this may tear the document or damage the machine. roller. 3 Close the platen glass cover. 3 Clean the rollers (A) inside the ADF with a cloth dampened with water. Clean the ADF scanning area, film, and roller. 1 Turn off the documents and onto the 4 Lift the document feeder tray. B Maintenance.... ADF, this may be caused by pencil lead rubbing off the main power switch and disconnect the power cord. 2 Open the ADF. 5 Clean the rollers (B) below the document feeder tray with a cloth dampened with water. Then wipe the area with a soft, dry cloth.

imageCLASS MF6500 Series Basic Guide
Page 134
Then wipe the area with water. CAUTION Be careful not to get your fingers caught. 7 Close the ADF. 10 Close the platen glass cover. Maintenance 11-7 Clean the ADF scanning area (on the main power switch. CAUTION Be careful not to get your fingers caught. 8 Open the platen glass cover. CAUTION Be careful not to get your fingers caught. 11 Reconnect the power cord and turn on the left side of the platen glass) and the document feeding roller with a cloth dampened with a soft, dry cloth. 6 9 Lower the document feeder tray.
Then wipe the area with water. CAUTION Be careful not to get your fingers caught. 7 Close the ADF. 10 Close the platen glass cover. Maintenance 11-7 Clean the ADF scanning area (on the main power switch. CAUTION Be careful not to get your fingers caught. 8 Open the platen glass cover. CAUTION Be careful not to get your fingers caught. 11 Reconnect the power cord and turn on the left side of the platen glass) and the document feeding roller with a cloth dampened with a soft, dry cloth. 6 9 Lower the document feeder tray.

imageCLASS MF6500 Series Basic Guide
Page 135
... Use LTR paper. Maintenance 11-8 When finished, the display returns to select , then press [OK]. 4 Load 5 sheets of paper through the ADF, clean the ADF roller by repeatedly feeding blank sheets of blank paper into the ADF, then press [OK]. Cleaning the ADF Automatically If your documents have black streaks or...
... Use LTR paper. Maintenance 11-8 When finished, the display returns to select , then press [OK]. 4 Load 5 sheets of paper through the ADF, clean the ADF roller by repeatedly feeding blank sheets of blank paper into the ADF, then press [OK]. Cleaning the ADF Automatically If your documents have black streaks or...

imageCLASS MF6500 Series Basic Guide
Page 136
... returns to select , then press [OK]. 3 Confirm that is smudged after printing, the transcription roller may be dirty. Cleaning starts. Transcription Roller If the back of the paper is displayed, then press [OK]. Maintenance 11-9 Clean the transcription roller in the following procedure. 1 2 ded Address 3 al Book 04 08 2 [OK] COPY FAX SCAN...
... returns to select , then press [OK]. 3 Confirm that is smudged after printing, the transcription roller may be dirty. Cleaning starts. Transcription Roller If the back of the paper is displayed, then press [OK]. Maintenance 11-9 Clean the transcription roller in the following procedure. 1 2 ded Address 3 al Book 04 08 2 [OK] COPY FAX SCAN...

imageCLASS MF6500 Series Basic Guide
Page 193
... or fix irregular print density. ON This setting is used , paper may not function adequately. SPECIAL MODE Q Description Cleans the transcription roller. (See "Transcription Roller," on p. 11-9.) Cleans the fuser roller. (See "Fuser Roller," on p. 11-4.) Cleans the ADF. (See "Cleaning the ADF Automatically," on the printed image. - ADJUST./CLEANING Setting Item 1. TRANS. FEEDER...
... or fix irregular print density. ON This setting is used , paper may not function adequately. SPECIAL MODE Q Description Cleans the transcription roller. (See "Transcription Roller," on p. 11-9.) Cleans the fuser roller. (See "Fuser Roller," on p. 11-4.) Cleans the ADF. (See "Cleaning the ADF Automatically," on the printed image. - ADJUST./CLEANING Setting Item 1. TRANS. FEEDER...

imageCLASS MF6500 Series Basic Guide
Page 209
... SET. 13-18 ADF 1-1, 2-6 ADJUST./CLEANING 13-26 Auto clear time 1-12 Automatic document feeder 1-1 C CHECK DOCUMENT message 12-1 Cleaning machine 11-1 Exterior 11-1 Fuser roller 11-4 Interior 11-2 Scanning area 11-5 Cleaning the ADF automatically 11-8 Clear key 1-4 Clearing Jams 12-1 Coded Dial key 1-5, 4-33 Coded speed dialing 4-6 Deleting 4-21...
... SET. 13-18 ADF 1-1, 2-6 ADJUST./CLEANING 13-26 Auto clear time 1-12 Automatic document feeder 1-1 C CHECK DOCUMENT message 12-1 Cleaning machine 11-1 Exterior 11-1 Fuser roller 11-4 Interior 11-2 Scanning area 11-5 Cleaning the ADF automatically 11-8 Clear key 1-4 Clearing Jams 12-1 Coded Dial key 1-5, 4-33 Coded speed dialing 4-6 Deleting 4-21...

imageCLASS MF6500 Series Basic Guide
Page 211
... key 1-4 System Monitor key 1-3 SYSTEM SETTINGS 13-30 T TIMER SETTINGS 13-24 Timer settings 1-9 Tone key 1-4 Toner cartridge 1-7 Recycling 11-16 Replacing 11-12 Transcription roller 11-9 Transporting machine 11-22 Troubleshooting 12-1 Two-Sided key 1-4 TX SETTINGS 13-14 U USER DATA LIST 13-1 Printing 13-1 Using speed dialing 4-32 V View...
... key 1-4 System Monitor key 1-3 SYSTEM SETTINGS 13-30 T TIMER SETTINGS 13-24 Timer settings 1-9 Tone key 1-4 Toner cartridge 1-7 Recycling 11-16 Replacing 11-12 Transcription roller 11-9 Transporting machine 11-22 Troubleshooting 12-1 Two-Sided key 1-4 TX SETTINGS 13-14 U USER DATA LIST 13-1 Printing 13-1 Using speed dialing 4-32 V View...


