

TS3500 series User Manual
Page 2
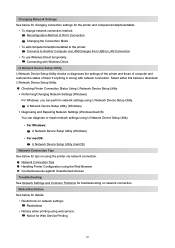
... Printing Network Settings 37 Reconfiguration Method of Wi-Fi Connection 42 Connecting with Wireless Direct 43 IJ Network Device Setup Utility (macOS 45 IJ Network Device Setup Utility 46 Starting Up IJ Network Device Setup Utility 47 Diagnosing and Repairing Network Settings 48 List of Models Which Does Not Support Diagnosis and Repair...
... Printing Network Settings 37 Reconfiguration Method of Wi-Fi Connection 42 Connecting with Wireless Direct 43 IJ Network Device Setup Utility (macOS 45 IJ Network Device Setup Utility 46 Starting Up IJ Network Device Setup Utility 47 Diagnosing and Repairing Network Settings 48 List of Models Which Does Not Support Diagnosis and Repair...

TS3500 series User Manual
Page 5
... 171 Frequently Asked Questions 176 Network Settings and Common Problems 178 Network Communication Problems 180 Cannot Find Printer on Network 181 Cannot Find Printer During Setup 182 Cannot Proceed beyond Printer Connection Screen (Cannot Find Printer Connected via USB). 185 Cannot Find Printer while Using Wi-Fi 187 Network Connection Problems...
... 171 Frequently Asked Questions 176 Network Settings and Common Problems 178 Network Communication Problems 180 Cannot Find Printer on Network 181 Cannot Find Printer During Setup 182 Cannot Proceed beyond Printer Connection Screen (Cannot Find Printer Connected via USB). 185 Cannot Find Printer while Using Wi-Fi 187 Network Connection Problems...

TS3500 series User Manual
Page 29
In that is displayed on setup procedure, click here. 29 In that case, the connection of the device may switch to the printer that case, web services for connecting to the ... printer using the wireless router. • Wireless Direct Connect the printer and devices (e.g. Transmission fees for the printer cannot be disabled. Network Connection Settings/Setup Perform connection setup for wireless connection. ◦ Connection methods vary depending on the printer. • Wireless Connection Connect the printer and devices (e.g. If you can connect up...
In that is displayed on setup procedure, click here. 29 In that case, the connection of the device may switch to the printer that case, web services for connecting to the ... printer using the wireless router. • Wireless Direct Connect the printer and devices (e.g. Transmission fees for the printer cannot be disabled. Network Connection Settings/Setup Perform connection setup for wireless connection. ◦ Connection methods vary depending on the printer. • Wireless Connection Connect the printer and devices (e.g. If you can connect up...
TS3500 series User Manual
Page 30
...Notice for Web Service Printing 30 Notice/Restriction See below to download IJ Network Device Setup Utility. Network Connection Tips Handling Printer Configuration using IJ Network Device Setup Utility. IJ Network Device Setup Utility (Windows) • Diagnosing and Repairing Network Settings (Windows/macOS) You can ...from USB to LAN Connection • To use Wireless Direct temporarily: Connecting with Wireless Direct IJ Network Device Setup Utility IJ Network Device Setup Utility checks or diagnoses the settings of the printer and those of computer and restores the status of Wi-Fi...
...Notice for Web Service Printing 30 Notice/Restriction See below to download IJ Network Device Setup Utility. Network Connection Tips Handling Printer Configuration using IJ Network Device Setup Utility. IJ Network Device Setup Utility (Windows) • Diagnosing and Repairing Network Settings (Windows/macOS) You can ...from USB to LAN Connection • To use Wireless Direct temporarily: Connecting with Wireless Direct IJ Network Device Setup Utility IJ Network Device Setup Utility checks or diagnoses the settings of the printer and those of computer and restores the status of Wi-Fi...

TS3500 series User Manual
Page 31
... Direct (Access Point Mode) Important • If a device is connected to the Internet via a wireless router. • Configuration, router functions, setup procedures and security settings of the device. Do not proceed to the next screen of your device and the wireless router are connected. As for... a wireless router, and you connect to something other than "IEEE802.11n only." For details on changing the settings of this guide until setup is complete. • For office use will be disabled. In that if you connect a device and the printer using the same connection...
... Direct (Access Point Mode) Important • If a device is connected to the Internet via a wireless router. • Configuration, router functions, setup procedures and security settings of the device. Do not proceed to the next screen of your device and the wireless router are connected. As for... a wireless router, and you connect to something other than "IEEE802.11n only." For details on changing the settings of this guide until setup is complete. • For office use will be disabled. In that if you connect a device and the printer using the same connection...
TS3500 series User Manual
Page 34
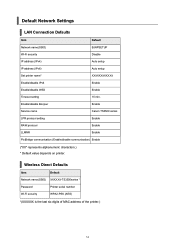
...-PSK (AES) *(XXXXXX is the last six digits of MAC address of the printer.) 34 Enable/disable Bonjour Service name LPR protocol setting Enable Canon TS3500 series Enable RAW protocol Enable LLMNR Enable PictBridge communication (Enable/disable communication) Enable ("XX" represents alphanumeric characters.) * Default value depends on printer... Defaults Item Network name(SSID) Wi-Fi security Default BJNPSETUP Disable IP address (IPv4) IP address (IPv6) Set printer name* Auto setup Auto setup XXXXXXXXXXXX Enable/disable IPv6 Enable/disable WSD Timeout setting Enable Enable 15 min.
...-PSK (AES) *(XXXXXX is the last six digits of MAC address of the printer.) 34 Enable/disable Bonjour Service name LPR protocol setting Enable Canon TS3500 series Enable RAW protocol Enable LLMNR Enable PictBridge communication (Enable/disable communication) Enable ("XX" represents alphanumeric characters.) * Default value depends on printer... Defaults Item Network name(SSID) Wi-Fi security Default BJNPSETUP Disable IP address (IPv4) IP address (IPv6) Set printer name* Auto setup Auto setup XXXXXXXXXXXX Enable/disable IPv6 Enable/disable WSD Timeout setting Enable Enable 15 min.
TS3500 series User Manual
Page 35
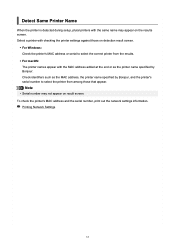
... check the printer's MAC address and the serial number, print out the network settings information. Detect Same Printer Name When the printer is detected during setup, plural printers with the MAC address added at the end or as the MAC address, the printer name specified by Bonjour.
... check the printer's MAC address and the serial number, print out the network settings information. Detect Same Printer Name When the printer is detected during setup, plural printers with the MAC address added at the end or as the MAC address, the printer name specified by Bonjour.

TS3500 series User Manual
Page 36
Connects to Another Computer via LAN/Changes from USB to LAN Connection To connect an additional computer to the printer via LAN, or to change from USB to LAN connection, click here and perform setup. 36
Connects to Another Computer via LAN/Changes from USB to LAN Connection To connect an additional computer to the printer via LAN, or to change from USB to LAN connection, click here and perform setup. 36

TS3500 series User Manual
Page 42
...or Wireless Direct). • For Windows: See Changing the Connection Mode. ◦ Perform settings on the Network Settings screen on IJ Network Device Setup Utility. Reconfiguration Method of LCD 3. Check that printer is turned on your computer, smartphone/tablet. • For macOS: See Changing the Connection... Mode. 42 Important Before you perform settings using IJ Network Device Setup Utility, turn on Easy wireless connect mode on the printer following instructions on . 2. Press and hold (Wireless connect) button for 3 seconds.
...or Wireless Direct). • For Windows: See Changing the Connection Mode. ◦ Perform settings on the Network Settings screen on IJ Network Device Setup Utility. Reconfiguration Method of LCD 3. Check that printer is turned on your computer, smartphone/tablet. • For macOS: See Changing the Connection... Mode. 42 Important Before you perform settings using IJ Network Device Setup Utility, turn on Easy wireless connect mode on the printer following instructions on . 2. Press and hold (Wireless connect) button for 3 seconds.

TS3500 series User Manual
Page 45
IJ Network Device Setup Utility (macOS) IJ Network Device Setup Utility Starting Up IJ Network Device Setup Utility Diagnosing and Repairing Network Settings List of Models Which Does Not Support Diagnosis and Repair Function 45
IJ Network Device Setup Utility (macOS) IJ Network Device Setup Utility Starting Up IJ Network Device Setup Utility Diagnosing and Repairing Network Settings List of Models Which Does Not Support Diagnosis and Repair Function 45
TS3500 series User Manual
Page 46
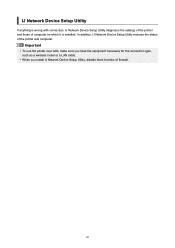
Important • To use the printer over LAN, make sure you have the equipment necessary for the connection type, such as a wireless router or a LAN cable. • When you install IJ Network Device Setup Utility, disable block function of the printer and computer. In addition, IJ Network Device Setup Utility restores the status of firewall. 46 IJ Network Device Setup Utility If anything is wrong with connection, IJ Network Device Setup Utility diagnoses the settings of the printer and those of computer on which it is installed.
Important • To use the printer over LAN, make sure you have the equipment necessary for the connection type, such as a wireless router or a LAN cable. • When you install IJ Network Device Setup Utility, disable block function of the printer and computer. In addition, IJ Network Device Setup Utility restores the status of firewall. 46 IJ Network Device Setup Utility If anything is wrong with connection, IJ Network Device Setup Utility diagnoses the settings of the printer and those of computer on which it is installed.

TS3500 series User Manual
Page 47
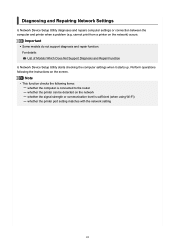
Diagnosing and Repairing Network Settings 47 Enter the password specified for your computer and select Install Helper. IJ Network Device Setup Utility starts diagnosis and repair of network. Starting Up IJ Network Device Setup Utility Start up IJ Network Device Setup Utility, the screen below appears. When you start up Launchpad, select Canon Utilities, and then select IJ Network Device Setup Utility.
Diagnosing and Repairing Network Settings 47 Enter the password specified for your computer and select Install Helper. IJ Network Device Setup Utility starts diagnosis and repair of network. Starting Up IJ Network Device Setup Utility Start up IJ Network Device Setup Utility, the screen below appears. When you start up Launchpad, select Canon Utilities, and then select IJ Network Device Setup Utility.
TS3500 series User Manual
Page 48
Diagnosing and Repairing Network Settings IJ Network Device Setup Utility diagnoses and repairs computer settings or connection between the computer and printer when a problem (e.g. Perform operations following items: whether the computer is connected to... checks the following the instructions on the network) occurs. For details: List of Models Which Does Not Support Diagnosis and Repair Function IJ Network Device Setup Utility starts checking the computer settings when it starts up. Important • Some models do not support diagnosis and repair function. cannot print from a ...
Diagnosing and Repairing Network Settings IJ Network Device Setup Utility diagnoses and repairs computer settings or connection between the computer and printer when a problem (e.g. Perform operations following items: whether the computer is connected to... checks the following the instructions on the network) occurs. For details: List of Models Which Does Not Support Diagnosis and Repair Function IJ Network Device Setup Utility starts checking the computer settings when it starts up. Important • Some models do not support diagnosis and repair function. cannot print from a ...
TS3500 series User Manual
Page 49
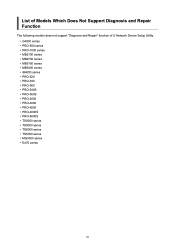
List of Models Which Does Not Support Diagnosis and Repair Function The following models does not support "Diagnose and Repair" function of IJ Network Device Setup Utility. • G4000 series • PRO-500 series • PRO-1000 series • MB2100 series • MB2700 series • MB5100 series • MB5400 series • ...
List of Models Which Does Not Support Diagnosis and Repair Function The following models does not support "Diagnose and Repair" function of IJ Network Device Setup Utility. • G4000 series • PRO-500 series • PRO-1000 series • MB2100 series • MB2700 series • MB5100 series • MB5400 series • ...

TS3500 series User Manual
Page 74
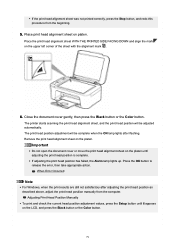
... on . 2. Note • If the remaining ink level is low, the nozzle check pattern will be printed correctly. Loading Plain Paper / Photo Paper 3. Press the Setup button until the printer completes the printing of the nozzle check pattern. 5. Check that printer is low. Examine the nozzle check pattern. 74 You need...
... on . 2. Note • If the remaining ink level is low, the nozzle check pattern will be printed correctly. Loading Plain Paper / Photo Paper 3. Press the Setup button until the printer completes the printing of the nozzle check pattern. 5. Check that printer is low. Examine the nozzle check pattern. 74 You need...
TS3500 series User Manual
Page 76
... after cleaning the print head twice, clean the print head deeply. 76 To check the print head condition, print the nozzle check pattern. Press the Setup button until the printer completes the cleaning of the print head. Cleaning the print head consumes ink, so clean the print head only when necessary...
... after cleaning the print head twice, clean the print head deeply. 76 To check the print head condition, print the nozzle check pattern. Press the Setup button until the printer completes the cleaning of the print head. Cleaning the print head consumes ink, so clean the print head only when necessary...
TS3500 series User Manual
Page 77
Press the Setup button until the printer completes the deep cleaning of the print head. To check the print head condition, print the nozzle check pattern. Deep Print ... hours. Do not perform any other operations until 3 appears on . 2. If the problem is still not resolved after replacing the FINE cartridge, contact your nearest Canon service center to 2 minutes. 4. Press the Black button or the Color button. Check the print head condition. Cleaning the print head deeply consumes more ink...
Press the Setup button until the printer completes the deep cleaning of the print head. To check the print head condition, print the nozzle check pattern. Deep Print ... hours. Do not perform any other operations until 3 appears on . 2. If the problem is still not resolved after replacing the FINE cartridge, contact your nearest Canon service center to 2 minutes. 4. Press the Black button or the Color button. Check the print head condition. Cleaning the print head deeply consumes more ink...

TS3500 series User Manual
Page 78
... Head If printed ruled lines are misaligned or print results are otherwise unsatisfactory, adjust the print head position. Loading Plain Paper / Photo Paper 3. Press the Setup button until 4 appears on the print head alignment sheet. Check that printer is low. The print head alignment sheet will not be scanned properly. 78
... Head If printed ruled lines are misaligned or print results are otherwise unsatisfactory, adjust the print head position. Loading Plain Paper / Photo Paper 3. Press the Setup button until 4 appears on the print head alignment sheet. Check that printer is low. The print head alignment sheet will not be scanned properly. 78
TS3500 series User Manual
Page 79
... results are still not satisfactory after flashing. Adjusting Print Head Position Manually • To print and check the current head position adjustment values, press the Setup button until 6 appears on the platen until adjusting the print head position is complete. • If adjusting the print head position has failed, the Alarm...
... results are still not satisfactory after flashing. Adjusting Print Head Position Manually • To print and check the current head position adjustment values, press the Setup button until 6 appears on the platen until adjusting the print head position is complete. • If adjusting the print head position has failed, the Alarm...

TS3500 series User Manual
Page 87
... inside the rear tray with a moistened cotton swab or the like while rotating the shaft (A) manually. In this operation two or more times. Press the Setup button until 7 appears on the rear tray. Press the Stop button.
... inside the rear tray with a moistened cotton swab or the like while rotating the shaft (A) manually. In this operation two or more times. Press the Setup button until 7 appears on the rear tray. Press the Stop button.


