

Camera User Guide
Page 2
... 8 Setting Menu 9 Accessories 10 Appendix Index 2 Before Use Initial Information Package Contents Before use, make sure the following items are included in the package. Camera Battery Pack NB-9L* Compact Power Adapter CA-DC30/ CA-DC30E Interface Cable IFC-400PCU Wrist Strap * Do not peel off the...
... 8 Setting Menu 9 Accessories 10 Appendix Index 2 Before Use Initial Information Package Contents Before use, make sure the following items are included in the package. Camera Battery Pack NB-9L* Compact Power Adapter CA-DC30/ CA-DC30E Interface Cable IFC-400PCU Wrist Strap * Do not peel off the...
Camera User Guide
Page 4
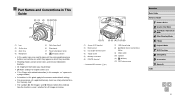
... text are indicated in brackets. ●● : Important information you should know ●● : Notes and tips for still images or movies. (1) Screen (LCD monitor) (2) Battery cover (3) DC coupler terminal cover (4) Tripod socket (5) Memory card cover (6) DIGITAL terminal * Used with related information (in this example, "xx" represents a page number) ●●...
... text are indicated in brackets. ●● : Important information you should know ●● : Notes and tips for still images or movies. (1) Screen (LCD monitor) (2) Battery cover (3) DC coupler terminal cover (4) Tripod socket (5) Memory card cover (6) DIGITAL terminal * Used with related information (in this example, "xx" represents a page number) ●●...

Camera User Guide
Page 5
... 14 Touch-Screen Operations 14 Touching 14 Dragging 14 Initial Preparations 15 Attaching the Strap 15 Inserting and Charging the Battery Pack 15 Using a Computer to Charge the Battery 16 Removing the Battery Pack 17 Inserting the Memory Card 17 Removing the Memory Card 17 Setting the Date and Time 17 Changing the...
... 14 Touch-Screen Operations 14 Touching 14 Dragging 14 Initial Preparations 15 Attaching the Strap 15 Inserting and Charging the Battery Pack 15 Using a Computer to Charge the Battery 16 Removing the Battery Pack 17 Inserting the Memory Card 17 Removing the Memory Card 17 Setting the Date and Time 17 Changing the...
Camera User Guide
Page 8
... Other Settings 110 Restoring Defaults 110 9 Accessories 111 System Map 111 Optional Accessories 112 Power Supplies 112 Printer 112 Using Optional Accessories 113 Charging Battery Pack by Battery Charger 113 Powering the Camera with Household Power 113 Using the Software 114 Software 114 Software Instruction Manual 114 Computer Connections via a Cable 115...
... Other Settings 110 Restoring Defaults 110 9 Accessories 111 System Map 111 Optional Accessories 112 Power Supplies 112 Printer 112 Using Optional Accessories 113 Charging Battery Pack by Battery Charger 113 Powering the Camera with Household Power 113 Using the Software 114 Software 114 Software Instruction Manual 114 Computer Connections via a Cable 115...

Camera User Guide
Page 9
...Removing All Images from a Photobook 120 10 Appendix 121 Troubleshooting 121 On-Screen Messages 125 On-Screen Information 127 Shooting (Information Display 127 Battery Level 127 Playback (Detailed Information Display 128 Summary of 4:3 Shots per Memory Card 134 Recording Time per Memory Card 134 Flash Range 134... Shooting Range 135 Continuous Shooting Speed 135 Shutter Speed 135 Aperture 135 Battery Pack NB-9L 135 Compact Power Adapter CA-DC30/CA-DC30E 135 Index 136 Wi-Fi (Wireless LAN) Precautions 138 Radio Wave...
...Removing All Images from a Photobook 120 10 Appendix 121 Troubleshooting 121 On-Screen Messages 125 On-Screen Information 127 Shooting (Information Display 127 Battery Level 127 Playback (Detailed Information Display 128 Summary of 4:3 Shots per Memory Card 134 Recording Time per Memory Card 134 Flash Range 134... Shooting Range 135 Continuous Shooting Speed 135 Shutter Speed 135 Aperture 135 Battery Pack NB-9L 135 Compact Power Adapter CA-DC30/CA-DC30E 135 Index 136 Wi-Fi (Wireless LAN) Precautions 138 Radio Wave...

Camera User Guide
Page 11
...eyesight. ●● Do not touch the product during thunderstorms if it . ●● Use only the recommended battery pack/batteries. ●● Do not place the battery pack/batteries near or in electrical shock or fire. Remove the plug periodically and, using a dry cloth, wipe away any separately...9679; Be sure to also check the guides included with liquid, and do not allow dust or metal objects (such as inside , remove the battery pack/batteries or unplug immediately. ●● Do not look through the viewfinder (if your product uses one ) at least 1 meter (3.3 feet) ...
...eyesight. ●● Do not touch the product during thunderstorms if it . ●● Use only the recommended battery pack/batteries. ●● Do not place the battery pack/batteries near or in electrical shock or fire. Remove the plug periodically and, using a dry cloth, wipe away any separately...9679; Be sure to also check the guides included with liquid, and do not allow dust or metal objects (such as inside , remove the battery pack/batteries or unplug immediately. ●● Do not look through the viewfinder (if your product uses one ) at least 1 meter (3.3 feet) ...

Camera User Guide
Page 12
... electrical shock, fire, burns, or other insulators. Humid or dusty places These could result in hot places, or if you discard the battery pack/batteries, cover the terminals with tape or other injuries. The heat emitted from the broken fragments. ●● When using the camera on ..., be sure to attach these accessories firmly. Use a tripod in burns or damage to malfunction. ●● Remove and store the battery pack/batteries when you are not using the product. Places subject to cover it may crack, and the shards of the skin or blistering. Even ...
... electrical shock, fire, burns, or other insulators. Humid or dusty places These could result in hot places, or if you discard the battery pack/batteries, cover the terminals with tape or other injuries. The heat emitted from the broken fragments. ●● When using the camera on ..., be sure to attach these accessories firmly. Use a tripod in burns or damage to malfunction. ●● Remove and store the battery pack/batteries when you are not using the product. Places subject to cover it may crack, and the shards of the skin or blistering. Even ...

Camera User Guide
Page 13
...down with the camera in use. Data may cause malfunctions or damage the screen. ●● When putting the camera in use old and new batteries together. Also close the screen (so that it to overheat and distort, resulting in product damage or fire. ●● If your product's ... 13 Doing so may be lost because a magnet (1) is easily influenced by magnetism such as a credit card near pets. ●● Unplug any battery charger used with the product when not in your bag, ensure that have different levels of the screen. ●● Do not attach any dedicated...
...down with the camera in use. Data may cause malfunctions or damage the screen. ●● When putting the camera in use old and new batteries together. Also close the screen (so that it to overheat and distort, resulting in product damage or fire. ●● If your product's ... 13 Doing so may be lost because a magnet (1) is easily influenced by magnetism such as a credit card near pets. ●● Unplug any battery charger used with the product when not in your bag, ensure that have different levels of the screen. ●● Do not attach any dedicated...

Camera User Guide
Page 15
... until the lock clicks shut. ●●If you slide it, until it cannot be attached to charge the battery pack initially, because the camera is facing the right way and locks when inserted. 3 Close the cover. ●●Lower the cover (1) and ...9679;●Slide the cover (1) and open it (2). 2 Insert the battery pack. ●●Holding the battery pack with the terminals (1) facing as shown, press the battery lock (2) in the camera. Initial Preparations Prepare for shooting as you insert the battery pack facing the wrong way, it clicks into the correct position. Attaching...
... until the lock clicks shut. ●●If you slide it, until it cannot be attached to charge the battery pack initially, because the camera is facing the right way and locks when inserted. 3 Close the cover. ●●Lower the cover (1) and ...9679;●Slide the cover (1) and open it (2). 2 Insert the battery pack. ●●Holding the battery pack with the terminals (1) facing as shown, press the battery lock (2) in the camera. Initial Preparations Prepare for shooting as you insert the battery pack facing the wrong way, it clicks into the correct position. Attaching...
Camera User Guide
Page 16
...plug fully into the camera terminal (2). ●●Insert the larger plug of the interface cable into the included compact power adapter. 5 Charge the battery pack. ●●CA-DC30: Flip out the plug (1) and plug the compact power adapter into a power outlet (2). ●●CA-DC30E..." (= 133). ●● You can be charged in a different format, use a commercially available adapter for traveling, which may damage the battery pack. Charge the battery pack on charging time and the number of shots and recording time possible with 100 - 240 V AC power (50/60 Hz). 4 Connect ...
...plug fully into the camera terminal (2). ●●Insert the larger plug of the interface cable into the included compact power adapter. 5 Charge the battery pack. ●●CA-DC30: Flip out the plug (1) and plug the compact power adapter into a power outlet (2). ●●CA-DC30E..." (= 133). ●● You can be charged in a different format, use a commercially available adapter for traveling, which may damage the battery pack. Charge the battery pack on charging time and the number of shots and recording time possible with 100 - 240 V AC power (50/60 Hz). 4 Connect ...

Camera User Guide
Page 17
...; For guidelines on how many shots or hours of recording can be saved on one memory card, see "Number of the arrow. ●●The battery pack will pop up . Before Use Basic Guide Advanced Guide 1 Camera Basics 2 Creative Shot Mode 3 Auto Mode / Hybrid Auto Mode 4 Other Shooting Modes 5 P ... as you manage images by shooting date or print images showing the date. 1 Turn the camera on . Removing the Battery Pack ●●Open the cover and press the battery lock in the direction of 4:3 Shots per Memory Card" (= 134). Inserting memory cards facing the wrong way may damage...
...; For guidelines on how many shots or hours of recording can be saved on one memory card, see "Number of the arrow. ●●The battery pack will pop up . Before Use Basic Guide Advanced Guide 1 Camera Basics 2 Creative Shot Mode 3 Auto Mode / Hybrid Auto Mode 4 Other Shooting Modes 5 P ... as you manage images by shooting date or print images showing the date. 1 Turn the camera on . Removing the Battery Pack ●●Open the cover and press the battery lock in the direction of 4:3 Shots per Memory Card" (= 134). Inserting memory cards facing the wrong way may damage...

Camera User Guide
Page 18
...Touch [ ][ ] to an AC adapter kit (sold separately, =112), even if the camera is left off. ●● Once the date/time battery is no longer displayed. ●●To turn off the camera, press the power button. ●● Unless you turn the camera on . Specify ...screen. ●● Date/time settings can be retained for about 3 weeks by the camera's built-in date/time battery (backup battery) after the battery pack is removed. ●● The date/time battery will be displayed when you set daylight saving time (1 hour ahead), touch [ ] and choose [ ] in . ...
...Touch [ ][ ] to an AC adapter kit (sold separately, =112), even if the camera is left off. ●● Once the date/time battery is no longer displayed. ●●To turn off the camera, press the power button. ●● Unless you turn the camera on . Specify ...screen. ●● Date/time settings can be retained for about 3 weeks by the camera's built-in date/time battery (backup battery) after the battery pack is removed. ●● The date/time battery will be displayed when you set daylight saving time (1 hour ahead), touch [ ] and choose [ ] in . ...
Camera User Guide
Page 24
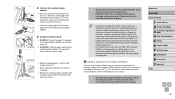
..., as down . 1 Press halfway. (Press lightly to focus.) ●●Press the shutter button halfway. Power-Saving Features (Auto Power Down) As a way to conserve battery power, the camera automatically deactivates the screen (Display Off) and then turns itself off. To activate the screen and prepare for shooting when the screen...
..., as down . 1 Press halfway. (Press lightly to focus.) ●●Press the shutter button halfway. Power-Saving Features (Auto Power Down) As a way to conserve battery power, the camera automatically deactivates the screen (Display Off) and then turns itself off. To activate the screen and prepare for shooting when the screen...

Camera User Guide
Page 29
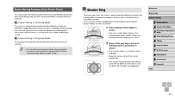
... Lamp On Orange Blinking Charging Charging error ●● When the power lamp blinks green, never turn the camera off, open the memory card or battery cover, or shake or jolt the camera, which may corrupt images or damage the camera or memory card. Moving the Cursor ●●Touch [ ] [ ]. Entering...
... Lamp On Orange Blinking Charging Charging error ●● When the power lamp blinks green, never turn the camera off, open the memory card or battery cover, or shake or jolt the camera, which may corrupt images or damage the camera or memory card. Moving the Cursor ●●Touch [ ] [ ]. Entering...

Camera User Guide
Page 36
... without still images, adjust the setting in [ ] mode to play a digest movie, or specify the date of the digest movie to play (=66). ●● Battery life is shorter in this case, mount the camera on a tripod or take other measures to keep it still. ●● If your previous shot...
... without still images, adjust the setting in [ ] mode to play a digest movie, or specify the date of the digest movie to play (=66). ●● Battery life is shorter in this case, mount the camera on a tripod or take other measures to keep it still. ●● If your previous shot...

Camera User Guide
Page 78
...end of movie] is displayed. ●●Touching [ ] when it is displayed will be available. ●● Movies may not be saved if the battery pack runs out while saving is now saved as a new file. ●●To cancel trimming, touch [Cancel]. ●●To clear your trimming ...;●[ ] changes to [ ] to indicate that you can trim from the nearest [ ] on the right to the end when you should use a fully charged battery pack or an AC adapter kit (sold separately, =112). Before Use Basic Guide Advanced Guide 1 Camera Basics 2 Creative Shot Mode 3 Auto Mode / Hybrid Auto Mode...
...end of movie] is displayed. ●●Touching [ ] when it is displayed will be available. ●● Movies may not be saved if the battery pack runs out while saving is now saved as a new file. ●●To cancel trimming, touch [Cancel]. ●●To clear your trimming ...;●[ ] changes to [ ] to indicate that you can trim from the nearest [ ] on the right to the end when you should use a fully charged battery pack or an AC adapter kit (sold separately, =112). Before Use Basic Guide Advanced Guide 1 Camera Basics 2 Creative Shot Mode 3 Auto Mode / Hybrid Auto Mode...

Camera User Guide
Page 99
... [ ] medium, [ ] low, [ ] weak ●● Sending images to Web services will resize images that the supported image quality varies depending on the CANON iMAGE GATEWAY server. Choosing the Image Resolution (Size) On the screen, you can choose the resolution (size) of your fingers or other objects off the... To send images at once. Covering this may limit the number of images or length of the network you can send. Notes on the camera battery level. ●● Up to 50 images can be sent together at original size, select [No] as the resizing option. ●● Choosing...
... [ ] medium, [ ] low, [ ] weak ●● Sending images to Web services will resize images that the supported image quality varies depending on the CANON iMAGE GATEWAY server. Choosing the Image Resolution (Size) On the screen, you can choose the resolution (size) of your fingers or other objects off the... To send images at once. Covering this may limit the number of images or length of the network you can send. Notes on the camera battery level. ●● Up to 50 images can be sent together at original size, select [No] as the resizing option. ●● Choosing...

Camera User Guide
Page 101
...8 Setting Menu 9 Accessories 10 Appendix Index 101 Sending Images Images sent from the camera are automatically sent to Web services from the CANON iMAGE GATEWAY server, even if the computer is already assigned to a smartphone (= 81). ●●Access the mobile connection screen as.... ●●If you have already assigned [ ] to the [ ] button, press the [ ] button. ●●If you should use a fully charged battery pack or an AC adapter kit (sold separately, =112). Preparing the Camera Register [ ] as described in steps 1 - 2 in "Uploading Images to Web Services"...
...8 Setting Menu 9 Accessories 10 Appendix Index 101 Sending Images Images sent from the camera are automatically sent to Web services from the CANON iMAGE GATEWAY server, even if the computer is already assigned to a smartphone (= 81). ●●Access the mobile connection screen as.... ●●If you have already assigned [ ] to the [ ] button, press the [ ] button. ●●If you should use a fully charged battery pack or an AC adapter kit (sold separately, =112). Preparing the Camera Register [ ] as described in steps 1 - 2 in "Uploading Images to Web Services"...

Camera User Guide
Page 108
... in another device, you to adjust the brightness. approximately ten seconds after approximately three minutes of memory cards, take other steps to reduce battery consumption. 1 Configure the setting. ●●Choose [Eco Mode], and then choose [On]. ●●[ ] is now shown on the ...bar to conserve battery power in use, the screen quickly darkens to back them up. 1 Access the [Format] screen. ●●Touch [Format]. 2 Choose [OK]. ●...
... in another device, you to adjust the brightness. approximately ten seconds after approximately three minutes of memory cards, take other steps to reduce battery consumption. 1 Configure the setting. ●●Choose [Eco Mode], and then choose [On]. ●●[ ] is now shown on the ...bar to conserve battery power in use, the screen quickly darkens to back them up. 1 Access the [Format] screen. ●●Touch [Format]. 2 Choose [OK]. ●...

Camera User Guide
Page 111
... not be liable for purchase separately. This product is recommended. Use of genuine Canon accessories is designed to achieve excellent performance when used with optional Canon accessories and other compatible accessories sold separately System Map Included Accessories Battery Pack NB-9L* Compact Power Adapter CA-DC30/ CA-DC30E Wrist strap Interface Cable IFC...
... not be liable for purchase separately. This product is recommended. Use of genuine Canon accessories is designed to achieve excellent performance when used with optional Canon accessories and other compatible accessories sold separately System Map Included Accessories Battery Pack NB-9L* Compact Power Adapter CA-DC30/ CA-DC30E Wrist strap Interface Cable IFC...