
User Manual
Page 40
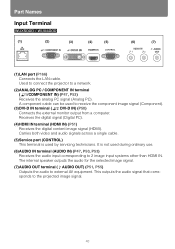
...COMPONENT IN terminal ( /COMPONENT IN) (P47, P53) Receives the analog PC signal (Analog PC). Used to connect the projector to external AV equipment. Receives the digital signal (Digital PC). (4)HDMI IN terminal (HDMI IN) (P51) Receives the digital content image signal (HDMI). This... outputs the audio signal that corresponds to 2 image input systems other than HDMI IN. Part Names Input Terminal (1) (2) (3) (4) (5) (6) (7) (1)LAN port (P166) Connects the LAN cable. Carries both video ...
...COMPONENT IN terminal ( /COMPONENT IN) (P47, P53) Receives the analog PC signal (Analog PC). Used to connect the projector to external AV equipment. Receives the digital signal (Digital PC). (4)HDMI IN terminal (HDMI IN) (P51) Receives the digital content image signal (HDMI). This... outputs the audio signal that corresponds to 2 image input systems other than HDMI IN. Part Names Input Terminal (1) (2) (3) (4) (5) (6) (7) (1)LAN port (P166) Connects the LAN cable. Carries both video ...
User Manual
Page 62
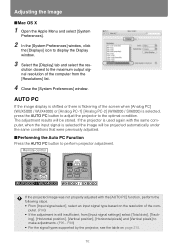
... 2 In the [System Preferences] window, click the [Displays] icon to display the Display window. 3 Select the [Display] tab and select the resolution closest to the maximum output signal resolution of the screen when [Analog PC] (WUX5000 / WUX4000) or [Analog PC-1] [Analog PC-2] (WX6000 / SX6000) is selected, press...218. 62 AUTO PC If the image display is shifted or there is still insufficient, from the [Resolutions] list. 4 Close the [System Preferences] window. Remote control If the projected image was not properly adjusted with the same computer, when the input signal is selected the ...
... 2 In the [System Preferences] window, click the [Displays] icon to display the Display window. 3 Select the [Display] tab and select the resolution closest to the maximum output signal resolution of the screen when [Analog PC] (WUX5000 / WUX4000) or [Analog PC-1] [Analog PC-2] (WX6000 / SX6000) is selected, press...218. 62 AUTO PC If the image display is shifted or there is still insufficient, from the [Resolutions] list. 4 Close the [System Preferences] window. Remote control If the projected image was not properly adjusted with the same computer, when the input signal is selected the ...
User Manual
Page 88
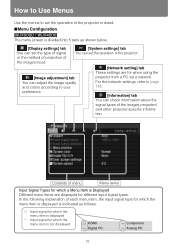
... of projection of each menu item, the input signal type for which the menu item is displayed is indicated as shown below. [Display settings] tab [System settings] tab You can set the type of signal You can set the operation of the images projected and other projector-specific informa- For the...
... of projection of each menu item, the input signal type for which the menu item is displayed is indicated as shown below. [Display settings] tab [System settings] tab You can set the type of signal You can set the operation of the images projected and other projector-specific informa- For the...

User Manual
Page 89
User's Manual Setting Functions from a PC via a network. For the network settings, refer to your preference. [System settings] tab You can check information about the signal types of menu Menu items 89 How to Use Menus The menu screen is divided into 6 ...
User's Manual Setting Functions from a PC via a network. For the network settings, refer to your preference. [System settings] tab You can check information about the signal types of menu Menu items 89 How to Use Menus The menu screen is divided into 6 ...

User Manual
Page 105
... settings]> [User screen settings] > [No signal screen> MENU > [System settings] > [User screen settings] > [No signal screen] Rear projection Rear ceiling mounted projection Black Blue The screen is all black. Contact the Canon Customer Support Center for more detailed information. • If you flip the... image, the keystone distortion adjustment will be reset. 105 The screen is all blue. Press the OK button to accept your setting and then press the MENU button or EXIT button (WX6000 / SX6000...
... settings]> [User screen settings] > [No signal screen> MENU > [System settings] > [User screen settings] > [No signal screen] Rear projection Rear ceiling mounted projection Black Blue The screen is all black. Contact the Canon Customer Support Center for more detailed information. • If you flip the... image, the keystone distortion adjustment will be reset. 105 The screen is all blue. Press the OK button to accept your setting and then press the MENU button or EXIT button (WX6000 / SX6000...

User Manual
Page 106
Press the OK button to accept your setting and then press the MENU button or EXIT button (WX6000 / SX6000). • [Black] is all black. Setting Display Status Screen When Blank [Screen when blank] HDMI Digital PC Component Analog PC You ...] Selecting a Logo at the factory. MENU > [Display settings] > [User screen settings] > [Projector on] MENU > [System settings] > [User screen settings] > [Projector on] Black Blue The screen is all blue. Displays the Canon logo that was registered in advance at Startup [Projector on] HDMI Digital PC Component Analog PC You can...
Press the OK button to accept your setting and then press the MENU button or EXIT button (WX6000 / SX6000). • [Black] is all black. Setting Display Status Screen When Blank [Screen when blank] HDMI Digital PC Component Analog PC You ...] Selecting a Logo at the factory. MENU > [Display settings] > [User screen settings] > [Projector on] MENU > [System settings] > [User screen settings] > [Projector on] Black Blue The screen is all blue. Displays the Canon logo that was registered in advance at Startup [Projector on] HDMI Digital PC Component Analog PC You can...
User Manual
Page 120
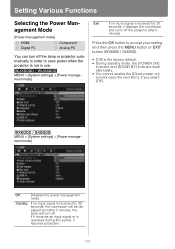
... to save power when the projector is not in order to accept your setting and then press the MENU button or EXIT button (WX6000 / SX6000). • [Off] is the factory default. • During standby mode, the [POWER ON] indicator and [STAND BY] indicator flash ...alternately. • You cannot enable the [Direct power on] function (see the next item), if you select [Off]. MENU > [System settings] > [Power management mode] Off Standby Disables the power management mode. Setting Various Functions Selecting the Power Management Mode [Power management mode] HDMI ...
... to save power when the projector is not in order to accept your setting and then press the MENU button or EXIT button (WX6000 / SX6000). • [Off] is the factory default. • During standby mode, the [POWER ON] indicator and [STAND BY] indicator flash ...alternately. • You cannot enable the [Direct power on] function (see the next item), if you select [Off]. MENU > [System settings] > [Power management mode] Off Standby Disables the power management mode. Setting Various Functions Selecting the Power Management Mode [Power management mode] HDMI ...
User Manual
Page 121
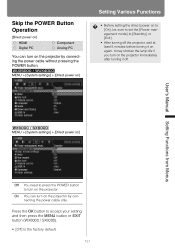
... management mode] to [Standby] or [Exit]. • After turning off the projector, wait at least 5 minutes before turning it off. MENU > [System settings] > [Direct power on] Setting Various Functions • Before setting the direct power on the projector by connecting the power cable only. Press the ... can turn on the projector by connecting the power cable without pressing the POWER button. User's Manual Setting Functions from Menus MENU > [System settings] > [Direct power on] Off You need to press the POWER button to accept your setting and then press the MENU button or...
... management mode] to [Standby] or [Exit]. • After turning off the projector, wait at least 5 minutes before turning it off. MENU > [System settings] > [Direct power on] Setting Various Functions • Before setting the direct power on the projector by connecting the power cable only. Press the ... can turn on the projector by connecting the power cable without pressing the POWER button. User's Manual Setting Functions from Menus MENU > [System settings] > [Direct power on] Off You need to press the POWER button to accept your setting and then press the MENU button or...
User Manual
Page 122
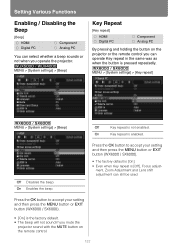
... enabled. On Enables the beep. Press the OK button to accept your setting and then press the MENU button or EXIT button (WX6000 / SX6000). • [On] is the factory default. • The beep will not sound if you mute the projector sound with the MUTE button... to accept your setting and then press the MENU button or EXIT button (WX6000 / SX6000). • The factory default is [On]. • Even when Key repeat is [Off], Focus adjust- MENU > [System settings] > [Key repeat] MENU > [System settings] > [Beep] Off Key repeat is enabled. Setting Various Functions Enabling / Disabling...
... enabled. On Enables the beep. Press the OK button to accept your setting and then press the MENU button or EXIT button (WX6000 / SX6000). • [On] is the factory default. • The beep will not sound if you mute the projector sound with the MUTE button... to accept your setting and then press the MENU button or EXIT button (WX6000 / SX6000). • The factory default is [On]. • Even when Key repeat is [Off], Focus adjust- MENU > [System settings] > [Key repeat] MENU > [System settings] > [Beep] Off Key repeat is enabled. Setting Various Functions Enabling / Disabling...
User Manual
Page 123
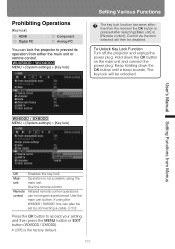
.... Use the main unit button. Hold down the OK button until a beep sounds. Control via the item selected will be disabled. MENU > [System settings] > [Key lock] Setting Various Functions The key lock function becomes effective from the moment the OK button is the factory default. 123 Prohibiting... Digital PC Component Analog PC You can lock the projector to accept your setting and then press the MENU button or EXIT button (WX6000 / SX6000). • [Off] is pressed after selecting [Main unit] or [Remote control]. Keep holding down the OK button on the main unit and...
.... Use the main unit button. Hold down the OK button until a beep sounds. Control via the item selected will be disabled. MENU > [System settings] > [Key lock] Setting Various Functions The key lock function becomes effective from the moment the OK button is the factory default. 123 Prohibiting... Digital PC Component Analog PC You can lock the projector to accept your setting and then press the MENU button or EXIT button (WX6000 / SX6000). • [Off] is pressed after selecting [Main unit] or [Remote control]. Keep holding down the OK button on the main unit and...
User Manual
Page 124
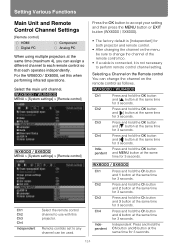
Select the main unit channel. MENU > [System settings] > [Remote control] MENU > [System settings] > [Remote control] Press the OK button to accept your setting and then press the MENU button or EXIT button (WX6000 / SX6000). • The factory default is not necessary to use with this when performing infrared ... time for 3 seconds. Press and hold the Ch button and 0 button at the same time for 3 seconds. 124 For the WX6000 / SX6000, set to each remote control so that each operates independently. Press and hold the Ch button and 2 button at the same time for 3 seconds...
Select the main unit channel. MENU > [System settings] > [Remote control] MENU > [System settings] > [Remote control] Press the OK button to accept your setting and then press the MENU button or EXIT button (WX6000 / SX6000). • The factory default is not necessary to use with this when performing infrared ... time for 3 seconds. Press and hold the Ch button and 0 button at the same time for 3 seconds. 124 For the WX6000 / SX6000, set to each remote control so that each operates independently. Press and hold the Ch button and 2 button at the same time for 3 seconds...
User Manual
Page 125
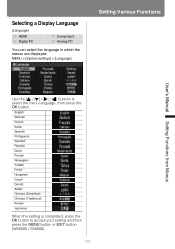
MENU > [System settings] > [Language] Setting Various Functions User's Manual Setting Functions from Menus Use the buttons to accept your setting and then press the MENU button or EXIT button (WX6000 / SX6000). 125 Selecting a Display Language [Language] HDMI Digital PC Component Analog PC You can select the language in which the menus are displayed...
MENU > [System settings] > [Language] Setting Various Functions User's Manual Setting Functions from Menus Use the buttons to accept your setting and then press the MENU button or EXIT button (WX6000 / SX6000). 125 Selecting a Display Language [Language] HDMI Digital PC Component Analog PC You can select the language in which the menus are displayed...

User Manual
Page 126
MENU > [System settings] > [Guide] - When the positional lock (P139) is set to accept your setting and then press the MENU button or EXIT button (WX6000 / SX6000). • [On] is the factory default. • The guide screen is shown at the following times. - Press the OK button to [On] (WX6000 / SX6000) MENU > [Install settings] > [On...
MENU > [System settings] > [Guide] - When the positional lock (P139) is set to accept your setting and then press the MENU button or EXIT button (WX6000 / SX6000). • [On] is the factory default. • The guide screen is shown at the following times. - Press the OK button to [On] (WX6000 / SX6000) MENU > [Install settings] > [On...
User Manual
Page 127
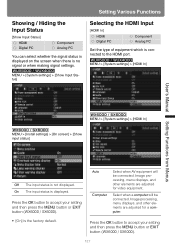
... a computer will be connected. Press the OK button to accept your setting and then press the MENU button or EXIT button (WX6000 / SX6000). 127 Image processing, menu displays, and other elements are adjusted for a computer. • [On] is the factory default. Press the... is displayed on the screen when there is connected to the HDMI port. Auto Computer Select when AV equipment will be connected. MENU > [System settings] > [HDMI In] User's Manual Setting Functions from Menus MENU > [System settings] > [HDMI In] MENU > [Install settings] > [On screen] > [Show input...
... a computer will be connected. Press the OK button to accept your setting and then press the MENU button or EXIT button (WX6000 / SX6000). 127 Image processing, menu displays, and other elements are adjusted for a computer. • [On] is the factory default. Press the... is displayed on the screen when there is connected to the HDMI port. Auto Computer Select when AV equipment will be connected. MENU > [System settings] > [HDMI In] User's Manual Setting Functions from Menus MENU > [System settings] > [HDMI In] MENU > [Install settings] > [On screen] > [Show input...
User Manual
Page 128
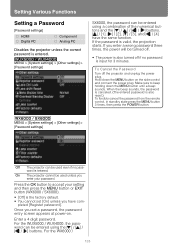
... also reset.) To forcibly cancel the password from the remote control, in standby state press the MENU button 3 times, then press the POWER button. MENU > [System settings] > [Other settings] > [Password settings] Off The projector can be entered using a combination of the numerical buttons and the buttons. [ ] / [1], [ ... the MENU button on . Make sure to accept your password. pleted [Register password]. MENU > [System settings] > [Other settings] > [Password settings] SX6000, the password can be used unless you have the same function. When the beep sounds, the password...
... also reset.) To forcibly cancel the password from the remote control, in standby state press the MENU button 3 times, then press the POWER button. MENU > [System settings] > [Other settings] > [Password settings] Off The projector can be entered using a combination of the numerical buttons and the buttons. [ ] / [1], [ ... the MENU button on . Make sure to accept your password. pleted [Register password]. MENU > [System settings] > [Other settings] > [Password settings] SX6000, the password can be used unless you have the same function. When the beep sounds, the password...
User Manual
Page 129
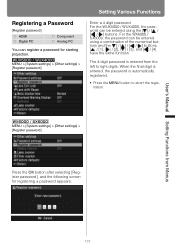
For the WX6000 / SX6000, the password can be entered using a combination of the numerical buttons and the buttons. [ ] / [1], [ ] / [2], [ ] / [3], and [ ] / [4] have the same function. MENU > [System settings] > [Other settings] > [Register password] Press the OK button after selecting [...entered from Menus Registering a Password [Register password] HDMI Digital PC Component Analog PC You can be entered using the buttons. MENU > [System settings] > [Other settings] > [Register password] Setting Various Functions Enter a 4 digit password. For the WUX5000 / WUX4000, the password...
For the WX6000 / SX6000, the password can be entered using a combination of the numerical buttons and the buttons. [ ] / [1], [ ] / [2], [ ] / [3], and [ ] / [4] have the same function. MENU > [System settings] > [Other settings] > [Register password] Press the OK button after selecting [...entered from Menus Registering a Password [Register password] HDMI Digital PC Component Analog PC You can be entered using the buttons. MENU > [System settings] > [Other settings] > [Register password] Setting Various Functions Enter a 4 digit password. For the WUX5000 / WUX4000, the password...
User Manual
Page 130
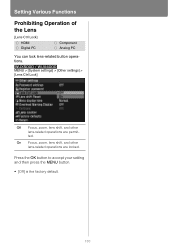
MENU > [System settings] > [Other settings] > [Lens Ctrl Lock] Off Focus, zoom, lens shift, and other lens-related operations are permitted. Press the OK button to accept your setting and then press the MENU button. • [Off] is the factory default. 130 On Focus, zoom, lens shift, and other lens-related operations are locked. Setting Various Functions Prohibiting Operation of the Lens [Lens Ctrl Lock] HDMI Digital PC Component Analog PC You can lock lens-related button operations.
MENU > [System settings] > [Other settings] > [Lens Ctrl Lock] Off Focus, zoom, lens shift, and other lens-related operations are permitted. Press the OK button to accept your setting and then press the MENU button. • [Off] is the factory default. 130 On Focus, zoom, lens shift, and other lens-related operations are locked. Setting Various Functions Prohibiting Operation of the Lens [Lens Ctrl Lock] HDMI Digital PC Component Analog PC You can lock lens-related button operations.
User Manual
Page 131
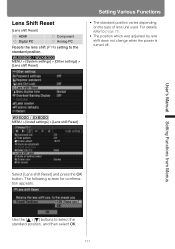
... shift Reset] HDMI Digital PC Component Analog PC Resets the lens shift (P74) setting to select the standard position, and then select OK. 131 MENU > [System settings] > [Other settings] > [Lens shift Reset] Setting Various Functions • The standard position varies depending on the type of lens unit used. The following screen...
... shift Reset] HDMI Digital PC Component Analog PC Resets the lens shift (P74) setting to select the standard position, and then select OK. 131 MENU > [System settings] > [Other settings] > [Lens shift Reset] Setting Various Functions • The standard position varies depending on the type of lens unit used. The following screen...
User Manual
Page 132
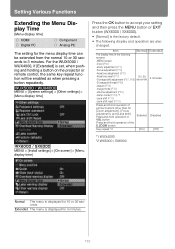
MENU > [System settings] > [Other settings] > [Menu display time] Press the OK button to accept your setting and then press the MENU button or EXIT button (WX6000 / SX6000). • [Normal] is set, when pushing and holding a button on the projector or remote control, the same ... 3 minutes. Item [Normal] [Extended] The display time of the D.ZOOM button Enabled Disabled Key repeat *2 [On] [Off] *1 WUX4000 *2 WX6000 / SX6000 MENU > [Install settings] > [On screen] > [Menu display time] Normal The menu is displayed for 10 or 30 seconds. Setting Various Functions Extending the...
MENU > [System settings] > [Other settings] > [Menu display time] Press the OK button to accept your setting and then press the MENU button or EXIT button (WX6000 / SX6000). • [Normal] is set, when pushing and holding a button on the projector or remote control, the same ... 3 minutes. Item [Normal] [Extended] The display time of the D.ZOOM button Enabled Disabled Key repeat *2 [On] [Off] *1 WUX4000 *2 WX6000 / SX6000 MENU > [Install settings] > [On screen] > [Menu display time] Normal The menu is displayed for 10 or 30 seconds. Setting Various Functions Extending the...
User Manual
Page 133
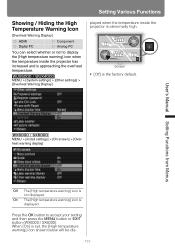
...PC Component Analog PC You can select whether or not to accept your setting and then press the MENU button or EXIT button (WX6000 / SX6000). On The [High temperature warning] icon is set, the [High temperature warning] icon shown below will be dis- 133 When [On]...to display the [High temperature warning] icon when the temperature inside the projector is approaching the overheat temperature. MENU > [System settings] > [Other settings] > [Overheat Warning Display] Setting Various Functions played when the temperature inside the projector has increased and is abnormally high.
...PC Component Analog PC You can select whether or not to accept your setting and then press the MENU button or EXIT button (WX6000 / SX6000). On The [High temperature warning] icon is set, the [High temperature warning] icon shown below will be dis- 133 When [On]...to display the [High temperature warning] icon when the temperature inside the projector is approaching the overheat temperature. MENU > [System settings] > [Other settings] > [Overheat Warning Display] Setting Various Functions played when the temperature inside the projector has increased and is abnormally high.