
User Manual
Page 4
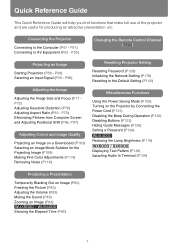
...) Freezing the Picture (P82) Adjusting the Volume (P83) Muting the Sound (P83) Zooming an Image (P84) Showing the Elapsed Time (P85) 4 P51) Connecting to the Computer (P47 - Connecting the Projector Connecting to AV Equipment (P52 - P58) Selecting an Input Signal (P59 - P55) Changing the Remote Control Channel (P124) Projecting an Image Starting...
...) Freezing the Picture (P82) Adjusting the Volume (P83) Muting the Sound (P83) Zooming an Image (P84) Showing the Elapsed Time (P85) 4 P51) Connecting to the Computer (P47 - Connecting the Projector Connecting to AV Equipment (P52 - P58) Selecting an Input Signal (P59 - P55) Changing the Remote Control Channel (P124) Projecting an Image Starting...
User Manual
Page 6
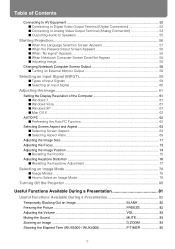
Table of Contents Connecting to AV Equipment 52 ■ Connecting to Digital Video Output Terminal (Digital Connection 52 ■ Connecting to Analog Video Output Terminal (Analog Connection 53 ■ Outputting Audio ... BLANK 82 Freezing the Picture FREEZE 82 Adjusting the Volume VOL 83 Muting the Sound MUTE 83 Zooming an Image D.ZOOM 84 Showing the Elapsed Time (WUX5000 / WUX4000 P-TIMER 85 6
Table of Contents Connecting to AV Equipment 52 ■ Connecting to Digital Video Output Terminal (Digital Connection 52 ■ Connecting to Analog Video Output Terminal (Analog Connection 53 ■ Outputting Audio ... BLANK 82 Freezing the Picture FREEZE 82 Adjusting the Volume VOL 83 Muting the Sound MUTE 83 Zooming an Image D.ZOOM 84 Showing the Elapsed Time (WUX5000 / WUX4000 P-TIMER 85 6
User Manual
Page 8
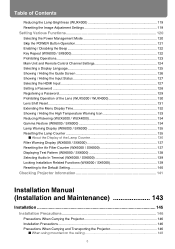
...Selecting the Power Management Mode 120 Skip the POWER Button Operation 121 Enabling / Disabling the Beep 122 Key Repeat (WX6000 / SX6000 122 Prohibiting Operations...123 Main Unit and Remote Control Channel Settings 124 Selecting a Display Language 125 Showing / Hiding the Guide Screen...WUX4000 130 Lens Shift Reset ...131 Extending the Menu Display Time 132 Showing / Hiding the High Temperature Warning Icon 133 Reducing Flickering (WUX5000 / WUX4000 134 Gamma Restore (WX6000 / SX6000 134 Lamp Warning Display (WX6000 / SX6000 135 Resetting the Lamp Counter 135 ■ About the ...
...Selecting the Power Management Mode 120 Skip the POWER Button Operation 121 Enabling / Disabling the Beep 122 Key Repeat (WX6000 / SX6000 122 Prohibiting Operations...123 Main Unit and Remote Control Channel Settings 124 Selecting a Display Language 125 Showing / Hiding the Guide Screen...WUX4000 130 Lens Shift Reset ...131 Extending the Menu Display Time 132 Showing / Hiding the High Temperature Warning Icon 133 Reducing Flickering (WUX5000 / WUX4000 134 Gamma Restore (WX6000 / SX6000 134 Lamp Warning Display (WX6000 / SX6000 135 Resetting the Lamp Counter 135 ■ About the ...

User Manual
Page 13
...these minimum distances must be dangerous. • If the projector is unused for an extended time, unplug the projector from the power outlet. • Do not project the same image for a long time. The diagrams shown here indicates the minimum space required. Heat build-up can reduce the service...hazard. • Allowing the proper amount of the unit. Otherwise it may cause a breakdown or a disaster. If the projector is critical for a long time, the cooling fans can also be maintained. DO NOT SET THE PROJECTOR IN GREASY, WET, OR SMOKY CONDITIONS SUCH AS IN A KITCHEN TO PREVENT A ...
...these minimum distances must be dangerous. • If the projector is unused for an extended time, unplug the projector from the power outlet. • Do not project the same image for a long time. The diagrams shown here indicates the minimum space required. Heat build-up can reduce the service...hazard. • Allowing the proper amount of the unit. Otherwise it may cause a breakdown or a disaster. If the projector is critical for a long time, the cooling fans can also be maintained. DO NOT SET THE PROJECTOR IN GREASY, WET, OR SMOKY CONDITIONS SUCH AS IN A KITCHEN TO PREVENT A ...

User Manual
Page 14
... not recommended by the manufacturers. Slots and openings in the rear and front of the cabinet are provided for ventilation, to insure reliable operation of time, unplug it from the wall outlet. For added protection of the projector during a lightning storm, or when it from the AC power supply before beginning...
... not recommended by the manufacturers. Slots and openings in the rear and front of the cabinet are provided for ventilation, to insure reliable operation of time, unplug it from the wall outlet. For added protection of the projector during a lightning storm, or when it from the AC power supply before beginning...
User Manual
Page 20
... areas. Doing so could result in an explosion. • As strong light beams are emitted while the projector is required, contact the Canon Customer Support Center. • Do not disassemble or modify the projector (including consumable parts) or the remote control. • Do not...lens. Pay particular attention in preventing young children from a position where your shadow will not be used for a long period of time, be cast on these areas during projector operation. Safety Instructions Warning Pay attention to the following points regarding installation and handling of...
... areas. Doing so could result in an explosion. • As strong light beams are emitted while the projector is required, contact the Canon Customer Support Center. • Do not disassemble or modify the projector (including consumable parts) or the remote control. • Do not...lens. Pay particular attention in preventing young children from a position where your shadow will not be used for a long period of time, be cast on these areas during projector operation. Safety Instructions Warning Pay attention to the following points regarding installation and handling of...
User Manual
Page 21
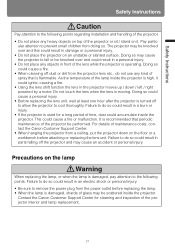
... projector or sit / stand on the lamp Warning When replacing the lamp, or when the lamp is used for cleaning and inspection of time, dust could accumulate inside the projector is moving. Pay partic- The projector may cause an accident or personal injury. For details of the... projector be performed. It is recommended that periodic maintenance of maintenance costs, contact the Canon Customer Support Center. • When hanging the projector from the projector lens etc., do so could result in a burn or injury. •...
... projector or sit / stand on the lamp Warning When replacing the lamp, or when the lamp is used for cleaning and inspection of time, dust could accumulate inside the projector is moving. Pay partic- The projector may cause an accident or personal injury. For details of the... projector be performed. It is recommended that periodic maintenance of maintenance costs, contact the Canon Customer Support Center. • When hanging the projector from the projector lens etc., do so could result in a burn or injury. •...
User Manual
Page 22
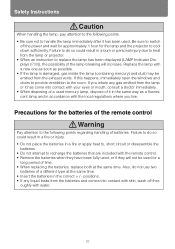
... it has come into contact with skin, wash off the power and wait for approximately 1 hour for a long period of time. • When replacing the batteries, replace both at the same time. • Insert the batteries in a burn or personal injury due to heat from the lamp or projector. • When an... emitted from the batteries and comes into contact with your eyes or mouth, consult a doctor immediately. • When disposing of a different type at the same time. Be sure to the room.
... it has come into contact with skin, wash off the power and wait for approximately 1 hour for a long period of time. • When replacing the batteries, replace both at the same time. • Insert the batteries in a burn or personal injury due to heat from the lamp or projector. • When an... emitted from the batteries and comes into contact with your eyes or mouth, consult a doctor immediately. • When disposing of a different type at the same time. Be sure to the room.
User Manual
Page 23
... damage to the lens unit. • Do not reuse any packaging or shock-absorbent materials that were supplied with the projector at the time of purchase for transporting or shipping the projector. Protection of the projector which could cause a malfunction. • If transportation is necessary,...performed by the user. Doing so may also enter the interior of the projector cannot be performed by a qualified technician or contact the Canon Customer Support Center. 23 Fragments from shock-absorbent material may cause a malfunction. • When carrying or holding up the projector after ...
... damage to the lens unit. • Do not reuse any packaging or shock-absorbent materials that were supplied with the projector at the time of purchase for transporting or shipping the projector. Protection of the projector which could cause a malfunction. • If transportation is necessary,...performed by the user. Doing so may also enter the interior of the projector cannot be performed by a qualified technician or contact the Canon Customer Support Center. 23 Fragments from shock-absorbent material may cause a malfunction. • When carrying or holding up the projector after ...

User Manual
Page 28
.... • If any liquid from inside the batteries leaks out and contacts your skin, be used for a long period of time. • When replacing the batteries, replace both batteries at the same time and do not use two batteries of a different type together. • Insert the batteries with the + and - Supplied Accessories...
.... • If any liquid from inside the batteries leaks out and contacts your skin, be used for a long period of time. • When replacing the batteries, replace both batteries at the same time and do not use two batteries of a different type together. • Insert the batteries with the + and - Supplied Accessories...

User Manual
Page 29
... on the front or rear of the projector to prevent the 2 remote controls from interfering with each other. (P124) 29 Point it at the same time, you can change the channel settings to operate it. (26.3') (26.3') • Use the remote control within a distance of approximately 8 m (26.3') from the projector. •...
... on the front or rear of the projector to prevent the 2 remote controls from interfering with each other. (P124) 29 Point it at the same time, you can change the channel settings to operate it. (26.3') (26.3') • Use the remote control within a distance of approximately 8 m (26.3') from the projector. •...
User Manual
Page 35
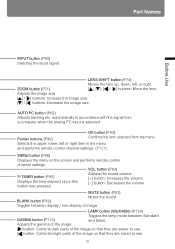
.... [ ] / [ ] buttons: Increase the image size. [ ] / [ ] buttons: Decrease the image size. AUTO PC button (P62) Adjusts tracking etc. VOL button (P83) P-TIMER button (P85) Displays the time elapsed since this button was pressed. Adjusts the sound volume. [+] button: Increases the volume. [+-] button: Decreases the volume. LAMP button (WUX4000) (P119) GAMMA button (P113...
.... [ ] / [ ] buttons: Increase the image size. [ ] / [ ] buttons: Decrease the image size. AUTO PC button (P62) Adjusts tracking etc. VOL button (P83) P-TIMER button (P85) Displays the time elapsed since this button was pressed. Adjusts the sound volume. [+] button: Increases the volume. [+-] button: Decreases the volume. LAMP button (WUX4000) (P119) GAMMA button (P113...

User Manual
Page 38
...(4) (3) (2) (2) POWER button (P56, P80) Turns the projector on or off / on the screen. (4) LENS button Each time the button is high, it will illuminate at the same time as the [WARNING] indicator. • TEMP (red) : When the temperature inside the projector increases further and a temperature error occurs...the projector is shut down. • WARNING (red) : Lights up or flashes when an error occurs. • LAMP (orange) : Flashes when the time for replacing the lamp is shown by the LED indicators (off . (3) MENU button (P88, P89) Displays a menu on / flashing). To adjust, use...
...(4) (3) (2) (2) POWER button (P56, P80) Turns the projector on or off / on the screen. (4) LENS button Each time the button is high, it will illuminate at the same time as the [WARNING] indicator. • TEMP (red) : When the temperature inside the projector increases further and a temperature error occurs...the projector is shut down. • WARNING (red) : Lights up or flashes when an error occurs. • LAMP (orange) : Flashes when the time for replacing the lamp is shown by the LED indicators (off . (3) MENU button (P88, P89) Displays a menu on / flashing). To adjust, use...

User Manual
Page 39
Another error has occurred. * Either the [POWER ON] or [STAND BY] indicator illuminates, depending on . Power-saving mode engaged. * * The time for replacing the lamp is open. Power was turned off due to turn power on (standby). The lamp cover is near. Internal temperature is on ...
Another error has occurred. * Either the [POWER ON] or [STAND BY] indicator illuminates, depending on . Power-saving mode engaged. * * The time for replacing the lamp is open. Power was turned off due to turn power on (standby). The lamp cover is near. Internal temperature is on ...

User Manual
Page 51
... included) To HDMI IN terminal Digital image output terminal (HDMI terminal) * When an HDMI cable is connected, digital audio is also connected at the same time. ■Outputting Audio to Speakers It is possible to output audio from the projected images to amplified speakers. User's Manual Projecting an Image Connecting the...
... included) To HDMI IN terminal Digital image output terminal (HDMI terminal) * When an HDMI cable is connected, digital audio is also connected at the same time. ■Outputting Audio to Speakers It is possible to output audio from the projected images to amplified speakers. User's Manual Projecting an Image Connecting the...
User Manual
Page 52
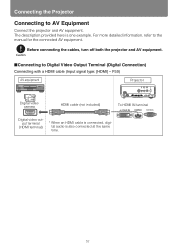
... connecting the cables, turn off both the projector and AV equipment. ■Connecting to AV Equipment Connect the projector and AV equipment. For more detailed information, refer to the manual for the connected AV equipment. P59) AV equipment Projector Digital video camera HDMI cable (not included)... To HDMI IN terminal Digital video output terminal (HDMI terminal) * When an HDMI cable is connected, digital audio is one example. The description provided here is also connected at the same time...
... connecting the cables, turn off both the projector and AV equipment. ■Connecting to AV Equipment Connect the projector and AV equipment. For more detailed information, refer to the manual for the connected AV equipment. P59) AV equipment Projector Digital video camera HDMI cable (not included)... To HDMI IN terminal Digital video output terminal (HDMI terminal) * When an HDMI cable is connected, digital audio is one example. The description provided here is also connected at the same time...
User Manual
Page 57
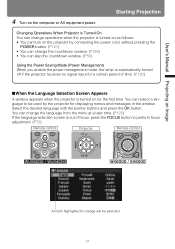
... management mode, the lamp is automatically turned off if the projector receives no signal input for a certain period of time. (P120) ■When the Language Selection Screen Appears A window appears when the projector is out of focus, ... is turned on as follows. • You can turn on the projector by the projector for the first time. Select the desired language with the pointer buttons and press the OK button. User's Manual Projecting an Image ...P121) • You can change the language from the menu at a later time. (P125) If the language selection screen is turned on the computer or...
... management mode, the lamp is automatically turned off if the projector receives no signal input for a certain period of time. (P120) ■When the Language Selection Screen Appears A window appears when the projector is out of focus, ... is turned on as follows. • You can turn on the projector by the projector for the first time. Select the desired language with the pointer buttons and press the OK button. User's Manual Projecting an Image ...P121) • You can change the language from the menu at a later time. (P125) If the language selection screen is turned on the computer or...

User Manual
Page 74
... top left and bottom right. (P161) 1 Press either the LENS-SHIFT button (WUX5000 / WUX4000) or the SHIFT button (WX6000 / SX6000) on the remote control, or the LENS button on the projector 3 times in order to as "lens shift". This function is referred to display the window shown below will be displayed. Adjusting...
... top left and bottom right. (P161) 1 Press either the LENS-SHIFT button (WUX5000 / WUX4000) or the SHIFT button (WX6000 / SX6000) on the remote control, or the LENS button on the projector 3 times in order to as "lens shift". This function is referred to display the window shown below will be displayed. Adjusting...

User Manual
Page 79
The image mode changes each time the IMAGE button is pressed. (The displayed image modes vary depending on the remote control to Select an Image Mode Press the IMAGE button on the selected input signal.) Remote control You can also select any image mode from the [Image mode] menu. (P109) • User settings 1 - 5 are displayed when the desired image settings have been created and stored using the user memory function in the image adjustment menu. (P110) 79 User's Manual Projecting an Image Selecting an Image Mode ■How to select.
The image mode changes each time the IMAGE button is pressed. (The displayed image modes vary depending on the remote control to Select an Image Mode Press the IMAGE button on the selected input signal.) Remote control You can also select any image mode from the [Image mode] menu. (P109) • User settings 1 - 5 are displayed when the desired image settings have been created and stored using the user memory function in the image adjustment menu. (P110) 79 User's Manual Projecting an Image Selecting an Image Mode ■How to select.
User Manual
Page 80
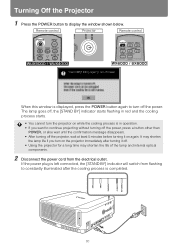
... until the confirmation message disappears. • After turning off the projector, wait at least 5 minutes before turning it off. • Using the projector for a long time may shorten the life of the lamp and internal optical components. 2 Disconnect the power cord from flashing to turn on the projector immediately after the...
... until the confirmation message disappears. • After turning off the projector, wait at least 5 minutes before turning it off. • Using the projector for a long time may shorten the life of the lamp and internal optical components. 2 Disconnect the power cord from flashing to turn on the projector immediately after the...
