
User Manual
Page 9
...-Tuning Colors (6-axis Color Adjustment 102 Fine-Tuning Gamma 103 Controlling Contrast (Iris 104 Specifying the Lamp Mode 105 Resetting Image Adjustment Settings 105 Customizing System Operation (System Settings 106 Registering User Logos 106 Positioning User Logos 106 No Signal Screen...107 Screen When Blank 107 Selecting a Logo at Startup 108 Specifying...
...-Tuning Colors (6-axis Color Adjustment 102 Fine-Tuning Gamma 103 Controlling Contrast (Iris 104 Specifying the Lamp Mode 105 Resetting Image Adjustment Settings 105 Customizing System Operation (System Settings 106 Registering User Logos 106 Positioning User Logos 106 No Signal Screen...107 Screen When Blank 107 Selecting a Logo at Startup 108 Specifying...
User Manual
Page 13
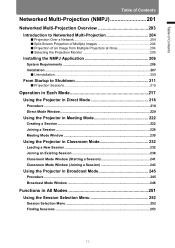
... Multiple Images 204 ■ Projection of an Image from Multiple Projectors at Once 204 ■ Selecting the Projection Monitor 205 Installing the NMPJ Application 206 System Requirements 206 Installation ...207 ■ Uninstallation...209 From Startup to Shutdown 211 ■ Projection Sessions 215 Operation in Each Mode 217 Using the Projector in...
... Multiple Images 204 ■ Projection of an Image from Multiple Projectors at Once 204 ■ Selecting the Projection Monitor 205 Installing the NMPJ Application 206 System Requirements 206 Installation ...207 ■ Uninstallation...209 From Startup to Shutdown 211 ■ Projection Sessions 215 Operation in Each Mode 217 Using the Projector in...

User Manual
Page 54
... to select the resolution closest to the projector's maximum resolution. 3 Click the [OK] button. ■ Mac OS X 1 Open the Apple Menu and select [System Preferences]. 2 In the [System Preferences] window, click the [Displays] icon to display the Display window. 3 Select the [Display] tab and select the resolution closest to the maximum output...
... to select the resolution closest to the projector's maximum resolution. 3 Click the [OK] button. ■ Mac OS X 1 Open the Apple Menu and select [System Preferences]. 2 In the [System Preferences] window, click the [Displays] icon to display the Display window. 3 Select the [Display] tab and select the resolution closest to the maximum output...

User Manual
Page 77
... be used. 1 Insert the USB flash drive in the projector can be selected as the image source. • If the projector cannot mount the file system, the drive name is grayed out and the following icon is displayed. Remote control Projector 3 Press the INPUT button repeatedly to select the partition, and...
... be used. 1 Insert the USB flash drive in the projector can be selected as the image source. • If the projector cannot mount the file system, the drive name is grayed out and the following icon is displayed. Remote control Projector 3 Press the INPUT button repeatedly to select the partition, and...
User Manual
Page 82
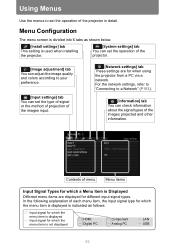
... via a network. Contents of the images input. [Network settings] tab These settings are displayed for which the menu item is used when installing the projector. [System settings] tab You can set the operation of the projector. [Image adjustment] tab You can adjust the image quality and colors according to your preference...
... via a network. Contents of the images input. [Network settings] tab These settings are displayed for which the menu item is used when installing the projector. [System settings] tab You can set the operation of the projector. [Image adjustment] tab You can adjust the image quality and colors according to your preference...

User Manual
Page 106
... • The factory default is now registered. The portion of registered user logos as a user logo. Positioning User Logos > [System settings] > [User screen settings] > [Logo position] HDMI Digital PC Component Analog PC LAN USB Specify the position of the image...and then press the OK button. Registered user logos can specify the position after a logo has been registered. Customizing System Operation (System Settings) Registering User Logos > [System settings] > [User screen settings] > [Logo capture] HDMI Digital PC Component Analog PC LAN USB Registers the ...
... • The factory default is now registered. The portion of registered user logos as a user logo. Positioning User Logos > [System settings] > [User screen settings] > [Logo position] HDMI Digital PC Component Analog PC LAN USB Specify the position of the image...and then press the OK button. Registered user logos can specify the position after a logo has been registered. Customizing System Operation (System Settings) Registering User Logos > [System settings] > [User screen settings] > [Logo capture] HDMI Digital PC Component Analog PC LAN USB Registers the ...

User Manual
Page 107
...factory default. Black Blue User logo The screen is all black. Black Blue User logo The screen is all black. Screen When Blank > [System settings] > [User screen settings] > [Screen when blank] HDMI Digital PC Component Analog PC LAN USB You can choose a black, blue,... or registered user screen. Customizing System Operation (System Settings) No Signal Screen > [System settings] > [User screen settings] > [No signal screen] HDMI Digital PC Component Analog PC LAN USB As the image projected...
...factory default. Black Blue User logo The screen is all black. Black Blue User logo The screen is all black. Screen When Blank > [System settings] > [User screen settings] > [Screen when blank] HDMI Digital PC Component Analog PC LAN USB You can choose a black, blue,... or registered user screen. Customizing System Operation (System Settings) No Signal Screen > [System settings] > [User screen settings] > [No signal screen] HDMI Digital PC Component Analog PC LAN USB As the image projected...

User Manual
Page 108
... is ready for projection. Disable auto power-off. • [Canon logo] is projected. Displays the Canon logo that was registered in use. Customizing System Operation (System Settings) Selecting a Logo at the factory. Specifying Auto Power-Off > [System settings] > [Auto poweroff] HDMI Digital PC Component Analog PC... accept your setting and then press the MENU button or EXIT button. • [15 min.] is not in advance at Startup > [System settings] > [User screen settings] > [Projector on] HDMI Digital PC Component Analog PC LAN USB You can display a specified logo on...
... is ready for projection. Disable auto power-off. • [Canon logo] is projected. Displays the Canon logo that was registered in use. Customizing System Operation (System Settings) Selecting a Logo at the factory. Specifying Auto Power-Off > [System settings] > [Auto poweroff] HDMI Digital PC Component Analog PC... accept your setting and then press the MENU button or EXIT button. • [15 min.] is not in advance at Startup > [System settings] > [User screen settings] > [Projector on] HDMI Digital PC Component Analog PC LAN USB You can display a specified logo on...

User Manual
Page 109
Specifying Silence or Operating Tones > [System settings] > [Beep] HDMI Digital PC Component Analog PC LAN USB You can select whether a beep sounds or not when you mute the projector sound with ... turn on the projector immediately after turning it on the projector by connecting the power cable without pressing the POWER button. Customizing System Operation (System Settings) Specifying Direct Power-On > [System settings] > [Direct power on] HDMI Digital PC Component Analog PC LAN USB You can turn on the projector by connecting the power...
Specifying Silence or Operating Tones > [System settings] > [Beep] HDMI Digital PC Component Analog PC LAN USB You can select whether a beep sounds or not when you mute the projector sound with ... turn on the projector immediately after turning it on the projector by connecting the power cable without pressing the POWER button. Customizing System Operation (System Settings) Specifying Direct Power-On > [System settings] > [Direct power on] HDMI Digital PC Component Analog PC LAN USB You can turn on the projector by connecting the power...
User Manual
Page 110
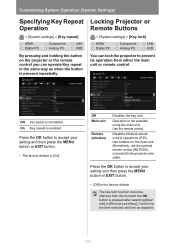
Customizing System Operation (System Settings) Specifying Key Repeat Operation > [System settings] > [Key repeat] HDMI Digital PC Component Analog PC LAN USB By pressing and holding the button on the main unit. On Key repeat is ... default is [On]. The key lock function becomes effective from either the main unit or remote control. Control via a cable. Locking Projector or Remote Buttons > [System settings] > [Key lock] HDMI Digital PC Component Analog PC LAN USB You can operate Key repeat in the same way as when the button is...
Customizing System Operation (System Settings) Specifying Key Repeat Operation > [System settings] > [Key repeat] HDMI Digital PC Component Analog PC LAN USB By pressing and holding the button on the main unit. On Key repeat is ... default is [On]. The key lock function becomes effective from either the main unit or remote control. Control via a cable. Locking Projector or Remote Buttons > [System settings] > [Key lock] HDMI Digital PC Component Analog PC LAN USB You can operate Key repeat in the same way as when the button is...
User Manual
Page 111
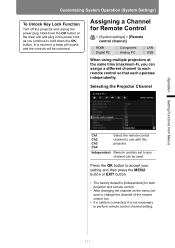
Customizing System Operation (System Settings) To Unlock Key Lock Function Turn off the projector and unplug the power plug. Assigning a Channel for both projector and remote control. • After ... on the menu, be sure to change the channel of the remote control too. • If a cable is connected, it is [Independent] for Remote Control > [System settings] > [Remote control channel] HDMI Digital PC Component Analog PC LAN USB When using multiple projectors at the same time (maximum 4), you continue to use...
Customizing System Operation (System Settings) To Unlock Key Lock Function Turn off the projector and unplug the power plug. Assigning a Channel for both projector and remote control. • After ... on the menu, be sure to change the channel of the remote control too. • If a cable is connected, it is [Independent] for Remote Control > [System settings] > [Remote control channel] HDMI Digital PC Component Analog PC LAN USB When using multiple projectors at the same time (maximum 4), you continue to use...

User Manual
Page 112
... same time for 3 seconds. Motion blur reduction can change the channel on the remote control as follows. Reducing Motion Blur > [System settings] > [Motion blur reduction] HDMI Digital PC Component Analog PC LAN USB Motion blur is available in [Presentation] or [Dynamic] ...image modes (P95). Customizing System Operation (System Settings) Selecting a Channel on the Remote control You can make this blurring less noticeable. Off Motion blur reduction is not performed...
... same time for 3 seconds. Motion blur reduction can change the channel on the remote control as follows. Reducing Motion Blur > [System settings] > [Motion blur reduction] HDMI Digital PC Component Analog PC LAN USB Motion blur is available in [Presentation] or [Dynamic] ...image modes (P95). Customizing System Operation (System Settings) Selecting a Channel on the Remote control You can make this blurring less noticeable. Off Motion blur reduction is not performed...

User Manual
Page 113
...processing, menu displays, and other elements are adjusted for a computer. Operation Setting Functions from Menus Auto Computer Select when AV equipment will be connected. Use the buttons to accept your setting and then press the MENU button or EXIT button....Hungarian Czech Danish Arabic Chinese (Simplified) Chinese (Traditional) Korean Japanese 113 Select when a computer will be connected. Customizing System Operation (System Settings) Specifying HDMI Input > [System settings] > [HDMI In] HDMI Digital PC Component Analog PC LAN USB Set the type of equipment which the ...
...processing, menu displays, and other elements are adjusted for a computer. Operation Setting Functions from Menus Auto Computer Select when AV equipment will be connected. Use the buttons to accept your setting and then press the MENU button or EXIT button....Hungarian Czech Danish Arabic Chinese (Simplified) Chinese (Traditional) Korean Japanese 113 Select when a computer will be connected. Customizing System Operation (System Settings) Specifying HDMI Input > [System settings] > [HDMI In] HDMI Digital PC Component Analog PC LAN USB Set the type of equipment which the ...

User Manual
Page 114
... turned off. • The power is also turned off if no password is entered. Once you have completed [Register password]. Customizing System Operation (System Settings) When the setting is completed, press the OK button to accept your setting and then press the MENU button or EXIT button.... cannot be used unless you enter a wrong password three times, the power will be used even if no password is input for Operation > [System settings] > [Other settings] > [Password settings] HDMI Digital PC Component Analog PC LAN USB Disables the projector unless the correct password is valid...
... turned off. • The power is also turned off if no password is entered. Once you have completed [Register password]. Customizing System Operation (System Settings) When the setting is completed, press the OK button to accept your setting and then press the MENU button or EXIT button.... cannot be used unless you enter a wrong password three times, the power will be used even if no password is input for Operation > [System settings] > [Other settings] > [Password settings] HDMI Digital PC Component Analog PC LAN USB Disables the projector unless the correct password is valid...
User Manual
Page 115
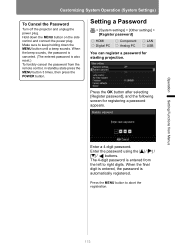
Make sure to keep holding down the MENU button on the side control and connect the power plug. Setting a Password > [System settings] > [Other settings] > [Register password] HDMI Digital PC Component Analog PC LAN USB You can register a password for registering a password ... for starting projection. When the final digit is entered, the password is also reset.) To forcibly cancel the password from Menus Customizing System Operation (System Settings) To Cancel the Password Turn off the projector and unplug the power plug. Operation Setting Functions from the remote control, in...
Make sure to keep holding down the MENU button on the side control and connect the power plug. Setting a Password > [System settings] > [Other settings] > [Register password] HDMI Digital PC Component Analog PC LAN USB You can register a password for registering a password ... for starting projection. When the final digit is entered, the password is also reset.) To forcibly cancel the password from Menus Customizing System Operation (System Settings) To Cancel the Password Turn off the projector and unplug the power plug. Operation Setting Functions from the remote control, in...

User Manual
Page 116
... as possible to the condition when the projector was purchased, however it completely to the factory default without performing Gamma restore. Customizing System Operation (System Settings) Restoring Original Gamma Settings > [System settings] > [Other settings] > [Gamma restore] HDMI Digital PC Component Analog PC LAN USB This function is used when the lamp has been...
... as possible to the condition when the projector was purchased, however it completely to the factory default without performing Gamma restore. Customizing System Operation (System Settings) Restoring Original Gamma Settings > [System settings] > [Other settings] > [Gamma restore] HDMI Digital PC Component Analog PC LAN USB This function is used when the lamp has been...

User Manual
Page 117
... reset the lamp counter. When the lamp hours are 2,700 hours to display the lamp counter. Operation Setting Functions from Menus Customizing System Operation (System Settings) Resetting the Lamp Counter > [System settings] > [Other settings] > [Lamp counter] HDMI Digital PC Component Analog PC LAN USB You can reset the lamp counter that indicates the...
... reset the lamp counter. When the lamp hours are 2,700 hours to display the lamp counter. Operation Setting Functions from Menus Customizing System Operation (System Settings) Resetting the Lamp Counter > [System settings] > [Other settings] > [Lamp counter] HDMI Digital PC Component Analog PC LAN USB You can reset the lamp counter that indicates the...

User Manual
Page 118
... counter, press the OK button when [Air filter counter] is for cleaning and replacing the air filter. Customizing System Operation (System Settings) Resetting the Air Filter Counter > [System settings] > [Other settings] > [Air filter counter] HDMI Digital PC Component Analog PC LAN USB This resets...projector while the LED is flashing. During the update, the LED indicator will display an update confirmation screen. If so, contact the Canon Customer Support Center. • This firmware version is selected. Press the MENU button or EXIT button. Select [Firmware], press the...
... counter, press the OK button when [Air filter counter] is for cleaning and replacing the air filter. Customizing System Operation (System Settings) Resetting the Air Filter Counter > [System settings] > [Other settings] > [Air filter counter] HDMI Digital PC Component Analog PC LAN USB This resets...projector while the LED is flashing. During the update, the LED indicator will display an update confirmation screen. If so, contact the Canon Customer Support Center. • This firmware version is selected. Press the MENU button or EXIT button. Select [Firmware], press the...

User Manual
Page 119
...This function does not reset the values for confirmation appears. Select [Factory defaults] and press the OK button. Customizing System Operation (System Settings) Resetting to the Default Setting > [System settings] > [Other settings] > [Factory defaults] HDMI Digital PC Component Analog PC LAN USB You can reset... the menu item settings and restore the system settings to the conditions at the time it was saved. (P96) 119 The following screen for [Lamp counter], [Language], [Remote ...
...This function does not reset the values for confirmation appears. Select [Factory defaults] and press the OK button. Customizing System Operation (System Settings) Resetting to the Default Setting > [System settings] > [Other settings] > [Factory defaults] HDMI Digital PC Component Analog PC LAN USB You can reset... the menu item settings and restore the system settings to the conditions at the time it was saved. (P96) 119 The following screen for [Lamp counter], [Language], [Remote ...

User Manual
Page 120
... receiving error mails. (P183) Projector name* Name which identifies this is not displayed. Firmware Current firmware version Serial no. Information shown Item Explanation Model name WUX450 / WX520 Input signal Details of the input signal currently selected Information such as the type, resolution, and frequency of the images projected and other information.... Checking Projector Information > [Information] HDMI Digital PC Component Analog PC LAN USB You can check information about the signal types of the signal is installed System information System information.
... receiving error mails. (P183) Projector name* Name which identifies this is not displayed. Firmware Current firmware version Serial no. Information shown Item Explanation Model name WUX450 / WX520 Input signal Details of the input signal currently selected Information such as the type, resolution, and frequency of the images projected and other information.... Checking Projector Information > [Information] HDMI Digital PC Component Analog PC LAN USB You can check information about the signal types of the signal is installed System information System information.