User Manual
Page 2
How to select the [Install settings] tab. The WUX450 / WX520 Multimedia Projector (hereinafter referred to as "the projector") is... software for the screen which is given here. In this manual thoroughly to display the menu window. Remote control Projector 2 Press the [ ] / [ ] buttons to Use This Manual Thank you to use . 2 The "Operation" section (P47... are shown as follows. The remote control allows you for purchasing a Canon projector. Operation of buttons on the side of the symbols used . 1 Press the MENU button to make the most of your projector. This Manual ...
How to select the [Install settings] tab. The WUX450 / WX520 Multimedia Projector (hereinafter referred to as "the projector") is... software for the screen which is given here. In this manual thoroughly to display the menu window. Remote control Projector 2 Press the [ ] / [ ] buttons to Use This Manual Thank you to use . 2 The "Operation" section (P47... are shown as follows. The remote control allows you for purchasing a Canon projector. Operation of buttons on the side of the symbols used . 1 Press the MENU button to make the most of your projector. This Manual ...

User Manual
Page 33
... battery compartment lid. Insert 2 new AAA batteries in a fire. • Do not attempt to the following points when handling the batteries. Slide the lid while pressing it . Slide the lid until you hear a click to securely close it to wash the liquid off thoroughly. 33 Doing so could result in a fire...
... battery compartment lid. Insert 2 new AAA batteries in a fire. • Do not attempt to the following points when handling the batteries. Slide the lid while pressing it . Slide the lid until you hear a click to securely close it to wash the liquid off thoroughly. 33 Doing so could result in a fire...

User Manual
Page 50
...the Projector In" (P140). 2 Press the POWER button. You can skip the countdown window. (P108) When the Projector Is Left Idle If no signal is started. Step 1 Turn the Projector On 1 Check the connection between the projector and the computer or AV equipment. (P134 - Remote control Projector... inactivity (by connecting the power cord, without pressing the POWER button. (P109) • You can change the language from the menu at a later time. (P113) • If the language selection screen is turned on the computer or AV equipment power. Changing Operations When Projector is Turned...
...the Projector In" (P140). 2 Press the POWER button. You can skip the countdown window. (P108) When the Projector Is Left Idle If no signal is started. Step 1 Turn the Projector On 1 Check the connection between the projector and the computer or AV equipment. (P134 - Remote control Projector... inactivity (by connecting the power cord, without pressing the POWER button. (P109) • You can change the language from the menu at a later time. (P113) • If the language selection screen is turned on the computer or AV equipment power. Changing Operations When Projector is Turned...

User Manual
Page 52
... flash drives can be projected when you have selected [LAN] as the input signal. Step 2 Select an Input Signal Selecting an Input Signal 1 Press the INPUT button to the projector over a network can select the target input signal with a green circle and enclosed by a white circle. 52...P77). • In split-screen mode, the side without control rights is ready for projection. 2 You can switch the available input signal types by pressing the INPUT button. • You can be projected when you have selected [USB] as the input signal. An input signal that is identified by ...
... flash drives can be projected when you have selected [LAN] as the input signal. Step 2 Select an Input Signal Selecting an Input Signal 1 Press the INPUT button to the projector over a network can select the target input signal with a green circle and enclosed by a white circle. 52...P77). • In split-screen mode, the side without control rights is ready for projection. 2 You can switch the available input signal types by pressing the INPUT button. • You can be projected when you have selected [USB] as the input signal. An input signal that is identified by ...
User Manual
Page 55
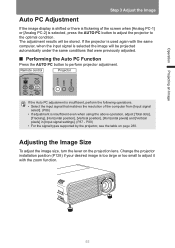
...the projection lens. Adjusting the Image Size To adjust the image size, turn the lever on page 288. If the projector is selected, press the AUTO PC button to adjust the projector to the optimal condition. Remote control Projector If the Auto PC adjustment is insufficient, perform ...the following operations. • Select the input signal that were previously adjusted. ■ Performing the Auto PC Function Press the AUTO PC button to adjust it with the same computer, when the input signal is too large or too small to perform projector adjustment...
...the projection lens. Adjusting the Image Size To adjust the image size, turn the lever on page 288. If the projector is selected, press the AUTO PC button to adjust the projector to the optimal condition. Remote control Projector If the Auto PC adjustment is insufficient, perform ...the following operations. • Select the input signal that were previously adjusted. ■ Performing the Auto PC Function Press the AUTO PC button to adjust it with the same computer, when the input signal is too large or too small to perform projector adjustment...

User Manual
Page 57
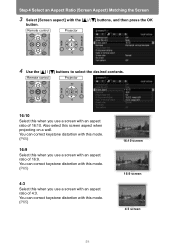
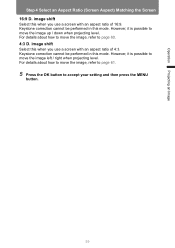
... MENU button to display the menu window. Remote control Projector 2 Press the [ ] / [ ] buttons to "Relationship between Aspect and Screen Aspect" on page 283. Operation Projecting an Image Step 4 Select an Aspect Ratio (Screen Aspect) Matching the ... aspect ratio, refer to select the [Install settings] tab. Remote control Projector 57 You may need to make best use of the computer or other AV equipment connected. Selecting Screen Aspect Select the correct aspect ratio for the projection to change the setting depending on the resolution of the screen size...
... MENU button to display the menu window. Remote control Projector 2 Press the [ ] / [ ] buttons to "Relationship between Aspect and Screen Aspect" on page 283. Operation Projecting an Image Step 4 Select an Aspect Ratio (Screen Aspect) Matching the ... aspect ratio, refer to select the [Install settings] tab. Remote control Projector 57 You may need to make best use of the computer or other AV equipment connected. Selecting Screen Aspect Select the correct aspect ratio for the projection to change the setting depending on the resolution of the screen size...
User Manual
Page 58
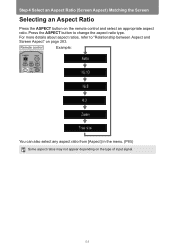
... 3 Select [Screen aspect] with an aspect ratio of 16:9. Remote control Projector 16:10 Select this when you use a screen with the [ ] / [ ] buttons, and then press the OK button. You can correct keystone distortion with this mode. (P65) 4:3 Select this when you use a screen with this screen aspect when projecting on...
... 3 Select [Screen aspect] with an aspect ratio of 16:9. Remote control Projector 16:10 Select this when you use a screen with the [ ] / [ ] buttons, and then press the OK button. You can correct keystone distortion with this mode. (P65) 4:3 Select this when you use a screen with this screen aspect when projecting on...
User Manual
Page 59
... possible to move the image up / down when projecting level. For details about how to move the image, refer to accept your setting and then press the MENU button. 59 image shift Select this mode. For details about how to move the image, refer to page 61...
... possible to move the image up / down when projecting level. For details about how to move the image, refer to accept your setting and then press the MENU button. 59 image shift Select this mode. For details about how to move the image, refer to page 61...

User Manual
Page 60
Remote control Projector 3 Use the [ ] / [ ] buttons to reposition the image. Image Shift This option applies image processing to select [Digital image shift], then press the OK button. Projector 2 Press the [ ] / [ ] buttons to display the menu. Remote control Projector 60 image shift], press the MENU button to select the [Install settings] tab. For this reason, it is called digital image shift. 1 When the screen aspect is [16:9 D. Step 4 Select an Aspect Ratio (Screen Aspect) Matching the Screen Moving Image with 16:9 D.
Remote control Projector 3 Use the [ ] / [ ] buttons to reposition the image. Image Shift This option applies image processing to select [Digital image shift], then press the OK button. Projector 2 Press the [ ] / [ ] buttons to display the menu. Remote control Projector 60 image shift], press the MENU button to select the [Install settings] tab. For this reason, it is called digital image shift. 1 When the screen aspect is [16:9 D. Step 4 Select an Aspect Ratio (Screen Aspect) Matching the Screen Moving Image with 16:9 D.

User Manual
Page 61
Moving Image with 4:3 D. Remote control Projector 61 Image Shift 1 When the screen aspect is [4:3 D. Screen 5 When the image fits the screen, press the OK button. Projector 2 Press the [ ] / [ ] buttons to display the menu. image shift], press the MENU button to select the [Install settings] tab. Operation Projecting an Image Step 4 Select an Aspect Ratio (Screen Aspect) Matching the Screen 4 Use the [ ] / [ ] buttons to move the image up . [ ] button Moves the image down . Remote control Projector [ ] button Moves the image up or down .
Moving Image with 4:3 D. Remote control Projector 61 Image Shift 1 When the screen aspect is [4:3 D. Screen 5 When the image fits the screen, press the OK button. Projector 2 Press the [ ] / [ ] buttons to display the menu. image shift], press the MENU button to select the [Install settings] tab. Operation Projecting an Image Step 4 Select an Aspect Ratio (Screen Aspect) Matching the Screen 4 Use the [ ] / [ ] buttons to move the image up . [ ] button Moves the image down . Remote control Projector [ ] button Moves the image up or down .

User Manual
Page 62
... display the [D. image shift reset] window. Resetting the Image Shift Perform the following steps to select [Digital image shift], then press the OK button. Next, select [OK] with the [ ] button, and then press the OK button. 62 Step 4 Select an Aspect Ratio (Screen Aspect) Matching the Screen 3 Use the [ ] / [ ] buttons to reset...
... display the [D. image shift reset] window. Resetting the Image Shift Perform the following steps to select [Digital image shift], then press the OK button. Next, select [OK] with the [ ] button, and then press the OK button. 62 Step 4 Select an Aspect Ratio (Screen Aspect) Matching the Screen 3 Use the [ ] / [ ] buttons to reset...
User Manual
Page 64
For more details about aspect ratios, refer to change the aspect ratio type. Remote control Example: You can also select any aspect ratio from [Aspect] in the menu. (P85) Some aspect ratios may not appear depending on the remote control and select an appropriate aspect ratio. Step 4 Select an Aspect Ratio (Screen Aspect) Matching the Screen Selecting an Aspect Ratio Press the ASPECT button on the type of input signal. 64 Press the ASPECT button to "Relationship between Aspect and Screen Aspect" on page 283.
For more details about aspect ratios, refer to change the aspect ratio type. Remote control Example: You can also select any aspect ratio from [Aspect] in the menu. (P85) Some aspect ratios may not appear depending on the remote control and select an appropriate aspect ratio. Step 4 Select an Aspect Ratio (Screen Aspect) Matching the Screen Selecting an Aspect Ratio Press the ASPECT button on the type of input signal. 64 Press the ASPECT button to "Relationship between Aspect and Screen Aspect" on page 283.

User Manual
Page 65
...8226; Keystone can be effective in some lens shift positions. • The digital image shift function (P60) is accessed when this button is pressed and the screen aspect is [4:3 D. If you place the projector in memory. If the keystone distortion is not necessary. • Signals are... image may not be adjusted within the range of keystone adjustment is corrected. image shift]. ■ Horizontal/Vertical Keystone Correction 1 Press either the KEYSTONE button on the remote control or the KEYSTONE button on switching between the two types of correction are processed digitally ...
...8226; Keystone can be effective in some lens shift positions. • The digital image shift function (P60) is accessed when this button is pressed and the screen aspect is [4:3 D. If you place the projector in memory. If the keystone distortion is not necessary. • Signals are... image may not be adjusted within the range of keystone adjustment is corrected. image shift]. ■ Horizontal/Vertical Keystone Correction 1 Press either the KEYSTONE button on the remote control or the KEYSTONE button on switching between the two types of correction are processed digitally ...

User Manual
Page 66
... [ ] button Reduces the dimensions of the upper edge. [ ] button Reduces the dimensions of the right edge. 3 When keystone distortion has been corrected, press the OK button. ■ Corner Adjustment 1 Press either the KEYSTONE button on the remote control or the KEYSTONE button on the projector in order to adjust the dimensions. Remote...
... [ ] button Reduces the dimensions of the upper edge. [ ] button Reduces the dimensions of the right edge. 3 When keystone distortion has been corrected, press the OK button. ■ Corner Adjustment 1 Press either the KEYSTONE button on the remote control or the KEYSTONE button on the projector in order to adjust the dimensions. Remote...
User Manual
Page 67
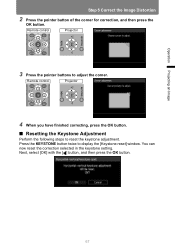
... now reset the correction selected in the keystone setting. Operation Projecting an Image Step 5 Correct the Image Distortion 2 Press the pointer button of the corner for correction, and then press the OK button. Remote control Projector 3 Press the pointer buttons to reset the keystone adjustment. Remote control Projector 4 When you have finished correcting...
... now reset the correction selected in the keystone setting. Operation Projecting an Image Step 5 Correct the Image Distortion 2 Press the pointer button of the corner for correction, and then press the OK button. Remote control Projector 3 Press the pointer buttons to reset the keystone adjustment. Remote control Projector 4 When you have finished correcting...

User Manual
Page 69
Operation Projecting an Image Step 6 Select the Image Quality (Image Mode) ■ Selecting an Image Mode Press the IMAGE button on the selected input signal.) Remote control You can also select any image mode from the [Image mode] menu. (P95) • User settings 1 - 5 are displayed when the desired image settings have been created and stored using the user memory function in the image adjustment menu (P96). 69 The image mode changes each time the IMAGE button is pressed. (The displayed image modes vary depending on the remote control to select.
Operation Projecting an Image Step 6 Select the Image Quality (Image Mode) ■ Selecting an Image Mode Press the IMAGE button on the selected input signal.) Remote control You can also select any image mode from the [Image mode] menu. (P95) • User settings 1 - 5 are displayed when the desired image settings have been created and stored using the user memory function in the image adjustment menu (P96). 69 The image mode changes each time the IMAGE button is pressed. (The displayed image modes vary depending on the remote control to select.

User Manual
Page 70
... network functions should be active in the current image mode. • Auto Power-Off A function for the selected function. Step 7 Set Power-Saving Settings Press the ECO button on the remote control to the page describing each function. • Lamp Settings (P105) • Auto Power-Off (P108) •... Standby Settings (P168) 70 The following three settings are available. • Lamp Settings For changing lamp and fan power consumption in standby mode. 1 Press the ECO button to select a menu. Remote control 2 Press the [ ] / [ ] buttons to display the window shown below.
... network functions should be active in the current image mode. • Auto Power-Off A function for the selected function. Step 7 Set Power-Saving Settings Press the ECO button on the remote control to the page describing each function. • Lamp Settings (P105) • Auto Power-Off (P108) •... Standby Settings (P168) 70 The following three settings are available. • Lamp Settings For changing lamp and fan power consumption in standby mode. 1 Press the ECO button to select a menu. Remote control 2 Press the [ ] / [ ] buttons to display the window shown below.
User Manual
Page 71
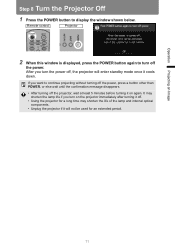
If you want to continue projecting without turning off the power, press a button other than POWER, or else wait until the confirmation message disappears. • After turning off the projector, wait at least 5 minutes before turning it ... optical components. • Unplug the projector if it will enter standby mode once it cools down. Operation Projecting an Image Step 8 Turn the Projector Off 1 Press the POWER button to turn the power off the power. Remote control Projector 2 When this window is displayed...
If you want to continue projecting without turning off the power, press a button other than POWER, or else wait until the confirmation message disappears. • After turning off the projector, wait at least 5 minutes before turning it ... optical components. • Unplug the projector if it will enter standby mode once it cools down. Operation Projecting an Image Step 8 Turn the Projector Off 1 Press the POWER button to turn the power off the power. Remote control Projector 2 When this window is displayed...
User Manual
Page 74
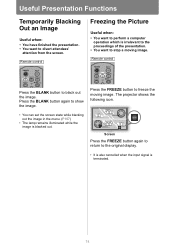
... FREEZE button again to return to black out the image. Press the FREEZE button to stop a moving image. Remote control Press the BLANK button to the original display. • It is also cancelled when the input signal is terminated. 74 Remote control Freezing the Picture Useful ... image. Useful Presentation Functions Temporarily Blacking Out an Image Useful when: • You have finished the presentation. • You want to freeze the moving image. Press the BLANK button again to divert attendees' attention from the screen.
... FREEZE button again to return to black out the image. Press the FREEZE button to stop a moving image. Remote control Press the BLANK button to the original display. • It is also cancelled when the input signal is terminated. 74 Remote control Freezing the Picture Useful ... image. Useful Presentation Functions Temporarily Blacking Out an Image Useful when: • You have finished the presentation. • You want to freeze the moving image. Press the BLANK button again to divert attendees' attention from the screen.

User Manual
Page 75
Press the MUTE button to mute the sound. Remote control Useful when: • You want to temporality mute unnecessary sound. • You want to adjust the ... too low. • You can also mute the sound of the speakers connected via the audio output terminal. 75 Remote control Press the VOL button. The following icon. Screen Press the MUTE button again to cancel the mute function. • You can also adjust the volume level of the speakers connected via...
Press the MUTE button to mute the sound. Remote control Useful when: • You want to temporality mute unnecessary sound. • You want to adjust the ... too low. • You can also mute the sound of the speakers connected via the audio output terminal. 75 Remote control Press the VOL button. The following icon. Screen Press the MUTE button again to cancel the mute function. • You can also adjust the volume level of the speakers connected via...
