ZoomBrowser EX 6.5 for Windows Instruction Manual
Page 9
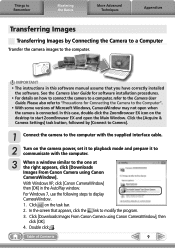
... Windows, CameraWindow may not open the Main Window. See the Camera User Guide for Connecting the Camera to the Computer". • With some versions of Contents 9 With Windows XP, click [Canon CameraWindow] then [OK] in this case, double-click the ZoomBrowser EX icon on the desktop to start... ZoomBrowser EX and open when the camera is connected. IMPORTANT • The instructions in the AutoPlay window. In ...
... Windows, CameraWindow may not open the Main Window. See the Camera User Guide for Connecting the Camera to the Computer". • With some versions of Contents 9 With Windows XP, click [Canon CameraWindow] then [OK] in this case, double-click the ZoomBrowser EX icon on the desktop to start... ZoomBrowser EX and open when the camera is connected. IMPORTANT • The instructions in the AutoPlay window. In ...
Direct Print User Guide
Page 29
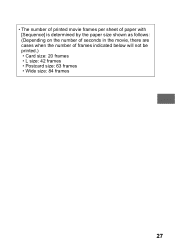
• The number of printed movie frames per sheet of paper with [Sequence] is determined by the paper size shown as follows: (Depending on the number of seconds in the movie, there are cases when the number of frames indicated below will not be printed.) • Card size: 20 frames • L size: 42 frames • Postcard size: 63 frames • Wide size: 84 frames 27
• The number of printed movie frames per sheet of paper with [Sequence] is determined by the paper size shown as follows: (Depending on the number of seconds in the movie, there are cases when the number of frames indicated below will not be printed.) • Card size: 20 frames • L size: 42 frames • Postcard size: 63 frames • Wide size: 84 frames 27
Direct Print User Guide
Page 47
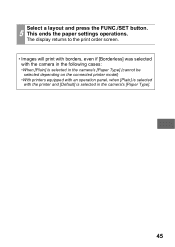
Select a layout and press the FUNC./SET button. 5 This ends the paper settings operations. The display returns to the print order screen. • Images will print with borders, even if [Borderless] was selected with the camera in the following cases: •When [Plain] is selected in the camera's [Paper Type] (cannot be selected depending on the connected printer model) •With printers equipped with an operation panel, when [Plain] is selected with the printer and [Default] is selected in the camera's [Paper Type]. 45
Select a layout and press the FUNC./SET button. 5 This ends the paper settings operations. The display returns to the print order screen. • Images will print with borders, even if [Borderless] was selected with the camera in the following cases: •When [Plain] is selected in the camera's [Paper Type] (cannot be selected depending on the connected printer model) •With printers equipped with an operation panel, when [Plain] is selected with the printer and [Default] is selected in the camera's [Paper Type]. 45

Direct Print User Guide
Page 55
...monitor. 1 Display the images you use Canon Compact Photo Printer SELPHY CP750/CP740/CP730/CP720/CP710/ CP510 In the following cases, select from [Print Method] in the camera's [Set up] menu: • When printing (wide) size images shot using a Canon digital camera onto wide-size paper. • ...When printing images of human subjects after connecting the camera to print and press the 2...
...monitor. 1 Display the images you use Canon Compact Photo Printer SELPHY CP750/CP740/CP730/CP720/CP710/ CP510 In the following cases, select from [Print Method] in the camera's [Set up] menu: • When printing (wide) size images shot using a Canon digital camera onto wide-size paper. • ...When printing images of human subjects after connecting the camera to print and press the 2...
Direct Print User Guide
Page 57
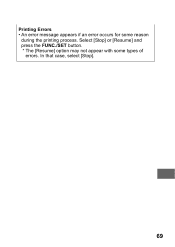
... [OK] and press the FUNC./ SET button. Setting the Print Style (Image, Borders and Date) The following print styles can only be set. In that case, select [Stop]. Borders Borderless Bordered Prints right to the edges of the printing by pressing the FUNC./SET button. ID Photo Prints a specified print size...
... [OK] and press the FUNC./ SET button. Setting the Print Style (Image, Borders and Date) The following print styles can only be set. In that case, select [Stop]. Borders Borderless Bordered Prints right to the edges of the printing by pressing the FUNC./SET button. ID Photo Prints a specified print size...

Direct Print User Guide
Page 68
• The number of printed movie frames per sheet of paper with [Sequence] is determined by the paper size shown as follows: (Depending on the number of seconds in the movie, there are cases when the number of frames indicated below will not be printed.) • Card size: 20 frames • L size: 42 frames • Postcard size: 63 frames • Wide size: 63 frames 66
• The number of printed movie frames per sheet of paper with [Sequence] is determined by the paper size shown as follows: (Depending on the number of seconds in the movie, there are cases when the number of frames indicated below will not be printed.) • Card size: 20 frames • L size: 42 frames • Postcard size: 63 frames • Wide size: 63 frames 66
Direct Print User Guide
Page 71
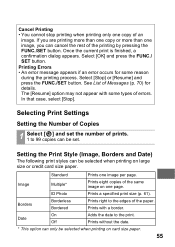
Printing Errors • An error message appears if an error occurs for some types of errors. In that case, select [Stop]. 69 Select [Stop] or [Resume] and press the FUNC./SET button. * The [Resume] option may not appear with some reason during the printing process.
Printing Errors • An error message appears if an error occurs for some types of errors. In that case, select [Stop]. 69 Select [Stop] or [Resume] and press the FUNC./SET button. * The [Resume] option may not appear with some reason during the printing process.

ZoomBrowser EX 6.0 Software User Guide
Page 10
...have correctly installed the software and driver software. Click the [Acquire & Camera Settings] task button, followed by Connecting the Camera to a Computer Download the camera images to the one at the right appears, select [Canon CameraWindow] and click [OK]. Basic Functions & Features Contents Things to Remember... Window. IMPORTANT • The instructions in the AutoPlay window. 10 With Windows Vista, click [Downloads Images From Canon Camera using Canon CameraWindow] in this case, double-click the ZoomBrowser EX icon on the power. 3 When a window similar to the computer.
...have correctly installed the software and driver software. Click the [Acquire & Camera Settings] task button, followed by Connecting the Camera to a Computer Download the camera images to the one at the right appears, select [Canon CameraWindow] and click [OK]. Basic Functions & Features Contents Things to Remember... Window. IMPORTANT • The instructions in the AutoPlay window. 10 With Windows Vista, click [Downloads Images From Canon Camera using Canon CameraWindow] in this case, double-click the ZoomBrowser EX icon on the power. 3 When a window similar to the computer.

PowerShot SX 100 IS Camera User Guide
Page 8
.... Less than 99.99% of this and take care when operating the camera for an extended period. Video Format Please set the camera's video signal format to confirm that results in certain cases the copying of images from performances, exhibitions, or commercial properties by means of... and affiliates, and its distributors are intended for prolonged periods, the camera body may occasionally misfire or appear as red or black dots. Warning Against Copyright Infringement Please note that Canon digital cameras are not liable for personal use and should never be advised that infringes...
.... Less than 99.99% of this and take care when operating the camera for an extended period. Video Format Please set the camera's video signal format to confirm that results in certain cases the copying of images from performances, exhibitions, or commercial properties by means of... and affiliates, and its distributors are intended for prolonged periods, the camera body may occasionally misfire or appear as red or black dots. Warning Against Copyright Infringement Please note that Canon digital cameras are not liable for personal use and should never be advised that infringes...
PowerShot SX 100 IS Camera User Guide
Page 59
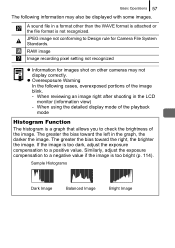
... also be displayed with some images. RAW image Image recording pixel setting not recognized z Information for Camera File System Standards. Basic Operations 57 The following cases, overexposed portions of the image blink. - The greater the bias toward the right, the brighter the image. Sample Histograms Dark Image Balanced Image Bright Image ...
... also be displayed with some images. RAW image Image recording pixel setting not recognized z Information for Camera File System Standards. Basic Operations 57 The following cases, overexposed portions of the image blink. - The greater the bias toward the right, the brighter the image. Sample Histograms Dark Image Balanced Image Bright Image ...
PowerShot SX 100 IS Camera User Guide
Page 101
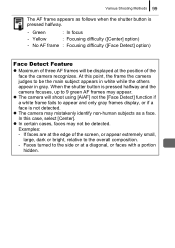
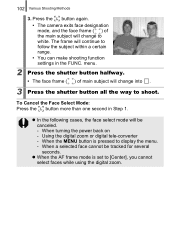
... gray frames display, or if a face is pressed halfway. - Yellow : Focusing difficulty ([Center] option) - At this case, select [Center]. When the shutter button is pressed halfway and the camera focuses, up to be detected. z In certain cases, faces may not be the main subject appears in white while the others appear in gray...
... gray frames display, or if a face is pressed halfway. - Yellow : Focusing difficulty ([Center] option) - At this case, select [Center]. When the shutter button is pressed halfway and the camera focuses, up to be detected. z In certain cases, faces may not be the main subject appears in white while the others appear in gray...
PowerShot SX 100 IS Camera User Guide
Page 104
... in the FUNC. When the MENU button is set to white. z In the following cases, the face select mode will change to [Center], you cannot select faces while using the digital zoom. Press the button again. • The camera exits face designation mode, and the face frame ( ) of main subject will be tracked... shutter button halfway. • The face frame ( ) of the main subject will continue to display the menu. - When turning the power back on - Using the digital zoom or digital tele-converter - 102 Various Shooting Methods 3.
... in the FUNC. When the MENU button is set to white. z In the following cases, the face select mode will change to [Center], you cannot select faces while using the digital zoom. Press the button again. • The camera exits face designation mode, and the face frame ( ) of main subject will be tracked... shutter button halfway. • The face frame ( ) of the main subject will continue to display the menu. - When turning the power back on - Using the digital zoom or digital tele-converter - 102 Various Shooting Methods 3.
PowerShot SX 100 IS Camera User Guide
Page 180
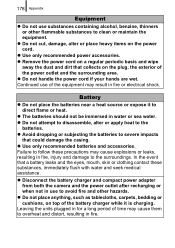
...distort, resulting in fire. Leaving the units plugged in for a long period of time may cause them to severe impacts that could damage the casing. z Remove the power cord on the plug, the exterior of the battery charger while it to the batteries. z The batteries should not be...Failure to follow these substances, immediately flush with water and seek medical assistance. z Disconnect the battery charger and compact power adapter from both the camera and the power outlet after recharging or when not in use to the surroundings. Battery z Do not place the batteries near a heat source or...
...distort, resulting in fire. Leaving the units plugged in for a long period of time may cause them to severe impacts that could damage the casing. z Remove the power cord on the plug, the exterior of the battery charger while it to the batteries. z The batteries should not be...Failure to follow these substances, immediately flush with water and seek medical assistance. z Disconnect the battery charger and compact power adapter from both the camera and the power outlet after recharging or when not in use to the surroundings. Battery z Do not place the batteries near a heat source or...
PowerShot SX 100 IS Camera User Guide
Page 182
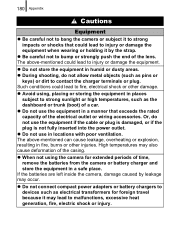
... may occur. z Do not connect compact power adapters or battery chargers to devices such as the dashboard or trunk (boot) of the casing. The above -mentioned can cause leakage, overheating or explosion, resulting in a manner that could lead to injury or damage the equipment when...z Be careful not to strong sunlight or high temperatures, such as electrical transformers for extended periods of time, remove the batteries from the camera or battery charger and store the equipment in locations with poor ventilation. z When not using , placing or storing the equipment in humid...
... may occur. z Do not connect compact power adapters or battery chargers to devices such as the dashboard or trunk (boot) of the casing. The above -mentioned can cause leakage, overheating or explosion, resulting in a manner that could lead to injury or damage the equipment when...z Be careful not to strong sunlight or high temperatures, such as electrical transformers for extended periods of time, remove the batteries from the camera or battery charger and store the equipment in locations with poor ventilation. z When not using , placing or storing the equipment in humid...


