

User Manual
Page 4
... Commission Notice 12 Canadian Radio Interference Regulations 12 Precautions on Handling the Batteries in the Remote Controller 13 Lamp Handling Precautions 13 Carrying/Transporting the Projector 14 Installation Precautions 14 Features of the Multimedia Projector SX7 MarkII/SX60 16 Supplied Manuals and Symbols Used in This Manual 17 Supplied Manuals...17 Before Use ...20...
... Commission Notice 12 Canadian Radio Interference Regulations 12 Precautions on Handling the Batteries in the Remote Controller 13 Lamp Handling Precautions 13 Carrying/Transporting the Projector 14 Installation Precautions 14 Features of the Multimedia Projector SX7 MarkII/SX60 16 Supplied Manuals and Symbols Used in This Manual 17 Supplied Manuals...17 Before Use ...20...

User Manual
Page 6
... Color Adjustment (2 107 Making Advanced Color Adjustment (3 107 Correcting the Image According to the Ambient Light (SX7 II 108 Reducing the Lamp Brightness 109 Resetting the Image Settings 110 Setting Various Function 111 Setting Auto Setup Function 111 Selecting the Power...a Password 117 Resetting to the Default Setting 117 Resetting the Lamp Counter 118 Maintenance...120 Cleaning the Projector 120 Cleaning and Replacing the Air Filter 121 Replacing the Lamp ...122 Troubleshooting 126 WARNING Lamp Flash Patterns 126 Symptoms and Solutions 127 Appendix ...132 Supported Computer...
... Color Adjustment (2 107 Making Advanced Color Adjustment (3 107 Correcting the Image According to the Ambient Light (SX7 II 108 Reducing the Lamp Brightness 109 Resetting the Image Settings 110 Setting Various Function 111 Setting Auto Setup Function 111 Selecting the Power...a Password 117 Resetting to the Default Setting 117 Resetting the Lamp Counter 118 Maintenance...120 Cleaning the Projector 120 Cleaning and Replacing the Air Filter 121 Replacing the Lamp ...122 Troubleshooting 126 WARNING Lamp Flash Patterns 126 Symptoms and Solutions 127 Appendix ...132 Supported Computer...

User Manual
Page 7
...SYMBOL INDICATES THAT THERE ARE IMPORTANT OPERATING AND MAINTENANCE INSTRUCTIONS FOR THIS UNIT IN THE OWNER'S MANUAL. If your projector is not operating correctly, read this booklet. If the problem still persists, contact the service center or the dealer where... you to operate the projector properly. THERE ARE NO USER-SERVICEABLE PARTS INSIDE EXCEPT LAMPS. This projector offers many convenient features and functions. Operating the projector properly enables you purchased the projector. REFER SERVICING TO QUALIFIED SERVICE PERSONNEL. CAUTION Not ...
...SYMBOL INDICATES THAT THERE ARE IMPORTANT OPERATING AND MAINTENANCE INSTRUCTIONS FOR THIS UNIT IN THE OWNER'S MANUAL. If your projector is not operating correctly, read this booklet. If the problem still persists, contact the service center or the dealer where... you to operate the projector properly. THERE ARE NO USER-SERVICEABLE PARTS INSIDE EXCEPT LAMPS. This projector offers many convenient features and functions. Operating the projector properly enables you purchased the projector. REFER SERVICING TO QUALIFIED SERVICE PERSONNEL. CAUTION Not ...

User Manual
Page 11
... for -one basis when you purchased it. NOTE FOR CUSTOMERS IN THE US LAMP(S) INSIDE THIS PRODUCT CONTAIN MERCURY AND MUST BE RECYCLED OR DISPOSED OF ACCORDING TO...laws implementing those Directives. SAFETY INSTRUCTIONS AC Power Cord Requirement The AC Power Cord supplied with this projector meets the requirements for use in the country you buy a new similar product or to an .../EC), the Battery Directive (2006/66/EC) and/or your household waste disposal service or visit www.canon-europe.com/environment. (EEA: Norway, Iceland and Liechtenstein) 11 Should you be disposed of waste could ...
... for -one basis when you purchased it. NOTE FOR CUSTOMERS IN THE US LAMP(S) INSIDE THIS PRODUCT CONTAIN MERCURY AND MUST BE RECYCLED OR DISPOSED OF ACCORDING TO...laws implementing those Directives. SAFETY INSTRUCTIONS AC Power Cord Requirement The AC Power Cord supplied with this projector meets the requirements for use in the country you buy a new similar product or to an .../EC), the Battery Directive (2006/66/EC) and/or your household waste disposal service or visit www.canon-europe.com/environment. (EEA: Norway, Iceland and Liechtenstein) 11 Should you be disposed of waste could ...
User Manual
Page 13
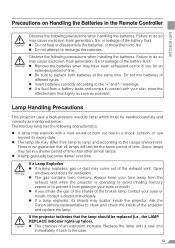
... at the same time. The mercury lamp has the following precautions when handling the batteries. Some lamps may come out of the battery fluid. Ask the Canon service representative to clean and check the inside the projector. Replace the lamp with your face away from a battery... explosion, heat generation, fire, or leakage of the exhaust vent. Open windows and doors for the same period of the projector and replace the lamp. z If a lamp explodes, its expiry date. Precautions on Handling the Batteries in your eyes or mouth, consult a doctor immediately. Failure to ...
... at the same time. The mercury lamp has the following precautions when handling the batteries. Some lamps may come out of the battery fluid. Ask the Canon service representative to clean and check the inside the projector. Replace the lamp with your face away from a battery... explosion, heat generation, fire, or leakage of the exhaust vent. Open windows and doors for the same period of the projector and replace the lamp. z If a lamp explodes, its expiry date. Precautions on Handling the Batteries in your eyes or mouth, consult a doctor immediately. Failure to ...

User Manual
Page 14
... Hot air is not designed to protect the projector from dust and scratches on the surface of the projector's mercury lamp according to local regulations just Caution like the fluorescent lamps. z Replace the adjustable foot before putting the projector in accident or injury. In particular, keep ... bag. Do not put any metallic object on the projector. When carrying the projector with the carrying bag. z The carrying bag is exhausted from these areas, or you carry the projector. SAFETY INSTRUCTIONS Disposal of Waste Lamp z Dispose of it , or place anything that may...
... Hot air is not designed to protect the projector from dust and scratches on the surface of the projector's mercury lamp according to local regulations just Caution like the fluorescent lamps. z Replace the adjustable foot before putting the projector in accident or injury. In particular, keep ... bag. Do not put any metallic object on the projector. When carrying the projector with the carrying bag. z The carrying bag is exhausted from these areas, or you carry the projector. SAFETY INSTRUCTIONS Disposal of Waste Lamp z Dispose of it , or place anything that may...

User Manual
Page 16
...photo image or an image that has been processed on watching a movie. * At the [Quiet] lamp mode. The MULTIMEDIA PROJECTOR SX7 MarkII/SX60 are high-performance projectors which creates a comfortable atmosphere where you can reproduce the atmosphere of a full-scale movie theater in ...project a 100-inch image when placed 3 m (9.8') to the big screen. Various Image Modes for purchasing a Canon projector. Adobe®RGB Color Space Compatibility (SX7 II) AdobeRGB color space compatibility achieves faithful color reproduction. "Home Cinema" Mode Reproducing the Atmosphere of a Movie...
...photo image or an image that has been processed on watching a movie. * At the [Quiet] lamp mode. The MULTIMEDIA PROJECTOR SX7 MarkII/SX60 are high-performance projectors which creates a comfortable atmosphere where you can reproduce the atmosphere of a full-scale movie theater in ...project a 100-inch image when placed 3 m (9.8') to the big screen. Various Image Modes for purchasing a Canon projector. Adobe®RGB Color Space Compatibility (SX7 II) AdobeRGB color space compatibility achieves faithful color reproduction. "Home Cinema" Mode Reproducing the Atmosphere of a Movie...

User Manual
Page 17
... and replacing the air filter and lamp replacement. * This guide shows an outline flowchart of the projector. It provides information about operation or restriction is shown as follows: (SX7 II) Function or description only applicable to use the projectors. Adjusting the Focus You can be...or a useful tip is provided here. 17 Symbols of your projector and ensure safety. A precaution about projector safety, cautions, quick start and stop the projector, as well as the functions available for the projector, SX7 MarkII/SX60. Indicates the button operation on the remote control. ...
... and replacing the air filter and lamp replacement. * This guide shows an outline flowchart of the projector. It provides information about operation or restriction is shown as follows: (SX7 II) Function or description only applicable to use the projectors. Adjusting the Focus You can be...or a useful tip is provided here. 17 Symbols of your projector and ensure safety. A precaution about projector safety, cautions, quick start and stop the projector, as well as the functions available for the projector, SX7 MarkII/SX60. Indicates the button operation on the remote control. ...

User Manual
Page 23
...RS-CL08 or RS-CL09) when appropriate. z Make sure to do so will result in malfuncCaution tions or fire hazards. z If you mount the projector on the ceiling. z You should never install the ceiling mounting bracket by selecting [Image flip H/V] from the menu (P97). 23 BEFORE USE Bottom ...Side Lens Cap Strap Insertion Hole Adjustable Foot (P43) Air Intake Vent Do not block the air intake. Lamp Cover (P123) Rear Adjustable Foot (for fine adjustment) Air Filter (P121) Screw Holes for installation of ceiling mounting bracket (M4 x 6) (P139) Mounting...
...RS-CL08 or RS-CL09) when appropriate. z Make sure to do so will result in malfuncCaution tions or fire hazards. z If you mount the projector on the ceiling. z You should never install the ceiling mounting bracket by selecting [Image flip H/V] from the menu (P97). 23 BEFORE USE Bottom ...Side Lens Cap Strap Insertion Hole Adjustable Foot (P43) Air Intake Vent Do not block the air intake. Lamp Cover (P123) Rear Adjustable Foot (for fine adjustment) Air Filter (P121) Screw Holes for installation of ceiling mounting bracket (M4 x 6) (P139) Mounting...

User Manual
Page 28
... (1) (2) (3) (1) POWER indicator (P40, 60, 111) Indicates the projector status. Flashing red: The projector is being turned off (the lamp is being turned on the projector. (3) LED illumination lamp (P115) Indicate the projector status with 3 blue LEDs. Blinking from the left: The projector is under the power management mode. (2) WARNING lamp (P126) Flashes red when a problem has been detected...
... (1) (2) (3) (1) POWER indicator (P40, 60, 111) Indicates the projector status. Flashing red: The projector is being turned off (the lamp is being turned on the projector. (3) LED illumination lamp (P115) Indicate the projector status with 3 blue LEDs. Blinking from the left: The projector is under the power management mode. (2) WARNING lamp (P126) Flashes red when a problem has been detected...

User Manual
Page 40
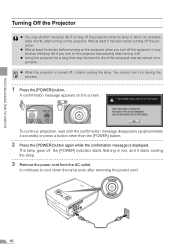
...lens cap and press the [POWER] button. The [POWER] indicator flashes green, and then lights in red. Wait until the lamp is Not in Use The projector constantly consumes approximately 7W power even when it cannot be turned on the power plug to start the projection. Fully insert the power... cord plug into the socket. Unplug the Power Cord When the Projector is cooled down and the [POWER] indicator lights in green. 40 z Once the projector is turned off, it is not used for a while. Otherwise, the operating computer may suffer electromagnetic...
...lens cap and press the [POWER] button. The [POWER] indicator flashes green, and then lights in red. Wait until the lamp is Not in Use The projector constantly consumes approximately 7W power even when it cannot be turned on the power plug to start the projection. Fully insert the power... cord plug into the socket. Unplug the Power Cord When the Projector is cooled down and the [POWER] indicator lights in green. 40 z Once the projector is turned off, it is not used for a while. Otherwise, the operating computer may suffer electromagnetic...

User Manual
Page 41
... be used by performing the focus adjustment if it is out of focus. (P46, 51) The LED illumination lamp blinks blue until the projection is turned on the projector by performing the auto setup or the focus adjustment if you cannot read the message due to enable or disable... the LED illumination lamp (P115). Selecting a Language A window appears when the projector is started. Select your language as shown below. z You can select a language to be selected. z Adjust the focus by the projector for displaying menus and so on the countdown screen (P100...
... be used by performing the focus adjustment if it is out of focus. (P46, 51) The LED illumination lamp blinks blue until the projection is turned on the projector by performing the auto setup or the focus adjustment if you cannot read the message due to enable or disable... the LED illumination lamp (P115). Selecting a Language A window appears when the projector is started. Select your language as shown below. z You can select a language to be selected. z Adjust the focus by the projector for displaying menus and so on the countdown screen (P100...
User Manual
Page 60
...A confirmation message appears on the projector. It continues to cool down the lamp even after removing the power cord. 60 PROJECTING AN IMAGE FROM THE COMPUTER Turning Off the Projector z You may shorten the lamp life if turning off the projector while its lamp is still in red, and it... starts cooling the lamp. You cannot turn off the projector. Wait at least 5 minutes before turning off the projector. To continue projection, wait ...
...A confirmation message appears on the projector. It continues to cool down the lamp even after removing the power cord. 60 PROJECTING AN IMAGE FROM THE COMPUTER Turning Off the Projector z You may shorten the lamp life if turning off the projector while its lamp is still in red, and it... starts cooling the lamp. You cannot turn off the projector. Wait at least 5 minutes before turning off the projector. To continue projection, wait ...

User Manual
Page 61
...the [POWER] indicator stops flashing in the carrying bag. z The projector becomes inoperative when the lamp is standby. Do not put the projector in red and stays on the top control or remote control is turned off the projector by disconnecting the power cord without pressing the [POWER] button. z .... z You can use ("Off & Go" function). Setting Up the Power Management Function You can carry the projector immediately after the use the power management function that turns off the lamp if the projector receives no signal input and is not operated for a while. In the standby mode, the...
...the [POWER] indicator stops flashing in the carrying bag. z The projector becomes inoperative when the lamp is standby. Do not put the projector in red and stays on the top control or remote control is turned off the projector by disconnecting the power cord without pressing the [POWER] button. z .... z You can use ("Off & Go" function). Setting Up the Power Management Function You can carry the projector immediately after the use the power management function that turns off the lamp if the projector receives no signal input and is not operated for a while. In the standby mode, the...

User Manual
Page 111
...auto setup function, respectively. Exit Enters the exit mode and turns off the lamp or projector automatically for saving power. z The [POWER] indicator flashes red and green when the projector is pressed. Auto keystone Auto input Auto screen color Enables/disables the auto ...Selecting the Power Management Mode [Power management mode] DIGITAL PC ANALOG PC DIGITAL VIDEO COMP./SCART VIDEO/S-VIDEO You can turn off the projector automatically. Off Disables the power management mode. T System settings T Auto setup T System settings T Power management mode SETTING UP FUNCTIONS...
...auto setup function, respectively. Exit Enters the exit mode and turns off the lamp or projector automatically for saving power. z The [POWER] indicator flashes red and green when the projector is pressed. Auto keystone Auto input Auto screen color Enables/disables the auto ...Selecting the Power Management Mode [Power management mode] DIGITAL PC ANALOG PC DIGITAL VIDEO COMP./SCART VIDEO/S-VIDEO You can turn off the projector automatically. Off Disables the power management mode. T System settings T Auto setup T System settings T Power management mode SETTING UP FUNCTIONS...

User Manual
Page 112
tion. z Wait at least 5 minutes before turning on the projector when you turn on func- On Enables the direct power on the projector immediately after turning it off the projector with the [MUTE] button. 112 It may shorten the lamp life if you turn off . Off Disables the beep. On Enables the ...beep. Enabling/Disabling the Beep [Beep] DIGITAL PC ANALOG PC DIGITAL VIDEO COMP./SCART VIDEO/S-VIDEO You can set the projector to confirm, and then press the [MENU] button....
tion. z Wait at least 5 minutes before turning on the projector when you turn on func- On Enables the direct power on the projector immediately after turning it off the projector with the [MUTE] button. 112 It may shorten the lamp life if you turn off . Off Disables the beep. On Enables the ...beep. Enabling/Disabling the Beep [Beep] DIGITAL PC ANALOG PC DIGITAL VIDEO COMP./SCART VIDEO/S-VIDEO You can set the projector to confirm, and then press the [MENU] button....
User Manual
Page 115
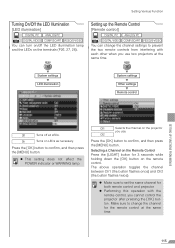
... illumination T System settings T Other settings T Remote control SETTING UP FUNCTIONS FROM MENUS Off Turns off the LED illumination lamp and the LEDs on the projector you cannot control the projector after pressing the [OK] button. Selecting a Channel on the Remote Control Press the [LIGHT] button for both remote...OK] button to change the channel settings to prevent the two remote controls from interfering with the remote control, you use two projectors at the same time. 115 Setting up the Remote Control [Remote control] DIGITAL PC ANALOG PC DIGITAL VIDEO COMP./SCART VIDEO/S-...
... illumination T System settings T Other settings T Remote control SETTING UP FUNCTIONS FROM MENUS Off Turns off the LED illumination lamp and the LEDs on the projector you cannot control the projector after pressing the [OK] button. Selecting a Channel on the Remote Control Press the [LIGHT] button for both remote...OK] button to change the channel settings to prevent the two remote controls from interfering with the remote control, you use two projectors at the same time. 115 Setting up the Remote Control [Remote control] DIGITAL PC ANALOG PC DIGITAL VIDEO COMP./SCART VIDEO/S-...
User Manual
Page 117
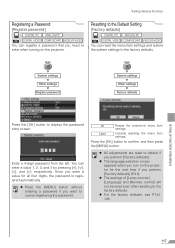
...T Other settings T Register password T System settings T Other settings T Factory defaults Press the [OK] button to enter when turning on the projector for all four digits, the password is registered automatically. z Press the [MENU] button without entering a password if you perform [Factory defaults] ...(P41). z The settings of [Lamp counter], [Language] and [Remote control] will not be reset even after resetting to cancel registering the password. < OK Resets the projector's menu item settings. Press the [OK] button to default if you ...
...T Other settings T Register password T System settings T Other settings T Factory defaults Press the [OK] button to enter when turning on the projector for all four digits, the password is registered automatically. z Press the [MENU] button without entering a password if you perform [Factory defaults] ...(P41). z The settings of [Lamp counter], [Language] and [Remote control] will not be reset even after resetting to cancel registering the password. < OK Resets the projector's menu item settings. Press the [OK] button to default if you ...

User Manual
Page 118
... the projector when you replace it. Cancels resetting the lamp counter. Resetting the Lamp Counter [Lamp counter] DIGITAL PC ANALOG PC DIGITAL VIDEO COMP./SCART VIDEO/S-VIDEO You can reset the lamp counter that indicates the timing to confirm, and then press the [MENU] button. Display Examples of Lamp Counter z If the time of use is: SX7...
... the projector when you replace it. Cancels resetting the lamp counter. Resetting the Lamp Counter [Lamp counter] DIGITAL PC ANALOG PC DIGITAL VIDEO COMP./SCART VIDEO/S-VIDEO You can reset the lamp counter that indicates the timing to confirm, and then press the [MENU] button. Display Examples of Lamp Counter z If the time of use is: SX7...

User Manual
Page 121
Otherwise, you replace the lamp. z Clean the air filter frequently. Filter cover Air filter Push MAINTENANCE z Attach the ...steps 1 to protect the internal lens and mirror from the AC outlet. Replacing the Air Filter 1 Turn off the projector, remove the power plug from your dealer. 121 z Handle the air filter carefully. If damaged, the air filter will... block the air flow into the projector through the air filter opening. Wait until the projector cools down , remove the cover by pushing the position of the main body to 5 in...
Otherwise, you replace the lamp. z Clean the air filter frequently. Filter cover Air filter Push MAINTENANCE z Attach the ...steps 1 to protect the internal lens and mirror from the AC outlet. Replacing the Air Filter 1 Turn off the projector, remove the power plug from your dealer. 121 z Handle the air filter carefully. If damaged, the air filter will... block the air flow into the projector through the air filter opening. Wait until the projector cools down , remove the cover by pushing the position of the main body to 5 in...


