

User Manual
Page 1
MULTIMEDIA PROJECTOR User's Manual Table of contents/Safety Instructions Before Use Setting Up the Projector Projecting an Image from the Computer Projecting an Image from AV Equipment Useful Functions Available During a Presentation Setting Up Functions from Menus Maintenance Troubleshooting Appendix Index ENG
MULTIMEDIA PROJECTOR User's Manual Table of contents/Safety Instructions Before Use Setting Up the Projector Projecting an Image from the Computer Projecting an Image from AV Equipment Useful Functions Available During a Presentation Setting Up Functions from Menus Maintenance Troubleshooting Appendix Index ENG

User Manual
Page 7
... correctly, read this booklet. THIS SYMBOL INDICATES THAT THERE ARE IMPORTANT OPERATING AND MAINTENANCE INSTRUCTIONS FOR THIS UNIT IN THE OWNER'S MANUAL. Operating the projector properly enables you purchased the projector. Improper operation may result in the Standard for use in a computer room...reducing the product-life, but also malfunctions, fire hazards, or other accidents. THERE ARE NO USER-SERVICEABLE PARTS INSIDE EXCEPT LAMPS. CAUTION Not for the Protection of this manual thoroughly in order to manage those features and maintain it in the "Troubleshooting" section at the...
... correctly, read this booklet. THIS SYMBOL INDICATES THAT THERE ARE IMPORTANT OPERATING AND MAINTENANCE INSTRUCTIONS FOR THIS UNIT IN THE OWNER'S MANUAL. Operating the projector properly enables you purchased the projector. Improper operation may result in the Standard for use in a computer room...reducing the product-life, but also malfunctions, fire hazards, or other accidents. THERE ARE NO USER-SERVICEABLE PARTS INSIDE EXCEPT LAMPS. CAUTION Not for the Protection of this manual thoroughly in order to manage those features and maintain it in the "Troubleshooting" section at the...

User Manual
Page 17
.... 1 Press the [FOCUS] button. Supplied Manuals and Symbols Used in This Manual Supplied Manuals User's Manual (This Document) This is a universal manual for projecting images. It provides information about operation... or restriction is given here. Indicates the button operation on the main unit. A precaution about projector safety, cautions, quick start and stop the projector, as well as the functions available for the projector, SX7...
.... 1 Press the [FOCUS] button. Supplied Manuals and Symbols Used in This Manual Supplied Manuals User's Manual (This Document) This is a universal manual for projecting images. It provides information about operation... or restriction is given here. Indicates the button operation on the main unit. A precaution about projector safety, cautions, quick start and stop the projector, as well as the functions available for the projector, SX7...
User Manual
Page 20
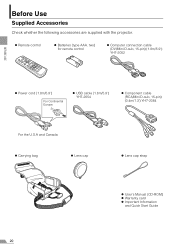
z Remote control z Batteries (type AAA, two) for remote control z Computer connection cable (DVI/Mini D-sub, 15-pin) (1.8m/5.9') YH7-2052 BEFORE USE z Power cord (1.8m/5.9') For Continental Europe z USB cable (1.8m/5.9') YH7-2054 z Component cable (RCA/Mini D-sub, 15-pin) (0.4m/1.3') YH7-2084 For the U.S.A and Canada z Carrying bag z Lens cap z Lens cap strap z User's Manual (CD-ROM) z Warranty card z Important Information and Quick Start Guide 20 Before Use Supplied Accessories Check whether the following accessories are supplied with the projector.
z Remote control z Batteries (type AAA, two) for remote control z Computer connection cable (DVI/Mini D-sub, 15-pin) (1.8m/5.9') YH7-2052 BEFORE USE z Power cord (1.8m/5.9') For Continental Europe z USB cable (1.8m/5.9') YH7-2054 z Component cable (RCA/Mini D-sub, 15-pin) (0.4m/1.3') YH7-2084 For the U.S.A and Canada z Carrying bag z Lens cap z Lens cap strap z User's Manual (CD-ROM) z Warranty card z Important Information and Quick Start Guide 20 Before Use Supplied Accessories Check whether the following accessories are supplied with the projector.
User Manual
Page 21
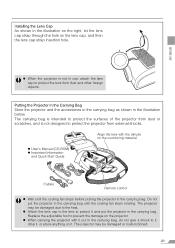
... the lens cap, and then the lens cap strap insertion hole. Replace the adjustable foot to protect the projector from dust and other foreign objects. z User's Manual (CD-ROM) z Important Information and Quick Start Guide Cables Remote control z Wait until the cooling fan stops rotating. Align the lens with it put the...
... the lens cap, and then the lens cap strap insertion hole. Replace the adjustable foot to protect the projector from dust and other foreign objects. z User's Manual (CD-ROM) z Important Information and Quick Start Guide Cables Remote control z Wait until the cooling fan stops rotating. Align the lens with it put the...

User Manual
Page 92
z Confirm the input signal type according to the User's Manual that came with the AV equipment connected. Auto 1080i 1035i 720p 575p Selects the component format automatically according to the User's Manual that came with the AV equipment connected. 92 Selecting an Input Signal Type (2) [...Input signal select] VIDEO/S-VIDEO You can select an input signal type manually if a video image from a AV equipment is ...
z Confirm the input signal type according to the User's Manual that came with the AV equipment connected. Auto 1080i 1035i 720p 575p Selects the component format automatically according to the User's Manual that came with the AV equipment connected. 92 Selecting an Input Signal Type (2) [...Input signal select] VIDEO/S-VIDEO You can select an input signal type manually if a video image from a AV equipment is ...

User Manual
Page 98
...DIGITAL VIDEO COMP./SCART VIDEO/S-VIDEO You can adjust the while balance so that of natural light on a standard screen. T Display settings T User screen settings T Logo capture < SETTING UP FUNCTIONS FROM MENUS Normal Greenboard Adjust Projects an image in an almost natural color tone on the...temporarily. Correcting the Screen Color [Screen color] DIGITAL PC ANALOG PC DIGITAL VIDEO COMP./SCART VIDEO/S-VIDEO You can project a desired image (logo) when you manually adjust it, press [ ] or [ ] button to select red, green, or blue. [>] Increases the color tone of each color. [ Adjusts ...
...DIGITAL VIDEO COMP./SCART VIDEO/S-VIDEO You can adjust the while balance so that of natural light on a standard screen. T Display settings T User screen settings T Logo capture < SETTING UP FUNCTIONS FROM MENUS Normal Greenboard Adjust Projects an image in an almost natural color tone on the...temporarily. Correcting the Screen Color [Screen color] DIGITAL PC ANALOG PC DIGITAL VIDEO COMP./SCART VIDEO/S-VIDEO You can project a desired image (logo) when you manually adjust it, press [ ] or [ ] button to select red, green, or blue. [>] Increases the color tone of each color. [ Adjusts ...

User Manual
Page 116
... password with the AV equipment for more detailed information on the projector. If the password is valid, projection starts. Press the [OK] button to the User's Manual that came with and [>]. Press the [OK] button to confirm, and then press the [MENU] button. < z Once you set a password to enter the password each...
... password with the AV equipment for more detailed information on the projector. If the password is valid, projection starts. Press the [OK] button to the User's Manual that came with and [>]. Press the [OK] button to confirm, and then press the [MENU] button. < z Once you set a password to enter the password each...

User Manual
Page 129
...132). If the dual screen mode has been selected, change it to perform this operation varies among computer manufacturers. The projector is forced to the User's Manual that came with a spare lamp if you have one (P13, 122, 123). Wait until the internal temperature gets down the [Fn] key ...monitor while holding down , and then turn on the notebook computer. For more detailed information, refer to be defective if it is connected to the User's Manual that displayed on the external monitor output, press the [LCD] or [VGA] function key or a key with dust. Check whether the air ...
...132). If the dual screen mode has been selected, change it to perform this operation varies among computer manufacturers. The projector is forced to the User's Manual that came with a spare lamp if you have one (P13, 122, 123). Wait until the internal temperature gets down the [Fn] key ...monitor while holding down , and then turn on the notebook computer. For more detailed information, refer to be defective if it is connected to the User's Manual that displayed on the external monitor output, press the [LCD] or [VGA] function key or a key with dust. Check whether the air ...


