
User Guide
Page 2
Table of Contents Table of Contents Introduction ...5 How to Use This Manual 6 Safety Precautions 8 Printer Parts and Their Functions 14 Front View 15 Rear View ...16 Inside the Printer 17 Operation Panel 18 Printer Driver Functions (Windows 19 Opening the Printer Properties Dialog Box 20 Printer Properties Dialog Box Description 22 BJ Status Monitor Functions 36 Cancelling a Print Job 39 Uninstalling Printer Drivers 40 Printer Driver Functions (Macintosh 41 Description of Print Settings 42 BJ Print Monitor 58 Cancelling a Print Job 60 2
Table of Contents Table of Contents Introduction ...5 How to Use This Manual 6 Safety Precautions 8 Printer Parts and Their Functions 14 Front View 15 Rear View ...16 Inside the Printer 17 Operation Panel 18 Printer Driver Functions (Windows 19 Opening the Printer Properties Dialog Box 20 Printer Properties Dialog Box Description 22 BJ Status Monitor Functions 36 Cancelling a Print Job 39 Uninstalling Printer Drivers 40 Printer Driver Functions (Macintosh 41 Description of Print Settings 42 BJ Print Monitor 58 Cancelling a Print Job 60 2

User Guide
Page 8
...Choosing a location Do not place the printer close to use the printer safely. Do not attempt to flammable solvents such as alcohol or thinners. s Power supply Never attempt to ensure that you ignore any way not described in this manual to plug in this manual. Never damage, modify, stretch or ...excessively bend or twist the power cord. Warning ® You may cause an electric shock/fire or damage the printer if you use the printer in any of these safety precautions. Do...
...Choosing a location Do not place the printer close to use the printer safely. Do not attempt to flammable solvents such as alcohol or thinners. s Power supply Never attempt to ensure that you ignore any way not described in this manual to plug in this manual. Never damage, modify, stretch or ...excessively bend or twist the power cord. Warning ® You may cause an electric shock/fire or damage the printer if you use the printer in any of these safety precautions. Do...

User Guide
Page 20
... [Properties] • Windows 2000 [Main] tab The Printing Preferences (or Printer Properties) dialog box opens. The operations may be opened by selecting Print from the File menu. 2 Ensure Canon i850 is generally used to print a document. The Print dialog box can be... your application, select the command to specify printer settings just before printing. For further details, see the user's manual for opening the Printer Properties dialog box. Printer Driver Functions (Windows) Opening the Printer Properties Dialog Box The Printer Properties dialog box can usually be opened from...
... [Properties] • Windows 2000 [Main] tab The Printing Preferences (or Printer Properties) dialog box opens. The operations may be opened by selecting Print from the File menu. 2 Ensure Canon i850 is generally used to print a document. The Print dialog box can be... your application, select the command to specify printer settings just before printing. For further details, see the user's manual for opening the Printer Properties dialog box. Printer Driver Functions (Windows) Opening the Printer Properties Dialog Box The Printer Properties dialog box can usually be opened from...

User Guide
Page 24
...Canon i850 - Click to check the layout before printing. (6) Print Advisor... To see a description of operating procedures, click the Help button. Guide. button. (4) Grayscale Printing Select to print a grayscale version of the printer driver. Note ® To see a description of any item in the Printer... start the Print Advisor. To make detailed color adjustments, select Manual, then click the Set... mark then click the desired item. By having the user answer a series of color adjustment. Printer Driver Functions (Windows) (3) Color Adjustment Select the method of ...
...Canon i850 - Click to check the layout before printing. (6) Print Advisor... To see a description of operating procedures, click the Help button. Guide. button. (4) Grayscale Printing Select to print a grayscale version of the printer driver. Note ® To see a description of any item in the Printer... start the Print Advisor. To make detailed color adjustments, select Manual, then click the Set... mark then click the desired item. By having the user answer a series of color adjustment. Printer Driver Functions (Windows) (3) Color Adjustment Select the method of ...

User Guide
Page 43
To enter the size manually, select Custom 1 - Custom 3 and click Custom. (2) Banner Printing Select this check box when printing on banner paper. (3) Borderless Printing The image is printed on the ... Borderless Printing are left on the four sides of the paper. Description of the print media, and resizing the printed image. Page Setup Dialog Box Printer Driver Functions (Macintosh) The Page Setup dialog box contains settings for the print job. To open the Page Setup dialog box, select Page Setup from...
To enter the size manually, select Custom 1 - Custom 3 and click Custom. (2) Banner Printing Select this check box when printing on banner paper. (3) Borderless Printing The image is printed on the ... Borderless Printing are left on the four sides of the paper. Description of the print media, and resizing the printed image. Page Setup Dialog Box Printer Driver Functions (Macintosh) The Page Setup dialog box contains settings for the print job. To open the Page Setup dialog box, select Page Setup from...

User Guide
Page 48
Allows you to print a grayscale version of Print Settings 48 Description of a color document. Printer Driver Functions (Macintosh) (4) Print Mode Select the option in the Detailed Setting Dialog Box. (6) Grayscale Printing Select to manually set the print quality and color settings in accordance with the document type and printing purpose. (5) Details...
Allows you to print a grayscale version of Print Settings 48 Description of a color document. Printer Driver Functions (Macintosh) (4) Print Mode Select the option in the Detailed Setting Dialog Box. (6) Grayscale Printing Select to manually set the print quality and color settings in accordance with the document type and printing purpose. (5) Details...
User Guide
Page 49
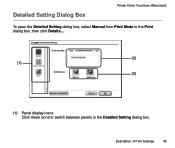
Description of Print Settings 49 Detailed Setting Dialog Box Printer Driver Functions (Macintosh) To open the Detailed Setting dialog box, select Manual from Print Mode in the Print dialog box, then click Details.... (2) (1) (3) (1) Panel display icons Click these icons to switch between panels in the Detailed Setting dialog box.
Description of Print Settings 49 Detailed Setting Dialog Box Printer Driver Functions (Macintosh) To open the Detailed Setting dialog box, select Manual from Print Mode in the Print dialog box, then click Details.... (2) (1) (3) (1) Panel display icons Click these icons to switch between panels in the Detailed Setting dialog box.

User Guide
Page 98
s Printer Driver Settings • Media Type: Glossy Photo Paper • Page Size: Ensure the setting matches the size set the left, right, top...leaving any margins. For instructions on setting margins, refer to set margins, set in the application. Glossy Photo Paper GP-301/GP-301N 98 Canon recommends that you print within the printing area. ¬ Printing Area Note ® For photograph and illustration data that you want to print ...it is printed. • Do not touch the printed surface until the ink is fixed (approx. If you to the user's manual for your application.
s Printer Driver Settings • Media Type: Glossy Photo Paper • Page Size: Ensure the setting matches the size set the left, right, top...leaving any margins. For instructions on setting margins, refer to set margins, set in the application. Glossy Photo Paper GP-301/GP-301N 98 Canon recommends that you print within the printing area. ¬ Printing Area Note ® For photograph and illustration data that you want to print ...it is printed. • Do not touch the printed surface until the ink is fixed (approx. If you to the user's manual for your application.

User Guide
Page 112
s Printer Driver Settings • Media Type: Matte Photo Paper • Page Size: Ensure the setting matches the size set the left, right, top, and bottom margins ... Printing, create the data by using an application that it is printed. • Do not touch the printed surface until the ink is fixed. Canon recommends that you print within the printing area. ¬ Printing Area Note ® For photograph and illustration data that you want to the user...
s Printer Driver Settings • Media Type: Matte Photo Paper • Page Size: Ensure the setting matches the size set the left, right, top, and bottom margins ... Printing, create the data by using an application that it is printed. • Do not touch the printed surface until the ink is fixed. Canon recommends that you print within the printing area. ¬ Printing Area Note ® For photograph and illustration data that you want to the user...

User Guide
Page 130
Windows 1 Open the Printer Properties dialog box. 2 On the Main tab, click High for the Print Quality setting. Print Quality is Poor or Contains Errors 130 s In the printer driver settings, select a higher print quality setting. Troubleshooting Macintosh 1 Open the Print dialog box. 2 For Print Mode, select Manual and then click Details. 3 Click the Quality icon and then drag the Print Quality slide bar to the Fine end.
Windows 1 Open the Printer Properties dialog box. 2 On the Main tab, click High for the Print Quality setting. Print Quality is Poor or Contains Errors 130 s In the printer driver settings, select a higher print quality setting. Troubleshooting Macintosh 1 Open the Print dialog box. 2 For Print Mode, select Manual and then click Details. 3 Click the Quality icon and then drag the Print Quality slide bar to the Fine end.

User Guide
Page 131
Printed Paper Curls or Ink Blots Troubleshooting s Use high resolution paper or photo paper to adjust the intensity. pictures with intense colors or photographs). s Reduce the Intensity setting in the printer driver and try printing again. Windows 1 Open the Printer Properties dialog box. 2 On the Main tab, select Manual for Color Adjustment, and then click Set. 3 Drag the Intensity slide bar to print images that require a lot of ink, (i.e. Print Quality is Poor or Contains Errors 131
Printed Paper Curls or Ink Blots Troubleshooting s Use high resolution paper or photo paper to adjust the intensity. pictures with intense colors or photographs). s Reduce the Intensity setting in the printer driver and try printing again. Windows 1 Open the Printer Properties dialog box. 2 On the Main tab, select Manual for Color Adjustment, and then click Set. 3 Drag the Intensity slide bar to print images that require a lot of ink, (i.e. Print Quality is Poor or Contains Errors 131

User Guide
Page 136
... box. 2 For Print Mode, select Manual and then click Details. 3 Click the Color icon and drag the Intensity slide bar to adjust the intensity. Troubleshooting s Reduce the Intensity setting in the printer driver and try printing again. Windows 1 Open the Printer Properties dialog box. 2 On the Main... tab, select Manual for Color Adjustment, and then click Set. 3 Drag the Intensity slide bar to ...
... box. 2 For Print Mode, select Manual and then click Details. 3 Click the Color icon and drag the Intensity slide bar to adjust the intensity. Troubleshooting s Reduce the Intensity setting in the printer driver and try printing again. Windows 1 Open the Printer Properties dialog box. 2 On the Main... tab, select Manual for Color Adjustment, and then click Set. 3 Drag the Intensity slide bar to ...
User Guide
Page 138
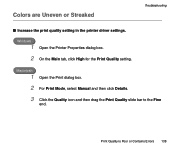
Colors are Uneven or Streaked Troubleshooting s Increase the print quality setting in the printer driver settings. Macintosh 1 Open the Print dialog box. 2 For Print Mode, select Manual and then click Details. 3 Click the Quality icon and then drag the Print Quality slide bar to the Fine end. Print Quality is Poor or Contains Errors 138 Windows 1 Open the Printer Properties dialog box. 2 On the Main tab, click High for the Print Quality setting.
Colors are Uneven or Streaked Troubleshooting s Increase the print quality setting in the printer driver settings. Macintosh 1 Open the Print dialog box. 2 For Print Mode, select Manual and then click Details. 3 Click the Quality icon and then drag the Print Quality slide bar to the Fine end. Print Quality is Poor or Contains Errors 138 Windows 1 Open the Printer Properties dialog box. 2 On the Main tab, click High for the Print Quality setting.

User Guide
Page 139
s Set the halftoning method to Diffusion in the printer driver settings. Macintosh 1 Open the Print dialog box. 2 For Print Mode, select Manual and then click Details. 3 Click the Quality icon and then click Diffusion for the Halftoning setting. Print Quality is Poor or Contains Errors 139 Troubleshooting Windows 1 Open the Printer Properties dialog box. 2 On the Main tab, select Custom for the Print Quality setting, and click Set. 3 Click Diffusion for the Halftoning setting.
s Set the halftoning method to Diffusion in the printer driver settings. Macintosh 1 Open the Print dialog box. 2 For Print Mode, select Manual and then click Details. 3 Click the Quality icon and then click Diffusion for the Halftoning setting. Print Quality is Poor or Contains Errors 139 Troubleshooting Windows 1 Open the Printer Properties dialog box. 2 On the Main tab, select Custom for the Print Quality setting, and click Set. 3 Click Diffusion for the Halftoning setting.

User Guide
Page 156
... Settings and then select Print directly to the Windows NT 4.0 manual for information on the Screen 156 An Error Message is enabled, disable it to send the print data directly to the printer and try printing again. 1 Open the Printer Properties dialog box from the Start menu. ¬ Opening the... Printer Properties dialog box directly from the Start menu 2 Click the Advanced tab or Scheduling tab...
... Settings and then select Print directly to the Windows NT 4.0 manual for information on the Screen 156 An Error Message is enabled, disable it to send the print data directly to the printer and try printing again. 1 Open the Printer Properties dialog box from the Start menu. ¬ Opening the... Printer Properties dialog box directly from the Start menu 2 Click the Advanced tab or Scheduling tab...

User Guide
Page 157
...;icting device list. If you are any device conflicts. For details on how to delete a device, refer to the instruction manual for any conflicting devices. An error is generated if there are using the USB interface (in Windows XP/Windows Me/Windows 2000... then double-click Printer Port (LPT1)*. * The printer port name depends on your system environment. 4 On the Hardware tab, check for that device. • When using Windows Me or Windows 98, click Device Manager on the Device Manager tab, double-click Universal serial bus controllers, and then double-click Canon i850.
...;icting device list. If you are any device conflicts. For details on how to delete a device, refer to the instruction manual for any conflicting devices. An error is generated if there are using the USB interface (in Windows XP/Windows Me/Windows 2000... then double-click Printer Port (LPT1)*. * The printer port name depends on your system environment. 4 On the Hardware tab, check for that device. • When using Windows Me or Windows 98, click Device Manager on the Device Manager tab, double-click Universal serial bus controllers, and then double-click Canon i850.

User Guide
Page 172
... has been installed. • The printer port of the computer supports the ECP mode. • The parallel port is set to ECP mode in the BIOS settings. ® Refer to the Quick Start Guide for faster printing. Refer to your computer manual for details on some computers. Note ...® The ECP mode may not speed up printing on printer port specifications and BIOS settings. 2 Open the Printer Properties dialog box from the Start menu. ¬ Opening the Printer Properties dialog box directly from the Start...
... has been installed. • The printer port of the computer supports the ECP mode. • The parallel port is set to ECP mode in the BIOS settings. ® Refer to the Quick Start Guide for faster printing. Refer to your computer manual for details on some computers. Note ...® The ECP mode may not speed up printing on printer port specifications and BIOS settings. 2 Open the Printer Properties dialog box from the Start menu. ¬ Opening the Printer Properties dialog box directly from the Start...

