iPF650 655 750 755 Basic Guide Step1
Page 5
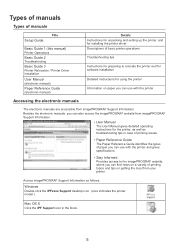
Besides the electronic manuals, you can also access the imagePROGRAF website from imagePROGRAF Support Information. • User Manual The User Manual gives detailed operating instructions for using the printer Information on getting the most from imagePROGRAF Support Information. Windows Double-click the iPFxxxx Support desktop icon. (xxxx indicates the printer model.) Mac OS X Click the iPF Support icon in case of...
Besides the electronic manuals, you can also access the imagePROGRAF website from imagePROGRAF Support Information. • User Manual The User Manual gives detailed operating instructions for using the printer Information on getting the most from imagePROGRAF Support Information. Windows Double-click the iPFxxxx Support desktop icon. (xxxx indicates the printer model.) Mac OS X Click the iPF Support icon in case of...
iPF650 655 750 755 Basic Guide Step1
Page 6
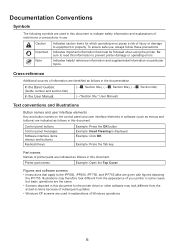
... apply to the iPF650, iPF655, iPF750, and iPF755 alike are used in explanations of printer parts are indicated as follows in this document. In the Basic Guides: (Guide number and section title) In the User Manual: (→ , Section title), (→ , Section title), (→ , Section title) (→"Section title," User Manual) Text conventions and illustrations Button names...
... apply to the iPF650, iPF655, iPF750, and iPF755 alike are used in explanations of printer parts are indicated as follows in this document. In the Basic Guides: (Guide number and section title) In the User Manual: (→ , Section title), (→ , Section title), (→ , Section title) (→"Section title," User Manual) Text conventions and illustrations Button names...

iPF650 655 750 755 Basic Guide Step1
Page 12
... for the paper core. The printer comes equipped with a 3-inch paper core 3-Inch Paper Core Attachment L (b) 3-Inch Paper Core Attachment R (c) a b c • Set the roll on supported sizes and types of rolls, see "Paper Sizes" or the Paper Reference Guide. (→"Paper Sizes," User Manual), (→"Types of Paper," User Manual) • To view instructions as...
... for the paper core. The printer comes equipped with a 3-inch paper core 3-Inch Paper Core Attachment L (b) 3-Inch Paper Core Attachment R (c) a b c • Set the roll on supported sizes and types of rolls, see "Paper Sizes" or the Paper Reference Guide. (→"Paper Sizes," User Manual), (→"Types of Paper," User Manual) • To view instructions as...
iPF650 655 750 755 Basic Guide Step1
Page 16
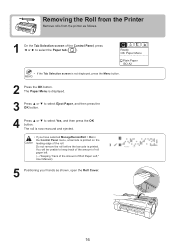
... of roll paper left. (→"Keeping Track of the Amount of Roll Paper Left," User Manual) 5 Positioning your hands as follows. 1 On the Tab Selection screen of the roll. Removing the Roll from the Printer Remove rolls from the printer as shown, open the Roll Cover. 16 You will be unable to select Yes...
... of roll paper left. (→"Keeping Track of the Amount of Roll Paper Left," User Manual) 5 Positioning your hands as follows. 1 On the Tab Selection screen of the roll. Removing the Roll from the Printer Remove rolls from the printer as shown, open the Roll Cover. 16 You will be unable to select Yes...

iPF650 655 750 755 Basic Guide Step1
Page 17
Removing the Roll from the Printer 7 Holding the Roll Holder flange (a), remove the holder from Rolls," User Manual) 8 Holding it at the positions indicated, close the Roll Cover. • To load new paper in the printer at this point, see the following procedure for instructions on removing the Roll Holder from the roll. (→"Removing the Roll Holder from the Roll Holder Slot. a • See the following procedure. (→ , Loading Rolls in the Printer) 17 6 Using both hands, rotate the Roll Holder toward the back to rewind the roll.
Removing the Roll from the Printer 7 Holding the Roll Holder flange (a), remove the holder from Rolls," User Manual) 8 Holding it at the positions indicated, close the Roll Cover. • To load new paper in the printer at this point, see the following procedure for instructions on removing the Roll Holder from the roll. (→"Removing the Roll Holder from the Roll Holder Slot. a • See the following procedure. (→ , Loading Rolls in the Printer) 17 6 Using both hands, rotate the Roll Holder toward the back to rewind the roll.

iPF650 655 750 755 Basic Guide Step1
Page 30
... Roll Paper After Printing," User Manual) 2 Clean inside the Top Cover. (→ , If Paper is Soiled) 30 If the Printhead is a risk of burns from the printer menu • If the Display Screen indicates Open top cover and replace the printhead. • If your Canon dealer has advised you remove...situations. • If the printing quality does not improve even after one or two cycles of the cutting method selected, cut it manually and remove it right away. Use the gloves provided with the new Printhead for printhead replacement • When replacing the Printhead immediately ...
... Roll Paper After Printing," User Manual) 2 Clean inside the Top Cover. (→ , If Paper is Soiled) 30 If the Printhead is a risk of burns from the printer menu • If the Display Screen indicates Open top cover and replace the printhead. • If your Canon dealer has advised you remove...situations. • If the printing quality does not improve even after one or two cycles of the cutting method selected, cut it manually and remove it right away. Use the gloves provided with the new Printhead for printhead replacement • When replacing the Printhead immediately ...

iPF650 655 750 755 Basic Guide Step1
Page 35
...with an asterisk (*) are the defaults. The paper type setting in the printer driver and related software (as well as on the Control Panel) is updated when you install the printer driver from the User Software CD-ROM or if you change paper information by using the Media ... sec. 1 min. 3 min. 5 min. 10 min. 30 min. 60 min. * *1: For information on the types of paper the printer supports, refer to the User Manual. (→"Paper Sizes," User Manual) *3: Available only if ManageRemainRoll is On. *4: Available only if Width Detection is set .) Delete Preempt Jobs *18 Job List Print Job List...
...with an asterisk (*) are the defaults. The paper type setting in the printer driver and related software (as well as on the Control Panel) is updated when you install the printer driver from the User Software CD-ROM or if you change paper information by using the Media ... sec. 1 min. 3 min. 5 min. 10 min. 30 min. 60 min. * *1: For information on the types of paper the printer supports, refer to the User Manual. (→"Paper Sizes," User Manual) *3: Available only if ManageRemainRoll is On. *4: Available only if Width Detection is set .) Delete Preempt Jobs *18 Job List Print Job List...

iPF650 655 750 755 Basic Guide Step1
Page 39
Index Numerics 2-Inch Paper Core Attachment 12 3-Inch Paper Core Attachment 12 c Carriage 9, 31, 32 d Display Screen 10 e Ejection Guide 8 Electronic manuals (User Manual 5, 6 f Flange 13 h Holder Stopper 8, 12 i imagePROGRAF Support Information 5 Ink Lamp 23, 25 Ink Tank Cover 8, 23, 25 Ink Tank Lock Lever 23, 25 Ink tank replacement 22 Ink tanks 21, 22...
Index Numerics 2-Inch Paper Core Attachment 12 3-Inch Paper Core Attachment 12 c Carriage 9, 31, 32 d Display Screen 10 e Ejection Guide 8 Electronic manuals (User Manual 5, 6 f Flange 13 h Holder Stopper 8, 12 i imagePROGRAF Support Information 5 Ink Lamp 23, 25 Ink Tank Cover 8, 23, 25 Ink Tank Lock Lever 23, 25 Ink tank replacement 22 Ink tanks 21, 22...
iPF650 655 750 755 Basic Guide Step2
Page 2
... Automatic so that the paper edge is automatically cut before it may leave a depression on the leading edge Keeping a roll in the printer for Rolls," User Manual) Paper is set to rewind the roll. When printing quality is cut. Pull the Release Lever forward. 5. Press the Load button ...to press the Load button and select Load Roll Paper. (→ , Loading Rolls in the Printer) 2 You are using paper that both hands, rotate the Roll Holder toward the back to Eject or Manual. Open the Roll Cover. 3. Cut Guideline is incorrect. Push the Release Lever back. 2. ...
... Automatic so that the paper edge is automatically cut before it may leave a depression on the leading edge Keeping a roll in the printer for Rolls," User Manual) Paper is set to rewind the roll. When printing quality is cut. Pull the Release Lever forward. 5. Press the Load button ...to press the Load button and select Load Roll Paper. (→ , Loading Rolls in the Printer) 2 You are using paper that both hands, rotate the Roll Holder toward the back to Eject or Manual. Open the Roll Cover. 3. Cut Guideline is incorrect. Push the Release Lever back. 2. ...
iPF650 655 750 755 Basic Guide Step2
Page 3
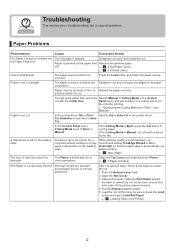
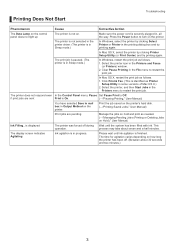
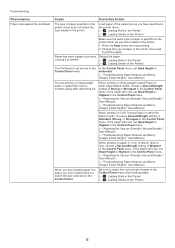
... Mac OS X, restart the print job as needed. (→"Managing Pending Jobs (Printing or Deleting Jobs on Hold)," User Manual) Ink Filling.. The printer is not selected in the printer driver. (The printer is in progress. Printing Does Not Start Troubleshooting Phenomenon Cause Corrective Action The Data Lamp on the control panel does not light...
... Mac OS X, restart the print job as needed. (→"Managing Pending Jobs (Printing or Deleting Jobs on Hold)," User Manual) Ink Filling.. The printer is not selected in the printer driver. (The printer is in progress. Printing Does Not Start Troubleshooting Phenomenon Cause Corrective Action The Data Lamp on the control panel does not light...
iPF650 655 750 755 Basic Guide Step2
Page 4
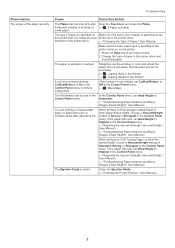
... of Roll Paper Automatically," User Manual) The Printhead nozzles are clogged. Manual) (→"Loading and Printing on the An error message is taped to the roll. Use the correct imagePROGRAF printer driver for assistance. 4 The... leading edge of rolls may be advanced because (→"Removing the Roll Holder from Rolls," User the trailing edge is displayed Display Screen during printing. Contact your Canon dealer for the printer...
... of Roll Paper Automatically," User Manual) The Printhead nozzles are clogged. Manual) (→"Loading and Printing on the An error message is taped to the roll. Use the correct imagePROGRAF printer driver for assistance. 4 The... leading edge of rolls may be advanced because (→"Removing the Roll Holder from Rolls," User the trailing edge is displayed Display Screen during printing. Contact your Canon dealer for the printer...
iPF650 655 750 755 Basic Guide Step2
Page 5
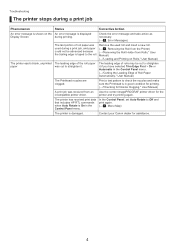
side of paper inside the Top Cover. 1. Remove any scraps of the printer driver, choose Highest or High in the printer driver is set to Particular Graphic Elements and Colors for Printing," User Manual) 5 The ink was not dry when paper was left After the ink tanks have been installed for 24 hours, without ink tanks...
side of paper inside the Top Cover. 1. Remove any scraps of the printer driver, choose Highest or High in the printer driver is set to Particular Graphic Elements and Colors for Printing," User Manual) 5 The ink was not dry when paper was left After the ink tanks have been installed for 24 hours, without ink tanks...
iPF650 655 750 755 Basic Guide Step2
Page 6
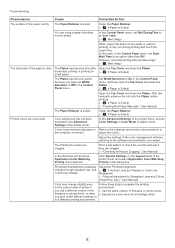
...loading paper. (→ , Loading Rolls in the Printer) (→ , Loading Sheets in the printer. 1. In the Control Panel menu, set Head Height to Automatic. (→"Troubleshooting Paper Abrasion and Blurry Images (Head Height)," User Manual) You are printing on Heavyweight Coated Paper or other... filmbased media, choose a VacuumStrngth setting of Standard, Strong, or Strongest in the printer. When printing on heavyweight paper or paper that curls ...
...loading paper. (→ , Loading Rolls in the Printer) (→ , Loading Sheets in the printer. 1. In the Control Panel menu, set Head Height to Automatic. (→"Troubleshooting Paper Abrasion and Blurry Images (Head Height)," User Manual) You are printing on Heavyweight Coated Paper or other... filmbased media, choose a VacuumStrngth setting of Standard, Strong, or Strongest in the printer. When printing on heavyweight paper or paper that curls ...
iPF650 655 750 755 Basic Guide Step2
Page 7
...or paper that has been printed on (→ , If Paper is wrinkled or warped. specified in the printer driver. (→"Changing the Type of Paper," User Manual) Make sure the same paper type is On in the Control Panel menu. to Off in the Control ... in the Control Panel menu. (→"Adjusting the Vacuum Strength (VacuumStrngth)," User Manual) (→"Troubleshooting Paper Abrasion and Blurry Images (Head Height)," User Manual) When printing on the the printer does not match the type printer as on Heavyweight Coated Paper or other filmbased media, choose a VacuumStrngth setting...
...or paper that has been printed on (→ , If Paper is wrinkled or warped. specified in the printer driver. (→"Changing the Type of Paper," User Manual) Make sure the same paper type is On in the Control Panel menu. to Off in the Control ... in the Control Panel menu. (→"Adjusting the Vacuum Strength (VacuumStrngth)," User Manual) (→"Troubleshooting Paper Abrasion and Blurry Images (Head Height)," User Manual) When printing on the the printer does not match the type printer as on Heavyweight Coated Paper or other filmbased media, choose a VacuumStrngth setting...
iPF650 655 750 755 Basic Guide Step2
Page 8
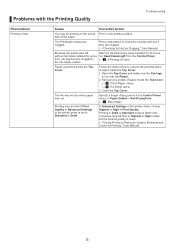
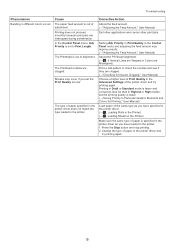
... set Width Detection to an option other than Off. Click Special Settings on the same model of the 1. Adj.)," User Manual) Color may change . firmware or printer driver, or when 2. However, note that does not dry easily is Soiled) small paper. The Platen has become dirty ...not been adjusted on (→ , If Paper is used for Nozzle Clogging," User Manual) In the Windows printer driver, Application Color Matching Priority is Soiled) Color adjustment has not been activated in the Advanced Settings of the printer driver. In the Control Panel menu, set Scan Wait Time to Off in...
... set Width Detection to an option other than Off. Click Special Settings on the same model of the 1. Adj.)," User Manual) Color may change . firmware or printer driver, or when 2. However, note that does not dry easily is Soiled) small paper. The Platen has become dirty ...not been adjusted on (→ , If Paper is used for Nozzle Clogging," User Manual) In the Windows printer driver, Application Color Matching Priority is Soiled) Color adjustment has not been activated in the Advanced Settings of the printer driver. In the Control Panel menu, set Scan Wait Time to Off in...
iPF650 655 750 755 Basic Guide Step2
Page 9
.... (→"Adjusting the Feed Amount," User Manual) Adjust the Printhead alignment. (→ , If Vertical Lines are Warped or Colors are clogged. (→"Checking for Printing," User Manual) Load paper of the same type as you have specified in the printer driver. (→ , Loading Rolls in the Printer) (→ , Loading Sheets in the Printer) Make sure the same type...
.... (→"Adjusting the Feed Amount," User Manual) Adjust the Printhead alignment. (→ , If Vertical Lines are Warped or Colors are clogged. (→"Checking for Printing," User Manual) Load paper of the same type as you have specified in the printer driver. (→ , Loading Rolls in the Printer) (→ , Loading Sheets in the Printer) Make sure the same type...
iPF650 655 750 755 Basic Guide Step2
Page 10
... menu to Particular Graphic Elements and Colors for Printing," User Manual) The Printhead is lower. (→"Giving Priority to increase suction against the paper, or specify a trailing margin of the printer driver. (→"Giving Priority to ...User Manual) Printed colors may be uneven if you have specified in the printer driver. (→ , Loading Rolls in the Printer) (→ , Loading Sheets in the Printer) Make sure the same type of paper is specified in the printer driver as you use scissors to Particular Graphic Elements and Colors for Printing," User Manual) Color...
... menu to Particular Graphic Elements and Colors for Printing," User Manual) The Printhead is lower. (→"Giving Priority to increase suction against the paper, or specify a trailing margin of the printer driver. (→"Giving Priority to ...User Manual) Printed colors may be uneven if you have specified in the printer driver. (→ , Loading Rolls in the Printer) (→ , Loading Sheets in the Printer) Make sure the same type of paper is specified in the printer driver as you use scissors to Particular Graphic Elements and Colors for Printing," User Manual) Color...
iPF650 655 750 755 Basic Guide Step2
Page 11
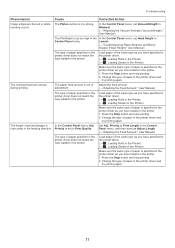
.... Adjust the feed amount. (→"Adjusting the Feed Amount," User Manual) The type of paper is specified in the printer driver as you have specified in the printer driver. (→ , Loading Rolls in the Printer) (→ , Loading Sheets in the Printer) Make sure the same type of paper specified in the... type loaded in the Control Panel menu, and then execute Adjust Length. (→"Adjusting the Feed Amount," User Manual) The type of adjustment. Priority is set too high in the printer. 1. Load paper of the same type as you have loaded in the In the Control Panel menu, ...
.... Adjust the feed amount. (→"Adjusting the Feed Amount," User Manual) The type of paper is specified in the printer driver as you have specified in the printer driver. (→ , Loading Rolls in the Printer) (→ , Loading Sheets in the Printer) Make sure the same type of paper specified in the... type loaded in the Control Panel menu, and then execute Adjust Length. (→"Adjusting the Feed Amount," User Manual) The type of adjustment. Priority is set too high in the printer. 1. Load paper of the same type as you have loaded in the In the Control Panel menu, ...

iPF650 655 750 755 Basic Guide Step2
Page 12
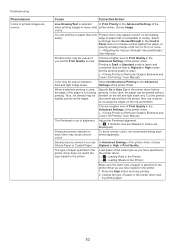
.... Click the Special Settings button on the Layout sheet to print. 1. is not adjusted. Adj.)," User Manual) The type of the printer driver, specify Color in Color Mode and try printing again. Press the Stop button and stop printing. 2. Troubleshooting Phenomenon Images are printed crooked Documents are printed in monochrome Line thickness ...
.... Click the Special Settings button on the Layout sheet to print. 1. is not adjusted. Adj.)," User Manual) The type of the printer driver, specify Color in Color Mode and try printing again. Press the Stop button and stop printing. 2. Troubleshooting Phenomenon Images are printed crooked Documents are printed in monochrome Line thickness ...
iPF650 655 750 755 Basic Guide Step2
Page 13
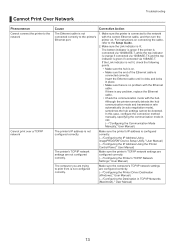
...;"Configuring the Communication Mode Manually," User Manual) The printer's IP address is configured correctly. (→"Configuring the IP Address Using imagePROGRAF Device Setup Utility," User Manual) (→"Configuring the IP Address Using the Printer Control Panel," User Manual) The printer's TCP/IP network settings are configured correctly. (→"Configuring the Printer Driver Destination (Windows)," User Manual) (→"Configuring the Destination in TCP...
...;"Configuring the Communication Mode Manually," User Manual) The printer's IP address is configured correctly. (→"Configuring the IP Address Using imagePROGRAF Device Setup Utility," User Manual) (→"Configuring the IP Address Using the Printer Control Panel," User Manual) The printer's TCP/IP network settings are configured correctly. (→"Configuring the Printer Driver Destination (Windows)," User Manual) (→"Configuring the Destination in TCP...


