
iPF810 User Manual
Page 10
... Printhead...586 Checking for Better Print Quality 553 Adjusting the Printhead 553 Adjusting the Printhead...553 Automatic Straightening of Lines and Colors (Auto Head Adj 554 Manual Straightening of Lines and Colors (Manual Head Adj 556 Adjusting Line Misalignment (Head Inc. Contents Adjustments for Nozzle...603 When to Replace the Maintenance Cartridge 604 Cleaning the Printer 605 Cleaning the Printer Exterior...605 Cleaning Inside the Top Cover 606 Cleaning the Printhead...609 Other Maintenance 610 Preparing to Transfer the Printer 610 Updating the Firmware...615 viii Contents
... Printhead...586 Checking for Better Print Quality 553 Adjusting the Printhead 553 Adjusting the Printhead...553 Automatic Straightening of Lines and Colors (Auto Head Adj 554 Manual Straightening of Lines and Colors (Manual Head Adj 556 Adjusting Line Misalignment (Head Inc. Contents Adjustments for Nozzle...603 When to Replace the Maintenance Cartridge 604 Cleaning the Printer 605 Cleaning the Printer Exterior...605 Cleaning Inside the Top Cover 606 Cleaning the Printhead...609 Other Maintenance 610 Preparing to Transfer the Printer 610 Updating the Firmware...615 viii Contents

iPF810 User Manual
Page 40
... label indicates the Ink Tank color. k. ▲ Button Ofine: Press this button to display the previous menu item or setting value. Information Button Displays printer submenus. Load/Eject Button By pressing this button to rewind rolls manually. (→P.151) Menu mode: Press this ..., and instructions for at least a second to clean the Printhead ( Head Cleaning A ). p. i. OK Button In Menu mode, press this button for three seconds to cancel print jobs in the direction of ejection, as the printer status and messages. Note • In Sleep mode, you press this...
... label indicates the Ink Tank color. k. ▲ Button Ofine: Press this button to display the previous menu item or setting value. Information Button Displays printer submenus. Load/Eject Button By pressing this button to rewind rolls manually. (→P.151) Menu mode: Press this ..., and instructions for at least a second to clean the Printhead ( Head Cleaning A ). p. i. OK Button In Menu mode, press this button for three seconds to cancel print jobs in the direction of ejection, as the printer status and messages. Note • In Sleep mode, you press this...

iPF810 User Manual
Page 42
...paper. Stop Button Hold down this button if the Display Screen indicates to cancel print jobs in the direction of ejection, as the printer status and messages. Color Label This label indicates the Ink Tank color. l. ▼ Button Ofine mode: Press this button to feed the... button except the Power button to clean the Printhead ( Head Cleaning A ). o. p. Instructions for loading paper are shown if paper is not accessing the hard disk. Feeder Selection Button Switches the paper source. Display Screen Shows the printer menu, as well as needed. (→P.151) Menu ...
...paper. Stop Button Hold down this button if the Display Screen indicates to cancel print jobs in the direction of ejection, as the printer status and messages. Color Label This label indicates the Ink Tank color. l. ▼ Button Ofine mode: Press this button to feed the... button except the Power button to clean the Printhead ( Head Cleaning A ). o. p. Instructions for loading paper are shown if paper is not accessing the hard disk. Feeder Selection Button Switches the paper source. Display Screen Shows the printer menu, as well as needed. (→P.151) Menu ...

iPF810 User Manual
Page 51
...submenu, the printer will revert to manage print jobs is received or if you select a menu, the printer switches to Menu mode. If you do not operate the printer. Ofine, printing Menus available during printing or a screen to the previous mode in about ten seconds if no print job is...button other than the Information button to display the submenus. Printer Status When Menu is solved. Note • You can start Head Cleaning A by holding down the Information button for three seconds or more. (→P.588) Printer Parts 37 Ofine, when an error message is ...
...submenu, the printer will revert to manage print jobs is received or if you select a menu, the printer switches to Menu mode. If you do not operate the printer. Ofine, printing Menus available during printing or a screen to the previous mode in about ten seconds if no print job is...button other than the Information button to display the submenus. Printer Status When Menu is solved. Note • You can start Head Cleaning A by holding down the Information button for three seconds or more. (→P.588) Printer Parts 37 Ofine, when an error message is ...
iPF810 User Manual
Page 59
Standard * Loose Off VacuumStrngth Automatic * Strongest Strong Standard Weak Weakest Width Off Detection On * NearEnd RollMrgn 3mm 20mm Cut Speed Fast Fifth Level Sixth Level Printer Parts 45 Feed Priority Automatic * Band Joint Print Length Adjust Length From -0.70% to A 0.70% Adjust Length From -0.70% to B 0.70% Head Height Automatic * Highest High Standard Low Lowest Skew Check Lv. Scan Wait Time Off 1 sec. 3 sec. 5 sec. 7 sec. 9 sec. Control Panel First Level Second Level Third Level Fourth Level 60 min.
Standard * Loose Off VacuumStrngth Automatic * Strongest Strong Standard Weak Weakest Width Off Detection On * NearEnd RollMrgn 3mm 20mm Cut Speed Fast Fifth Level Sixth Level Printer Parts 45 Feed Priority Automatic * Band Joint Print Length Adjust Length From -0.70% to A 0.70% Adjust Length From -0.70% to B 0.70% Head Height Automatic * Highest High Standard Low Lowest Skew Check Lv. Scan Wait Time Off 1 sec. 3 sec. 5 sec. 7 sec. 9 sec. Control Panel First Level Second Level Third Level Fourth Level 60 min.
iPF810 User Manual
Page 62
No Yes Advanced Adj. Standard Adj. No Yes Manual Band No Adj Fifth Level Sixth Level 48 Printer Parts Standard Adj. Control Panel First Level Adjust Printer Second Level Third Level 2 dots Fourth Level 3 dots 4 dots * 5 dots 6 dots 7 dots ThickenFine Lines Off * On AdjustFaint Off Lines On * Auto Rotate Off On * Nesting Use Nesting Off * On Nesting WaitTime 1-99 minutes Cut Lines Off * On On-the-Fly Off * On Auto Head Adj. No Yes Advanced Adj. No Yes Auto Print Off On * Manual Head No Adj (*10) Yes Auto Band Adj.
No Yes Advanced Adj. Standard Adj. No Yes Manual Band No Adj Fifth Level Sixth Level 48 Printer Parts Standard Adj. Control Panel First Level Adjust Printer Second Level Third Level 2 dots Fourth Level 3 dots 4 dots * 5 dots 6 dots 7 dots ThickenFine Lines Off * On AdjustFaint Off Lines On * Auto Rotate Off On * Nesting Use Nesting Off * On Nesting WaitTime 1-99 minutes Cut Lines Off * On On-the-Fly Off * On Auto Head Adj. No Yes Advanced Adj. No Yes Auto Print Off On * Manual Head No Adj (*10) Yes Auto Band Adj.

iPF810 User Manual
Page 64
... No * IEEE1394 Return Defaults No * Yes Repl. S. Control Panel First Level Maintenance System Setup Second Level Third Level Fourth Level Ethernet 802.3 Ethernet SNAP Print Service BinderyPServer (*6) RPrinter NDSPServer * NPrinter AppleTalk On Off * Ethernet Driver Auto Detect On * Off Comm.Mode (*7) Half Duplex * Full Duplex Ethernet Type ...10 Base-T * (*7) 100 Base-TX Spanning Tree Not Use * Use MAC Address 000085XXXXXX Ext. No Cleaner Yes Move Printer Level 1 * Level 2 Level 3 Warning Buzzer Off On * Fifth Level Sixth Level 50...
... No * IEEE1394 Return Defaults No * Yes Repl. S. Control Panel First Level Maintenance System Setup Second Level Third Level Fourth Level Ethernet 802.3 Ethernet SNAP Print Service BinderyPServer (*6) RPrinter NDSPServer * NPrinter AppleTalk On Off * Ethernet Driver Auto Detect On * Off Comm.Mode (*7) Half Duplex * Full Duplex Ethernet Type ...10 Base-T * (*7) 100 Base-TX Spanning Tree Not Use * Use MAC Address 000085XXXXXX Ext. No Cleaner Yes Move Printer Level 1 * Level 2 Level 3 Warning Buzzer Off On * Fifth Level Sixth Level 50...

iPF810 User Manual
Page 68
... only if ManageRemainRoll is On. *3: Available if Feed Priority is Automatic or Print Length. *4: Not displayed if IP Mode is Manual. *5: For information on the Control Panel ) is updated when you install the printer driver from the User Software CD-ROM or if you change paper information by...the following menus are displayed during printing. • Menu Durng Prtng Choose this menu to display Head Cleaning, Fine Band Adj., and Information. • Job Mgmt Menu Choose this menu to the Paper Reference Guide. (→P.125) The paper type setting in the printer driver and related software (as...
... only if ManageRemainRoll is On. *3: Available if Feed Priority is Automatic or Print Length. *4: Not displayed if IP Mode is Manual. *5: For information on the Control Panel ) is updated when you install the printer driver from the User Software CD-ROM or if you change paper information by...the following menus are displayed during printing. • Menu Durng Prtng Choose this menu to display Head Cleaning, Fine Band Adj., and Information. • Job Mgmt Menu Choose this menu to the Paper Reference Guide. (→P.125) The paper type setting in the printer driver and related software (as...
iPF810 User Manual
Page 70
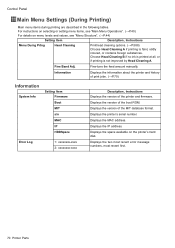
For instructions on menu operations, see "Main Menu Settings (During Printing)". (→P.70) First Level Second Level Third Level Fourth Level Fifth Level Sixth Level Seventh Level Menu Durng Head Head Prtng Cleaning * Cleaning A * Head Cleaning B Fine Band Adj. From -5 to 5 Information System Info Error Log 1:xxxxxxxx xxxx 2:xxxxxxxx xxxx 56 Printer Parts Control Panel Main menu during printing The structure of the main menu during printing, see "Main Menu Operations". (→P.40) For details on menu items available during printing is as follows.
For instructions on menu operations, see "Main Menu Settings (During Printing)". (→P.70) First Level Second Level Third Level Fourth Level Fifth Level Sixth Level Seventh Level Menu Durng Head Head Prtng Cleaning * Cleaning A * Head Cleaning B Fine Band Adj. From -5 to 5 Information System Info Error Log 1:xxxxxxxx xxxx 2:xxxxxxxx xxxx 56 Printer Parts Control Panel Main menu during printing The structure of the main menu during printing, see "Main Menu Operations". (→P.40) For details on menu items available during printing is as follows.
iPF810 User Manual
Page 71
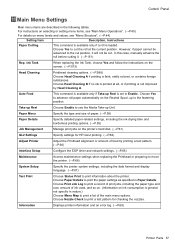
.... Information Displays printer information and an error log. (→P.69) Printer Parts 57 Choose Yes to print a list of ink used, and so on. (Information on the screen. (→P.573) Head Cleaning Printhead cleaning options. (→P.588) Choose Head Cleaning A if printing is loaded....Structure". (→P.44) Setting Item Description, Instructions Paper Cutting This command is available only if a roll is faint, oddly colored, or contains foreign substances. However, if paper cannot be cut. Control Panel Main Menu Settings Main menu items are described ...
.... Information Displays printer information and an error log. (→P.69) Printer Parts 57 Choose Yes to print a list of ink used, and so on. (Information on the screen. (→P.573) Head Cleaning Printhead cleaning options. (→P.588) Choose Head Cleaning A if printing is loaded....Structure". (→P.44) Setting Item Description, Instructions Paper Cutting This command is available only if a roll is faint, oddly colored, or contains foreign substances. However, if paper cannot be cut. Control Panel Main Menu Settings Main menu items are described ...
iPF810 User Manual
Page 73
...is loaded askew, note that if you prefer to become soiled. It may occur. If you print on Japanese paper (washi) or other cases when specifying a particular starting position for printing. Printer Parts 59 Normally, select Automatic. If you use adhesive paper, choosing Slow helps prevent adhesive from... width and skew are not detected if you specify a wait time. The printed surface may adhere to the amount of stretching or shrinkage of the current paper. Adjustment relative to the leading edge. Head Height Adjust the Printhead height. (→P.561) Skew Check Lv. Cutting Mode...
...is loaded askew, note that if you prefer to become soiled. It may occur. If you print on Japanese paper (washi) or other cases when specifying a particular starting position for printing. Printer Parts 59 Normally, select Automatic. If you use adhesive paper, choosing Slow helps prevent adhesive from... width and skew are not detected if you specify a wait time. The printed surface may adhere to the amount of stretching or shrinkage of the current paper. Adjustment relative to the leading edge. Head Height Adjust the Printhead height. (→P.561) Skew Check Lv. Cutting Mode...
iPF810 User Manual
Page 78
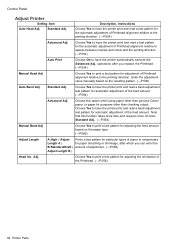
... relative to have the printer print and read a band adjustment test pattern for automatic adjustment of Printhead alignment relative to spaces between nozzles and colors and the printing direction. (→P.554) Auto Print Choose On to print a test pattern for ...printer print and read a band adjustment test pattern for automatic adjustment of Printhead alignment relative to have the printer automatically execute the Advanced Adj. Standard Adj. Control Panel Adjust Printer Setting Item Auto Head Adj. Note that this option when using paper other than genuine Canon...
... relative to have the printer print and read a band adjustment test pattern for automatic adjustment of Printhead alignment relative to spaces between nozzles and colors and the printing direction. (→P.554) Auto Print Choose On to print a test pattern for ...printer print and read a band adjustment test pattern for automatic adjustment of Printhead alignment relative to have the printer automatically execute the Advanced Adj. Standard Adj. Control Panel Adjust Printer Setting Item Auto Head Adj. Note that this option when using paper other than genuine Canon...
iPF810 User Manual
Page 84
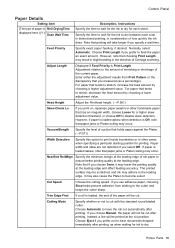
... Main Menu Settings (During Printing) Main menu items during printing are described in the following tables. For instructions on selecting or setting menu items, see "Main Menu Operations". (→P.40) For details on the printer's hard disk. Choose Head Cleaning B if no ink is printed at all, or if printing is faint, oddly colored, or contains foreign...
... Main Menu Settings (During Printing) Main menu items during printing are described in the following tables. For instructions on selecting or setting menu items, see "Main Menu Operations". (→P.40) For details on the printer's hard disk. Choose Head Cleaning B if no ink is printed at all, or if printing is faint, oddly colored, or contains foreign...

iPF810 User Manual
Page 88
Current printer settings. Control Panel GL2 Settings Color Mode Print Quality Print (Economy) Input Resolution Paper Source Conserve Paper Line Cap Smoothing Line Width ThickenFineLines AdjustFaintLines Auto Rotate Nesting Use Nesting Nesting WaitTime Cut Lines On-The-Fly Adjust Printer Auto Head Adj. The past ve error codes. 74 Printer Parts Auto Print Information Error Log 01 - 05 HP-GL/2 setting values. Printhead adjustment value.
Current printer settings. Control Panel GL2 Settings Color Mode Print Quality Print (Economy) Input Resolution Paper Source Conserve Paper Line Cap Smoothing Line Width ThickenFineLines AdjustFaintLines Auto Rotate Nesting Use Nesting Nesting WaitTime Cut Lines On-The-Fly Adjust Printer Auto Head Adj. The past ve error codes. 74 Printer Parts Auto Print Information Error Log 01 - 05 HP-GL/2 setting values. Printhead adjustment value.

iPF810 User Manual
Page 430
... to start the imagePROGRAF Status Monitor, which offers the following settings are available on the utilities, refer to hot folders. Printer Driver Utility Sheet (Windows) The following maintenance for the printer. • Nozzle (ink ejecting outlet) check • Nozzle (ink ejecting outlet) cleaning • Head alignment adjustment • Feed amount adjustment B Color imageRUNNER Enlargement Copy...
... to start the imagePROGRAF Status Monitor, which offers the following settings are available on the utilities, refer to hot folders. Printer Driver Utility Sheet (Windows) The following maintenance for the printer. • Nozzle (ink ejecting outlet) check • Nozzle (ink ejecting outlet) cleaning • Head alignment adjustment • Feed amount adjustment B Color imageRUNNER Enlargement Copy...
iPF810 User Manual
Page 461
...; Nozzle (ink ejecting outlet) cleaning • Head alignment adjustment • Feed amount adjustment Click to start imagePROGRAF Printmonitor, which enables you to complete the settings for Color imageRUNNER Enlargement Copy (iR enlargement copy). *1: For details, see Color imageRUNNER Enlargement Copy . C Set Click to view the status of print jobs. Printer Driver Setting Item A Set B View Description...
...; Nozzle (ink ejecting outlet) cleaning • Head alignment adjustment • Feed amount adjustment Click to start imagePROGRAF Printmonitor, which enables you to complete the settings for Color imageRUNNER Enlargement Copy (iR enlargement copy). *1: For details, see Color imageRUNNER Enlargement Copy . C Set Click to view the status of print jobs. Printer Driver Setting Item A Set B View Description...

iPF810 User Manual
Page 567
... For instructions, see "Manual Straightening of Lines and Colors (Manual Head Adj)". (→P.556) • Printed lines are blurred Executing Head Height to adjust the printhead position. or Manual Head Adj to adjust the printhead height may improve printing results. For adjustment instructions, Automatic Straightening of Lines and Colors (Auto Head Adj.) (→P.554) or see "Checking for...
... For instructions, see "Manual Straightening of Lines and Colors (Manual Head Adj)". (→P.556) • Printed lines are blurred Executing Head Height to adjust the printhead position. or Manual Head Adj to adjust the printhead height may improve printing results. For adjustment instructions, Automatic Straightening of Lines and Colors (Auto Head Adj.) (→P.554) or see "Checking for...
iPF810 User Manual
Page 568
... paper. • Attaching the Roll Holder to have the printer print and read a test pattern for adjustment. • This function is not possible as possible. • Use Advanced Adj. For instructions on the printer. Auto Head Adj. to ne-tune the space between colors to appear as attractive as expected using highly transparent ...
... paper. • Attaching the Roll Holder to have the printer print and read a test pattern for adjustment. • This function is not possible as possible. • Use Advanced Adj. For instructions on the printer. Auto Head Adj. to ne-tune the space between colors to appear as attractive as expected using highly transparent ...
iPF810 User Manual
Page 569
...or ▼ to select Auto Head Adj., and then press the ► button. 5. If you whether to select Standard Adj. A test pattern is displayed asking you are printing on a roll or a sheet of A2 size or larger. 7. Adjustment is now nished if you have printed on sheets smaller than A2 ...to select Yes, and then press the OK button. Press ▲ or ▼ to display MAIN MENU. Press the Menu button to select Adjust Printer, and then press the ► button. 4. Press ▲ or ▼ to continue printing. or Advanced Adj., and then press the ► button. 6.
...or ▼ to select Auto Head Adj., and then press the ► button. 5. If you whether to select Standard Adj. A test pattern is displayed asking you are printing on a roll or a sheet of A2 size or larger. 7. Adjustment is now nished if you have printed on sheets smaller than A2 ...to select Yes, and then press the OK button. Press ▲ or ▼ to display MAIN MENU. Press the Menu button to select Adjust Printer, and then press the ► button. 4. Press ▲ or ▼ to continue printing. or Advanced Adj., and then press the ► button. 6.
iPF810 User Manual
Page 599
...Ink Tank replacement is disabled. In this point. You can continue to print, but prepare to replace the Ink Tank. (→P.584) Before print jobs and maintenance that consume a lot of ink. If a message for large-format printing, head cleaning, and maintenance, which require a lot of ink If little ink ...is left , the Message lamp is lit and Ink Level: Check is shown on the Display Screen, and printing is shown on the Display Screen. Ink Tanks When...
...Ink Tank replacement is disabled. In this point. You can continue to print, but prepare to replace the Ink Tank. (→P.584) Before print jobs and maintenance that consume a lot of ink. If a message for large-format printing, head cleaning, and maintenance, which require a lot of ink If little ink ...is left , the Message lamp is lit and Ink Level: Check is shown on the Display Screen, and printing is shown on the Display Screen. Ink Tanks When...


