
User Guide
Page 1
Be sure to read the Safety Precautions contained in a safe place for future reference. Be sure to ensure proper operation of two manuals: Palm-size PC User's Guide and this product. E Keep this manual in this manual to read this manual first. E-100/E-105 Getting Started with the CASSIOPEIA (Hardware Manual) User documentation consists of this booklet.
Be sure to read the Safety Precautions contained in a safe place for future reference. Be sure to ensure proper operation of two manuals: Palm-size PC User's Guide and this product. E Keep this manual in this manual to read this manual first. E-100/E-105 Getting Started with the CASSIOPEIA (Hardware Manual) User documentation consists of this booklet.
User Guide
Page 3
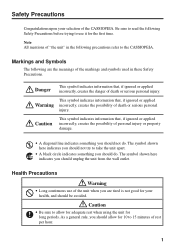
Safety Precautions Congratulations upon your health, and should be avoided. Note All mentions of the CASSIOPEIA. Be sure to read the following Safety Precautions before trying to take the unit apart. • A black circle indicates something you ...should unplug the unit from the wall outlet. Markings and Symbols The following precautions refer to the CASSIOPEIA. This symbol indicates information that, if ignored or applied Warning incorrectly, creates the possibility of the markings and symbols used in the following are ...
Safety Precautions Congratulations upon your health, and should be avoided. Note All mentions of the CASSIOPEIA. Be sure to read the following Safety Precautions before trying to take the unit apart. • A black circle indicates something you ...should unplug the unit from the wall outlet. Markings and Symbols The following precautions refer to the CASSIOPEIA. This symbol indicates information that, if ignored or applied Warning incorrectly, creates the possibility of the markings and symbols used in the following are ...
User Guide
Page 8
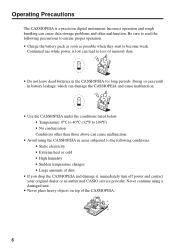
Incorrect operation and rough handling can cause malfunction. • Avoid using a damaged unit. • Never place heavy objects on top of the CASSIOPEIA. 6 Be sure to read the following conditions. • Static electricity • Extreme heat or cold • High humidity • ... damage it, immediately turn off power and contact your original dealer or an authorized CASIO service provider. Never continue using the CASSIOPEIA in the CASSIOPEIA for long periods. Operating Precautions The CASSIOPEIA is low can lead to loss of memory data. • Do not leave dead batteries ...
Incorrect operation and rough handling can cause malfunction. • Avoid using a damaged unit. • Never place heavy objects on top of the CASSIOPEIA. 6 Be sure to read the following conditions. • Static electricity • Extreme heat or cold • High humidity • ... damage it, immediately turn off power and contact your original dealer or an authorized CASIO service provider. Never continue using the CASSIOPEIA in the CASSIOPEIA for long periods. Operating Precautions The CASSIOPEIA is low can lead to loss of memory data. • Do not leave dead batteries ...
User Guide
Page 9
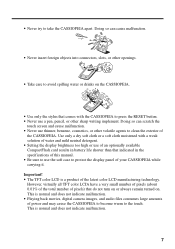
... malfunction. • Playing back movies, digital camera images, and audio files consumes large amounts of power and may cause the CASSIOPEIA to become warm to clean the exterior of the CASSIOPEIA. Doing so can scratch the touch screen and cause malfunction. • Never use the soft case to take the...have a very small number of pixels (about 0.01% of the total number of pixels) that do not turn on or always remain turned on the CASSIOPEIA. • Use only the stylus that comes with a weak solution of water and mild neutral detergent. • Setting the display brightness too high or...
... malfunction. • Playing back movies, digital camera images, and audio files consumes large amounts of power and may cause the CASSIOPEIA to become warm to clean the exterior of the CASSIOPEIA. Doing so can scratch the touch screen and cause malfunction. • Never use the soft case to take the...have a very small number of pixels (about 0.01% of the total number of pixels) that do not turn on or always remain turned on the CASSIOPEIA. • Use only the stylus that comes with a weak solution of water and mild neutral detergent. • Setting the display brightness too high or...
User Guide
Page 10
...Adapter ...5 Operating Precautions 6 Terms and Symbols used in this manual 9 Getting Ready 10 Initial Setup ...10 Where to go for information 11 Operations ...12 General Guide ...12 Using the Stylus ...14 Recalibrating the Touch Screen 14 Adjusting Display Contrast 15 Adjusting Display Brightness 15 ...Adjusting Auto Dimming Settings 15 Using the Cradle 16 To remove the CASSIOPEIA from the cradle 17 Connecting the Cradle to a Computer 18 Required System Configuration 19 Using the AC Adapter 20 Infrared ...
...Adapter ...5 Operating Precautions 6 Terms and Symbols used in this manual 9 Getting Ready 10 Initial Setup ...10 Where to go for information 11 Operations ...12 General Guide ...12 Using the Stylus ...14 Recalibrating the Touch Screen 14 Adjusting Display Contrast 15 Adjusting Display Brightness 15 ...Adjusting Auto Dimming Settings 15 Using the Cradle 16 To remove the CASSIOPEIA from the cradle 17 Connecting the Cradle to a Computer 18 Required System Configuration 19 Using the AC Adapter 20 Infrared ...

User Guide
Page 11
Be sure to the CASSIOPEIA. • The symbol "Important " indicates important information about a procedure that can result in this manual • The term "unit" in problems if not performed correctly. ...
Be sure to the CASSIOPEIA. • The symbol "Important " indicates important information about a procedure that can result in this manual • The term "unit" in problems if not performed correctly. ...
User Guide
Page 12
... the versatile features and functions of batteries are finished using it for about five seconds, and then press the [Power] button. 5. Your CASSIOPEIA will not operate correctly if you load the backup battery before doing anything else. Load the backup battery. 4. Use the AC Adapter to... appear first, followed shortly by a touch screen calibration screen. 6. on the display, perform a full reset (page 32). 10 appears on page 11 of this manual for information..." See the separate Palm-size PC User's Guide for more information. • The desktop appears after you are facing...
... the versatile features and functions of batteries are finished using it for about five seconds, and then press the [Power] button. 5. Your CASSIOPEIA will not operate correctly if you load the backup battery before doing anything else. Load the backup battery. 4. Use the AC Adapter to... appear first, followed shortly by a touch screen calibration screen. 6. on the display, perform a full reset (page 32). 10 appears on page 11 of this manual for information..." See the separate Palm-size PC User's Guide for more information. • The desktop appears after you are facing...
User Guide
Page 13
...powerful software features and functions available on the CASSIOPEIA Applications CD-ROM that you can I run into problems? See page 16 of this Hardware Manual and in the U.S. s CASIO Programs See the Palm-size User's Guide for information... and Canada only. 11 Read the Palm-size PC User's Guide...contained on page 34 of the CD-ROM. What should I do if I install the software on the CASSIOPEIA. Check the troubleshooting guides on the CD-ROM. Your CASSIOPEIA comes with the E-105? See the separate Palm-size PC User's Guide for use in the Palm-size PC User's Guide....
...powerful software features and functions available on the CASSIOPEIA Applications CD-ROM that you can I run into problems? See page 16 of this Hardware Manual and in the U.S. s CASIO Programs See the Palm-size User's Guide for information... and Canada only. 11 Read the Palm-size PC User's Guide...contained on page 34 of the CD-ROM. What should I do if I install the software on the CASSIOPEIA. Check the troubleshooting guides on the CD-ROM. Your CASSIOPEIA comes with the E-105? See the separate Palm-size PC User's Guide for use in the Palm-size PC User's Guide....

User Guide
Page 16
...Tap the touch screen twice in the stylus holder when you are performed using it. • Take care to avoid breaking the tip of the CASSIOPEIA. Tap Tap on -screen button, to select a menu item, or to perform other similar operations. Some applications require double-tapping to another location.... various operations that you expected when tapping on the screen. 14 Tapping is used to press an on the touch screen lightly with the CASSIOPEIA, or some other stylus type instrument* to perform touch screen operations. Important • Take care that you do not misplace or otherwise ...
...Tap the touch screen twice in the stylus holder when you are performed using it. • Take care to avoid breaking the tip of the CASSIOPEIA. Tap Tap on -screen button, to select a menu item, or to perform other similar operations. Some applications require double-tapping to another location.... various operations that you expected when tapping on the screen. 14 Tapping is used to press an on the touch screen lightly with the CASSIOPEIA, or some other stylus type instrument* to perform touch screen operations. Important • Take care that you do not misplace or otherwise ...
User Guide
Page 18
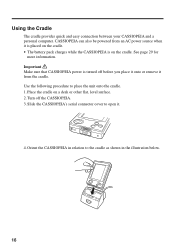
... is on a desk or other flat, level surface. 2. Orient the CASSIOPEIA in the illustration below. 16 CASSIOPEIA can also be powered from an AC power source when it from the cradle. See page 29 for more information. Turn off before you place ...it onto or remove it is placed on the cradle. • The battery pack charges while the CASSIOPEIA is turned off the CASSIOPEIA. 3. Place the cradle on the cradle. Slide the CASSIOPEIA's serial connector cover to the cradle as shown in relation to open it. 4. Use the following procedure to place...
... is on a desk or other flat, level surface. 2. Orient the CASSIOPEIA in the illustration below. 16 CASSIOPEIA can also be powered from an AC power source when it from the cradle. See page 29 for more information. Turn off before you place ...it onto or remove it is placed on the cradle. • The battery pack charges while the CASSIOPEIA is turned off the CASSIOPEIA. 3. Place the cradle on the cradle. Slide the CASSIOPEIA's serial connector cover to the cradle as shown in relation to open it. 4. Use the following procedure to place...
User Guide
Page 19
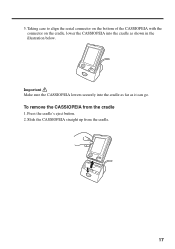
To remove the CASSIOPEIA from the cradle. 17 Important Make sure the CASSIOPEIA lowers securely into the cradle as it can go. Slide the CASSIOPEIA straight up from the cradle 1. 5. Press the cradle's eject button. 2. Taking care to align the serial connector on the bottom of the CASSIOPEIA with the connector on the cradle, lower the CASSIOPEIA into the cradle as far as shown in the illustration below.
To remove the CASSIOPEIA from the cradle. 17 Important Make sure the CASSIOPEIA lowers securely into the cradle as it can go. Slide the CASSIOPEIA straight up from the cradle 1. 5. Press the cradle's eject button. 2. Taking care to align the serial connector on the bottom of the CASSIOPEIA with the connector on the cradle, lower the CASSIOPEIA into the cradle as far as shown in the illustration below.

User Guide
Page 20
... for details about setting up and using an adapter. • Note that comes with the cradle. • Be sure to turn off the CASSIOPEIA and your computer to enable data transfers. See the documentation that after connecting the cradle to your computer, you want to computer. See the Palm...-size PC User's Guide for connection to make certain Windows CE Services settings on the type of possible connection configurations. Connect the end of the cable to a serial port of serial connectors vary from ...
... for details about setting up and using an adapter. • Note that comes with the cradle. • Be sure to turn off the CASSIOPEIA and your computer to enable data transfers. See the documentation that after connecting the cradle to your computer, you want to computer. See the Palm...-size PC User's Guide for connection to make certain Windows CE Services settings on the type of possible connection configurations. Connect the end of the cable to a serial port of serial connectors vary from ...
User Guide
Page 21
...Different minimum system requirements are required when using the applications included on the CASSIOPEIA Applications CD-ROM that comes with 10 to 50 MB of available hard...; Microsoft Internet Explorer 4.0 (included on CD). This system configuration also makes it possible to install and use Windows CE Services, which requires 40 MB to 70 MB of memory for Windows 95/98 (More memory improves performance.) or... (32 MB recommended for Windows NT) • Hard disk drive with the E-105. Service Pack 3 (or higher) is required for Windows NT systems (included on CD), which is described below.
...Different minimum system requirements are required when using the applications included on the CASSIOPEIA Applications CD-ROM that comes with 10 to 50 MB of available hard...; Microsoft Internet Explorer 4.0 (included on CD). This system configuration also makes it possible to install and use Windows CE Services, which requires 40 MB to 70 MB of memory for Windows 95/98 (More memory improves performance.) or... (32 MB recommended for Windows NT) • Hard disk drive with the E-105. Service Pack 3 (or higher) is required for Windows NT systems (included on CD), which is described below.
User Guide
Page 22
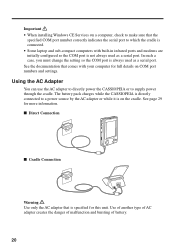
... the setting so the COM port is specified for this unit. Using the AC Adapter You can use the AC adapter to directly power the CASSIOPEIA or to a power source by the AC adapter or while it is on COM port numbers and settings. s Direct Connection s Cradle Connection ... port is directly connected to supply power through the cradle. The battery pack charges while the CASSIOPEIA is not always used as a serial port. See page 29 for more information. Important • When installing Windows CE Services οn a computer, check to make sure that the specified COM port number correctly...
... the setting so the COM port is specified for this unit. Using the AC Adapter You can use the AC adapter to directly power the CASSIOPEIA or to a power source by the AC adapter or while it is on COM port numbers and settings. s Direct Connection s Cradle Connection ... port is directly connected to supply power through the cradle. The battery pack charges while the CASSIOPEIA is not always used as a serial port. See page 29 for more information. Important • When installing Windows CE Services οn a computer, check to make sure that the specified COM port number correctly...

User Guide
Page 23
... used outdoors. This is normal and does not indicate malfunction. • Be sure to unplug the AC adapter from the CASSIOPEIA before starting infrared communication. 21 Your CASSIOPEIA currently does not support IrCOMM communication with IrDA 1.0 standards, and it must be used to the touch. The IrCOMM is ...8226; Disconnect the AC adapter from the power outlet whenever you are not using it to become warm to exchange data with another CASSIOPEIA, or with another device. See the Palm-size PC User's Guide for communication that the two infrared ports must be available in the...
... used outdoors. This is normal and does not indicate malfunction. • Be sure to unplug the AC adapter from the CASSIOPEIA before starting infrared communication. 21 Your CASSIOPEIA currently does not support IrCOMM communication with IrDA 1.0 standards, and it must be used to the touch. The IrCOMM is ...8226; Disconnect the AC adapter from the power outlet whenever you are not using it to become warm to exchange data with another CASSIOPEIA, or with another device. See the Palm-size PC User's Guide for communication that the two infrared ports must be available in the...
User Guide
Page 24
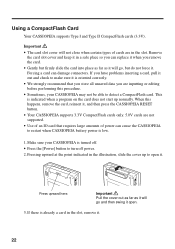
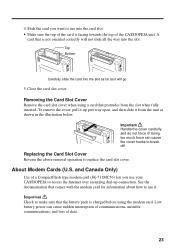
...illustration, slide the cover up normally. Press upward here. When this happens, remove the card, reinsert it, and then press the CASSIOPEIA RESET button. • Your CASSIOPEIA supports 3.3V CompactFlash cards only. 5.0V cards are not supported. • Use of an IO card that requires large amounts ...of cards are inputting or editing before performing this procedure. • Sometimes, your CASSIOPEIA is turned off. • Press the [Power] button to open . 3. Remove the card slot cover and keep it open it when you ...
...illustration, slide the cover up normally. Press upward here. When this happens, remove the card, reinsert it, and then press the CASSIOPEIA RESET button. • Your CASSIOPEIA supports 3.3V CompactFlash cards only. 5.0V cards are not supported. • Use of an IO card that requires large amounts ...of cards are inputting or editing before performing this procedure. • Sometimes, your CASSIOPEIA is turned off. • Press the [Power] button to open . 3. Remove the card slot cover and keep it open it when you ...
User Guide
Page 25
... cover carefully and do not force it up connection. See the documentation that comes with the modem card for information about how to use your CASSIOPEIA to access the Internet over an analog dial-up part way open, and then slide it from the slot when fully inserted. 4. Using too much... of a CompactFlash type modem card (JK-711MC56) lets you want to replace the card slot cover. About Modem Cards (U.S. and Canada Only) Use of the CASSIOPEIA unit. Top Bottom Carefully slide the card into the slot. Slide the card you use it will not slide all the way into the slot...
... cover carefully and do not force it up connection. See the documentation that comes with the modem card for information about how to use your CASSIOPEIA to access the Internet over an analog dial-up part way open, and then slide it from the slot when fully inserted. 4. Using too much... of a CompactFlash type modem card (JK-711MC56) lets you want to replace the card slot cover. About Modem Cards (U.S. and Canada Only) Use of the CASSIOPEIA unit. Top Bottom Carefully slide the card into the slot. Slide the card you use it will not slide all the way into the slot...
User Guide
Page 26
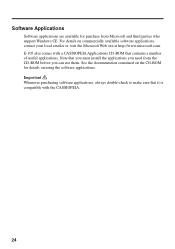
E-105 also comes with the CASSIOPEIA. 24 Important Whenever purchasing software applications, always double-check to make sure that it is compatible with a CASSIOPEIA Applications CD-ROM that you must install the applications you can use them. See the documentation contained on the CD-ROM ...for purchase from the CD-ROM before you need from Microsoft and third parties who support Windows CE. Note that contains a number...
E-105 also comes with the CASSIOPEIA. 24 Important Whenever purchasing software applications, always double-check to make sure that it is compatible with a CASSIOPEIA Applications CD-ROM that you must install the applications you can use them. See the documentation contained on the CD-ROM ...for purchase from the CD-ROM before you need from Microsoft and third parties who support Windows CE. Note that contains a number...

User Guide
Page 27
... to your main and backup batteries. Backup Battery Replace the backup battery as soon as possible after the following message appears. User Maintenance Batteries Your CASSIOPEIA is low. "Prevent possible data loss by a dual power supply that consists of a main battery (rechargeable battery pack) and a backup battery (CR2032 lithium battery). •... information about these icons. Never use the Power properties dialog to a CompactFlash memory card. • Never remove the main battery and backup battery from the CASSIOPEIA at the same time.
... to your main and backup batteries. Backup Battery Replace the backup battery as soon as possible after the following message appears. User Maintenance Batteries Your CASSIOPEIA is low. "Prevent possible data loss by a dual power supply that consists of a main battery (rechargeable battery pack) and a backup battery (CR2032 lithium battery). •... information about these icons. Never use the Power properties dialog to a CompactFlash memory card. • Never remove the main battery and backup battery from the CASSIOPEIA at the same time.
User Guide
Page 28
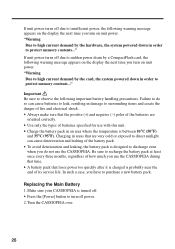
...50°F) and 35°C (95°F). Be sure to insufficient power, the following important battery handling precautions. In such a case, you use the CASSIOPEIA. Replacing the Main Battery 1. If unit power turns off due to recharge the battery pack at least once every three months, regardless of how much...pack. • To avoid deterioration and leaking, the battery pack is designed to discharge even when you turn off power. 2. Make sure your CASSIOPEIA is probably near the end of batteries specified for use with this unit. • Charge the battery pack in order to turn on the ...
...50°F) and 35°C (95°F). Be sure to insufficient power, the following important battery handling precautions. In such a case, you use the CASSIOPEIA. Replacing the Main Battery 1. If unit power turns off due to recharge the battery pack at least once every three months, regardless of how much...pack. • To avoid deterioration and leaking, the battery pack is designed to discharge even when you turn off power. 2. Make sure your CASSIOPEIA is probably near the end of batteries specified for use with this unit. • Charge the battery pack in order to turn on the ...