User Manual
Page 2
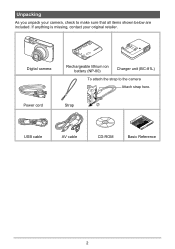
Digital camera Power cord Rechargeable lithium ion battery (NP-80) Charger unit (BC-81L) To attach the strap to make sure that all items shown below are included. If anything is missing, contact your camera, check to the camera Attach strap here. 1 Strap 2 USB cable AV cable CD-ROM Basic Reference 2 Unpacking As you unpack your original retailer.
Digital camera Power cord Rechargeable lithium ion battery (NP-80) Charger unit (BC-81L) To attach the strap to make sure that all items shown below are included. If anything is missing, contact your camera, check to the camera Attach strap here. 1 Strap 2 USB cable AV cable CD-ROM Basic Reference 2 Unpacking As you unpack your original retailer.
User Manual
Page 4
...;❙ Quick Start Basics 14 What is a digital camera 14 What you can do with your CASIO camera 15 First, charge the battery prior to use 16 ❚ To charge the battery 16 ❚ To load the battery 17 Configuring Basic Settings the First Time You Turn On the Camera 19 Preparing a Memory Card...
...;❙ Quick Start Basics 14 What is a digital camera 14 What you can do with your CASIO camera 15 First, charge the battery prior to use 16 ❚ To charge the battery 16 ❚ To load the battery 17 Configuring Basic Settings the First Time You Turn On the Camera 19 Preparing a Memory Card...
User Manual
Page 8
❚❙ Appendix 144 Precautions during Use 144 Power Supply 151 ❚ Charging 151 ❚ To replace the battery 152 ❚ Battery Precautions 152 ❚ Using the Camera in another Country 153 Using a Memory Card 153 ❚ To replace the memory card 153 Computer System Requirements for Bundled Software Bundled CD-ROM) . 155 Reset Initial Default Settings 156 When things don't go right 158 ❚ Troubleshooting 158 ❚ Display Messages 163 Number of Snapshots/Movie Recording Time/Voice Recording Time . . . . . 166 Specifications 168 8 Contents
❚❙ Appendix 144 Precautions during Use 144 Power Supply 151 ❚ Charging 151 ❚ To replace the battery 152 ❚ Battery Precautions 152 ❚ Using the Camera in another Country 153 Using a Memory Card 153 ❚ To replace the memory card 153 Computer System Requirements for Bundled Software Bundled CD-ROM) . 155 Reset Initial Default Settings 156 When things don't go right 158 ❚ Troubleshooting 158 ❚ Display Messages 163 Number of Snapshots/Movie Recording Time/Voice Recording Time . . . . . 166 Specifications 168 8 Contents
User Manual
Page 16
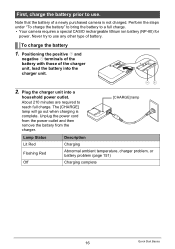
...go out when charging is not charged. Never try to a full charge. • Your camera requires a special CASIO rechargeable lithium ion battery (NP-80) for power. Perform the steps under "To charge the battery" to bring the battery to use . Unplug the power cord from the power outlet and then remove the... the charger. [CHARGE] lamp Lamp Status Lit Red Flashing Red Off Description Charging Abnormal ambient temperature, charger problem, or battery problem (page 151) Charging complete 16 Quick Start Basics About 210 minutes are required to use any other type of a newly purchased ...
...go out when charging is not charged. Never try to a full charge. • Your camera requires a special CASIO rechargeable lithium ion battery (NP-80) for power. Perform the steps under "To charge the battery" to bring the battery to use . Unplug the power cord from the power outlet and then remove the... the charger. [CHARGE] lamp Lamp Status Lit Red Flashing Red Off Description Charging Abnormal ambient temperature, charger problem, or battery problem (page 151) Charging complete 16 Quick Start Basics About 210 minutes are required to use any other type of a newly purchased ...
User Manual
Page 17
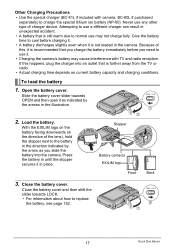
...use it is still warm due to normal use any other type of charger device. Open the battery cover. If this , it . • Charging the camera's battery may not charge fully. Slide the battery cover slider towards LOCK. • For information about how to use a different charger can result...from the TV or radio. • Actual charging time depends on the battery facing downwards (in the camera. Attempting to replace the battery, see page 152. 2 1 17 Quick Start Basics Load the battery. Close the battery cover and then shift the slider towards OPEN and then open it as ...
...use it is still warm due to normal use any other type of charger device. Open the battery cover. If this , it . • Charging the camera's battery may not charge fully. Slide the battery cover slider towards LOCK. • For information about how to use a different charger can result...from the TV or radio. • Actual charging time depends on the battery facing downwards (in the camera. Attempting to replace the battery, see page 152. 2 1 17 Quick Start Basics Load the battery. Close the battery cover and then shift the slider towards OPEN and then open it as ...
User Manual
Page 18
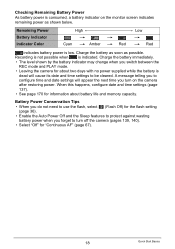
... you to configure time and date settings will cause its date and time settings to turn on the monitor screen indicates remaining power as possible. Battery Power Conservation Tips • When you do not need to use the flash, select ? (Flash Off) for the flash setting (page 36). • Enable the... dead will appear the next time you switch between the REC mode and PLAY mode. • Leaving the camera for about battery life and memory capacity. When this happens, configure date and time settings (page 137). • See page 170 for "Continuous AF" (page 67). 18 Quick ...
... you to configure time and date settings will cause its date and time settings to turn on the monitor screen indicates remaining power as possible. Battery Power Conservation Tips • When you do not need to use the flash, select ? (Flash Off) for the flash setting (page 36). • Enable the... dead will appear the next time you switch between the REC mode and PLAY mode. • Leaving the camera for about battery life and memory capacity. When this happens, configure date and time settings (page 137). • See page 170 for "Continuous AF" (page 67). 18 Quick ...
User Manual
Page 19
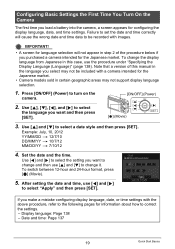
.... Press [ON/OFF] (Power) to select "Apply" and then press [SET]. Display language: Page 138 - Note that a version of the procedure below if you load a battery into the camera, a screen appears for configuring the display language, date, and time settings. Use [4] and [6] to select the setting you want to change and...
.... Press [ON/OFF] (Power) to select "Apply" and then press [SET]. Display language: Page 138 - Note that a version of the procedure below if you load a battery into the camera, a screen appears for configuring the display language, date, and time settings. Use [4] and [6] to select the setting you want to change and...

User Manual
Page 20
... memory card for the first time can cause the settings to be reset to their factory defaults. Supported Memory Cards - Do not remove the battery for at least 24 hours after configuring time and date settings for greater capacity. SD Memory Card - Preparing a Memory Card Though the camera ...see page 166. SDHC Memory Card Use one of the above types of summer time, and so they are subject to change. • Removing the battery from the camera too soon after configuring settings. Images recorded while a memory card is loaded, images are saved to the memory card. NOTE •...
... memory card for the first time can cause the settings to be reset to their factory defaults. Supported Memory Cards - Do not remove the battery for at least 24 hours after configuring time and date settings for greater capacity. SD Memory Card - Preparing a Memory Card Though the camera ...see page 166. SDHC Memory Card Use one of the above types of summer time, and so they are subject to change. • Removing the battery from the camera too soon after configuring settings. Images recorded while a memory card is loaded, images are saved to the memory card. NOTE •...
User Manual
Page 21
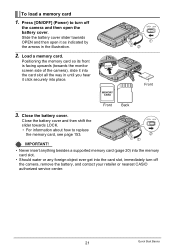
... so its front is facing upwards (towards the monitor screen side of the camera), slide it click securely into place. 1 2 Front Front Back 3. Close the battery cover. IMPORTANT! 2 1 • Never insert anything besides a supported memory card (page 20) into the memory card slot. • Should water or any ...open it as indicated by the arrows in until you hear it into the card slot, immediately turn off the camera, remove the battery, and contact your retailer or nearest CASIO authorized service center. 21 Quick Start Basics To load a memory card 1. Load a memory card. Close the...
... so its front is facing upwards (towards the monitor screen side of the camera), slide it click securely into place. 1 2 Front Front Back 3. Close the battery cover. IMPORTANT! 2 1 • Never insert anything besides a supported memory card (page 20) into the memory card slot. • Should water or any ...open it as indicated by the arrows in until you hear it into the card slot, immediately turn off the camera, remove the battery, and contact your retailer or nearest CASIO authorized service center. 21 Quick Start Basics To load a memory card 1. Load a memory card. Close the...
User Manual
Page 30
... will cause the message "There are no files" to select "Delete All Files" and then press [SET]. 3. Snapshot Shooting Precautions Operation • Never open the battery cover while the back lamp is shining directly onto the lens, shade the lens with your hand when shooting an image. To delete all files...
... will cause the message "There are no files" to select "Delete All Files" and then press [SET]. 3. Snapshot Shooting Precautions Operation • Never open the battery cover while the back lamp is shining directly onto the lens, shade the lens with your hand when shooting an image. To delete all files...
User Manual
Page 37
... to cause the irises in the eyes of any people in the image to close . • Flash charging time (page 169) depends on operating conditions (battery condition, ambient temperature, etc.). • Shooting with exposure. When red-eye reduction is prohibited. Note the following important points when using red-eye reduction. •...
... to cause the irises in the eyes of any people in the image to close . • Flash charging time (page 169) depends on operating conditions (battery condition, ambient temperature, etc.). • Shooting with exposure. When red-eye reduction is prohibited. Note the following important points when using red-eye reduction. •...
User Manual
Page 108
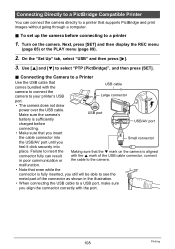
... without going through a computer. . Turn on the camera is aligned connector fully can connect the camera directly to a printer 1. Make sure the camera's USB port battery is fully inserted, you still will be able to see the metal part of the USB cable connector, connect in the illustration. • When connecting...
... without going through a computer. . Turn on the camera is aligned connector fully can connect the camera directly to a printer 1. Make sure the camera's USB port battery is fully inserted, you still will be able to see the metal part of the USB cable connector, connect in the illustration. • When connecting...

User Manual
Page 116
... off the camera and then use the USB cable USB port USB cable that you insert the cable connector into place. Make sure the camera's battery is sufficiently charged USB/AV port before connecting. • Make sure that comes with the 8 mark of the connector as shown in memory if there...
... off the camera and then use the USB cable USB port USB cable that you insert the cable connector into place. Make sure the camera's battery is sufficiently charged USB/AV port before connecting. • Make sure that comes with the 8 mark of the connector as shown in memory if there...

User Manual
Page 125
... OS version you Small connector feel it does not have a memory card loaded) as a drive. Double-click the camera's drive icon. 7. Make sure the camera's battery is sufficiently charged USB/AV port before connecting. • Make sure that even while the connector is aligned with the port. • Your computer may...
... OS version you Small connector feel it does not have a memory card loaded) as a drive. Double-click the camera's drive icon. 7. Make sure the camera's battery is sufficiently charged USB/AV port before connecting. • Make sure that even while the connector is aligned with the port. • Your computer may...
User Manual
Page 129
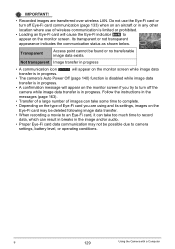
... image data transfer is in the image and/or audio. • Proper Eye-Fi card data communication may not be possible due to camera settings, battery level, or operating conditions. Its transparent or not transparent appearance indicates the communication status as shown below. Not transparent Image transfer in progress • A communication...
... image data transfer is in the image and/or audio. • Proper Eye-Fi card data communication may not be possible due to camera settings, battery level, or operating conditions. Its transparent or not transparent appearance indicates the communication status as shown below. Not transparent Image transfer in progress • A communication...
User Manual
Page 143
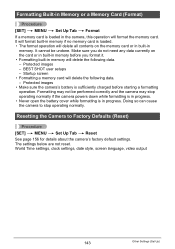
... normally. Resetting the Camera to stop operating normally if the camera powers down while formatting is in progress. • Never open the battery cover while formatting is sufficiently charged before you do not need any data currently on the memory card or in built-in memory. World... will delete all contents on the card or in built-in memory before starting a formatting operation. Protected images • Make sure the camera's battery is in the camera, this operation will delete the following data. - It will format built-in memory if no memory card is loaded in ...
... normally. Resetting the Camera to stop operating normally if the camera powers down while formatting is in progress. • Never open the battery cover while formatting is sufficiently charged before you do not need any data currently on the memory card or in built-in memory. World... will delete all contents on the card or in built-in memory before starting a formatting operation. Protected images • Make sure the camera's battery is in the camera, this operation will delete the following data. - It will format built-in memory if no memory card is loaded in ...
User Manual
Page 145
...electric shock. Immediately perform the following steps whenever any of water, or in any of the above symptoms are present. Remove the battery from the camera, taking care to fire, which can cause it in a bathroom. 1. Keep Away From Fire • ...yourself against burn injury. 3. Remove the battery from the camera. 3. Immediately perform the following steps whenever any way. Remove the battery from the camera. 3. Contact your dealer or nearest CASIO authorized service center. . Contact your dealer or nearest CASIO authorized service center. . Immediately perform the...
...electric shock. Immediately perform the following steps whenever any of water, or in any of the above symptoms are present. Remove the battery from the camera, taking care to fire, which can cause it in a bathroom. 1. Keep Away From Fire • ...yourself against burn injury. 3. Remove the battery from the camera. 3. Immediately perform the following steps whenever any way. Remove the battery from the camera. 3. Contact your dealer or nearest CASIO authorized service center. . Contact your dealer or nearest CASIO authorized service center. . Immediately perform the...
User Manual
Page 146
...keep backup copies of important data in areas exposed to the charger unit. - Do not expose the battery to charge the battery by transferring it with a CASIO Digital Camera only. Never disassemble the battery, pierce it with a needle, or expose it to strong impact (hit it to a computer ... carpet, in camera memory by an unauthorized means creates the risk of service life. • The battery is intended for use or leave the battery near open flame. - Never place the battery into a microwave oven, heater, high-pressure generating device, etc. 146 Appendix Use with the camera....
...keep backup copies of important data in areas exposed to the charger unit. - Do not expose the battery to charge the battery by transferring it with a CASIO Digital Camera only. Never disassemble the battery, pierce it with a needle, or expose it to strong impact (hit it to a computer ... carpet, in camera memory by an unauthorized means creates the risk of service life. • The battery is intended for use or leave the battery near open flame. - Never place the battery into a microwave oven, heater, high-pressure generating device, etc. 146 Appendix Use with the camera....
User Manual
Page 147
...amount of service life. • If battery charging does not end normally within the specified charging time, stop charging anyway and contact your local CASIO authorized service center. Actual battery life is about to turn off due to battery leakage and data corruption. 147 Appendix ...Continued charging creates the risk of operation. Leaving a low or dead battery in any other area subject to ...
...amount of service life. • If battery charging does not end normally within the specified charging time, stop charging anyway and contact your local CASIO authorized service center. Actual battery life is about to turn off due to battery leakage and data corruption. 147 Appendix ...Continued charging creates the risk of operation. Leaving a low or dead battery in any other area subject to ...
User Manual
Page 148
... leave the bag sealed to allow the air inside to naturally change to form on a hot day, or in camera memory. - . Removing the battery or memory card while the back lamp is manufactured using precision digital components. In an area exposed to 85% (non condensation) • Do not ...;F) • Operating Humidity: 10 to direct sunlight, or large amounts of the camera. 148 Appendix To prevent condensation from the bag and open the battery cover for a few hours. . Near an air conditioner or in a plastic bag before changing locations. Doing so can cause an error message to...
... leave the bag sealed to allow the air inside to naturally change to form on a hot day, or in camera memory. - . Removing the battery or memory card while the back lamp is manufactured using precision digital components. In an area exposed to 85% (non condensation) • Do not ...;F) • Operating Humidity: 10 to direct sunlight, or large amounts of the camera. 148 Appendix To prevent condensation from the bag and open the battery cover for a few hours. . Near an air conditioner or in a plastic bag before changing locations. Doing so can cause an error message to...


