
Owners Manual
Page 1
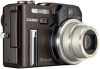
E Digital Camera EX-P700 User's Guide Thank you for purchasing this CASIO product. • Before using it, be sure to read the precautions contained in this User's Guide. • Keep the User's Guide in a safe place for future reference. • For the most up-to-date information about this product, visit the official EXILIM Website at http://www.exilim.com/. K824PCM1DMX
E Digital Camera EX-P700 User's Guide Thank you for purchasing this CASIO product. • Before using it, be sure to read the precautions contained in this User's Guide. • Keep the User's Guide in a safe place for future reference. • For the most up-to-date information about this product, visit the official EXILIM Website at http://www.exilim.com/. K824PCM1DMX

Owners Manual
Page 2
... Lithium Ion Battery (NP-40) Card Remote Controller (WR-4C) Lithium Battery (CR2025) • For card remote controller. Strap CD-ROM (CASIO Digital Camera Software) USB Cable AV Cable Basic Reference • Note that the shape of the AC power cord plug varies according to make sure that all ...
... Lithium Ion Battery (NP-40) Card Remote Controller (WR-4C) Lithium Battery (CR2025) • For card remote controller. Strap CD-ROM (CASIO Digital Camera Software) USB Cable AV Cable Basic Reference • Note that the shape of the AC power cord plug varies according to make sure that all ...

Owners Manual
Page 3
... record an image 22 To view a recorded image 23 To delete an image 23 24 GETTING READY About This Manual 24 General Guide 26 Camera 26 Monitor Screen Contents 29 REC modes 29 PLAY mode 33 Changing the Contents of the Monitor Screen 34 Indicator Lamps 35 Attaching the Strap... Using the Rapid Charger 37 To load the battery 41 To remove the battery 42 Power Supply Precautions 45 Using AC Power 48 Turning the Camera On and Off 50 Configuring Power Saving Settings 51 Using the On-screen Menus 52 Configuring Display Language and Clock Settings ... 54 To configure...
... record an image 22 To view a recorded image 23 To delete an image 23 24 GETTING READY About This Manual 24 General Guide 26 Camera 26 Monitor Screen Contents 29 REC modes 29 PLAY mode 33 Changing the Contents of the Monitor Screen 34 Indicator Lamps 35 Attaching the Strap... Using the Rapid Charger 37 To load the battery 41 To remove the battery 42 Power Supply Precautions 45 Using AC Power 48 Turning the Camera On and Off 50 Configuring Power Saving Settings 51 Using the On-screen Menus 52 Configuring Display Language and Clock Settings ... 54 To configure...
Owners Manual
Page 4
INTRODUCTION 58 BASIC IMAGE RECORDING Recording an Image 58 Specifying the Recording Mode 58 Aiming the Camera 59 Recording an Image 60 Recording Precautions 62 About Auto Focus 63 About the REC Mode Monitor Screen 63 Previewing the Last Image Recorded 64...64 To delete preview buffer contents after recording a single image 65 Orientation Sensor 65 Using the Optical Viewfinder 67 Using Zoom 68 Optical Zoom 68 Digital Zoom 69 Using the Flash 71 Flash Unit Status 72 Changing the Flash Intensity Setting 73 Using Flash Assist 73 Flash Precautions 74 Using the...
INTRODUCTION 58 BASIC IMAGE RECORDING Recording an Image 58 Specifying the Recording Mode 58 Aiming the Camera 59 Recording an Image 60 Recording Precautions 62 About Auto Focus 63 About the REC Mode Monitor Screen 63 Previewing the Last Image Recorded 64...64 To delete preview buffer contents after recording a single image 65 Orientation Sensor 65 Using the Optical Viewfinder 67 Using Zoom 68 Optical Zoom 68 Digital Zoom 69 Using the Flash 71 Flash Unit Status 72 Changing the Flash Intensity Setting 73 Using Flash Assist 73 Flash Precautions 74 Using the...
Owners Manual
Page 5
... Shot 123 Using the Movie Mode 124 Recording Audio 126 Adding Audio to a Snapshot 126 Recording Your Voice 128 Using the Histogram 130 REC Mode Camera Settings 132 Specifying ISO Sensitivity 133 Selecting the Auto Focus (AF) Mode 134 Selecting the Metering Mode 135 Using the Filter Function 136 Specifying Outline... On and Off 138 Using Icon Help 139 Assigning Functions to the [̇] and [̈] Keys 140 Specifying Power On Default Settings 141 Resetting the Camera 143 5
... Shot 123 Using the Movie Mode 124 Recording Audio 126 Adding Audio to a Snapshot 126 Recording Your Voice 128 Using the Histogram 130 REC Mode Camera Settings 132 Specifying ISO Sensitivity 133 Selecting the Auto Focus (AF) Mode 134 Selecting the Metering Mode 135 Using the Filter Function 136 Specifying Outline... On and Off 138 Using Icon Help 139 Assigning Functions to the [̇] and [̈] Keys 140 Specifying Power On Default Settings 141 Resetting the Camera 143 5
Owners Manual
Page 6
INTRODUCTION Using the Shortcut Menu (EX Menu 143 Using the Card Remote Controller for Recording ... 144 Loading the Battery 145 Before Using the Card Remote Controller for Recording 146 Using the ... the Display Image 171 Using Image Roulette 172 Adding Audio to a Snapshot 173 To re-record audio 174 Playing Back a Voice Recording File 175 Displaying Camera Images on a TV Screen 176 Selecting the Video Input System 177 178 DELETING FILES Deleting a Single File 178 Deleting All Files 179 6
INTRODUCTION Using the Shortcut Menu (EX Menu 143 Using the Card Remote Controller for Recording ... 144 Loading the Battery 145 Before Using the Card Remote Controller for Recording 146 Using the ... the Display Image 171 Using Image Roulette 172 Adding Audio to a Snapshot 173 To re-record audio 174 Playing Back a Voice Recording File 175 Displaying Camera Images on a TV Screen 176 Selecting the Video Input System 177 178 DELETING FILES Deleting a Single File 178 Deleting All Files 179 6

Owners Manual
Page 7
... an alarm 191 Stopping the Alarm 192 7 200 USING A MEMORY CARD Using a Memory Card 201 To insert a memory card into the camera 201 To remove a memory card from the camera 202 To format a memory card 202 Memory Card Precautions 203 Copying Files 204 To copy all the files in built-in memory...
... an alarm 191 Stopping the Alarm 192 7 200 USING A MEMORY CARD Using a Memory Card 201 To insert a memory card into the camera 201 To remove a memory card from the camera 202 To format a memory card 202 Memory Card Precautions 203 Copying Files 204 To copy all the files in built-in memory...
Owners Manual
Page 8
...Precautions 214 PRINT Image Matching III 215 Exif Print 215 216 VIEWING IMAGES ON A COMPUTER Using the Camera with a Windows Computer ........ 216 USB Connection Precautions 222 Using the Camera with a Macintosh Computer ....... 222 USB Connection Precautions 226 Operations You Can Perform from Your Computer ...an Album 239 To delete an album 240 Installing the Software from the CD-ROM 240 About the bundled CD-ROM (CASIO Digital Camera Software) 240 Computer System Requirements 242 Installing Software from the CD-ROM in Windows 243 Getting Started 244 Selecting a ...
...Precautions 214 PRINT Image Matching III 215 Exif Print 215 216 VIEWING IMAGES ON A COMPUTER Using the Camera with a Windows Computer ........ 216 USB Connection Precautions 222 Using the Camera with a Macintosh Computer ....... 222 USB Connection Precautions 226 Operations You Can Perform from Your Computer ...an Album 239 To delete an album 240 Installing the Software from the CD-ROM 240 About the bundled CD-ROM (CASIO Digital Camera Software) 240 Computer System Requirements 242 Installing Software from the CD-ROM in Windows 243 Getting Started 244 Selecting a ...

Owners Manual
Page 9
...LTD. assumes no responsibility for any damages or losses suffered by the screens and configuration of the actual camera. • The SD logo is a registered trademark of the EX-P700. • CASIO COMPUTER CO., LTD. assumes no responsibility for any damage or loss resulting from the CD-ROM on... other media to the use of Apple Computer, Inc. 9 Be sure to change without notice. • CASIO COMPUTER CO., LTD. assumes no ...
...LTD. assumes no responsibility for any damages or losses suffered by the screens and configuration of the actual camera. • The SD logo is a registered trademark of the EX-P700. • CASIO COMPUTER CO., LTD. assumes no responsibility for any damage or loss resulting from the CD-ROM on... other media to the use of Apple Computer, Inc. 9 Be sure to change without notice. • CASIO COMPUTER CO., LTD. assumes no ...
Owners Manual
Page 11
... view (page 32) The Ex Finder view provides you with a wealth of information on the monitor screen as memory is selected for the Auto Focus area, the camera takes simultaneous meter readings at seven different points and automatically selects the best one. Non-configurable variables create multiple ... combines with a large-capacity battery to provide more recording and playback between charges. • 16X zoom (page 68) 4X optical zoom, 4X digital zoom • 8.9MB flash memory Images can be set up to record multiple versions of an image altering the exposure, white balance, or focus...
... view (page 32) The Ex Finder view provides you with a wealth of information on the monitor screen as memory is selected for the Auto Focus area, the camera takes simultaneous meter readings at seven different points and automatically selects the best one. Non-configurable variables create multiple ... combines with a large-capacity battery to provide more recording and playback between charges. • 16X zoom (page 68) 4X optical zoom, 4X digital zoom • 8.9MB flash memory Images can be set up to record multiple versions of an image altering the exposure, white balance, or focus...

Owners Manual
Page 12
... • BESTSHOT (page 113) Simply select the sample scene that matches the type of image you are trying to record and the camera performs troublesome setups automatically for beautiful pictures every time. • Business Shot (page 121) Business Shot automatically corrects rectangular shapes when recording...two subjects into Web pages quickly and easily. • Calendar screen (page 166) A simple operation displays a full-month calendar on the camera's monitor screen. This means you can create images that include you and your current location. Each day of the full-month calendar shows a...
... • BESTSHOT (page 113) Simply select the sample scene that matches the type of image you are trying to record and the camera performs troublesome setups automatically for beautiful pictures every time. • Business Shot (page 121) Business Shot automatically corrects rectangular shapes when recording...two subjects into Web pages quickly and easily. • Calendar screen (page 166) A simple operation displays a full-month calendar on the camera's monitor screen. This means you can create images that include you and your current location. Each day of the full-month calendar shows a...

Owners Manual
Page 13
...enhances macro shots. • DCF Data Storage (page 228) DCF (Design rule for Camera File system) data storage protocol provides image compatibility between the digital camera and printers. • Digital Print Order Format (DPOF) (page 207) Images can be used when specifying images and... quantities for printing by connecting the camera with a USB cable (page 216). • Connect the camera to a computer simply by ...
...enhances macro shots. • DCF Data Storage (page 228) DCF (Design rule for Camera File system) data storage protocol provides image compatibility between the digital camera and printers. • Digital Print Order Format (DPOF) (page 207) Images can be used when specifying images and... quantities for printing by connecting the camera with a USB cable (page 216). • Connect the camera to a computer simply by ...

Owners Manual
Page 14
If swallowed accidentally, contact your physician immediately. • Never fire the flash in this camera out of the reach of the camera or attempt your eyesight. • Keep the small parts and accessories of this manual to "camera" refer to the CASIO EX-P700 Digital Camera. • Never try to open the case of small children. Doing so can...
If swallowed accidentally, contact your physician immediately. • Never fire the flash in this camera out of the reach of the camera or attempt your eyesight. • Keep the small parts and accessories of this manual to "camera" refer to the CASIO EX-P700 Digital Camera. • Never try to open the case of small children. Doing so can...

Owners Manual
Page 15
...no more smoke coming out of the plug. Never attempt your dealer or nearest CASIO authorized service center. Dust build up around the prongs of the camera, immediately turn it off . When using the flash, the camera should ever become cracked due to dropping it or otherwise subjecting it to rough... Should you do not use it near a heater. • At least once a year, unplug the AC adaptor power cord from the camera, take it to your nearest CASIO authorized service center for repair. INTRODUCTION • Never fire the flash while it is fired too close to the subject's eyes. Using the...
...no more smoke coming out of the plug. Never attempt your dealer or nearest CASIO authorized service center. Dust build up around the prongs of the camera, immediately turn it off . When using the flash, the camera should ever become cracked due to dropping it or otherwise subjecting it to rough... Should you do not use it near a heater. • At least once a year, unplug the AC adaptor power cord from the camera, take it to your nearest CASIO authorized service center for repair. INTRODUCTION • Never fire the flash while it is fired too close to the subject's eyes. Using the...
Owners Manual
Page 16
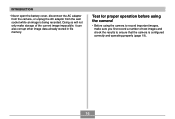
Test for proper operation before using the camera! • Before using the camera to record important images, make storage of test images and check the results to ensure that the camera is being recorded. INTRODUCTION • Never open the battery cover, disconnect the AC adaptor from the camera, or unplug the AC adaptor from the wall socket while an image is configured correctly and operating properly (page 19). 16 Doing so will not only make sure you first record a number of the current image impossible, it can also corrupt other image data already stored in file memory.
Test for proper operation before using the camera! • Before using the camera to record important images, make storage of test images and check the results to ensure that the camera is being recorded. INTRODUCTION • Never open the battery cover, disconnect the AC adaptor from the camera, or unplug the AC adaptor from the wall socket while an image is configured correctly and operating properly (page 19). 16 Doing so will not only make sure you first record a number of the current image impossible, it can also corrupt other image data already stored in file memory.

Owners Manual
Page 17
... message to direct sunlight - Other abnormal operations Any of the error. Any of the following areas. - Operating conditions • This camera is designed for use in temperatures ranging from 0°C to 40°C (32°F to 104°F). • Do not use ...while the operation lamp is being performed - In areas subject to temperature extremes - Removing the battery or memory card while the camera is manufactured using precision digital components. Near air conditioners, heaters, or other areas subject to high humidity or dust - Low battery power - INTRODUCTION Data ...
... message to direct sunlight - Other abnormal operations Any of the error. Any of the following areas. - Operating conditions • This camera is designed for use in temperatures ranging from 0°C to 40°C (32°F to 104°F). • Do not use ...while the operation lamp is being performed - In areas subject to temperature extremes - Removing the battery or memory card while the camera is manufactured using precision digital components. Near air conditioners, heaters, or other areas subject to high humidity or dust - Low battery power - INTRODUCTION Data ...
Owners Manual
Page 18
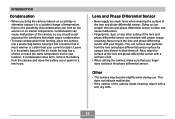
... is much force when cleaning the surface of the lens and phase differential sensor with a soft lens cloth. • When aiming the camera, make sure that is the possibility that condensation can interfere with proper image recording. This does not indicate malfunction. • If the ... Doing so can scratch the lens and phase differential sensor surface and cause malfunction. • Fingerprints, dust, or any other soiling of the camera needs cleaning, wipe it with a soft, dry cloth. 18 INTRODUCTION Condensation • When you should avoid exposing it to conditions that might ...
... is much force when cleaning the surface of the lens and phase differential sensor with a soft lens cloth. • When aiming the camera, make sure that is the possibility that condensation can interfere with proper image recording. This does not indicate malfunction. • If the ... Doing so can scratch the lens and phase differential sensor surface and cause malfunction. • Fingerprints, dust, or any other soiling of the camera needs cleaning, wipe it with a soft, dry cloth. 18 INTRODUCTION Condensation • When you should avoid exposing it to conditions that might ...

Owners Manual
Page 19
Plug-in Type 19 Charge the rechargeable litium ion battery (NP-40) 1 that comes with the camera (page 37). • Note that the shape of the rapid charger depends on the area where you purchased the camera. • It takes about two hours to achieve a full charge. 1 2 2 [CHARGE] lamp lights red during charging. [CHARGE] lamp turns green when charging is complete. QUICK START GUIDE QUICK START GUIDE First, charge the battery! 1. Power Cord Type [CHARGE] lamp lights red during charging. [CHARGE] lamp turns green when charging is complete.
Plug-in Type 19 Charge the rechargeable litium ion battery (NP-40) 1 that comes with the camera (page 37). • Note that the shape of the rapid charger depends on the area where you purchased the camera. • It takes about two hours to achieve a full charge. 1 2 2 [CHARGE] lamp lights red during charging. [CHARGE] lamp turns green when charging is complete. QUICK START GUIDE QUICK START GUIDE First, charge the battery! 1. Power Cord Type [CHARGE] lamp lights red during charging. [CHARGE] lamp turns green when charging is complete.

Owners Manual
Page 20
QUICK START GUIDE 2. Load the battery into the camera. (page 41). 1 3 2 Stopper 20
QUICK START GUIDE 2. Load the battery into the camera. (page 41). 1 3 2 Stopper 20
Owners Manual
Page 21
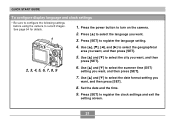
Use and [̈] to select the geographical area you want. 3. Set the date and the time. 9. Press [SET] to turn on the camera. 2. Press [̆] to select the date format setting you want , and then press [SET]. 5. Press the power button to register the language setting. ...SET] to record images. QUICK START GUIDE To configure display language and clock settings • Be sure to configure the following settings before using the camera to register the clock settings and exit the setting screen. 21 Use [̆] and [̄] to select the summer time (DST) setting you ...
Use and [̈] to select the geographical area you want. 3. Set the date and the time. 9. Press [SET] to turn on the camera. 2. Press [̆] to select the date format setting you want , and then press [SET]. 5. Press the power button to register the language setting. ...SET] to record images. QUICK START GUIDE To configure display language and clock settings • Be sure to configure the following settings before using the camera to register the clock settings and exit the setting screen. 21 Use [̆] and [̄] to select the summer time (DST) setting you ...


