
Owners Manual
Page 2
When purchasing a replacement or spare, be included with this EXILIM model. If anything is specially designed to be sure to purchase an NP-80 battery. 2 Digital camera Power cord Rechargeable lithium ion battery (NP-82*) Charger unit (BC-81L) To attach the strap to make sure that all items shown below are included. Unpacking As you unpack your original retailer. Strap 2 USB cable CD-ROM Basic Reference * The NP-82 battery is missing, contact your camera, check to the camera 1 Attach strap here.
When purchasing a replacement or spare, be included with this EXILIM model. If anything is specially designed to be sure to purchase an NP-80 battery. 2 Digital camera Power cord Rechargeable lithium ion battery (NP-82*) Charger unit (BC-81L) To attach the strap to make sure that all items shown below are included. Unpacking As you unpack your original retailer. Strap 2 USB cable CD-ROM Basic Reference * The NP-82 battery is missing, contact your camera, check to the camera 1 Attach strap here.
Owners Manual
Page 7
... Language Language) . 110 Configuring Sleep State Settings Sleep) . 110 Configuring Auto Power Settings Auto Power Off) . .111 Configuring [r] and [p] Settings REC/PLAY) . .111 Configuring USB Protocol Settings USB) . 112 Selecting the Screen Aspect Ratio and Video Output System Video Out) . 112 Formatting Built-in Memory or a Memory Card Format) . 113 Resetting the...
... Language Language) . 110 Configuring Sleep State Settings Sleep) . 110 Configuring Auto Power Settings Auto Power Off) . .111 Configuring [r] and [p] Settings REC/PLAY) . .111 Configuring USB Protocol Settings USB) . 112 Selecting the Screen Aspect Ratio and Video Output System Video Out) . 112 Formatting Built-in Memory or a Memory Card Format) . 113 Resetting the...
Owners Manual
Page 70
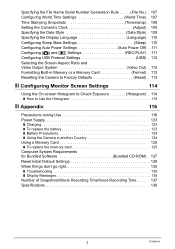
Yellow White TV Video Audio AV cable AUDIO IN jacks (white) VIDEO IN jack (yellow) USB/AV port Making sure that the mark on the camera while the AV cable is fully inserted, you feel it to insert the connector fully ... and select its video input mode. Failure to the TV. Use an optionally available AV cable (EMC-4A) to connect it click securely into the USB/ AV port until you still will not turn on a TV Screen 1.
Yellow White TV Video Audio AV cable AUDIO IN jacks (white) VIDEO IN jack (yellow) USB/AV port Making sure that the mark on the camera while the AV cable is fully inserted, you feel it to insert the connector fully ... and select its video input mode. Failure to the TV. Use an optionally available AV cable (EMC-4A) to connect it click securely into the USB/ AV port until you still will not turn on a TV Screen 1.
Owners Manual
Page 71
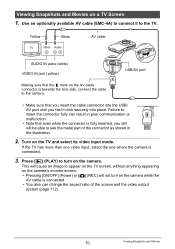
... Recorder or Video Deck Use one of the following methods to connect the camera to clear all indicators from the monitor screen (page 114). Camera: USB/AV port You can play back movies as you are using an optionally available AV cable. - NOTE • Audio is monaural. • Certain TVs may...
... Recorder or Video Deck Use one of the following methods to connect the camera to clear all indicators from the monitor screen (page 114). Camera: USB/AV port You can play back movies as you are using an optionally available AV cable. - NOTE • Audio is monaural. • Certain TVs may...
Owners Manual
Page 80
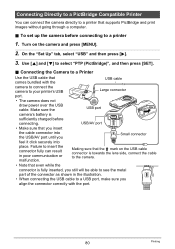
... inserted, you still will be able to see the metal part of the connector as shown in poor communication or malfunction. USB cable Large connector USB USB port USB/AV port Small connector Making sure that the mark on the camera and press [MENU]. 2. To set up the camera ...feel it click securely into place. Connecting Directly to a PictBridge Compatible Printer You can result in the illustration. • When connecting the USB cable to a USB port, make sure you align the connector correctly with the camera to connect the camera to select "PTP (PictBridge)", and then press [...
... inserted, you still will be able to see the metal part of the connector as shown in poor communication or malfunction. USB cable Large connector USB USB port USB/AV port Small connector Making sure that the mark on the camera and press [MENU]. 2. To set up the camera ...feel it click securely into place. Connecting Directly to a PictBridge Compatible Printer You can result in the illustration. • When connecting the USB cable to a USB port, make sure you align the connector correctly with the camera to connect the camera to select "PTP (PictBridge)", and then press [...

Owners Manual
Page 81
... want . 1 Image : Prints one image. Use [8] and [2] to select "Print" and then press [SET]. To print 1. Turn on and off the camera and disconnect the USB cable from step 5, if you want to select the image you can repeat the procedure from the printer and camera. 81 Printing DPOF Printing : Prints...
... want . 1 Image : Prints one image. Use [8] and [2] to select "Print" and then press [SET]. To print 1. Turn on and off the camera and disconnect the USB cable from step 5, if you want to select the image you can repeat the procedure from the printer and camera. 81 Printing DPOF Printing : Prints...

Owners Manual
Page 85
... a computer and view them there Transfer images stored on your computer to camera memory Playback and edit movies • Save images and view them manually (USB connection) (pages 87, 96). • Transfer images to a computer automatically over a wireless LAN for Windows and the Macintosh. • Windows users should refer to "Using...
... a computer and view them there Transfer images stored on your computer to camera memory Playback and edit movies • Save images and view them manually (USB connection) (pages 87, 96). • Transfer images to a computer automatically over a wireless LAN for Windows and the Macintosh. • Windows users should refer to "Using...

Owners Manual
Page 87
... You can be possible under "Computer System Requirements for details. See the "Read me" file that comes with a Computer On the "Set Up" tab, select "USB" and then press [6]. 3. Computer System Requirements for Bundled Software Computer system requirements are different for each application for Bundled Software (Bundled CD-ROM)" on the...
... You can be possible under "Computer System Requirements for details. See the "Read me" file that comes with a Computer On the "Set Up" tab, select "USB" and then press [6]. 3. Computer System Requirements for Bundled Software Computer system requirements are different for each application for Bundled Software (Bundled CD-ROM)" on the...
Owners Manual
Page 88
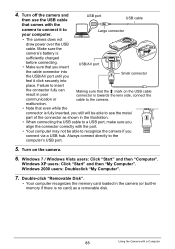
...port. • Your computer may not be able to your computer. Windows 7 / Windows Vista users: Click "Start" and then "Computer". Turn on the USB cable connector is towards the lens side, connect the cable to the camera. • Note that even while the connector is fully inserted, you still... will be able to the computer's USB port. 5. Double-click "Removable Disk". • Your computer recognizes the memory card loaded in the camera (or built-in memory if there is...
...port. • Your computer may not be able to your computer. Windows 7 / Windows Vista users: Click "Start" and then "Computer". Turn on the USB cable connector is towards the lens side, connect the cable to the camera. • Note that even while the connector is fully inserted, you still... will be able to the computer's USB port. 5. Double-click "Removable Disk". • Your computer recognizes the memory card loaded in the camera (or built-in memory if there is...
Owners Manual
Page 90
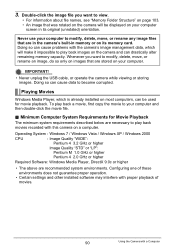
Double-click the image file you want to become corrupted. IMPORTANT! • Never unplug the USB cable, or operate the camera while viewing or storing images. Playing Movies Windows Media Player, which will be used for Movie Playback The minimum system ...
Double-click the image file you want to become corrupted. IMPORTANT! • Never unplug the USB cable, or operate the camera while viewing or storing images. Playing Movies Windows Media Player, which will be used for Movie Playback The minimum system ...

Owners Manual
Page 96
... IMPORTANT! • The camera does not support operation with your 99 operating system. Operation is supported with your computer and save files 1. Use the standard USB driver that comes with Mac OS 9, X (10.1, 10.2, 10.3, 10.4, 10.5, 10.6) only. On the "Set Up" tab, select...
... IMPORTANT! • The camera does not support operation with your 99 operating system. Operation is supported with your computer and save files 1. Use the standard USB driver that comes with Mac OS 9, X (10.1, 10.2, 10.3, 10.4, 10.5, 10.6) only. On the "Set Up" tab, select...
Owners Manual
Page 97
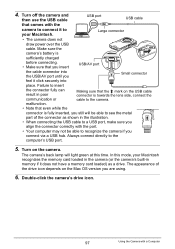
...camera's drive icon. 97 Using the Camera with the camera to connect it to the computer's USB port. 5. 4. Turn off the camera and then use the USB cable USB port USB cable that you insert USB/AV port the cable connector into place. Failure to insert the connector fully can result in ...Small connector feel it does not have a memory card loaded) as shown in poor communication or malfunction. Making sure that the mark on the USB cable connector is towards the lens side, connect the cable to the camera. • Note that even while the connector is sufficiently charged ...
...camera's drive icon. 97 Using the Camera with the camera to connect it to the computer's USB port. 5. 4. Turn off the camera and then use the USB cable USB port USB cable that you insert USB/AV port the cable connector into place. Failure to insert the connector fully can result in ...Small connector feel it does not have a memory card loaded) as shown in poor communication or malfunction. Making sure that the mark on the USB cable connector is towards the lens side, connect the cable to the camera. • Note that even while the connector is sufficiently charged ...

Owners Manual
Page 98
... in the camera's built-in its memory card. Double-click the folder that are stored on its original (unrotated) orientation. IMPORTANT! • Never unplug the USB cable, or operate the camera while viewing or storing images. Never use your Macintosh screen in memory or on your computer. To view copied images...
... in the camera's built-in its memory card. Double-click the folder that are stored on its original (unrotated) orientation. IMPORTANT! • Never unplug the USB cable, or operate the camera while viewing or storing images. Never use your Macintosh screen in memory or on your computer. To view copied images...
Owners Manual
Page 106
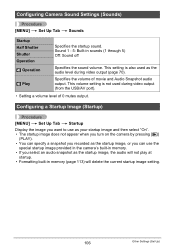
... off Specifies the sound volume. Sound 1 - 5: Built-in memory. • If you select an audio snapshot as the audio level during video output (from the USB/AV port). • Setting a volume level of movie and Audio Snapshot audio output. Configuring Camera Sound Settings (Sounds) Procedure [MENU] * Set Up Tab * Sounds Startup...
... off Specifies the sound volume. Sound 1 - 5: Built-in memory. • If you select an audio snapshot as the audio level during video output (from the USB/AV port). • Setting a volume level of movie and Audio Snapshot audio output. Configuring Camera Sound Settings (Sounds) Procedure [MENU] * Set Up Tab * Sounds Startup...
Owners Manual
Page 112
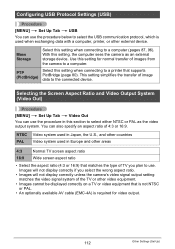
... the type of 4:3 or 16:9. Use this setting for video output. 112 Other Settings (Set Up) Configuring USB Protocol Settings (USB) Procedure [MENU] * Set Up Tab * USB You can use the procedure below to select the USB communication protocol, which is required for normal transfer of image data to the connected device. With this...
... the type of 4:3 or 16:9. Use this setting for video output. 112 Other Settings (Set Up) Configuring USB Protocol Settings (USB) Procedure [MENU] * Set Up Tab * USB You can use the procedure below to select the USB communication protocol, which is required for normal transfer of image data to the connected device. With this...

Owners Manual
Page 120
... of moisture, dust, or sand - Using a battery that appears. . Data Error Precautions Your digital camera is flashing green after turning off the camera - Disconnecting the USB cable while communication is due to direct sunlight, or large amounts of data in an area subjected to form on the interior and the exterior...
... of moisture, dust, or sand - Using a battery that appears. . Data Error Precautions Your digital camera is flashing green after turning off the camera - Disconnecting the USB cable while communication is due to direct sunlight, or large amounts of data in an area subjected to form on the interior and the exterior...
Owners Manual
Page 129
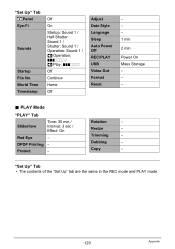
... Startup: Sound 1 / Half Shutter: Sound 1 / Shutter: Sound 1 / Operation: Sound 1 / = Operation Play: ...//// Off Continue Home Off Adjust Date Style Language Sleep Auto Power Off REC/PLAY USB Video Out Format Reset - - - 1 min 2 min Power On Mass Storage - - - . Rotation - Dubbing - Copy - Trimming - Protect - PLAY Mode "PLAY" Tab Slideshow Time: 30 min / Interval: 3 sec...
... Startup: Sound 1 / Half Shutter: Sound 1 / Shutter: Sound 1 / Operation: Sound 1 / = Operation Play: ...//// Off Continue Home Off Adjust Date Style Language Sleep Auto Power Off REC/PLAY USB Video Out Format Reset - - - 1 min 2 min Power On Mass Storage - - - . Rotation - Dubbing - Copy - Trimming - Protect - PLAY Mode "PLAY" Tab Slideshow Time: 30 min / Interval: 3 sec...

Owners Manual
Page 133
... time are displayed, or the wrong date and time are being stored along with resizing, trimming, rotation). Check all connections. 2)The wrong USB communication protocol is off. Problem Playback The color of device you are connecting (pages 87, 96). 3)If the camera is selected. Images ...page 109). The wrong display language is not turned on, turn it on. 4)Your computer may not be transferred over a USB connection. Select the correct USB communication protocol in the wrong language. Position the camera so sunlight does not shine directly into the lens when you are shooting....
... time are displayed, or the wrong date and time are being stored along with resizing, trimming, rotation). Check all connections. 2)The wrong USB communication protocol is off. Problem Playback The color of device you are connecting (pages 87, 96). 3)If the camera is selected. Images ...page 109). The wrong display language is not turned on, turn it on. 4)Your computer may not be transferred over a USB connection. Select the correct USB communication protocol in the wrong language. Position the camera so sunlight does not shine directly into the lens when you are shooting....
Owners Manual
Page 135
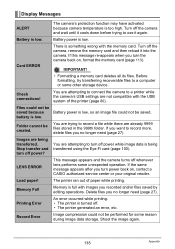
...camera, remove the memory card and then reload it again. You are attempting to connect the camera to a printer while the camera's USB settings are attempting to turn off whenever lens performs some unexpected operation. Folder cannot be performed for some other storage device. Images are ... operations. You are not compatible with the memory card. If the same message appears after you turn the camera back on , contact a CASIO authorized service center or your original retailer. Delete files you turn power back on , format the memory card (page 113). If this message...
...camera, remove the memory card and then reload it again. You are attempting to connect the camera to a printer while the camera's USB settings are attempting to turn off whenever lens performs some unexpected operation. Folder cannot be performed for some other storage device. Images are ... operations. You are not compatible with the memory card. If the same message appears after you turn the camera back on , contact a CASIO authorized service center or your original retailer. Delete files you turn power back on , format the memory card (page 113). If this message...
Owners Manual
Page 140
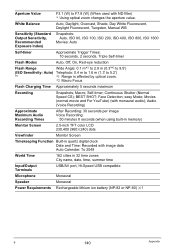
... image data Auto Calendar: To 2049 World Time 162 cities in 32 time zones City name, date, time, summer time Input/Output Terminals USB/AV port, Hi-Speed USB compatible Microphone Monaural Speaker Monaural Power Requirements Rechargeable lithium ion battery (NP-82 or NP-80) x1 B 140 Appendix White Balance Auto, Daylight...
... image data Auto Calendar: To 2049 World Time 162 cities in 32 time zones City name, date, time, summer time Input/Output Terminals USB/AV port, Hi-Speed USB compatible Microphone Monaural Speaker Monaural Power Requirements Rechargeable lithium ion battery (NP-82 or NP-80) x1 B 140 Appendix White Balance Auto, Daylight...


