Owners Manual
Page 1
E Digital Camera EX-Z60/EX-Z60DX User's Guide Thank you for purchasing this CASIO product. • Before using it, be sure to read the precautions contained in this User's Guide. • Keep the User's Guide in a safe place for future reference. • For the most up-to-date information about this product, visit the official EXILIM Website at http://www.exilim.com/. K815PCM1DKX
E Digital Camera EX-Z60/EX-Z60DX User's Guide Thank you for purchasing this CASIO product. • Before using it, be sure to read the precautions contained in this User's Guide. • Keep the User's Guide in a safe place for future reference. • For the most up-to-date information about this product, visit the official EXILIM Website at http://www.exilim.com/. K815PCM1DKX
Owners Manual
Page 2
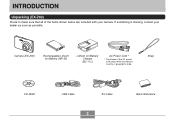
Strap CD-ROM USB Cable AV Cable 2 Basic Reference Camera (EX-Z60) Rechargeable Lithium Ion Battery (NP-20) Lithium Ion Battery Charger (BC-11L) AC Power Cord * * The shape of the AC power cord plug varies according to make sure that all of the items shown below are included with your dealer as soon as possible. If something is missing, contact your camera. INTRODUCTION INTRODUCTION Unpacking (EX-Z60) Check to country or geographic area.
Strap CD-ROM USB Cable AV Cable 2 Basic Reference Camera (EX-Z60) Rechargeable Lithium Ion Battery (NP-20) Lithium Ion Battery Charger (BC-11L) AC Power Cord * * The shape of the AC power cord plug varies according to make sure that all of the items shown below are included with your dealer as soon as possible. If something is missing, contact your camera. INTRODUCTION INTRODUCTION Unpacking (EX-Z60) Check to country or geographic area.

Owners Manual
Page 3
... Power Cord * 3 Special AC Adaptor (Plug-in Type) (AD-C52J) INTRODUCTION Unpacking (EX-Z60DX) Check to country or geographic area. Camera (EX-Z60) Rechargeable Lithium Ion Battery (NP-20) USB Cradle (CA-32) Strap CD-ROM USB Cable AV Cable Basic Reference • Note that ...all of the AC adaptor depends on the area where you purchased the camera. Special AC Adaptor (Inlet Type) (AD-C52G)...
... Power Cord * 3 Special AC Adaptor (Plug-in Type) (AD-C52J) INTRODUCTION Unpacking (EX-Z60DX) Check to country or geographic area. Camera (EX-Z60) Rechargeable Lithium Ion Battery (NP-20) USB Cradle (CA-32) Strap CD-ROM USB Cable AV Cable Basic Reference • Note that ...all of the AC adaptor depends on the area where you purchased the camera. Special AC Adaptor (Inlet Type) (AD-C52G)...
Owners Manual
Page 4
...view a recorded image 23 To delete an image 23 24 GETTING READY About This Manual 24 General Guide 25 Camera 25 Lithium Ion Battery Charger (EX-Z60) 27 USB Cradle (EX-Z60DX) 27 Monitor Screen Contents 29 REC Mode 29 PLAY Mode 31 Changing the Contents of the Monitor Screen... 33 Attaching the Strap 34 Power Requirements 35 EX-Z60 (Bundled with Charger Unit) 35 EX-Z60DX (Bundled with USB cradle) 40 Low Battery Indicator 43 To replace the battery 44 Power Supply Precautions 45 Turning the Camera On and Off 49 Configuring Power Saving Settings 51 ...
...view a recorded image 23 To delete an image 23 24 GETTING READY About This Manual 24 General Guide 25 Camera 25 Lithium Ion Battery Charger (EX-Z60) 27 USB Cradle (EX-Z60DX) 27 Monitor Screen Contents 29 REC Mode 29 PLAY Mode 31 Changing the Contents of the Monitor Screen... 33 Attaching the Strap 34 Power Requirements 35 EX-Z60 (Bundled with Charger Unit) 35 EX-Z60DX (Bundled with USB cradle) 40 Low Battery Indicator 43 To replace the battery 44 Power Supply Precautions 45 Turning the Camera On and Off 49 Configuring Power Saving Settings 51 ...
Owners Manual
Page 9
... LTD. shall not be trademarks or service marks of others. • Photo Loader and Photohands are the property of the EX-Z60/EX-Z60DX. • CASIO COMPUTER CO., LTD. Except as a result of this manual are either registered trademarks or trademarks of Adobe Systems Incorporated in...8226; Note that the example screens and product illustrations shown in this User's Guide may differ somewhat by the screens and configuration of the actual camera. • The SD logo is a registered trademark. • Windows, Internet Explorer, Windows Media, and DirectX are registered trademarks of Microsoft ...
... LTD. shall not be trademarks or service marks of others. • Photo Loader and Photohands are the property of the EX-Z60/EX-Z60DX. • CASIO COMPUTER CO., LTD. Except as a result of this manual are either registered trademarks or trademarks of Adobe Systems Incorporated in...8226; Note that the example screens and product illustrations shown in this User's Guide may differ somewhat by the screens and configuration of the actual camera. • The SD logo is a registered trademark. • Windows, Internet Explorer, Windows Media, and DirectX are registered trademarks of Microsoft ...
Owners Manual
Page 13
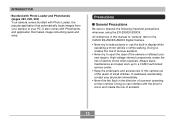
... risk of small children. Always leave maintenance and repair work up to a CASIO authorized service center. • Keep the small parts and accessories of this manual to "camera" refer to the CASIO EX-Z60/EX-Z60DX Digital Camera. • Never try to your own repairs. Doing so can interfere with... Photo Loader, the popular application that makes image retouching quick and easy. All references in this camera out of the reach of...
... risk of small children. Always leave maintenance and repair work up to a CASIO authorized service center. • Keep the small parts and accessories of this manual to "camera" refer to the CASIO EX-Z60/EX-Z60DX Digital Camera. • Never try to your own repairs. Doing so can interfere with... Photo Loader, the popular application that makes image retouching quick and easy. All references in this camera out of the reach of...
Owners Manual
Page 19
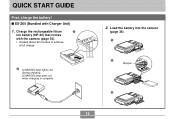
Load the battery into the camera (page 38). 1 2 Stopper 3 19 I EX-Z60 (Bundled with the camera (page 35). • It takes about 90 minutes to achieve a full charge. 2 [CHARGE] lamp lights red during charging. [CHARGE] lamp goes out when charging is complete. -T+ 2. Charge the rechargeable litium 1 ion battery (NP-20) that comes with Charger Unit) 1. QUICK START GUIDE QUICK START GUIDE First, charge the battery!
Load the battery into the camera (page 38). 1 2 Stopper 3 19 I EX-Z60 (Bundled with the camera (page 35). • It takes about 90 minutes to achieve a full charge. 2 [CHARGE] lamp lights red during charging. [CHARGE] lamp goes out when charging is complete. -T+ 2. Charge the rechargeable litium 1 ion battery (NP-20) that comes with Charger Unit) 1. QUICK START GUIDE QUICK START GUIDE First, charge the battery!
Owners Manual
Page 24
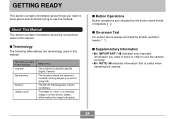
... About This Manual This section contains information about and do before trying to use the camera. I Terminology The following table defines the terminology used in this manual. GETTING READY GETTING READY This section contains information about things you...always enclosed by the button name inside of brackets ([ ]). This term as used in this manual: "camera" "file memory" "battery" "digital noise" Means this: The CASIO EX-Z60/EX-Z60DX Digital Camera The location where the camera is currently storing images you need to know in a recorded image or on the monitor screen, which ...
... About This Manual This section contains information about and do before trying to use the camera. I Terminology The following table defines the terminology used in this manual. GETTING READY GETTING READY This section contains information about things you...always enclosed by the button name inside of brackets ([ ]). This term as used in this manual: "camera" "file memory" "battery" "digital noise" Means this: The CASIO EX-Z60/EX-Z60DX Digital Camera The location where the camera is currently storing images you need to know in a recorded image or on the monitor screen, which ...
Owners Manual
Page 27
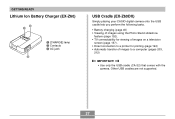
GETTING READY Lithium Ion Battery Charger (EX-Z60) 2 1 1 [CHARGE] lamp 2 Contacts 3 AC jack 3 USB Cradle (EX-Z60DX) Simply placing your CASIO digital camera onto the USB cradle lets you perform the following tasks. • Battery charging (page 40) • Viewing of images using the Photo Stand slideshow feature (... (page 194) • Automatic transfer of images to a computer (pages 203, 212) IMPORTANT! • Use only the USB cradle (CA-32) that comes with the camera. Other USB cradles are not supported. 27
GETTING READY Lithium Ion Battery Charger (EX-Z60) 2 1 1 [CHARGE] lamp 2 Contacts 3 AC jack 3 USB Cradle (EX-Z60DX) Simply placing your CASIO digital camera onto the USB cradle lets you perform the following tasks. • Battery charging (page 40) • Viewing of images using the Photo Stand slideshow feature (... (page 194) • Automatic transfer of images to a computer (pages 203, 212) IMPORTANT! • Use only the USB cradle (CA-32) that comes with the camera. Other USB cradles are not supported. 27
Owners Manual
Page 35
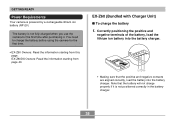
...You need to charge the battery before using the camera for the first time after purchasing it is not positioned correctly in the battery charger. 35 The battery is powered by a rechargeable lithium ion battery (NP-20). EX-Z60DX Owners: Read the information starting from page 40...sure that the battery will not charge properly if it . EX-Z60 (Bundled with Charger Unit) I To charge the battery 1. GETTING READY Power Requirements Your camera is not fully charged when you use the camera for the first time. • EX-Z60 Owners: Read the information starting from this page. Note that...
...You need to charge the battery before using the camera for the first time after purchasing it is not positioned correctly in the battery charger. 35 The battery is powered by a rechargeable lithium ion battery (NP-20). EX-Z60DX Owners: Read the information starting from page 40...sure that the battery will not charge properly if it . EX-Z60 (Bundled with Charger Unit) I To charge the battery 1. GETTING READY Power Requirements Your camera is not fully charged when you use the camera for the first time. • EX-Z60 Owners: Read the information starting from this page. Note that...
Owners Manual
Page 48
...cord, or subject it to become damaged (exposed internal wiring), contact your dealer or nearest CASIO authorized service center. Use only the AC adaptor bundled with water. Doing so creates the risk... warm during charging. Doing so creates the risk of the AC adaptor. I Battery Charger Precautions (EX-Z60) • Never plug the battery charger into an outlet or extension cord that marked on the ...or electric shock. • Use the AC adaptor where it will not be splashed with this camera. • Do not allow the AC adaptor cord to severe bending, twisting, or pulling....
...cord, or subject it to become damaged (exposed internal wiring), contact your dealer or nearest CASIO authorized service center. Use only the AC adaptor bundled with water. Doing so creates the risk... warm during charging. Doing so creates the risk of the AC adaptor. I Battery Charger Precautions (EX-Z60) • Never plug the battery charger into an outlet or extension cord that marked on the ...or electric shock. • Use the AC adaptor where it will not be splashed with this camera. • Do not allow the AC adaptor cord to severe bending, twisting, or pulling....
Owners Manual
Page 157
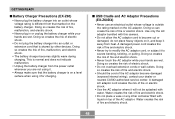
Displaying Camera Images on a TV Screen EX-Z60: You can display recorded images ...on and off Cancel playback Do this : Fast forward or fast reverse the audio Pause and unpause audio playback Adjust audio volume Toggle monitor screen indicators on a TV screen and even use [̆] and [̄]. Perform the following step to connect the camera...SET] to a TV. 157 C PLAYBACK To do this : Hold down [̇] or [̈]. To display camera images on a TV screen. Press [̄] and then use a TV screen to compose images before or after the...
Displaying Camera Images on a TV Screen EX-Z60: You can display recorded images ...on and off Cancel playback Do this : Fast forward or fast reverse the audio Pause and unpause audio playback Adjust audio volume Toggle monitor screen indicators on a TV screen and even use [̆] and [̄]. Perform the following step to connect the camera...SET] to a TV. 157 C PLAYBACK To do this : Hold down [̇] or [̈]. To display camera images on a TV screen. Press [̄] and then use a TV screen to compose images before or after the...
Owners Manual
Page 158
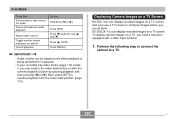
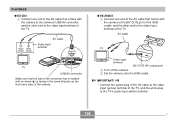
... the TV. PLAYBACK G EX-Z60 1 Connect one end of the AV cable that comes with the camera to the camera's USB/AV connector, and the other end to the video input terminal of the TV. G EX-Z60DX 1 Connect one end... of the AV cable that is marked with an arrow (̆) is facing in the same direction as the front (lens side) of the camera. Yellow White (Video) ...Video input terminal TV USB/AV connector Make sure that the side of the connector that comes with the camera to the [AV OUT] port of the USB cradle, and the other end to the video input ...
... the TV. PLAYBACK G EX-Z60 1 Connect one end of the AV cable that comes with the camera to the camera's USB/AV connector, and the other end to the video input terminal of the TV. G EX-Z60DX 1 Connect one end... of the AV cable that is marked with an arrow (̆) is facing in the same direction as the front (lens side) of the camera. Yellow White (Video) ...Video input terminal TV USB/AV connector Make sure that the side of the connector that comes with the camera to the [AV OUT] port of the USB cradle, and the other end to the video input ...
Owners Manual
Page 159
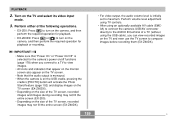
...152) and display images on the TV screen (EX-Z60DX). • Depending on the size of the TV screen, recorded images and images during recording may not fill the entire screen (EX-Z60). • Depending on the size of the following operations. • EX-Z60: Press [ ] to turn on the TV ...and even use the TV screen to compose images before recording them (EX-Z60DX). Turn on the camera, and then perform the required operation for ...
...152) and display images on the TV screen (EX-Z60DX). • Depending on the size of the TV screen, recorded images and images during recording may not fill the entire screen (EX-Z60). • Depending on the size of the following operations. • EX-Z60: Press [ ] to turn on the TV ...and even use the TV screen to compose images before recording them (EX-Z60DX). Turn on the camera, and then perform the required operation for ...
Owners Manual
Page 193
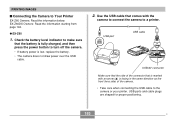
...Read the information starting from page 194. G EX-Z60 1. USB ports and cable plugs are shaped for proper positioning. 193 C Check the battery level indicator to make sure that the battery is fully charged, and then press the power button to turn off the camera. • If battery power is marked with ... is facing in the same direction as the front (lens side) of the connector that the side of the camera. • Take care when connecting the USB cable to Your Printer EX-Z60 Owners: Read the information below. USB port USB USB cable USB/AV connector Make sure that is low, replace...
...Read the information starting from page 194. G EX-Z60 1. USB ports and cable plugs are shaped for proper positioning. 193 C Check the battery level indicator to make sure that the battery is fully charged, and then press the power button to turn off the camera. • If battery power is marked with ... is facing in the same direction as the front (lens side) of the connector that the side of the camera. • Take care when connecting the USB cable to Your Printer EX-Z60 Owners: Read the information below. USB port USB USB cable USB/AV connector Make sure that is low, replace...
Owners Manual
Page 195
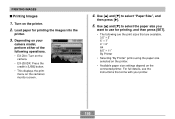
... press [̈]. 5. Turn on the connected printer. PRINTING IMAGES I Printing Images 1. Depending on the camera's monitor screen. 4. For full details, see the instructions that are the print sizes that come with your camera model, perform either of the following are available. 3.5˝ × 5˝ 5˝ ×... the images into the printer. 3. Load paper for printing, and then press [SET]. • The following operations. • EX-Z60: Turn on the camera. • EX-Z60DX: Press the cradle's [USB] button. • This displays the print menu on your printer. 195
... press [̈]. 5. Turn on the connected printer. PRINTING IMAGES I Printing Images 1. Depending on the camera's monitor screen. 4. For full details, see the instructions that are the print sizes that come with your camera model, perform either of the following are available. 3.5˝ × 5˝ 5˝ ×... the images into the printer. 3. Load paper for printing, and then press [SET]. • The following operations. • EX-Z60: Turn on the camera. • EX-Z60DX: Press the cradle's [USB] button. • This displays the print menu on your printer. 195

Owners Manual
Page 196
...8. See page 189 for printing and then repeat this option will be printed when "On" is complete. • EX-Z60: Turn off the camera and then disconnect the USB cable from the camera. • EX-Z60DX: Press the USB cradle's [USB] button and then turn off by pressing [BS]. Use [̆] and ... cause the message to print. • To print multiple images or all images: Select "DPOF Printing", and then press [SET]. Pressing any of the camera's buttons while printing is complete. • If you selected "1 Image" in progress will appear when printing is in step 6, you want . •...
...8. See page 189 for printing and then repeat this option will be printed when "On" is complete. • EX-Z60: Turn off the camera and then disconnect the USB cable from the camera. • EX-Z60DX: Press the USB cradle's [USB] button and then turn off by pressing [BS]. Use [̆] and ... cause the message to print. • To print multiple images or all images: Select "DPOF Printing", and then press [SET]. Pressing any of the camera's buttons while printing is complete. • If you selected "1 Image" in progress will appear when printing is in step 6, you want . •...
Owners Manual
Page 200
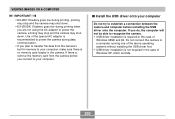
... the case of the special AC adaptor is recommended to power the camera during data communication. • If you plan to transfer file data from the camera's built-in the camera. VIEWING IMAGES ON A COMPUTER IMPORTANT! • EX-Z60: If battery goes low during printing, printing may stop and the... camera may shut down . If there is no memory card loaded in memory to ...
... the case of the special AC adaptor is recommended to power the camera during data communication. • If you plan to transfer file data from the camera's built-in the camera. VIEWING IMAGES ON A COMPUTER IMPORTANT! • EX-Z60: If battery goes low during printing, printing may stop and the... camera may shut down . If there is no memory card loaded in memory to ...
Owners Manual
Page 202
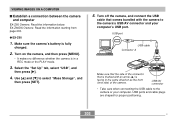
... Use [̆] and [̄] to the camera's USB/AV connector and your computer. USB ports and cable plugs are shaped for proper positioning. 202 C G EX-Z60 1. Select the "Set Up" tab, select "USB", and then press [̈]. 4. Turn off the camera, and connect the USB cable that is marked... with the camera to select "Mass Storage", and then press [SET]. 5. USB port ...
... Use [̆] and [̄] to the camera's USB/AV connector and your computer. USB ports and cable plugs are shaped for proper positioning. 202 C G EX-Z60 1. Select the "Set Up" tab, select "USB", and then press [̈]. 4. Turn off the camera, and connect the USB cable that is marked... with the camera to select "Mass Storage", and then press [SET]. 5. USB port ...
Owners Manual
Page 208
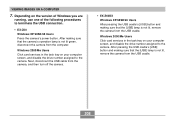
Depending on your computer screen, and disable the drive number assigned to the camera. Next, disconnect the USB cable from the camera, and then turn off the camera. • EX-Z60DX Windows XP/98SE/98 Users After pressing the USB cradle's [USB] button and making sure that the [USB] lamp is not lit... in the task tray on your computer screen, and disable the drive number assigned to terminate the USB connection. • EX-Z60 Windows XP/98SE/98 Users Press the camera's power button. Windows 2000/Me Users Click card services in the task tray on the version of Windows you are running,...
Depending on your computer screen, and disable the drive number assigned to the camera. Next, disconnect the USB cable from the camera, and then turn off the camera. • EX-Z60DX Windows XP/98SE/98 Users After pressing the USB cradle's [USB] button and making sure that the [USB] lamp is not lit... in the task tray on your computer screen, and disable the drive number assigned to terminate the USB connection. • EX-Z60 Windows XP/98SE/98 Users Press the camera's power button. Windows 2000/Me Users Click card services in the task tray on the version of Windows you are running,...

