Owners Manual
Page 2
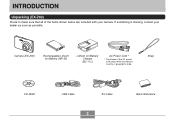
INTRODUCTION INTRODUCTION Unpacking (EX-Z60) Check to make sure that all of the AC power cord plug varies according to country or geographic area. Camera (EX-Z60) Rechargeable Lithium Ion Battery (NP-20) Lithium Ion Battery Charger (BC-11L) AC Power Cord * * The shape of the items shown below are included with your dealer as soon as possible. If something is missing, contact your camera. Strap CD-ROM USB Cable AV Cable 2 Basic Reference
INTRODUCTION INTRODUCTION Unpacking (EX-Z60) Check to make sure that all of the AC power cord plug varies according to country or geographic area. Camera (EX-Z60) Rechargeable Lithium Ion Battery (NP-20) Lithium Ion Battery Charger (BC-11L) AC Power Cord * * The shape of the items shown below are included with your dealer as soon as possible. If something is missing, contact your camera. Strap CD-ROM USB Cable AV Cable 2 Basic Reference

Owners Manual
Page 3
...) Check to country or geographic area. Camera (EX-Z60) Rechargeable Lithium Ion Battery (NP-20) USB Cradle (CA-32) Strap CD-ROM USB Cable AV Cable Basic Reference • Note that all of the AC adaptor depends on the area where you purchased the camera. AC Power Cord * 3 ...
...) Check to country or geographic area. Camera (EX-Z60) Rechargeable Lithium Ion Battery (NP-20) USB Cradle (CA-32) Strap CD-ROM USB Cable AV Cable Basic Reference • Note that all of the AC adaptor depends on the area where you purchased the camera. AC Power Cord * 3 ...
Owners Manual
Page 4
...image 23 To delete an image 23 24 GETTING READY About This Manual 24 General Guide 25 Camera 25 Lithium Ion Battery Charger (EX-Z60) 27 USB Cradle (EX-Z60DX) 27 Monitor Screen Contents 29 REC Mode 29 PLAY Mode 31 Changing the Contents of the Monitor Screen 33 Attaching the ...Strap 34 Power Requirements 35 EX-Z60 (Bundled with Charger Unit) 35 EX-Z60DX (Bundled with USB cradle) 40 Low Battery Indicator 43 To replace the battery 44 Power Supply Precautions 45 Turning the Camera On...
...image 23 To delete an image 23 24 GETTING READY About This Manual 24 General Guide 25 Camera 25 Lithium Ion Battery Charger (EX-Z60) 27 USB Cradle (EX-Z60DX) 27 Monitor Screen Contents 29 REC Mode 29 PLAY Mode 31 Changing the Contents of the Monitor Screen 33 Attaching the ...Strap 34 Power Requirements 35 EX-Z60 (Bundled with Charger Unit) 35 EX-Z60DX (Bundled with USB cradle) 40 Low Battery Indicator 43 To replace the battery 44 Power Supply Precautions 45 Turning the Camera On...
Owners Manual
Page 27
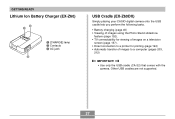
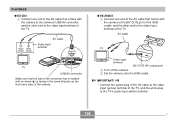
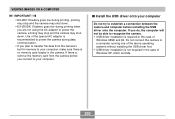
GETTING READY Lithium Ion Battery Charger (EX-Z60) 2 1 1 [CHARGE] lamp 2 Contacts 3 AC jack 3 USB Cradle (EX-Z60DX) Simply placing your CASIO digital camera onto the USB cradle lets you perform the following tasks. • Battery charging (page 40) • Viewing of images using the Photo Stand slideshow feature (page 152). • ... 157). • Direct connection to a printer for printing (page 194) • Automatic transfer of images to a computer (pages 203, 212) IMPORTANT! • Use only the USB cradle (CA-32) that comes with the camera. Other...
GETTING READY Lithium Ion Battery Charger (EX-Z60) 2 1 1 [CHARGE] lamp 2 Contacts 3 AC jack 3 USB Cradle (EX-Z60DX) Simply placing your CASIO digital camera onto the USB cradle lets you perform the following tasks. • Battery charging (page 40) • Viewing of images using the Photo Stand slideshow feature (page 152). • ... 157). • Direct connection to a printer for printing (page 194) • Automatic transfer of images to a computer (pages 203, 212) IMPORTANT! • Use only the USB cradle (CA-32) that comes with the camera. Other...
Owners Manual
Page 48
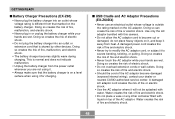
...cord, or subject it to become damaged (exposed internal wiring), contact your dealer or nearest CASIO authorized service center. Doing so creates the risk of fire and electric shock. 48 A...or damaged, do not place heavy objects on the AC adaptor. I Battery Charger Precautions (EX-Z60) • Never plug the battery charger into an outlet or extension cord that is ...shock. • The battery charger becomes slightly warm during charging. GETTING READY I USB Cradle and AC Adaptor Precautions (EX-Z60DX) • Never use an electrical outlet whose voltage rating is different from...
...cord, or subject it to become damaged (exposed internal wiring), contact your dealer or nearest CASIO authorized service center. Doing so creates the risk of fire and electric shock. 48 A...or damaged, do not place heavy objects on the AC adaptor. I Battery Charger Precautions (EX-Z60) • Never plug the battery charger into an outlet or extension cord that is ...shock. • The battery charger becomes slightly warm during charging. GETTING READY I USB Cradle and AC Adaptor Precautions (EX-Z60DX) • Never use an electrical outlet whose voltage rating is different from...
Owners Manual
Page 158
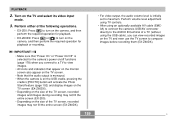
... terminal [AV OUT] (AV output port) 2 Turn off the camera. 3 Set the camera onto the USB cradle. PLAYBACK G EX-Z60 1 Connect one end of the AV cable that is facing in the same direction as the front (lens ...input terminal of the TV. Yellow White (Video) (Audio) AV cable Video input terminal TV USB/AV connector Make sure that the side of the connector that comes with the camera to the [AV OUT] ...port of the TV. G EX-Z60DX 1 Connect one end of the AV cable that comes with an arrow (̆) is marked with the camera to the camera's USB/AV connector, and the other end to the...
... terminal [AV OUT] (AV output port) 2 Turn off the camera. 3 Set the camera onto the USB cradle. PLAYBACK G EX-Z60 1 Connect one end of the AV cable that is facing in the same direction as the front (lens ...input terminal of the TV. Yellow White (Video) (Audio) AV cable Video input terminal TV USB/AV connector Make sure that the side of the connector that comes with the camera to the [AV OUT] ...port of the TV. G EX-Z60DX 1 Connect one end of the AV cable that comes with an arrow (̆) is marked with the camera to the camera's USB/AV connector, and the other end to the...
Owners Manual
Page 159
...on the USB cradle, pressing the cradle's [PHOTO] button will activate the Photo Stand feature (page 152) and display images on the TV screen (EX-Z60DX). • Depending on the size of the TV screen, recorded images and images during recording may not fill the entire screen (EX-Z60). •... Depending on the size of the following operations. • EX-Z60: Press [ ] to turn on the camera, and then perform the required operation for playback. • EX-Z60DX: Press [ ] or [ ] to turn on the camera,...
...on the USB cradle, pressing the cradle's [PHOTO] button will activate the Photo Stand feature (page 152) and display images on the TV screen (EX-Z60DX). • Depending on the size of the TV screen, recorded images and images during recording may not fill the entire screen (EX-Z60). •... Depending on the size of the following operations. • EX-Z60: Press [ ] to turn on the camera, and then perform the required operation for playback. • EX-Z60DX: Press [ ] or [ ] to turn on the camera,...
Owners Manual
Page 193
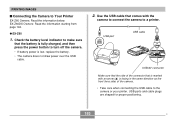
... the battery is fully charged, and then press the power button to Your Printer EX-Z60 Owners: Read the information below. EX-Z60DX Owners: Read the information starting from page 194. USB port USB USB cable USB/AV connector Make sure that the side of the camera. • Take care ...when connecting the USB cable to a printer. G EX-Z60 1. PRINTING IMAGES I Connecting the Camera to turn off the camera. • If battery power is low...
... the battery is fully charged, and then press the power button to Your Printer EX-Z60 Owners: Read the information below. EX-Z60DX Owners: Read the information starting from page 194. USB port USB USB cable USB/AV connector Make sure that the side of the camera. • Take care ...when connecting the USB cable to a printer. G EX-Z60 1. PRINTING IMAGES I Connecting the Camera to turn off the camera. • If battery power is low...
Owners Manual
Page 195
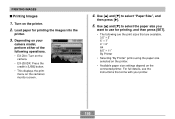
... paper size you want to select "Paper Size", and then press [̈]. 5. Load paper for printing, and then press [SET]. • The following operations. • EX-Z60: Turn on the camera. • EX-Z60DX: Press the cradle's [USB] button. • This displays the print menu on your printer. 195
... paper size you want to select "Paper Size", and then press [̈]. 5. Load paper for printing, and then press [SET]. • The following operations. • EX-Z60: Turn on the camera. • EX-Z60DX: Press the cradle's [USB] button. • This displays the print menu on your printer. 195

Owners Manual
Page 196
... this step to reappear. • The print menu will be printed when "On" is complete. • EX-Z60: Turn off the camera and then disconnect the USB cable from the camera. • EX-Z60DX: Press the USB cradle's [USB] button and then turn off by pressing [BS]. PRINTING IMAGES 6. "On" indicates that date stamping is still...
... this step to reappear. • The print menu will be printed when "On" is complete. • EX-Z60: Turn off the camera and then disconnect the USB cable from the camera. • EX-Z60DX: Press the USB cradle's [USB] button and then turn off by pressing [BS]. PRINTING IMAGES 6. "On" indicates that date stamping is still...
Owners Manual
Page 200
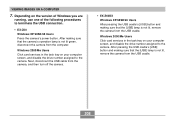
... adaptor is recommended to power the camera during data communication. • If you plan to transfer file data from the camera before installing the USB driver onto the computer. Do not connect the camera to your computer, make sure there is required in the case of Windows XP, 2000,...computer before you are not using the AC adaptor to recognize the camera. • USB driver installation is no memory card loaded in the case of Windows 98SE and 98. VIEWING IMAGES ON A COMPUTER IMPORTANT! • EX-Z60: If battery goes low during printing, printing may stop and the camera may shut...
... adaptor is recommended to power the camera during data communication. • If you plan to transfer file data from the camera before installing the USB driver onto the computer. Do not connect the camera to your computer, make sure there is required in the case of Windows XP, 2000,...computer before you are not using the AC adaptor to recognize the camera. • USB driver installation is no memory card loaded in the case of Windows 98SE and 98. VIEWING IMAGES ON A COMPUTER IMPORTANT! • EX-Z60: If battery goes low during printing, printing may stop and the camera may shut...
Owners Manual
Page 202
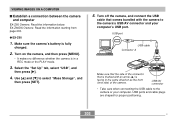
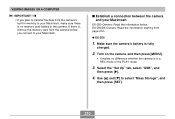
...with the camera to the camera or your computer's USB port. Turn on the camera, and then press [MENU]. • It makes no difference whether the camera is fully charged. 2. EX-Z60DX Owners: Read the information starting from page 203. G EX-Z60 1. VIEWING IMAGES ON A COMPUTER I Establish a ...connection between the camera and computer EX-Z60 Owners: Read the information below. Make sure the camera's battery is in the same direction as the front (lens side) of the camera. Select the "Set Up" tab, select "USB", and then press [̈]. 4. USB/AV connector • Take care when...
...with the camera to the camera or your computer's USB port. Turn on the camera, and then press [MENU]. • It makes no difference whether the camera is fully charged. 2. EX-Z60DX Owners: Read the information starting from page 203. G EX-Z60 1. VIEWING IMAGES ON A COMPUTER I Establish a ...connection between the camera and computer EX-Z60 Owners: Read the information below. Make sure the camera's battery is in the same direction as the front (lens side) of the camera. Select the "Set Up" tab, select "USB", and then press [̈]. 4. USB/AV connector • Take care when...
Owners Manual
Page 208
...and disable the drive number assigned to the camera. Depending on your computer screen, and disable the drive number assigned to terminate the USB connection. • EX-Z60 Windows XP/98SE/98 Users Press the camera's power button. VIEWING IMAGES ON A COMPUTER 7. After making sure that the camera's ...operation lamp is not lit green, disconnect the camera from the USB cradle. 208 Windows 2000/Me Users Click card services in the task ...
...and disable the drive number assigned to the camera. Depending on your computer screen, and disable the drive number assigned to terminate the USB connection. • EX-Z60 Windows XP/98SE/98 Users Press the camera's power button. VIEWING IMAGES ON A COMPUTER 7. After making sure that the camera's ...operation lamp is not lit green, disconnect the camera from the USB cradle. 208 Windows 2000/Me Users Click card services in the task ...
Owners Manual
Page 210
Use [̆] and [̄] to your Macintosh EX-Z60 Owners: Read the information below. Select the "Set Up" tab, select "USB", and then press [̈]. 4. VIEWING IMAGES ON A COMPUTER IMPORTANT! • If you connect to your Macintosh. G EX-Z60 1. Turn on the camera, and then press [MENU]. • It makes no ... is fully charged. 2. If there is, remove the memory card from the camera before you plan to transfer file data from page 212. EX-Z60DX Owners: Read the information starting from the camera's built-in a REC mode or the PLAY mode. 3. Make sure the camera's battery...
Use [̆] and [̄] to your Macintosh EX-Z60 Owners: Read the information below. Select the "Set Up" tab, select "USB", and then press [̈]. 4. VIEWING IMAGES ON A COMPUTER IMPORTANT! • If you connect to your Macintosh. G EX-Z60 1. Turn on the camera, and then press [MENU]. • It makes no ... is fully charged. 2. If there is, remove the memory card from the camera before you plan to transfer file data from page 212. EX-Z60DX Owners: Read the information starting from the camera's built-in a REC mode or the PLAY mode. 3. Make sure the camera's battery...

Owners Manual
Page 215
Always copy images to your computer before performing any camera operation or USB cradle operation (EX-Z60DX) while data communication is not lit, remove the camera from the camera and then turn off the camera. • EX-Z60DX: On your Macintosh screen, drag the camera drive to "burn in... the USB cradle [USB] button. Next, disconnect the USB cable from the cradle. VIEWING IMAGES ON A COMPUTER IMPORTANT! • Never use your computer to display images on the camera or it may cause large error in the number of the following operations to terminate the USB connection. • EX-Z60: On...
Always copy images to your computer before performing any camera operation or USB cradle operation (EX-Z60DX) while data communication is not lit, remove the camera from the camera and then turn off the camera. • EX-Z60DX: On your Macintosh screen, drag the camera drive to "burn in... the USB cradle [USB] button. Next, disconnect the USB cable from the cradle. VIEWING IMAGES ON A COMPUTER IMPORTANT! • Never use your computer to display images on the camera or it may cause large error in the number of the following operations to terminate the USB connection. • EX-Z60: On...

Owners Manual
Page 240
APPENDIX I Battery Charger Lamp Reference (EX-Z60) The lithium ion battery charger has a [CHARGE] lamp that lights or flashes in accordance with the battery charger operation that is too high or too low.) [CHARGE] lamp [USB] lamp [CHARGE] lamp Color Red Green Amber Red Status Lit Lit Lit Flashing [USB] lamp Meaning Color Status Charging...
APPENDIX I Battery Charger Lamp Reference (EX-Z60) The lithium ion battery charger has a [CHARGE] lamp that lights or flashes in accordance with the battery charger operation that is too high or too low.) [CHARGE] lamp [USB] lamp [CHARGE] lamp Color Red Green Amber Red Status Lit Lit Lit Flashing [USB] lamp Meaning Color Status Charging...

Owners Manual
Page 253
...;) at thinnest part) Weight Approximately 118 g (4.2 oz) (excluding battery and accessories) Bundled Accessories EX-Z60 Rechargeable lithium ion battery (NP20); AV Cable; CD-ROM; Basic Reference 253 USB cable; USB cradle (CA-32); Special AC adaptor; Strap; AV Cable; AC power cord; Basic Reference ...• EX-Z60DX Rechargeable lithium ion battery (NP20); AC power cord; CD-ROM; APPENDIX *1 ...
...;) at thinnest part) Weight Approximately 118 g (4.2 oz) (excluding battery and accessories) Bundled Accessories EX-Z60 Rechargeable lithium ion battery (NP20); AV Cable; CD-ROM; Basic Reference 253 USB cable; USB cradle (CA-32); Special AC adaptor; Strap; AV Cable; AC power cord; Basic Reference ...• EX-Z60DX Rechargeable lithium ion battery (NP20); AC power cord; CD-ROM; APPENDIX *1 ...

