
Owners Manual
Page 3
... language and clock settings ..... 22 To record an image 23 To view a recorded image 23 To delete an image 24 25 GETTING READY About This Manual 25 General Guide 26 Monitor Screen Contents 28 REC mode 28 PLAY mode 30 Changing the Contents of the Monitor Screen 31 Indicator Lamps 31...
... language and clock settings ..... 22 To record an image 23 To view a recorded image 23 To delete an image 24 25 GETTING READY About This Manual 25 General Guide 26 Monitor Screen Contents 28 REC mode 28 PLAY mode 30 Changing the Contents of the Monitor Screen 31 Indicator Lamps 31...

Owners Manual
Page 4
... 66 Using Auto Focus 67 Using the Macro Mode 68 Using the Infinity Mode 69 Using Manual Focus 69 Using Focus Lock 70 4 Exposure Compensation (EV Shift 71 Adjusting White Balance 73 Adjusting White Balance Manually 74 Using the BESTSHOT Mode 75 Creating Your Own BESTSHOT Setup 77 Combining Shots of Two...
... 66 Using Auto Focus 67 Using the Macro Mode 68 Using the Infinity Mode 69 Using Manual Focus 69 Using Focus Lock 70 4 Exposure Compensation (EV Shift 71 Adjusting White Balance 73 Adjusting White Balance Manually 74 Using the BESTSHOT Mode 75 Creating Your Own BESTSHOT Setup 77 Combining Shots of Two...

Owners Manual
Page 8
... Restrictions Except for any third party due to the use of the QV-R41/QVR51. • CASIO COMPUTER CO., LTD. assumes no responsibility for the purposes of your own personal enjoyment, unauthorized copying of this manual. • CASIO COMPUTER CO., LTD. shall not be trademarks or service marks of ...others. • Photo Loader and Photohands are subject to CASIO COMPUTER CO., LTD. assumes no responsibility for any damages or...
... Restrictions Except for any third party due to the use of the QV-R41/QVR51. • CASIO COMPUTER CO., LTD. assumes no responsibility for the purposes of your own personal enjoyment, unauthorized copying of this manual. • CASIO COMPUTER CO., LTD. shall not be trademarks or service marks of ...others. • Photo Loader and Photohands are subject to CASIO COMPUTER CO., LTD. assumes no responsibility for any damages or...

Owners Manual
Page 11
... other bright light through the camera's viewfinder. Doing so creates the risk of loss of fire and explosion. • Never fire the flash in this manual to "this camera" and "the camera" refer to strong impact. I Flash • Never use the camera to crack. • Should the display ... direction of the liquid inside the panel. I Display Panel • Do not apply strong pressure to the LCD panel surface or subject it to the CASIO QV-R41/QV-R51 Digital Camera. I Directly Viewing the Sun or Bright Light • Never look at the sun or any of a person operating a motor vehicle....
... other bright light through the camera's viewfinder. Doing so creates the risk of loss of fire and explosion. • Never fire the flash in this manual to "this camera" and "the camera" refer to strong impact. I Flash • Never use the camera to crack. • Should the display ... direction of the liquid inside the panel. I Display Panel • Do not apply strong pressure to the LCD panel surface or subject it to the CASIO QV-R41/QV-R51 Digital Camera. I Directly Viewing the Sun or Bright Light • Never look at the sun or any of a person operating a motor vehicle....

Owners Manual
Page 14
... allow them to become shorted. - Never try to take the following precautions refers to the CASIO BC-5H Charger Unit. 14 Do not rub! 2. Make sure you do not plan to use the camera for this manual refers to the rechargeable nickel-metal hydride batteries. • The term "charger unit" in this...
... allow them to become shorted. - Never try to take the following precautions refers to the CASIO BC-5H Charger Unit. 14 Do not rub! 2. Make sure you do not plan to use the camera for this manual refers to the rechargeable nickel-metal hydride batteries. • The term "charger unit" in this...
Owners Manual
Page 25
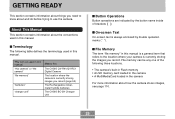
... about how the camera stores images, see page 110. 25 About This Manual This section contains information about and do before trying to use the camera. This term as used in this : The CASIO QV-R41/QV-R51 Digital Camera The location where the camera is currently storing images you ...record (page 52) The Rechargeable nickelmetal hydride batteries The CASIO BC-5H Charger Unit I File Memory The term "file memory" in this manual is a general term that refers to...
... about how the camera stores images, see page 110. 25 About This Manual This section contains information about and do before trying to use the camera. This term as used in this : The CASIO QV-R41/QV-R51 Digital Camera The location where the camera is currently storing images you ...record (page 52) The Rechargeable nickelmetal hydride batteries The CASIO BC-5H Charger Unit I File Memory The term "file memory" in this manual is a general term that refers to...
Owners Manual
Page 28
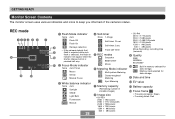
...card selected for None Auto Focus 6 Metering Mode indicator data storage. CB Infinity Manual Focus Center-weighted Metering A Date and time 3 White balance indicator None Auto Sunlight Shade Light Bulb Fluorescent Manual 28 Spot Metering 7 Memory capacity (Remaining number of the camera's status. GETTING ...10s Self-timer 10 sec 2s Self-timer 2 sec x3 Triple self-timer 5 REC modes Snapshot BESTSHOT A 2 Focus Mode indicator Movie • QV-R41 2304 ҂ 1712 pixels 2240 ҂ 1680 pixels 2240 ҂ 1488 (3:2)pixels 1600 ҂ 1200 pixels 1280 ҂ 960 pixels 640 ...
...card selected for None Auto Focus 6 Metering Mode indicator data storage. CB Infinity Manual Focus Center-weighted Metering A Date and time 3 White balance indicator None Auto Sunlight Shade Light Bulb Fluorescent Manual 28 Spot Metering 7 Memory capacity (Remaining number of the camera's status. GETTING ...10s Self-timer 10 sec 2s Self-timer 2 sec x3 Triple self-timer 5 REC modes Snapshot BESTSHOT A 2 Focus Mode indicator Movie • QV-R41 2304 ҂ 1712 pixels 2240 ҂ 1680 pixels 2240 ҂ 1488 (3:2)pixels 1600 ҂ 1200 pixels 1280 ҂ 960 pixels 640 ...

Owners Manual
Page 54
... is selected for the ISO sensitivity setting (page 86), the camera increases sensitivity and uses a slower shutter speed. When using focus lock (page 70) or manual focus (page 69). 54 BASIC IMAGE RECORDING Recording Precautions • Never open the battery compartment cover while the green operation lamp is being recorded to...
... is selected for the ISO sensitivity setting (page 86), the camera increases sensitivity and uses a slower shutter speed. When using focus lock (page 70) or manual focus (page 69). 54 BASIC IMAGE RECORDING Recording Precautions • Never open the battery compartment cover while the green operation lamp is being recorded to...

Owners Manual
Page 55
... will be different from what you see inside the viewfinder frame. • The monitor screen turns on automatically whenever you select the Macro mode or Manual Focus mode. BASIC IMAGE RECORDING About the REC Mode Monitor Screen • The image shown on your camera. The actual image is a simplified image for...
... will be different from what you see inside the viewfinder frame. • The monitor screen turns on automatically whenever you select the Macro mode or Manual Focus mode. BASIC IMAGE RECORDING About the REC Mode Monitor Screen • The image shown on your camera. The actual image is a simplified image for...

Owners Manual
Page 66
To set up focus (Macro) Perform infinity focus (Infinity) Focus manually (Manual Focus) 1. Selecting the Focus Mode You can select one of [̆] ( ) cycles thorough the focus mode settings shown below on the monitor screen. [̆] ( ) Select ...: None MF Focus mode indicator 66 In the REC mode, press [̆] ( ). • Each press of four different focus modes: Auto Focus, Macro, Infinity, and Manual. OTHER RECORDING FUNCTIONS OTHER RECORDING FUNCTIONS This section describes other powerful features and functions that are available for recording.
To set up focus (Macro) Perform infinity focus (Infinity) Focus manually (Manual Focus) 1. Selecting the Focus Mode You can select one of [̆] ( ) cycles thorough the focus mode settings shown below on the monitor screen. [̆] ( ) Select ...: None MF Focus mode indicator 66 In the REC mode, press [̆] ( ). • Each press of four different focus modes: Auto Focus, Macro, Infinity, and Manual. OTHER RECORDING FUNCTIONS OTHER RECORDING FUNCTIONS This section describes other powerful features and functions that are available for recording.

Owners Manual
Page 69
.... Boundary 69 Optical Zoom Factor 1X 3X Approximate Focus Range 10cm (3.9˝) to infinity (∞) 60cm (23.6˝) to infinity (∞) 1. Using Manual Focus With the Manual Focus mode, you can adjust the focus of the image that will be used for two optical zoom factors. Keep pressing [̆] ( ) until the focus... other faraway images. 1. OTHER RECORDING FUNCTIONS Using the Infinity Mode Use this point, a boundary also appears on the display, indicating the part of an image manually.
.... Boundary 69 Optical Zoom Factor 1X 3X Approximate Focus Range 10cm (3.9˝) to infinity (∞) 60cm (23.6˝) to infinity (∞) 1. Using Manual Focus With the Manual Focus mode, you can adjust the focus of the image that will be used for two optical zoom factors. Keep pressing [̆] ( ) until the focus... other faraway images. 1. OTHER RECORDING FUNCTIONS Using the Infinity Mode Use this point, a boundary also appears on the display, indicating the part of an image manually.

Owners Manual
Page 70
... frame when you record an image. The indications of the boundary displayed in the Auto Focus mode. 70 Record the image. IMPORTANT! • In the Manual Focus mode, the [̇] and [̈] keys adjust focus, even if you can use focus lock in focus. You can use [̇] and [̈] to... later. 3. Using Focus Lock Focus lock is a technique you used key customization to assign other functions to focus. While watching the image on the subject Manual focus position Do this : Focus out on the subject Focus in on the monitor screen, use to aid in the Auto Focus mode and the...
... frame when you record an image. The indications of the boundary displayed in the Auto Focus mode. 70 Record the image. IMPORTANT! • In the Manual Focus mode, the [̇] and [̈] keys adjust focus, even if you can use focus lock in focus. You can use [̇] and [̈] to... later. 3. Using Focus Lock Focus lock is a technique you used key customization to assign other functions to focus. While watching the image on the subject Manual focus position Do this : Focus out on the subject Focus in on the monitor screen, use to aid in the Auto Focus mode and the...

Owners Manual
Page 71
... achieve better results when recording a backlit subject, a strongly lit subject indoors, or a subject that is composed the way you change the exposure setting (EV value) manually to adjust for the lighting of the way to record it. • The focus and image recording operations are identical to +2.0EV Steps: 1/3EV 1.
... achieve better results when recording a backlit subject, a strongly lit subject indoors, or a subject that is composed the way you change the exposure setting (EV value) manually to adjust for the lighting of the way to record it. • The focus and image recording operations are identical to +2.0EV Steps: 1/3EV 1.

Owners Manual
Page 73
... Shade Incandescent light bulb (reddish tinge) Fluorescent light (greenish tinge) Difficult lighting that requires manual control (See "Adjusting White Balance Manually".) Select this setting: Auto Manual NOTES • Selecting "Manual" changes white balance to the settings achieved the last time a manual white balance operation was performed. • You can affect the color of an image...
... Shade Incandescent light bulb (reddish tinge) Fluorescent light (greenish tinge) Difficult lighting that requires manual control (See "Adjusting White Balance Manually".) Select this setting: Auto Manual NOTES • Selecting "Manual" changes white balance to the settings achieved the last time a manual white balance operation was performed. • You can affect the color of an image...

Owners Manual
Page 74
... object under the lighting conditions for a particular light source. Select the "REC" tab, select "White Balance", and then press [̈]. 3. Manual white balance helps to set the white balance, and then press the shutter release button. Use [̆] and [̄] to select...object you will be shooting under the "Auto" setting can cause the procedure to take a long time to perform manual white balance. 1. Point the camera at a dark colored object while performing manual white balance adjustment can take a long time to complete. 5. A white piece of paper • This starts...
... object under the lighting conditions for a particular light source. Select the "REC" tab, select "White Balance", and then press [̈]. 3. Manual white balance helps to set the white balance, and then press the shutter release button. Use [̆] and [̄] to select...object you will be shooting under the "Auto" setting can cause the procedure to take a long time to perform manual white balance. 1. Point the camera at a dark colored object while performing manual white balance adjustment can take a long time to complete. 5. A white piece of paper • This starts...

Owners Manual
Page 92
... or off , the camera automatically restores the initial factory default setting for the applicable mode. Turning on mode memory for a mode tells the camera to manual focus Zoom Position* (Wide Angle) * Only the optical zoom position is remembered. 92 The following table shows what happens when you turn mode memory on... default settings individually for the REC mode, flash mode, focus mode, white balance mode, ISO sensitivity, AF Area, metering mode, flash intensity, digital zoom mode, manual focus position, and zoom position.
... or off , the camera automatically restores the initial factory default setting for the applicable mode. Turning on mode memory for a mode tells the camera to manual focus Zoom Position* (Wide Angle) * Only the optical zoom position is remembered. 92 The following table shows what happens when you turn mode memory on... default settings individually for the REC mode, flash mode, focus mode, white balance mode, ISO sensitivity, AF Area, metering mode, flash intensity, digital zoom mode, manual focus position, and zoom position.

Owners Manual
Page 164
...-ROM. 164 You do not need to install DirectX if you read the user documentation for the camera, Photo Loader, and Photohands, all of this manual for more information. Macintosh See the "readme" file on page 167 (Windows) and page 169 (Macintosh) of which is an application that allows Windows 98...
...-ROM. 164 You do not need to install DirectX if you read the user documentation for the camera, Photo Loader, and Photohands, all of this manual for more information. Macintosh See the "readme" file on page 167 (Windows) and page 169 (Macintosh) of which is an application that allows Windows 98...

Owners Manual
Page 167
... browser and accesses the user registration website. Follow the instructions that appear on your computer to read user documentation files. In the "Manual" area, click the name of the manual you do so, of course, you need to the Internet. If you want to read . Click the "Register" button. • This starts...
... browser and accesses the user registration website. Follow the instructions that appear on your computer to read user documentation files. In the "Manual" area, click the name of the manual you do so, of course, you need to the Internet. If you want to read . Click the "Register" button. • This starts...

Owners Manual
Page 169
Open the "Photo Loader" folder and then open the "Manual" folder. 2. Open the "Digital Camera" folder, and then open the "Manual" folder. 2. On the CD-ROM, open the "English" folder. 3. Open "PhotoLoader_english". I To read the Photo Loader user's guide 1. I To view the ...Macintosh. I To register as a user Internet registration only is the language code. Visit the following procedures, you want to register: http://world.casio.com/qv/register/ 169 Open the file named "camera_xx.pdf". • "xx" is supported. You can download the latest version of Adobe Acrobat Reader...
Open the "Photo Loader" folder and then open the "Manual" folder. 2. Open the "Digital Camera" folder, and then open the "Manual" folder. 2. On the CD-ROM, open the "English" folder. 3. Open "PhotoLoader_english". I To read the Photo Loader user's guide 1. I To view the ...Macintosh. I To register as a user Internet registration only is the language code. Visit the following procedures, you want to register: http://world.casio.com/qv/register/ 169 Open the file named "camera_xx.pdf". • "xx" is supported. You can download the latest version of Adobe Acrobat Reader...

Owners Manual
Page 170
... x 1920 / 2560 x 1712 (3:2) / 2048 x 1536 / 1600 x 1200 / 1280 x 960 / 640 x 480 Fine / Normal / Economy -2.0 / -1.7 / -1.3 / -1.0 / -0.7 / -0.3 / 0.0 / +0.3 / +0.7 / +1.0 / +1.3 / +1.7 / +2.0 Auto / (Sunlight) / (Shade) / (Light Bulb) / (Fluorescent) / Manual QV-R41: ISO 64 / ISO 125 / ISO 250 / ISO 500 / Auto QV-R51: ISO 50 / ISO 100 / ISO 200 / ISO 400 / Auto Spot / Multi Metering Filter Sharpness Saturation Contrast Flash Intensity Grid Digital...
... x 1920 / 2560 x 1712 (3:2) / 2048 x 1536 / 1600 x 1200 / 1280 x 960 / 640 x 480 Fine / Normal / Economy -2.0 / -1.7 / -1.3 / -1.0 / -0.7 / -0.3 / 0.0 / +0.3 / +0.7 / +1.0 / +1.3 / +1.7 / +2.0 Auto / (Sunlight) / (Shade) / (Light Bulb) / (Fluorescent) / Manual QV-R41: ISO 64 / ISO 125 / ISO 250 / ISO 500 / Auto QV-R51: ISO 50 / ISO 100 / ISO 200 / ISO 400 / Auto Spot / Multi Metering Filter Sharpness Saturation Contrast Flash Intensity Grid Digital...

