
User Guide
Page 4
... 36 Input Settings Main Menu 38 Option Settings 1 Main Menu 39 Option Settings 2 Main Menu 40 USB Settings Main Menu (USB Port Models Only 42 Wireless Main Menu (USB Port Models Only 42 Operational Info Main Menu 42 Restore All Defaults Main Menu 42 Cleaning the Projector 43 Cleaning the Projector...
... 36 Input Settings Main Menu 38 Option Settings 1 Main Menu 39 Option Settings 2 Main Menu 40 USB Settings Main Menu (USB Port Models Only 42 Wireless Main Menu (USB Port Models Only 42 Operational Info Main Menu 42 Restore All Defaults Main Menu 42 Cleaning the Projector 43 Cleaning the Projector...

User Guide
Page 7
...Camera (YC-400, YC-430) Connection: A CASIO Multi Projection Camera can be connected directly to the projector's USB port for projection. After a wireless LAN connection is established, the contents of the calculator screen contents. XJ-A146/XJ-A246/XJ-A256 z Projection of documents and other images.... This makes it perfect for projecting images from MobiShow: You can install AWIND's MobiShow (client software for wireless connection to a projector) on a smartphone ...
...Camera (YC-400, YC-430) Connection: A CASIO Multi Projection Camera can be connected directly to the projector's USB port for projection. After a wireless LAN connection is established, the contents of the calculator screen contents. XJ-A146/XJ-A246/XJ-A256 z Projection of documents and other images.... This makes it perfect for projecting images from MobiShow: You can install AWIND's MobiShow (client software for wireless connection to a projector) on a smartphone ...

User Guide
Page 15
...) Use the setup menu (page 25) to adjust image brightness when the input source is at a vertical angle to the USB port or via the wireless adapter. 1. To use the [KEYSTONE +] and [KEYSTONE -] keys to adjust image brightness. 3. The projector detects when it is an external device connected to the screen...
...) Use the setup menu (page 25) to adjust image brightness when the input source is at a vertical angle to the USB port or via the wireless adapter. 1. To use the [KEYSTONE +] and [KEYSTONE -] keys to adjust image brightness. 3. The projector detects when it is an external device connected to the screen...
User Guide
Page 24
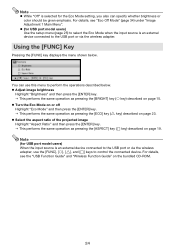
... press the [ENTER] key. z (for USB port model users) When the input source is an external device connected to the USB port or via the wireless adapter. For details, see "Eco Off Mode" (page 34) under "Image Adjustment 1 Main Menu". Note (for USB port model users) Use the setup ...Key Pressing the [FUNC] key displays the menu shown below . Note z While "Off" is an external device connected to the USB port or via the wireless adapter, use this menu to perform the operations described below . J This performs the same operation as pressing the [BRIGHT] key (O key) described on or ...
... press the [ENTER] key. z (for USB port model users) When the input source is an external device connected to the USB port or via the wireless adapter. For details, see "Eco Off Mode" (page 34) under "Image Adjustment 1 Main Menu". Note (for USB port model users) Use the setup ...Key Pressing the [FUNC] key displays the menu shown below . Note z While "Off" is an external device connected to the USB port or via the wireless adapter, use this menu to perform the operations described below . J This performs the same operation as pressing the [BRIGHT] key (O key) described on or ...

User Guide
Page 33
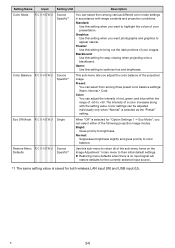
... . Setting Name: This column shows the names of the settings as follows: R : RGB input C : component video input V : video input H : HDMI (PC) input D : HDMI (DTV) input W : Wireless LAN input (USB port models only) U : USB input (USB port models only) The letter N indicates that provide detailed explanations of all of the projected image...
... . Setting Name: This column shows the names of the settings as follows: R : RGB input C : component video input V : video input H : HDMI (PC) input D : HDMI (DTV) input W : Wireless LAN input (USB port models only) U : USB input (USB port models only) The letter N indicates that provide detailed explanations of all of the projected image...
User Guide
Page 34
..." is selected for the currently selected input source. *1 The same setting value is selected as the "Preset" setting. Source Specific*1 Use this setting for both wireless LAN input (W) and USB input (U). Source Specific*1 Single This sub-menu lets you want to +50. The intensity of -50 to highlight the colors of...
..." is selected for the currently selected input source. *1 The same setting value is selected as the "Preset" setting. Source Specific*1 Use this setting for both wireless LAN input (W) and USB input (U). Source Specific*1 Single This sub-menu lets you want to +50. The intensity of -50 to highlight the colors of...

User Guide
Page 35
..., the setting is saved for the specific type of signal (XGA/60Hz, SXGA/60Hz, etc.) that the phase setting is performed, and not for both wireless LAN input (W) and USB input (U). About the "Signal Specific" Setting Unit For the items that have "Signal Specific" in the projected image while RGB is...
..., the setting is saved for the specific type of signal (XGA/60Hz, SXGA/60Hz, etc.) that the phase setting is performed, and not for both wireless LAN input (W) and USB input (U). About the "Signal Specific" Setting Unit For the items that have "Signal Specific" in the projected image while RGB is...

User Guide
Page 40
...*: Select this option to have Portuguese, Turkish, or Russian selected as the projector's language, selecting an external device connected to the projector's USB port or wireless adapter as the input source will cause some menus and messages to be sure to press the [P] (Power) key to its initial default only when...
...*: Select this option to have Portuguese, Turkish, or Russian selected as the projector's language, selecting an external device connected to the projector's USB port or wireless adapter as the input source will cause some menus and messages to be sure to press the [P] (Power) key to its initial default only when...

User Guide
Page 42
... (USB Port Models Only) The Wireless main menu is available only when "Wireless" is selected as the input source on all main menus to their initial factory defaults" on the bundled CD-ROM. Operational Info Main Menu Setting ... initial default settings. Light Time R C V H D W U N Single This sub-menu item shows the cumulative number of the input signal. For details about signal names, see the "Wireless Function Guide" on the CD-ROM that comes with the projector. Resolution RH Source Specific This sub-menu item appears only when RGB is no...
... (USB Port Models Only) The Wireless main menu is available only when "Wireless" is selected as the input source on all main menus to their initial factory defaults" on the bundled CD-ROM. Operational Info Main Menu Setting ... initial default settings. Light Time R C V H D W U N Single This sub-menu item shows the cumulative number of the input signal. For details about signal names, see the "Wireless Function Guide" on the CD-ROM that comes with the projector. Resolution RH Source Specific This sub-menu item appears only when RGB is no...