Owners Manual
Page 4
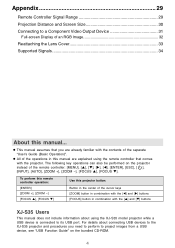
... Users This manual does not include information about connecting USB devices to the XJ-S35 projector and procedures you are already familiar with the contents of the separate "User's Guide (Basic Operation)". Appendix 29 Remote Controller Signal Range 29 Projection Distance and Screen Size 30 Connecting to a Component Video Output Device 31 Full...
... Users This manual does not include information about connecting USB devices to the XJ-S35 projector and procedures you are already familiar with the contents of the separate "User's Guide (Basic Operation)". Appendix 29 Remote Controller Signal Range 29 Projection Distance and Screen Size 30 Connecting to a Component Video Output Device 31 Full...
Owners Manual
Page 9
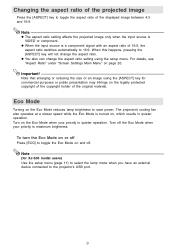
... Note (for commercial purposes or public presentation may infringe on , which results in quieter operation. The projector's cooling fan also operates at a slower speed while the Eco Mode is quieter operation. Note that ... the [ASPECT] key will not change the aspect ratio setting using the [ASPECT] key for XJ-S35 model users) Use the setup menu (page 11) to select the lamp mode when you... ratio setting affects the projected image only when the input source is a component signal with an aspect ratio of 16:9, the aspect ratio switches automatically to 16:9. z When the input ...
... Note (for commercial purposes or public presentation may infringe on , which results in quieter operation. The projector's cooling fan also operates at a slower speed while the Eco Mode is quieter operation. Note that ... the [ASPECT] key will not change the aspect ratio setting using the [ASPECT] key for XJ-S35 model users) Use the setup menu (page 11) to select the lamp mode when you... ratio setting affects the projected image only when the input source is a component signal with an aspect ratio of 16:9, the aspect ratio switches automatically to 16:9. z When the input ...

Owners Manual
Page 12
... [ESC] key. 12 To configure the "Image Adjustment J Contrast" setting 1 Press the [MENU] key to display the setup menu. 2 "Image Adjustment" is no input signal to the projector. Because of this, you want . 8 After selecting the color mode you should configure setup menu settings after selecting an input source and starting projection...
... [ESC] key. 12 To configure the "Image Adjustment J Contrast" setting 1 Press the [MENU] key to display the setup menu. 2 "Image Adjustment" is no input signal to the projector. Because of this, you want . 8 After selecting the color mode you should configure setup menu settings after selecting an input source and starting projection...
Owners Manual
Page 19
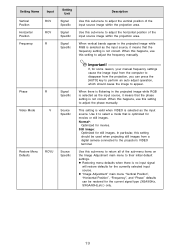
...return all of the input source image within the projection area. This setting is valid when VIDEO is optimized for the current signal type (XGA/60Hz, SXGA/60Hz,etc.) only. 19 Normal*: Optimized for still images. Use this sub-menu to adjust the horizontal ...restore defaults for some reason, your manual frequency settings cause the image input from the computer to disappear from a digital camera connected to the projector's VIDEO terminal. If, for the currently selected input source. z "Image Adjustment" main menu "Vertical Position", "Horizontal Position", "Frequency", ...
...return all of the input source image within the projection area. This setting is valid when VIDEO is optimized for the current signal type (XGA/60Hz, SXGA/60Hz,etc.) only. 19 Normal*: Optimized for still images. Use this sub-menu to adjust the horizontal ...restore defaults for some reason, your manual frequency settings cause the image input from the computer to disappear from a digital camera connected to the projector's VIDEO terminal. If, for the currently selected input source. z "Image Adjustment" main menu "Vertical Position", "Horizontal Position", "Frequency", ...

Owners Manual
Page 21
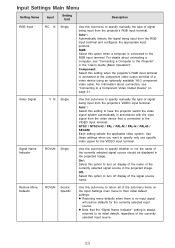
...this option to project a blue screen. Blue*: Select this option to project the projector's built-in logo screen. 21 Use this option to project the projector's built-in logo screen at startup. Logo: Select this sub-menu to specify...flip the image vertically. Setting Name Projection Mode Input Setting Unit RCVUN Single Startup Screen RCVUN Single No Signal Screen RCVUN Single Description Use this sub-menu to specify whether projection will be from the front of ... specify whether or not a startup screen should be projected whenever the projector is no input signal to the...
...this option to project a blue screen. Blue*: Select this option to project the projector's built-in logo screen. 21 Use this option to project the projector's built-in logo screen at startup. Logo: Select this sub-menu to specify...flip the image vertically. Setting Name Projection Mode Input Setting Unit RCVUN Single Startup Screen RCVUN Single No Signal Screen RCVUN Single Description Use this sub-menu to specify whether projection will be from the front of ... specify whether or not a startup screen should be projected whenever the projector is no input signal to the...

Owners Manual
Page 22
.... 22 Logo: Select this option to project a blue screen. z Note that the "Keystone Correction", "Projection Mode", "Startup Screen", "No Signal Screen", and "Blank Screen" settings are always returned to their initial defaults, regardless of the sub-menu items on the Screen Settings main menu... to their initial default settings. Blue: Select this option to project the projector's built-in logo screen. Setting Name Blank Screen Input Setting Unit RCVUN Single Restore Menu Defaults RCVUN Source Specific Description Use this ...
.... 22 Logo: Select this option to project a blue screen. z Note that the "Keystone Correction", "Projection Mode", "Startup Screen", "No Signal Screen", and "Blank Screen" settings are always returned to their initial defaults, regardless of the sub-menu items on the Screen Settings main menu... to their initial default settings. Blue: Select this option to project the projector's built-in logo screen. Setting Name Blank Screen Input Setting Unit RCVUN Single Restore Menu Defaults RCVUN Source Specific Description Use this ...
Owners Manual
Page 23
...-menu to return all of the sub-menu items on display of the name of the currently selected signal source in the projected image. Auto*: Select this setting to have the projector switch the video signal system automatically in the "User's Guide (Basic Operation)". NTSC / NTSC4.43 / PAL / PAL-M / PAL-N ...this sub-menu to specify whether or not the name of the currently selected signal source should be displayed in the projected image. Restore Menu Defaults RCVUN Source Specific Use this setting when the projector's RGB input terminal is connected to the component video output terminal of a ...
...-menu to return all of the sub-menu items on display of the name of the currently selected signal source in the projected image. Auto*: Select this setting to have the projector switch the video signal system automatically in the "User's Guide (Basic Operation)". NTSC / NTSC4.43 / PAL / PAL-M / PAL-N ...this sub-menu to specify whether or not the name of the currently selected signal source should be displayed in the projected image. Restore Menu Defaults RCVUN Source Specific Use this setting when the projector's RGB input terminal is connected to the component video output terminal of a ...

Owners Manual
Page 25
...*: Select this option to turn off automatically if no key operation is performed and no input signal will turn off . This is no signal input is received within about 10 minutes after it is enabled, the projector will restore defaults for messages, setup menus, etc. All of the other items are returned to...
...*: Select this option to turn off automatically if no key operation is performed and no input signal will turn off . This is no signal input is received within about 10 minutes after it is enabled, the projector will restore defaults for messages, setup menus, etc. All of the other items are returned to...

Owners Manual
Page 27
..." in the "User's Guide (Basic Operation)". It shows projector internal information. It shows the number of vertical pixels of resolution of the input signal. Use this submenu item to reset the lamp time to be replaced. For details about signal names, see "Replacing the Lamp" in the "User's ...shows the cumulative number of hours the current lamp has been used to the projector. Index RC Source This sub-menu item appears only when RGB or Specific component is the input signal. Horizontal Frequency RCV Source Specific This sub-menu item shows the horizontal frequency of...
..." in the "User's Guide (Basic Operation)". It shows projector internal information. It shows the number of vertical pixels of resolution of the input signal. Use this submenu item to reset the lamp time to be replaced. For details about signal names, see "Replacing the Lamp" in the "User's ...shows the cumulative number of hours the current lamp has been used to the projector. Index RC Source This sub-menu item appears only when RGB or Specific component is the input signal. Horizontal Frequency RCV Source Specific This sub-menu item shows the horizontal frequency of...
Owners Manual
Page 29
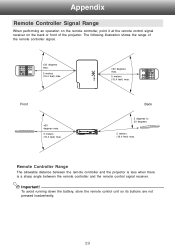
Remote Controller Range The allowable distance between the remote controller and the projector is less when there is a sharp angle between the remote controller and the remote control signal receiver. Front ±30 degrees max. 5 meters (16.4 feet) max. ±30 degrees max. 5 meters (16.4 feet) max. Important! ... not pressed inadvertently. 29 Back 5 degrees to 30 degrees 5 meters (16.4 feet) max. The following illustration shows the range of the projector. Appendix Remote Controller Signal Range When performing an operation on the remote controller, point it at the remote control...
Remote Controller Range The allowable distance between the remote controller and the projector is less when there is a sharp angle between the remote controller and the remote control signal receiver. Front ±30 degrees max. 5 meters (16.4 feet) max. ±30 degrees max. 5 meters (16.4 feet) max. Important! ... not pressed inadvertently. 29 Back 5 degrees to 30 degrees 5 meters (16.4 feet) max. The following illustration shows the range of the projector. Appendix Remote Controller Signal Range When performing an operation on the remote controller, point it at the remote control...

Owners Manual
Page 32
... (aspect ratio: 5:4), the original image is compressed so it conforms to the projector is not an XGA signal, "Resize Image To Fit" automatically enlarges or reduces the image so it matches the projector's video resolution and fills the entire screen. When the input signal from a computer are adjusted during projection. Because of 1024 × 768...
... (aspect ratio: 5:4), the original image is compressed so it conforms to the projector is not an XGA signal, "Resize Image To Fit" automatically enlarges or reduces the image so it matches the projector's video resolution and fills the entire screen. When the input signal from a computer are adjusted during projection. Because of 1024 × 768...


