
Owners Manual
Page 3
Contents About this manual 4 USB Port Equipped Model Users 4 Operation During Projection 5 Image Operations During Projection 5 Adjusting Image Brightness 5 Selecting the Color Mode 6 Zooming an Image ...6 Momentarily Cutting Off ... Image ...7 Displaying a Pointer in the Projected Image 8 Changing the aspect ratio of the projected image 9 Eco Mode ...10 Using the [FUNC] Key 10 Configuring Advanced Projector Settings 11 Basic Setup Menu Operations 11 Displaying the Setup Menu 11 Configuring Setup Menu Settings 11 Basic Setup Menu Example 12 Password Protecting the...
Contents About this manual 4 USB Port Equipped Model Users 4 Operation During Projection 5 Image Operations During Projection 5 Adjusting Image Brightness 5 Selecting the Color Mode 6 Zooming an Image ...6 Momentarily Cutting Off ... Image ...7 Displaying a Pointer in the Projected Image 8 Changing the aspect ratio of the projected image 9 Eco Mode ...10 Using the [FUNC] Key 10 Configuring Advanced Projector Settings 11 Basic Setup Menu Operations 11 Displaying the Setup Menu 11 Configuring Setup Menu Settings 11 Basic Setup Menu Example 12 Password Protecting the...
Owners Manual
Page 4
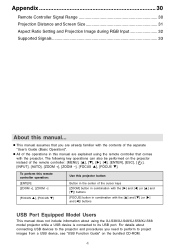
... in combination with the [S] and [T] (or [X] and [W]) buttons USB Port Equipped Model Users This manual does not include information about connecting USB devices to the projector and procedures you are explained using the XJ-S38/XJ-S48/XJ-S58/XJ-S68 model projector while a USB device is connected to its USB port. Appendix 30 Remote Controller Signal...
... in combination with the [S] and [T] (or [X] and [W]) buttons USB Port Equipped Model Users This manual does not include information about connecting USB devices to the projector and procedures you are explained using the XJ-S38/XJ-S48/XJ-S58/XJ-S68 model projector while a USB device is connected to its USB port. Appendix 30 Remote Controller Signal...

Owners Manual
Page 20
... source image within the projection area. When this happens, use this setting when projecting still images. Use this setting to adjust the phase manually. 20 Horizontal Position RCV Signal Specific Use this sub-menu to adjust the vertical position of the sub-menu items on the Image Adjustment ...[AUTO] key to perform an auto adjust operation, which should be used when projecting still images from a digital camera connected to the projector's VIDEO terminal. In particular, this setting when projecting a movie. Normal*: Select this setting should cause the image to appear.
... source image within the projection area. When this happens, use this setting when projecting still images. Use this setting to adjust the phase manually. 20 Horizontal Position RCV Signal Specific Use this sub-menu to adjust the vertical position of the sub-menu items on the Image Adjustment ...[AUTO] key to perform an auto adjust operation, which should be used when projecting still images from a digital camera connected to the projector's VIDEO terminal. In particular, this setting when projecting a movie. Normal*: Select this setting should cause the image to appear.
Owners Manual
Page 24
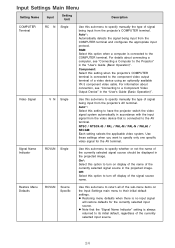
...the projected image. Auto*: Select this setting to have the projector switch the video signal system automatically in accordance with the input signal from the projector's AV terminal. On*: Select this sub-menu to specify manually the type of signal being input from the video device that ...off display of the signal source name. Signal Name Indicator RCVUN Single Use this sub-menu to specify manually the type of signal being input from the projector's COMPUTER terminal. Input Settings Main Menu Setting Name Input Setting Unit Description COMPUTER Terminal RCUVN Single Use this...
...the projected image. Auto*: Select this setting to have the projector switch the video signal system automatically in accordance with the input signal from the projector's AV terminal. On*: Select this sub-menu to specify manually the type of signal being input from the video device that ...off display of the signal source name. Signal Name Indicator RCVUN Single Use this sub-menu to specify manually the type of signal being input from the projector's COMPUTER terminal. Input Settings Main Menu Setting Name Input Setting Unit Description COMPUTER Terminal RCUVN Single Use this...


