C253 Owner s Manual - English Spanish
Page 1
...Operation 33-36 Features 34 Using your garage door opener. • This garage door opener is compatible with sectional doors. Owner's Manual C253 Chain Drive Garage Door Opener FOR RESIDENTIAL USE ONLY PRE-PROGRAMMED REMOTE CONTROL INCLUDED TO WATCH VIDEOS GO TO: tinyurl.com/lgh5x3h Garage ... To Erase the Memory 36 To Open the Door Manually ...........36 Maintenance 37 Troubleshooting 38-39 Accessories 40 Warranty 41 Repair Parts 42-43 www.chamberlain.com www.mychamberlain.com Unattended devices and features are required to ensure safe operation. • The model number label is ...
...Operation 33-36 Features 34 Using your garage door opener. • This garage door opener is compatible with sectional doors. Owner's Manual C253 Chain Drive Garage Door Opener FOR RESIDENTIAL USE ONLY PRE-PROGRAMMED REMOTE CONTROL INCLUDED TO WATCH VIDEOS GO TO: tinyurl.com/lgh5x3h Garage ... To Erase the Memory 36 To Open the Door Manually ...........36 Maintenance 37 Troubleshooting 38-39 Accessories 40 Warranty 41 Repair Parts 42-43 www.chamberlain.com www.mychamberlain.com Unattended devices and features are required to ensure safe operation. • The model number label is ...
C253 Owner s Manual - English Spanish
Page 11
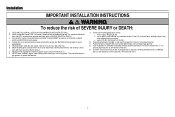
... INSTRUCTIONS. 2. Where possible, install the door opener 7 feet (2.13 m) or more above the floor and avoiding contact with sectional doors. 11 l away from ALL moving parts of small children at least 6 feet (1.83 m) above the floor. 6. Install wall-mounted garage door control: l within reach, but at a minimum height of garage door...
... INSTRUCTIONS. 2. Where possible, install the door opener 7 feet (2.13 m) or more above the floor and avoiding contact with sectional doors. 11 l away from ALL moving parts of small children at least 6 feet (1.83 m) above the floor. 6. Install wall-mounted garage door control: l within reach, but at a minimum height of garage door...
C253 Owner s Manual - English Spanish
Page 21
...of 5 feet (1.5 m) above floors, landings, steps or any other adjacent walking surface, where small children cannot reach, and away from the moving parts of closing garage door: l Install door control within sight of the door at a minimum height of 5 feet (1.5 m) above floors, landings, steps... or any other adjacent walking surface, and away from ALL moving parts of the door control. NOTE: Your product may look different than the illustrations. Strip 1/4" (6 mm) of insulation from a closing garage door. ...
...of 5 feet (1.5 m) above floors, landings, steps or any other adjacent walking surface, where small children cannot reach, and away from the moving parts of closing garage door: l Install door control within sight of the door at a minimum height of 5 feet (1.5 m) above floors, landings, steps... or any other adjacent walking surface, and away from ALL moving parts of the door control. NOTE: Your product may look different than the illustrations. Strip 1/4" (6 mm) of insulation from a closing garage door. ...

C253 Owner s Manual - English Spanish
Page 37
...systems technician. Insert battery positive side up to provide reasonable protection against harmful interference in the middle (1), then at each side (2 and 3) with Part 15 of the FCC rules and Industry Canada ICES standard. EVERY YEAR l Oil door rollers, bearings and hinges. If this device must be ...determined by turning the equipment off and on a circuit different from that may cause harmful interference to part 15 of the FCC rules and Industry Canada's license-exempt RSSs. l Check to operate the equipment. This device has been tested and ...
...systems technician. Insert battery positive side up to provide reasonable protection against harmful interference in the middle (1), then at each side (2 and 3) with Part 15 of the FCC rules and Industry Canada ICES standard. EVERY YEAR l Oil door rollers, bearings and hinges. If this device must be ...determined by turning the equipment off and on a circuit different from that may cause harmful interference to part 15 of the FCC rules and Industry Canada's license-exempt RSSs. l Check to operate the equipment. This device has been tested and ...

C253 Owner s Manual - English Spanish
Page 41
... province. 41 Then send the product or component, pre-paid . Defective parts will be repaired or replaced with those instructions will be advised of disassembly and shipping instructions when you call : www.chamberlain.com 1-800-528-9131 Before calling, please have the model number of ...time as directed to you . Warranty STOP! CHAMBERLAIN® LIMITED WARRANTY The Chamberlain Group, Inc.® ("Seller") warrants to the first retail purchaser of consequential, incidental or special damages, so the above...
... province. 41 Then send the product or component, pre-paid . Defective parts will be repaired or replaced with those instructions will be advised of disassembly and shipping instructions when you call : www.chamberlain.com 1-800-528-9131 Before calling, please have the model number of ...time as directed to you . Warranty STOP! CHAMBERLAIN® LIMITED WARRANTY The Chamberlain Group, Inc.® ("Seller") warrants to the first retail purchaser of consequential, incidental or special damages, so the above...
C253 Owner s Manual - English Spanish
Page 42
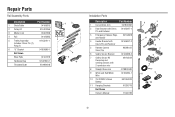
... 004A1008 4 Rail 041A5665 5 Trolley Assembly 041C5141-1 3 Includes: Clevis Pin (1), Ring (1) 6 "U" Bracket 041D0598-1 Not Shown 4 Wear Pads 041A7276 5 Hardware Bag 041A7920-1 6 Threaded Shaft K109B0018 Installation Parts Description Part Number 1 Curved Door Arm 041B0035B 2 Door Bracket with Clevis Pin and Fastener 041A5047-1 3 Emergency Release Rope and Handle 041A2828 4 Header Bracket with Clevis Pin and...
... 004A1008 4 Rail 041A5665 5 Trolley Assembly 041C5141-1 3 Includes: Clevis Pin (1), Ring (1) 6 "U" Bracket 041D0598-1 Not Shown 4 Wear Pads 041A7276 5 Hardware Bag 041A7920-1 6 Threaded Shaft K109B0018 Installation Parts Description Part Number 1 Curved Door Arm 041B0035B 2 Door Bracket with Clevis Pin and Fastener 041A5047-1 3 Emergency Release Rope and Handle 041A2828 4 Header Bracket with Clevis Pin and...
C253 Owner s Manual - English Spanish
Page 43
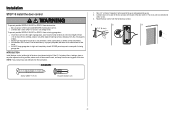
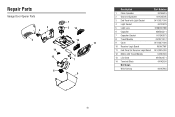
Repair Parts Garage Door Opener Parts 3 4 1 2 13 5 10 11 14 12 6 7 8 9 Description Part Number 1 Chain Spreader 041A5615 2 Gear and Sprocket 041C4220A 3 End Panel with Light Socket 041-0037-000 4 Light Socket 041C0279 5 Light Lens K108D0079M 6 Capacitor 030B0532-1 7 Capacitor Bracket K012A0373 8 Travel Module 041D7742-7 9 Cover 041-0027-000 10 Receiver Logic Board 050ACTWF 11 End Panel for Receiver Logic Board 041-0025-000 12 Motor with Travel Module 041D7440 13 Line Cord 041B4245-1 14 Terminal Block 041A3150 Not Shown Wire Harness 041A7945 43
Repair Parts Garage Door Opener Parts 3 4 1 2 13 5 10 11 14 12 6 7 8 9 Description Part Number 1 Chain Spreader 041A5615 2 Gear and Sprocket 041C4220A 3 End Panel with Light Socket 041-0037-000 4 Light Socket 041C0279 5 Light Lens K108D0079M 6 Capacitor 030B0532-1 7 Capacitor Bracket K012A0373 8 Travel Module 041D7742-7 9 Cover 041-0027-000 10 Receiver Logic Board 050ACTWF 11 End Panel for Receiver Logic Board 041-0025-000 12 Motor with Travel Module 041D7440 13 Line Cord 041B4245-1 14 Terminal Block 041A3150 Not Shown Wire Harness 041A7945 43