
Hardware Installation Guide
Page 6
... A P T E R 3 C H A P T E R Ports 1-4 System LEDs 1-5 Ethernet LEDs 1-5 WIC/VIC LEDs 1-6 Router Memory 1-9 Types of Memory 1-9 Amounts of Memory 1-10 Unpacking the Router 1-11 Additional Required Equipment 1-12 Installation 2-1 Before Installing the Router 2-1 Mounting the Router in a Rack 2-2 Attaching Brackets ... 2-11 Verifying the Installation 2-12 Optional Installation Steps 2-13 Connecting a PC 2-13 Connecting a Modem 2-14 Troubleshooting 3-1 Contacting Your Cisco Reseller 3-1 Recovering a Lost Password 3-2 Cisco 1760 Modular Access Router Hardware Installation Guide viii 78-13342-03
... A P T E R 3 C H A P T E R Ports 1-4 System LEDs 1-5 Ethernet LEDs 1-5 WIC/VIC LEDs 1-6 Router Memory 1-9 Types of Memory 1-9 Amounts of Memory 1-10 Unpacking the Router 1-11 Additional Required Equipment 1-12 Installation 2-1 Before Installing the Router 2-1 Mounting the Router in a Rack 2-2 Attaching Brackets ... 2-11 Verifying the Installation 2-12 Optional Installation Steps 2-13 Connecting a PC 2-13 Connecting a Modem 2-14 Troubleshooting 3-1 Contacting Your Cisco Reseller 3-1 Recovering a Lost Password 3-2 Cisco 1760 Modular Access Router Hardware Installation Guide viii 78-13342-03
Hardware Installation Guide
Page 7
... B-1 Ethernet Cables B-1 Ethernet Network Cabling Guidelines B-2 Console Cable and Adapter B-3 VIC Cables and Pinouts B-3 Cables and Pinouts for 2-Port ISDN BRI Card B-5 Installing and Upgrading Memory and Packet Voice Data Modules C-1 Safety Information C-1 Opening the Chassis C-3 Locating Modules C-4 Installing a DIMM C-4 Installing a SIMM C-6 Installing a PVDM C-7 Closing the Chassis C-10...
... B-1 Ethernet Cables B-1 Ethernet Network Cabling Guidelines B-2 Console Cable and Adapter B-3 VIC Cables and Pinouts B-3 Cables and Pinouts for 2-Port ISDN BRI Card B-5 Installing and Upgrading Memory and Packet Voice Data Modules C-1 Safety Information C-1 Opening the Chassis C-3 Locating Modules C-4 Installing a DIMM C-4 Installing a SIMM C-6 Installing a PVDM C-7 Closing the Chassis C-10...

Hardware Installation Guide
Page 10
... Guide xii 78-13342-03 Related Documentation Preface • Chapter 3, "Troubleshooting," describes some common network scenarios and how to use the Cisco IOS command-line interface (CLI) to configure the router in these problems. • Appendix A, "Technical Specifications," lists the physical characteristics...Data Modules," describes how to install or upgrade memory or data modules in your router, explains how to install voice hardware and how to configure the router for a Voice-over-IP (VoIP) network. • Cisco 1700 Router Software Configuration Guide describes some problems...
... Guide xii 78-13342-03 Related Documentation Preface • Chapter 3, "Troubleshooting," describes some common network scenarios and how to use the Cisco IOS command-line interface (CLI) to configure the router in these problems. • Appendix A, "Technical Specifications," lists the physical characteristics...Data Modules," describes how to install or upgrade memory or data modules in your router, explains how to install voice hardware and how to configure the router for a Voice-over-IP (VoIP) network. • Cisco 1700 Router Software Configuration Guide describes some problems...
Hardware Installation Guide
Page 29
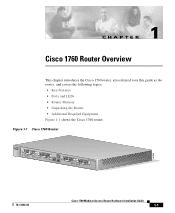
... guide as the router, and covers the following topics: • Key Features • Ports and LEDs • Router Memory • Unpacking the Router • Additional Required Equipment Figure 1-1 shows the Cisco 1760 router. Figure 1-1 Cisco 1760 Router 60944 PWR OK PVDM 0 OK PVDM 1 OK MOD OK SLOT0 0 OK 1 SLOT1 0 OK 1 CONSOLE ACT COL...
... guide as the router, and covers the following topics: • Key Features • Ports and LEDs • Router Memory • Unpacking the Router • Additional Required Equipment Figure 1-1 shows the Cisco 1760 router. Figure 1-1 Cisco 1760 Router 60944 PWR OK PVDM 0 OK PVDM 1 OK MOD OK SLOT0 0 OK 1 SLOT1 0 OK 1 CONSOLE ACT COL...

Hardware Installation Guide
Page 37
... software, dynamic configuration information, and routing table information in slot 3. Router Memory This section describes the types of memory contains the startup configuration. 78-13342-03 Cisco 1760 Modular Access Router Hardware Installation Guide 1-9 The router stores a working storage and contains the ...port 1 in DRAM. • Nonvolatile RAM (NVRAM)-This type of memory stored in this guide. Types of Memory The router has the following types of each type the router has. Chapter 1 Cisco 1760 Router Overview Router Memory Table 1-5 WIC/VIC LEDs (continued) LED SLOT 3 OK 0 ...
... software, dynamic configuration information, and routing table information in slot 3. Router Memory This section describes the types of memory contains the startup configuration. 78-13342-03 Cisco 1760 Modular Access Router Hardware Installation Guide 1-9 The router stores a working storage and contains the ...port 1 in DRAM. • Nonvolatile RAM (NVRAM)-This type of memory stored in this guide. Types of Memory The router has the following types of each type the router has. Chapter 1 Cisco 1760 Router Overview Router Memory Table 1-5 WIC/VIC LEDs (continued) LED SLOT 3 OK 0 ...

Hardware Installation Guide
Page 38
... of the operating system in every router in your network; Processor board ID 0000 (1314672220), with 62260K/3276K bytes of the Cisco IOS software. You can store multiple copies of memory. Use the show version command. The following example shows the output of the show version command to view the amount of... Flash memory (32 MB on board. The Cisco 1760-V is shipped with 96 MB of DRAM (64 MB on board and 32 MB in a DIMM socket) and 32 MB of DRAM, NVRAM...
... of the operating system in every router in your network; Processor board ID 0000 (1314672220), with 62260K/3276K bytes of the Cisco IOS software. You can store multiple copies of memory. Use the show version command. The following example shows the output of the show version command to view the amount of... Flash memory (32 MB on board. The Cisco 1760-V is shipped with 96 MB of DRAM (64 MB on board and 32 MB in a DIMM socket) and 32 MB of DRAM, NVRAM...
Hardware Installation Guide
Page 39
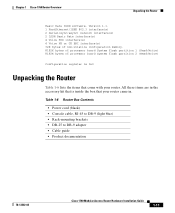
...8226; DB-25 to DB-9 adapter • Cable guide • Product documentation 78-13342-03 Cisco 1760 Modular Access Router Hardware Installation Guide 1-11 Chapter 1 Cisco 1760 Router Overview Unpacking the Router Basic Rate ISDN software, Version 1.1. 1 FastEthernet/IEEE 802.3 ...interface(s) 2 Serial(sync/async) network interface(s) 2 ISDN Basic Rate interface(s) 4 Voice FXS interface(s) 4 Voice NT or TE BRI interface(s) 32K bytes of non-volatile configuration memory...
...8226; DB-25 to DB-9 adapter • Cable guide • Product documentation 78-13342-03 Cisco 1760 Modular Access Router Hardware Installation Guide 1-11 Chapter 1 Cisco 1760 Router Overview Unpacking the Router Basic Rate ISDN software, Version 1.1. 1 FastEthernet/IEEE 802.3 ...interface(s) 2 Serial(sync/async) network interface(s) 2 ISDN Basic Rate interface(s) 4 Voice FXS interface(s) 4 Voice NT or TE BRI interface(s) 32K bytes of non-volatile configuration memory...
Hardware Installation Guide
Page 61
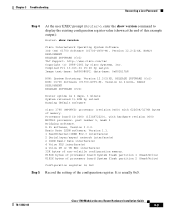
... 2 days, 1 minute System returned to display the existing configuration register value (shown at the end of memory. X.25 software, Version 3.0.0. Processor board ID 0000 (1314672220), with 62260K/3276K bytes of this example output): Router> show version Cisco Internetwork Operating System Software IOS (tm) C1700 Software (C1700-SV3Y-M), Version 12.2(2)XK, EARLY DEPLOYMENT...
... 2 days, 1 minute System returned to display the existing configuration register value (shown at the end of memory. X.25 software, Version 3.0.0. Processor board ID 0000 (1314672220), with 62260K/3276K bytes of this example output): Router> show version Cisco Internetwork Operating System Software IOS (tm) C1700 Software (C1700-SV3Y-M), Version 12.2(2)XK, EARLY DEPLOYMENT...

Hardware Installation Guide
Page 62
... to reset the configuration register: rommon 2> confreg 0x142 Initialize the router by bit 8 of the following : --- Cisco 1760 Modular Access Router Hardware Installation Guide 3-4 78-13342-03 Go to Step 3. To send a break in Flash memory and displays the following : • If break is enabled, go to Step 2. • If break is...
... to reset the configuration register: rommon 2> confreg 0x142 Initialize the router by bit 8 of the following : --- Cisco 1760 Modular Access Router Hardware Installation Guide 3-4 78-13342-03 Go to Step 3. To send a break in Flash memory and displays the following : • If break is enabled, go to Step 2. • If break is...

Hardware Installation Guide
Page 83
... data modules in the router. Warning Before working on a system that you should read before installing or upgrading memory in your router and contains the following sections: • Safety Information • Opening the Chassis • Locating Modules • Installing a DIMM • Installing a SIMM • ... Safety Information This section contains safety information that has an on/off switch, turn off the power and unplug the power cord. 78-13342-03 Cisco 1760 Modular Access Router Hardware Installation Guide C-1
... data modules in the router. Warning Before working on a system that you should read before installing or upgrading memory in your router and contains the following sections: • Safety Information • Opening the Chassis • Locating Modules • Installing a DIMM • Installing a SIMM • ... Safety Information This section contains safety information that has an on/off switch, turn off the power and unplug the power cord. 78-13342-03 Cisco 1760 Modular Access Router Hardware Installation Guide C-1

Hardware Installation Guide
Page 84
Safety Information Appendix C Installing and Upgrading Memory and Packet Voice Data Modules Warning Before opening the chassis, disconnect the telephone-network cables to avoid contact with your hand or any metal tool, ... systems without a power switch, line voltages are present within the power supply even when the power switch is off and the power cord is connected. Cisco 1760 Modular Access Router Hardware Installation Guide C-2 78-13342-03 For systems with a power switch, line voltages are present in WAN ports regardless of lightning...
Safety Information Appendix C Installing and Upgrading Memory and Packet Voice Data Modules Warning Before opening the chassis, disconnect the telephone-network cables to avoid contact with your hand or any metal tool, ... systems without a power switch, line voltages are present within the power supply even when the power switch is off and the power cord is connected. Cisco 1760 Modular Access Router Hardware Installation Guide C-2 78-13342-03 For systems with a power switch, line voltages are present in WAN ports regardless of lightning...
Hardware Installation Guide
Page 85
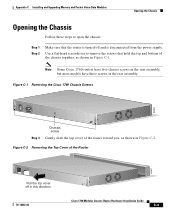
Note Some Cisco 1760 routers have five chassis screws in the rear assembly, but most models have three screws in Figure C-2. Appendix C Installing and Upgrading Memory and Packet Voice Data Modules Opening the Chassis Opening the Chassis Follow these steps to remove the screws that the...--6/2104.50HAVz~MAX Pull the top cover off and is turned off in this direction. 78-13342-03 Cisco 1760 Modular Access Router Hardware Installation Guide C-3 Figure C-1 Removing the Cisco 1760 Chassis Screws 1.5 M150A00X--6/2104.50HAVz~MAX 60956 Step 3 Chassis screw Gently slide the top cover of...
Note Some Cisco 1760 routers have five chassis screws in the rear assembly, but most models have three screws in Figure C-2. Appendix C Installing and Upgrading Memory and Packet Voice Data Modules Opening the Chassis Opening the Chassis Follow these steps to remove the screws that the...--6/2104.50HAVz~MAX Pull the top cover off and is turned off in this direction. 78-13342-03 Cisco 1760 Modular Access Router Hardware Installation Guide C-3 Figure C-1 Removing the Cisco 1760 Chassis Screws 1.5 M150A00X--6/2104.50HAVz~MAX 60956 Step 3 Chassis screw Gently slide the top cover of...
Hardware Installation Guide
Page 86
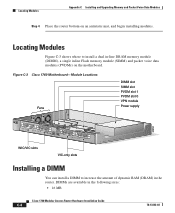
...) and packet voice data modules (PVDMs) on an antistatic mat, and begin installing modules. Locating Modules Appendix C Installing and Upgrading Memory and Packet Voice Data Modules Step 4 Place the router bottom on the motherboard. Locating Modules Figure C-3 shows where to increase the ...amount of dynamic RAM (DRAM) in the router. Figure C-3 Cisco 1760 Motherboard-Module Locations Fans DIMM slot SIMM slot PVDM slot 1 PVDM slot 0 VPN module Power supply 60958 PWR OK PVDM 0 OK PVDM 1...
...) and packet voice data modules (PVDMs) on an antistatic mat, and begin installing modules. Locating Modules Appendix C Installing and Upgrading Memory and Packet Voice Data Modules Step 4 Place the router bottom on the motherboard. Locating Modules Figure C-3 shows where to increase the ...amount of dynamic RAM (DRAM) in the router. Figure C-3 Cisco 1760 Motherboard-Module Locations Fans DIMM slot SIMM slot PVDM slot 1 PVDM slot 0 VPN module Power supply 60958 PWR OK PVDM 0 OK PVDM 1...
Hardware Installation Guide
Page 87
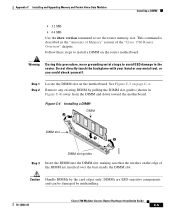
... Step 2 Locate the DIMM slot on page C-4. DIMMs are inserted over the bars inside the DIMM slot. Caution Handle DIMMs by mishandling. 78-13342-03 Cisco 1760 Modular Access Router Hardware Installation Guide C-5 Figure C-4 Installing a DIMM DIMM 2 DIMM slot 1 2 42289 DIMM slot guides Step 3 Insert the DIMM into...Do not directly touch the backplane with your hand or any existing DIMM by pulling the DIMM slot guides (shown in the "Amounts of Memory" section of the DIMM are ESD-sensitive components and can be damaged by the card edges only. Follow these steps to install a DIMM ...
... Step 2 Locate the DIMM slot on page C-4. DIMMs are inserted over the bars inside the DIMM slot. Caution Handle DIMMs by mishandling. 78-13342-03 Cisco 1760 Modular Access Router Hardware Installation Guide C-5 Figure C-4 Installing a DIMM DIMM 2 DIMM slot 1 2 42289 DIMM slot guides Step 3 Insert the DIMM into...Do not directly touch the backplane with your hand or any existing DIMM by pulling the DIMM slot guides (shown in the "Amounts of Memory" section of the DIMM are ESD-sensitive components and can be damaged by the card edges only. Follow these steps to install a DIMM ...
Hardware Installation Guide
Page 88
... yourself. See Figure C-3 on both sides outward and tilting the SIMM free of the clips. Remove any metal tool, or you . Cisco 1760 Modular Access Router Hardware Installation Guide C-6 78-13342-03 Warning During this procedure, wear grounding wrist straps to avoid ESD damage to ...increase the amount of Flash memory in size. Caution Handle SIMMs by mishandling. Installing a SIMM You can be damaged by the card edges only. Face the front panel...
... yourself. See Figure C-3 on both sides outward and tilting the SIMM free of the clips. Remove any metal tool, or you . Cisco 1760 Modular Access Router Hardware Installation Guide C-6 78-13342-03 Warning During this procedure, wear grounding wrist straps to avoid ESD damage to ...increase the amount of Flash memory in size. Caution Handle SIMMs by mishandling. Installing a SIMM You can be damaged by the card edges only. Face the front panel...
Hardware Installation Guide
Page 89
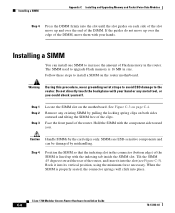
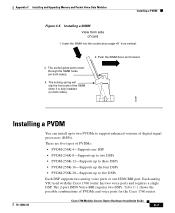
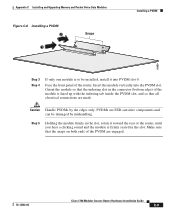
... to two PVDMs to five DSPs Each DSP supports two analog voice ports or one ISDN BRI port. Each analog VIC used with the Cisco 1760 router has two voice ports and requires a single DSP. Push the SIMM down and forward. 65287 Installing a PVDM You can install...Table C-1 shows the possible combinations of card 1. The locking spring will clip the front side of digital signal processors (DSPs). Appendix C Installing and Upgrading Memory and Packet Voice Data Modules Installing a PVDM Figure C-5 Installing a SIMM View from vertical. 3. Insert the SIMM into the socket at an angle 45˚...
... to two PVDMs to five DSPs Each DSP supports two analog voice ports or one ISDN BRI port. Each analog VIC used with the Cisco 1760 router has two voice ports and requires a single DSP. Push the SIMM down and forward. 65287 Installing a PVDM You can install...Table C-1 shows the possible combinations of card 1. The locking spring will clip the front side of digital signal processors (DSPs). Appendix C Installing and Upgrading Memory and Packet Voice Data Modules Installing a PVDM Figure C-5 Installing a SIMM View from vertical. 3. Insert the SIMM into the socket at an angle 45˚...
Hardware Installation Guide
Page 90
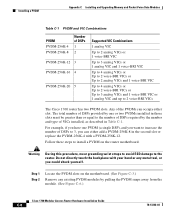
... any existing PVDM modules by the number and type of DSPs to 2 voice-BRI VICs The Cisco 1760 router has two PVDM slots. Installing a PVDM Appendix C Installing and Upgrading Memory and Packet Voice Data Modules Table C-1 PVDM and VIC Combinations PVDM PVDM-256K-4 PVDM-256K-8 ...Number of DSPs required by pulling the PVDM snaps away from the module. (See Figure C-6.) Cisco 1760 Modular Access Router Hardware Installation Guide ...
... any existing PVDM modules by the number and type of DSPs to 2 voice-BRI VICs The Cisco 1760 router has two PVDM slots. Installing a PVDM Appendix C Installing and Upgrading Memory and Packet Voice Data Modules Table C-1 PVDM and VIC Combinations PVDM PVDM-256K-4 PVDM-256K-8 ...Number of DSPs required by pulling the PVDM snaps away from the module. (See Figure C-6.) Cisco 1760 Modular Access Router Hardware Installation Guide ...
Hardware Installation Guide
Page 91
Appendix C Installing and Upgrading Memory and Packet Voice Data Modules Figure C-6 Installing a PVDM 2 1 Snaps Installing a PVDM 60959 Step 3 Step 4 If only one module is firmly seated in the slot. Caution ... edges only. Orient the module so that the indexing slot in the slot, rotate it into the PVDM slot. PVDMs are engaged. 78-13342-03 Cisco 1760 Modular Access Router Hardware Installation Guide C-9 Make sure that all electrical connections are made. Face the front panel of the PVDM are ESD-sensitive...
Appendix C Installing and Upgrading Memory and Packet Voice Data Modules Figure C-6 Installing a PVDM 2 1 Snaps Installing a PVDM 60959 Step 3 Step 4 If only one module is firmly seated in the slot. Caution ... edges only. Orient the module so that the indexing slot in the slot, rotate it into the PVDM slot. PVDMs are engaged. 78-13342-03 Cisco 1760 Modular Access Router Hardware Installation Guide C-9 Make sure that all electrical connections are made. Face the front panel of the PVDM are ESD-sensitive...
Hardware Installation Guide
Page 92
... Packet Voice Data Modules Closing the Chassis After installing memory or data modules on the motherboard, close the chassis by following these steps: Step 1 Step 2 Slide the top cover of the router back on the ...bottom of the chassis by pushing it in the opposite direction from that you removed when you opened the chassis. (See Figure C-1, "Removing the Cisco 1760 Chassis Screws," on page C-3. Replace the screws that shown in Figure C-2, "Removing the Top Cover of the Router," on page C-3.) C-10...
... Packet Voice Data Modules Closing the Chassis After installing memory or data modules on the motherboard, close the chassis by following these steps: Step 1 Step 2 Slide the top cover of the router back on the ...bottom of the chassis by pushing it in the opposite direction from that you removed when you opened the chassis. (See Figure C-1, "Removing the Cisco 1760 Chassis Screws," on page C-3. Replace the screws that shown in Figure C-2, "Removing the Top Cover of the Router," on page C-3.) C-10...

Hardware Installation Guide
Page 109
...1-5 Ethernet port connecting 2-6 to 2-7 description 1-2, 1-4 figure 1-3 specification A-1 Ethernet switch connecting to 2-7 required 1-12 F features, key 1-2 to 1-3 Flash memory description 1-10 location on router C-4 upgrading C-6 to C-7 front panel connectors 1-3 to 1-4 LEDs 1-3 ports 1-3 FXO VIC port B-3 FXS VIC port B-3 ...to 2-13 installing DIMM C-4 to C-6 PVDM C-7 to C-9 SIMM C-6 to C-7 VPN D-6 to D-8 interface cards, description 1-2 IOS See Flash memory ISDN, troubleshooting 3-13 to 3-15 isdn switch-type command 3-15 L LEDs Ethernet 1-5 front panel 1-3 OK LED diagnostics 3-7 to 3-8 system ...
...1-5 Ethernet port connecting 2-6 to 2-7 description 1-2, 1-4 figure 1-3 specification A-1 Ethernet switch connecting to 2-7 required 1-12 F features, key 1-2 to 1-3 Flash memory description 1-10 location on router C-4 upgrading C-6 to C-7 front panel connectors 1-3 to 1-4 LEDs 1-3 ports 1-3 FXO VIC port B-3 FXS VIC port B-3 ...to 2-13 installing DIMM C-4 to C-6 PVDM C-7 to C-9 SIMM C-6 to C-7 VPN D-6 to D-8 interface cards, description 1-2 IOS See Flash memory ISDN, troubleshooting 3-13 to 3-15 isdn switch-type command 3-15 L LEDs Ethernet 1-5 front panel 1-3 OK LED diagnostics 3-7 to 3-8 system ...