Hardware Installation Guide
Page 7
... P E N D I X C A P P E N D I X 78-13342-03 Determining the Configuration Register Value 3-2 Resetting the Router 3-4 Resetting the Password 3-6 Resetting the Configuration Register Value 3-6 Problem-Solving 3-7 OK LED Diagnostics 3-7 Troubleshooting WICs and VICs 3-8 Troubleshooting the Power ... BRI Card B-5 Installing and Upgrading Memory and Packet Voice Data Modules C-1 Safety Information C-1 Opening the Chassis C-3 Locating Modules C-4 Installing a DIMM C-4 Installing a SIMM C-6 Installing a PVDM C-7 Closing the Chassis C-10 Cisco 1760 Modular Access Router Hardware Installation Guide ix
... P E N D I X C A P P E N D I X 78-13342-03 Determining the Configuration Register Value 3-2 Resetting the Router 3-4 Resetting the Password 3-6 Resetting the Configuration Register Value 3-6 Problem-Solving 3-7 OK LED Diagnostics 3-7 Troubleshooting WICs and VICs 3-8 Troubleshooting the Power ... BRI Card B-5 Installing and Upgrading Memory and Packet Voice Data Modules C-1 Safety Information C-1 Opening the Chassis C-3 Locating Modules C-4 Installing a DIMM C-4 Installing a SIMM C-6 Installing a PVDM C-7 Closing the Chassis C-10 Cisco 1760 Modular Access Router Hardware Installation Guide ix

Hardware Installation Guide
Page 8
... Electrostatic Discharge Damage D-3 Installing the VPN Module in a Cisco 1760 Router D-4 Opening the Cisco 1760 Chassis D-4 Installing the VPN Module D-6 Closing the Cisco 1760 Chassis D-9 Installing the Echo Canceler Expansion Modules on Cisco Interface Cards E-1 Multiflex Trunk Interface Cards E-1 Echo E-2 Echo Canceler Expansion Modules E-2 Installing and Configuring the Echo Canceler Expansion Modules E-3 Cisco 1760 Modular Access Router Hardware Installation Guide x 78-13342...
... Electrostatic Discharge Damage D-3 Installing the VPN Module in a Cisco 1760 Router D-4 Opening the Cisco 1760 Chassis D-4 Installing the VPN Module D-6 Closing the Cisco 1760 Chassis D-9 Installing the Echo Canceler Expansion Modules on Cisco Interface Cards E-1 Multiflex Trunk Interface Cards E-1 Echo E-2 Echo Canceler Expansion Modules E-2 Installing and Configuring the Echo Canceler Expansion Modules E-3 Cisco 1760 Modular Access Router Hardware Installation Guide x 78-13342...

Hardware Installation Guide
Page 10
... to install or upgrade memory or data modules in your router. • Appendix D, "Installing the Virtual Private Network Module," describes how to install the Virtual Private Network (VPN) module in the router. • Appendix E, "Installing the Echo Canceler Expansion Modules on Cisco Interface Cards," provides information about the Cisco 1-port and the Cisco 2-port multiflex trunk interface cards. The...
... to install or upgrade memory or data modules in your router. • Appendix D, "Installing the Virtual Private Network Module," describes how to install the Virtual Private Network (VPN) module in the router. • Appendix E, "Installing the Echo Canceler Expansion Modules on Cisco Interface Cards," provides information about the Cisco 1-port and the Cisco 2-port multiflex trunk interface cards. The...
Hardware Installation Guide
Page 33
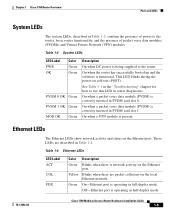
... Ethernet LEDs LED Label ACT COL FDX Color Description Green Blinks when there is being supplied to the router, basic router functionality, and the presence of packet voice data modules (PVDMs) and Virtual Private Network (VPN) modules. This LED blinks during the power-on the Ethernet port. On when a packet voice data...Ethernet port is correctly inserted in PVDM card slot 0. Yellow Blinks when there are described in half-duplex mode. 78-13342-03 Cisco 1760 Modular Access Router Hardware Installation Guide 1-5 On when a VPN module is functional. On when a packet voice data...
... Ethernet LEDs LED Label ACT COL FDX Color Description Green Blinks when there is being supplied to the router, basic router functionality, and the presence of packet voice data modules (PVDMs) and Virtual Private Network (VPN) modules. This LED blinks during the power-on the Ethernet port. On when a packet voice data...Ethernet port is correctly inserted in PVDM card slot 0. Yellow Blinks when there are described in half-duplex mode. 78-13342-03 Cisco 1760 Modular Access Router Hardware Installation Guide 1-5 On when a VPN module is functional. On when a packet voice data...

Hardware Installation Guide
Page 37
... in slot 3. DRAM is correctly inserted in this guide. Router Memory This section describes the types of memory contains the startup configuration. 78-13342-03 Cisco 1760 Modular Access Router Hardware Installation Guide 1-9 Chapter 1 Cisco 1760 Router Overview Router Memory Table 1-5 WIC/VIC LEDs (continued) LED SLOT 3... • Nonvolatile RAM (NVRAM)-This type of memory stored in the router and tells how to upgrade memory in the router, See Appendix C, "Installing and Upgrading Memory and Packet Voice Data Modules," in the card slot. Blinks when data is being sent to or...
... in slot 3. DRAM is correctly inserted in this guide. Router Memory This section describes the types of memory contains the startup configuration. 78-13342-03 Cisco 1760 Modular Access Router Hardware Installation Guide 1-9 Chapter 1 Cisco 1760 Router Overview Router Memory Table 1-5 WIC/VIC LEDs (continued) LED SLOT 3... • Nonvolatile RAM (NVRAM)-This type of memory stored in the router and tells how to upgrade memory in the router, See Appendix C, "Installing and Upgrading Memory and Packet Voice Data Modules," in the card slot. Blinks when data is being sent to or...

Hardware Installation Guide
Page 66
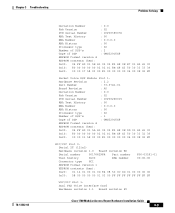
... FF FF FF FF FF FF FF Packet Voice DSP Module Slot 0: Hardware Revision : 2.2 Part Number : 73-3815-01 Board Revision : A0 Cisco 1760 Modular Access Router Hardware Installation Guide 3-8 78-13342-03 Router# show diag command to help determine problems with a card. The router DRAM failed. The parameter RAM area of Blinks 2 3 4 5 6 9 Meaning The...
... FF FF FF FF FF FF FF Packet Voice DSP Module Slot 0: Hardware Revision : 2.2 Part Number : 73-3815-01 Board Revision : A0 Cisco 1760 Modular Access Router Hardware Installation Guide 3-8 78-13342-03 Router# show diag command to help determine problems with a card. The router DRAM failed. The parameter RAM area of Blinks 2 3 4 5 6 9 Meaning The...
Hardware Installation Guide
Page 67
... 50 30 33 33 39 0x20: 30 30 37 58 03 00 81 00 00 00 00 04 00 09 02 FF Packet Voice DSP Module Slot 1: Hardware Revision : 2.2 Part Number : 73-3741-01 Board Revision : A0 Deviation Number : 0-0 Fab Version : 02 PCB Serial Number : ICP0326001Y RMA Test History : 00 RMA... 00 01 03 00 FF FF FF FF FF FF FF FF WIC/VIC Slot 1: Dual FXS Voice Interface Card Hardware revision 1.1 Board revision F0 Cisco 1760 Modular Access Router Hardware Installation Guide 3-9
... 50 30 33 33 39 0x20: 30 30 37 58 03 00 81 00 00 00 00 04 00 09 02 FF Packet Voice DSP Module Slot 1: Hardware Revision : 2.2 Part Number : 73-3741-01 Board Revision : A0 Deviation Number : 0-0 Fab Version : 02 PCB Serial Number : ICP0326001Y RMA Test History : 00 RMA... 00 01 03 00 FF FF FF FF FF FF FF FF WIC/VIC Slot 1: Dual FXS Voice Interface Card Hardware revision 1.1 Board revision F0 Cisco 1760 Modular Access Router Hardware Installation Guide 3-9

Hardware Installation Guide
Page 68
...Serial number 0014501612 Part number 800-02493-01 Test history 0x00 RMA number 00-00-00 Connector type WAN Module EEPROM format version 1 EEPROM contents (hex): 0x20: 01 0E 01 01 00 DD 46 EC 50 ...B0 Serial number 0019621176 Part number 800-02493-02 Test history 0x00 RMA number 00-00-00 Connector type WAN Module EEPROM format version 1 EEPROM contents (hex): 0x20: 01 0E 01 01 01 2B 65 38 50 09 BD...diag command displays similar information for each port available on the router. Table 3-2 lists problems that could occur with the WICs and VICs and describes possible solutions. 3-10...
...Serial number 0014501612 Part number 800-02493-01 Test history 0x00 RMA number 00-00-00 Connector type WAN Module EEPROM format version 1 EEPROM contents (hex): 0x20: 01 0E 01 01 00 DD 46 EC 50 ...B0 Serial number 0019621176 Part number 800-02493-02 Test history 0x00 RMA number 00-00-00 Connector type WAN Module EEPROM format version 1 EEPROM contents (hex): 0x20: 01 0E 01 01 01 2B 65 38 50 09 BD...diag command displays similar information for each port available on the router. Table 3-2 lists problems that could occur with the WICs and VICs and describes possible solutions. 3-10...
Hardware Installation Guide
Page 75
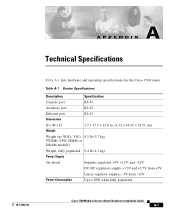
... x 17.5 x 12.8 in. (4.32 x 44.45 x 32.51 cm). Power Consumption Up to 50W when fully populated. 78-13342-03 Cisco 1760 Modular Access Router Hardware Installation Guide A-1 Weight Weight (no WICs, VICs, 8.2 lb (3.7 kg). Power Supply On-board Supplies regulated +5V, +12V, and -12V.... DC-DC regulators supply +3.3V and +2.5V from -12V. Auxiliary port RJ-45. Table A-1 Router Specifications Description Specification Console port RJ-45. PVDMs, VPN, SIMM, or DRAM module) Weight, fully populated 9.4 lb (4.3 kg). Linear regulator supplies -5V from +5V. Ethernet port RJ-...
... x 17.5 x 12.8 in. (4.32 x 44.45 x 32.51 cm). Power Consumption Up to 50W when fully populated. 78-13342-03 Cisco 1760 Modular Access Router Hardware Installation Guide A-1 Weight Weight (no WICs, VICs, 8.2 lb (3.7 kg). Power Supply On-board Supplies regulated +5V, +12V, and -12V.... DC-DC regulators supply +3.3V and +2.5V from -12V. Auxiliary port RJ-45. Table A-1 Router Specifications Description Specification Console port RJ-45. PVDMs, VPN, SIMM, or DRAM module) Weight, fully populated 9.4 lb (4.3 kg). Linear regulator supplies -5V from +5V. Ethernet port RJ-...

Hardware Installation Guide
Page 83
...Before working on a system that you should read before installing or upgrading memory in your router and contains the following sections: • Safety Information • Opening the Chassis • Locating Modules • Installing a DIMM • Installing a SIMM • Installing a PVDM •...; Closing the Chassis Safety Information This section contains safety information that has an on/off switch, turn off the power and unplug the power cord. 78-13342-03 Cisco 1760 Modular Access Router ...
...Before working on a system that you should read before installing or upgrading memory in your router and contains the following sections: • Safety Information • Opening the Chassis • Locating Modules • Installing a DIMM • Installing a SIMM • Installing a PVDM •...; Closing the Chassis Safety Information This section contains safety information that has an on/off switch, turn off the power and unplug the power cord. 78-13342-03 Cisco 1760 Modular Access Router ...

Hardware Installation Guide
Page 84
...Warning During this equipment. Safety Information Appendix C Installing and Upgrading Memory and Packet Voice Data Modules Warning Before opening the chassis, disconnect the telephone-network cables to the router. For systems without a power switch, line voltages are present within the power supply even when...install or replace this procedure, wear grounding wrist straps to avoid ESD damage to avoid contact with telephone-network voltages. Cisco 1760 Modular Access Router Hardware Installation Guide C-2 78-13342-03 For systems with your hand or any metal tool, or you could shock...
...Warning During this equipment. Safety Information Appendix C Installing and Upgrading Memory and Packet Voice Data Modules Warning Before opening the chassis, disconnect the telephone-network cables to the router. For systems without a power switch, line voltages are present within the power supply even when...install or replace this procedure, wear grounding wrist straps to avoid ESD damage to avoid contact with telephone-network voltages. Cisco 1760 Modular Access Router Hardware Installation Guide C-2 78-13342-03 For systems with your hand or any metal tool, or you could shock...
Hardware Installation Guide
Page 85
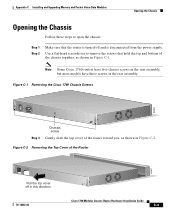
...C-1. Figure C-1 Removing the Cisco 1760 Chassis Screws 1.5 M150A00X--6/2104.50HAVz~MAX 60956 Step 3 Chassis screw Gently slide the top cover of the router toward you, as shown in Figure C-2. Appendix C Installing and Upgrading Memory and Packet Voice Data Modules Opening the Chassis Opening the... Chassis Follow these steps to remove the screws that the router is disconnected from the power supply. Figure C-2 Removing the Top Cover of the Router 60957 1.5 M150A00X--6/2104.50HAVz~MAX Pull ...
...C-1. Figure C-1 Removing the Cisco 1760 Chassis Screws 1.5 M150A00X--6/2104.50HAVz~MAX 60956 Step 3 Chassis screw Gently slide the top cover of the router toward you, as shown in Figure C-2. Appendix C Installing and Upgrading Memory and Packet Voice Data Modules Opening the Chassis Opening the... Chassis Follow these steps to remove the screws that the router is disconnected from the power supply. Figure C-2 Removing the Top Cover of the Router 60957 1.5 M150A00X--6/2104.50HAVz~MAX Pull ...
Hardware Installation Guide
Page 86
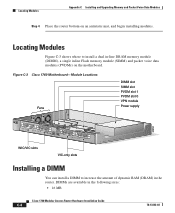
DIMMs are available in the router. Locating Modules Appendix C Installing and Upgrading Memory and Packet Voice Data Modules Step 4 Place the router bottom on the motherboard. Figure C-3 Cisco 1760 Motherboard-Module Locations Fans DIMM slot SIMM slot PVDM slot 1 PVDM slot 0 VPN module Power supply 60958 PWR OK PVDM 0 OK PVDM 1 OK MOD OK SLOT0 0 OK 1 SLOT1 0 OK...
DIMMs are available in the router. Locating Modules Appendix C Installing and Upgrading Memory and Packet Voice Data Modules Step 4 Place the router bottom on the motherboard. Figure C-3 Cisco 1760 Motherboard-Module Locations Fans DIMM slot SIMM slot PVDM slot 1 PVDM slot 0 VPN module Power supply 60958 PWR OK PVDM 0 OK PVDM 1 OK MOD OK SLOT0 0 OK 1 SLOT1 0 OK...
Hardware Installation Guide
Page 87
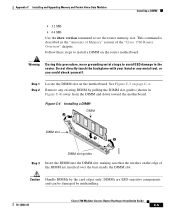
... damaged by the card edges only. Remove any metal tool, or you could shock yourself. Caution Handle DIMMs by mishandling. 78-13342-03 Cisco 1760 Modular Access Router Hardware Installation Guide C-5 Figure C-4 Installing a DIMM DIMM 2 DIMM slot 1 2 42289 DIMM slot guides Step 3 Insert the DIMM into ... slot. Step 1 Step 2 Locate the DIMM slot on page C-4. Appendix C Installing and Upgrading Memory and Packet Voice Data Modules Installing a DIMM • 32 MB • 64 MB Use the show version command to the router. Follow these steps to install a DIMM on the edge of the...
... damaged by the card edges only. Remove any metal tool, or you could shock yourself. Caution Handle DIMMs by mishandling. 78-13342-03 Cisco 1760 Modular Access Router Hardware Installation Guide C-5 Figure C-4 Installing a DIMM DIMM 2 DIMM slot 1 2 42289 DIMM slot guides Step 3 Insert the DIMM into ... slot. Step 1 Step 2 Locate the DIMM slot on page C-4. Appendix C Installing and Upgrading Memory and Packet Voice Data Modules Installing a DIMM • 32 MB • 64 MB Use the show version command to the router. Follow these steps to install a DIMM on the edge of the...
Hardware Installation Guide
Page 88
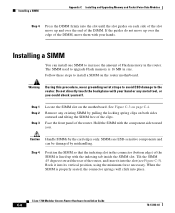
... this procedure, wear grounding wrist straps to avoid ESD damage to install a SIMM on the router motherboard. Tilt the SIMM 45 degrees toward you could shock yourself. Cisco 1760 Modular Access Router Hardware Installation Guide C-6 78-13342-03 Installing a SIMM You can be damaged by the card...seated, the connector springs will click into place. Face the front panel of the router. Follow these steps to the router. Installing a SIMM Appendix C Installing and Upgrading Memory and Packet Voice Data Modules Step 4 Press the DIMM firmly into the slot until the slot guides on ...
... this procedure, wear grounding wrist straps to avoid ESD damage to install a SIMM on the router motherboard. Tilt the SIMM 45 degrees toward you could shock yourself. Cisco 1760 Modular Access Router Hardware Installation Guide C-6 78-13342-03 Installing a SIMM You can be damaged by the card...seated, the connector springs will click into place. Face the front panel of the router. Follow these steps to the router. Installing a SIMM Appendix C Installing and Upgrading Memory and Packet Voice Data Modules Step 4 Press the DIMM firmly into the slot until the slot guides on ...
Hardware Installation Guide
Page 89
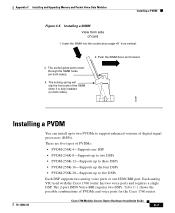
...from side of digital signal processors (DSPs). There are five types of PVDMs and voice ports for the Cisco 1760 router. 78-13342-03 Cisco 1760 Modular Access Router Hardware Installation Guide C-7 Table C-1 shows the possible combinations of PVDMs: • PVDM-256K-4-Supports one ...). 2. Appendix C Installing and Upgrading Memory and Packet Voice Data Modules Installing a PVDM Figure C-5 Installing a SIMM View from vertical. 3. The 2-port ISDN Voice-BRI requires two DSPs. Each analog VIC used with the Cisco 1760 router has two voice ports and requires a single DSP.
...from side of digital signal processors (DSPs). There are five types of PVDMs and voice ports for the Cisco 1760 router. 78-13342-03 Cisco 1760 Modular Access Router Hardware Installation Guide C-7 Table C-1 shows the possible combinations of PVDMs: • PVDM-256K-4-Supports one ...). 2. Appendix C Installing and Upgrading Memory and Packet Voice Data Modules Installing a PVDM Figure C-5 Installing a SIMM View from vertical. 3. The 2-port ISDN Voice-BRI requires two DSPs. Each analog VIC used with the Cisco 1760 router has two voice ports and requires a single DSP.
Hardware Installation Guide
Page 90
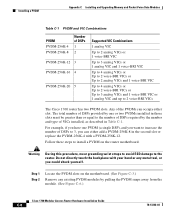
... The total number of DSPs to increase the number of DSPs provided by pulling the PVDM snaps away from the module. (See Figure C-6.) Cisco 1760 Modular Access Router Hardware Installation Guide C-8 78-13342-03 Do not directly touch the backplane with a PVDM-256K-12. Installing ...a PVDM Appendix C Installing and Upgrading Memory and Packet Voice Data Modules Table C-1 PVDM and VIC Combinations PVDM PVDM-256K-4 PVDM-...
... The total number of DSPs to increase the number of DSPs provided by pulling the PVDM snaps away from the module. (See Figure C-6.) Cisco 1760 Modular Access Router Hardware Installation Guide C-8 78-13342-03 Do not directly touch the backplane with a PVDM-256K-12. Installing ...a PVDM Appendix C Installing and Upgrading Memory and Packet Voice Data Modules Table C-1 PVDM and VIC Combinations PVDM PVDM-256K-4 PVDM-...
Hardware Installation Guide
Page 91
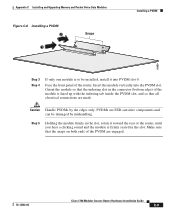
... to be damaged by the edges only. Caution Handle PVDMs by mishandling. Face the front panel of the router, until you hear a clicking sound and the module is lined up with the indexing tab inside the PVDM slot, and so that all electrical connections are ESD-sensitive components and can ... the slot, rotate it into the PVDM slot. Orient the module so that the snaps on both ends of the module is firmly seated in the connector (bottom edge) of the PVDM are engaged. 78-13342-03 Cisco 1760 Modular Access Router Hardware Installation Guide C-9 Make sure that the indexing slot in ...
... to be damaged by the edges only. Caution Handle PVDMs by mishandling. Face the front panel of the router, until you hear a clicking sound and the module is lined up with the indexing tab inside the PVDM slot, and so that all electrical connections are ESD-sensitive components and can ... the slot, rotate it into the PVDM slot. Orient the module so that the snaps on both ends of the module is firmly seated in the connector (bottom edge) of the PVDM are engaged. 78-13342-03 Cisco 1760 Modular Access Router Hardware Installation Guide C-9 Make sure that the indexing slot in ...
Hardware Installation Guide
Page 92
... shown in Figure C-2, "Removing the Top Cover of the Router," on page C-3.) C-10 Cisco 1760 Modular Access Router Hardware Installation Guide 78-13342-03 Closing the Chassis Appendix C Installing and Upgrading Memory and Packet Voice Data Modules Closing the Chassis After installing memory or data modules on the motherboard, close the chassis by following these...
... shown in Figure C-2, "Removing the Top Cover of the Router," on page C-3.) C-10 Cisco 1760 Modular Access Router Hardware Installation Guide 78-13342-03 Closing the Chassis Appendix C Installing and Upgrading Memory and Packet Voice Data Modules Closing the Chassis After installing memory or data modules on the motherboard, close the chassis by following these...
Hardware Installation Guide
Page 93
Before You Begin This section describes important safety information and the tools required to install the Virtual Private Network (VPN) module in a Cisco 1760 router. D A P P E N D I X Installing the Virtual Private Network Module This chapter describes how to install the VPN module. VPN Module Parts These parts are needed for installation and are included with the VPN module: • Two metal standoffs • Four screws 78-13342-03 Cisco 1760 Modular Access Router Hardware Installation Guide D-1 Read this section before installing the VPN module in your Cisco 1760 router.
Before You Begin This section describes important safety information and the tools required to install the Virtual Private Network (VPN) module in a Cisco 1760 router. D A P P E N D I X Installing the Virtual Private Network Module This chapter describes how to install the VPN module. VPN Module Parts These parts are needed for installation and are included with the VPN module: • Two metal standoffs • Four screws 78-13342-03 Cisco 1760 Modular Access Router Hardware Installation Guide D-1 Read this section before installing the VPN module in your Cisco 1760 router.


