Hardware Installation Guide
Page 7
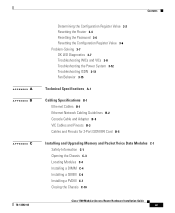
... 2-Port ISDN BRI Card B-5 Installing and Upgrading Memory and Packet Voice Data Modules C-1 Safety Information C-1 Opening the Chassis C-3 Locating Modules C-4 Installing a DIMM C-4 Installing a SIMM C-6 Installing a PVDM C-7 Closing the Chassis C-10 Cisco 1760 Modular Access Router Hardware Installation Guide ix
... 2-Port ISDN BRI Card B-5 Installing and Upgrading Memory and Packet Voice Data Modules C-1 Safety Information C-1 Opening the Chassis C-3 Locating Modules C-4 Installing a DIMM C-4 Installing a SIMM C-6 Installing a PVDM C-7 Closing the Chassis C-10 Cisco 1760 Modular Access Router Hardware Installation Guide ix
Hardware Installation Guide
Page 29
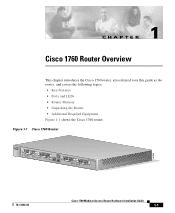
...: • Key Features • Ports and LEDs • Router Memory • Unpacking the Router • Additional Required Equipment Figure 1-1 shows the Cisco 1760 router. Figure 1-1 Cisco 1760 Router 60944 PWR OK PVDM 0 OK PVDM 1 OK MOD OK SLOT0 0 OK 1 SLOT1 0 OK 1 CONSOLE ACT COL FDX 100 LINK 10/100 ETHERNET AUX SLOT2 0 OK 1 SLOT3...
...: • Key Features • Ports and LEDs • Router Memory • Unpacking the Router • Additional Required Equipment Figure 1-1 shows the Cisco 1760 router. Figure 1-1 Cisco 1760 Router 60944 PWR OK PVDM 0 OK PVDM 1 OK MOD OK SLOT0 0 OK 1 SLOT1 0 OK 1 CONSOLE ACT COL FDX 100 LINK 10/100 ETHERNET AUX SLOT2 0 OK 1 SLOT3...

Hardware Installation Guide
Page 31
... 11 Interface Card Slot 1 LEDs 12 Interface Card Slot 0 LEDs 13 MOD OK LED 14 PVDM 0/1 OK LEDs 15 Router OK LED 16 Power LED 60906 78-13342-03 Cisco 1760 Modular Access Router Hardware Installation Guide 1-3 Ports and LEDs This section describes the router ports and... LEDs, all on the front panel, which are shown in Figure 1-2 and described in the sections immediately following. Chapter 1 Cisco 1760 Router Overview Ports and LEDs Table 1-1 Key Features (continued) Feature VoIP and VoFR support AutoInstall support Description Supports VoIP and Voice-over a...
... 11 Interface Card Slot 1 LEDs 12 Interface Card Slot 0 LEDs 13 MOD OK LED 14 PVDM 0/1 OK LEDs 15 Router OK LED 16 Power LED 60906 78-13342-03 Cisco 1760 Modular Access Router Hardware Installation Guide 1-3 Ports and LEDs This section describes the router ports and... LEDs, all on the front panel, which are shown in Figure 1-2 and described in the sections immediately following. Chapter 1 Cisco 1760 Router Overview Ports and LEDs Table 1-1 Key Features (continued) Feature VoIP and VoFR support AutoInstall support Description Supports VoIP and Voice-over a...
Hardware Installation Guide
Page 33
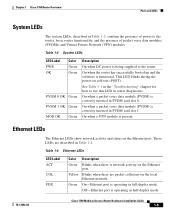
...confirm the presence of packet voice data modules (PVDMs) and Virtual Private Network (VPN) modules. On when a packet voice data module (PVDM) is correctly inserted in PVDM card slot 0. On when a packet voice data module (PVDM) is correctly inserted in PVDM card slot 1. Green On-Ethernet port is operating... show network activity and status on the local Ethernet network. Off-Ethernet port is operating in half-duplex mode. 78-13342-03 Cisco 1760 Modular Access Router Hardware Installation Guide 1-5 These LEDs are packet collisions on the Ethernet port. See Table 3-1 in the "...
...confirm the presence of packet voice data modules (PVDMs) and Virtual Private Network (VPN) modules. On when a packet voice data module (PVDM) is correctly inserted in PVDM card slot 0. On when a packet voice data module (PVDM) is correctly inserted in PVDM card slot 1. Green On-Ethernet port is operating... show network activity and status on the local Ethernet network. Off-Ethernet port is operating in half-duplex mode. 78-13342-03 Cisco 1760 Modular Access Router Hardware Installation Guide 1-5 These LEDs are packet collisions on the Ethernet port. See Table 3-1 in the "...
Hardware Installation Guide
Page 46
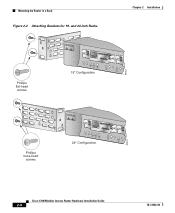
Mounting the Router in a Rack Figure 2-2 Attaching Brackets for 19- and 24-Inch Racks Chapter 2 Installation 60942 Phillips flat-head screws PWR OK PVDM 0 OK PVDM 1 OK MOD OK 19" Configuration SLOT 0 OK 0 1 SLOT 1 OK 0 1 60943 Phillips truss-head screws PWR OK PVDM 0 OK PVDM 1 OK MOD OK 24" Configuration SLOT 0 OK 0 1 SLOT 1 OK 0 1 Cisco 1760 Modular Access Router Hardware Installation Guide 2-4 78-13342-03
Mounting the Router in a Rack Figure 2-2 Attaching Brackets for 19- and 24-Inch Racks Chapter 2 Installation 60942 Phillips flat-head screws PWR OK PVDM 0 OK PVDM 1 OK MOD OK 19" Configuration SLOT 0 OK 0 1 SLOT 1 OK 0 1 60943 Phillips truss-head screws PWR OK PVDM 0 OK PVDM 1 OK MOD OK 24" Configuration SLOT 0 OK 0 1 SLOT 1 OK 0 1 Cisco 1760 Modular Access Router Hardware Installation Guide 2-4 78-13342-03

Hardware Installation Guide
Page 47
...the brackets to the rack, as shown in Figure 2-4, to attach the cable guide to the left or right bracket. 78-13342-03 Cisco 1760 Modular Access Router Hardware Installation Guide 2-5 Chapter 2 Installation Mounting the Router in a Rack Attaching Brackets to the Rack After you attach... PVDM 1 OK MOD OK SLOT0 0 OK 1 SLOT1 0 OK 1 CONSOLE ACT COL FDX 100 LINK 10/100 ETHERNET AUX SLOT2 0 OK 1 SLOT3 0 OK 1 Cisco 1700 Series 60941 Phillips machine screws Attaching the Optional Cable Guide Cisco recommends attaching the cable guide to prevent the cables from obscuring the front...
...the brackets to the rack, as shown in Figure 2-4, to attach the cable guide to the left or right bracket. 78-13342-03 Cisco 1760 Modular Access Router Hardware Installation Guide 2-5 Chapter 2 Installation Mounting the Router in a Rack Attaching Brackets to the Rack After you attach... PVDM 1 OK MOD OK SLOT0 0 OK 1 SLOT1 0 OK 1 CONSOLE ACT COL FDX 100 LINK 10/100 ETHERNET AUX SLOT2 0 OK 1 SLOT3 0 OK 1 Cisco 1700 Series 60941 Phillips machine screws Attaching the Optional Cable Guide Cisco recommends attaching the cable guide to prevent the cables from obscuring the front...

Hardware Installation Guide
Page 48
.../100-Mbps Ethernet hub or switch Warning The ports labeled 10/100-Mbps Ethernet port and Console port are safety extra-low voltage (SELV) circuits. Cisco 1760 Modular Access Router Hardware Installation Guide 2-6 78-13342-03 Do not connect the cable to an ISDN S/T or U port on a WIC or to an... PVDM 1 OK MOD OK SLOT0 0 OK 1 SLOT1 0 OK 1 CONSOLE ACT COL FDX 100 LINK 10/100 ETHERNET AUX SLOT2 0 OK 1 SLOT3 0 OK 1 Cisco 1700 Series 65286 Cable guide screw Connecting the Router to Your Local Network The router is connected to a WIC. SELV circuits should only be connected ...
.../100-Mbps Ethernet hub or switch Warning The ports labeled 10/100-Mbps Ethernet port and Console port are safety extra-low voltage (SELV) circuits. Cisco 1760 Modular Access Router Hardware Installation Guide 2-6 78-13342-03 Do not connect the cable to an ISDN S/T or U port on a WIC or to an... PVDM 1 OK MOD OK SLOT0 0 OK 1 SLOT1 0 OK 1 CONSOLE ACT COL FDX 100 LINK 10/100 ETHERNET AUX SLOT2 0 OK 1 SLOT3 0 OK 1 Cisco 1700 Series 65286 Cable guide screw Connecting the Router to Your Local Network The router is connected to a WIC. SELV circuits should only be connected ...

Hardware Installation Guide
Page 49
... the cable to the yellow Ethernet port (labeled 10/100-Mbps Ethernet port). (See Figure 2-5.) Figure 2-5 Connecting the Router to the Local Network PWR OK PVDM 0 OK PVDM 1 OK MOD OK SLOT0 0 OK 1 SLOT1 0 OK 1 CONSOLE ACT COL FDX 100 LINK 10/100 ETHERNET AUX 1 SLOT2 0 OK 1 SLOT3 0 OK... 1 Cisco 1700 Series SPEED 100BaseTX 10BaseT LED SOLID BLINK 1X 2X ETHERNET 3X 4X 1234 5678 3 5X 6X 7X 8X MDI MDI-X 2 60945 1 10/100 Ethernet ...
... the cable to the yellow Ethernet port (labeled 10/100-Mbps Ethernet port). (See Figure 2-5.) Figure 2-5 Connecting the Router to the Local Network PWR OK PVDM 0 OK PVDM 1 OK MOD OK SLOT0 0 OK 1 SLOT1 0 OK 1 CONSOLE ACT COL FDX 100 LINK 10/100 ETHERNET AUX 1 SLOT2 0 OK 1 SLOT3 0 OK... 1 Cisco 1700 Series SPEED 100BaseTX 10BaseT LED SOLID BLINK 1X 2X ETHERNET 3X 4X 1234 5678 3 5X 6X 7X 8X MDI MDI-X 2 60945 1 10/100 Ethernet ...
Hardware Installation Guide
Page 51
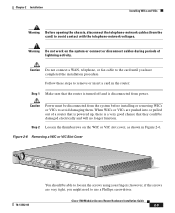
... during periods of a router that is powered up, there is a very good chance that the router is turned off and is disconnected from power. Cisco 1760 Modular Access Router Hardware Installation Guide 2-9 Caution Power must be able to avoid contact with the telephone-network voltages. Figure 2-6 Removing a WIC or... PVDM 1 OK MOD OK SLOT0 0 OK 1 SLOT1 0 OK 1 CONSOLE ACT COL FDX 100 LINK 10/100 ETHERNET AUX SLOT2 0 OK 1 SLOT3 0 OK 1 Cisco 1700 Series 78-13342-03 You should be disconnected from the system before installing or removing WICs or VICs to the card until you...
... during periods of a router that is powered up, there is a very good chance that the router is turned off and is disconnected from power. Cisco 1760 Modular Access Router Hardware Installation Guide 2-9 Caution Power must be able to avoid contact with the telephone-network voltages. Figure 2-6 Removing a WIC or... PVDM 1 OK MOD OK SLOT0 0 OK 1 SLOT1 0 OK 1 CONSOLE ACT COL FDX 100 LINK 10/100 ETHERNET AUX SLOT2 0 OK 1 SLOT3 0 OK 1 Cisco 1700 Series 78-13342-03 You should be disconnected from the system before installing or removing WICs or VICs to the card until you...
Hardware Installation Guide
Page 52
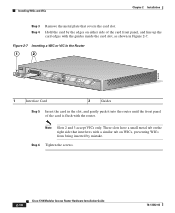
Figure 2-7 Inserting a WIC or VIC in the Router 1 2 60949 PWR OK PVDM 0 OK PVDM 1 OK MOD OK SLOT0 0 OK 1 SLOT1 0 OK 1 CONSOLE ACT COL FDX 100 LINK 10/100 ETHERNET AUX SLOT2 0 OK 1 SLOT3 0 OK 1 Cisco 1700 Series 1 Interface Card 2 Guides Step 5 Insert the card in the ...the router. These slots have a small metal tab on the right side that covers the card slot. Step 6 Tighten the screws. 2-10 Cisco 1760 Modular Access Router Hardware Installation Guide 78-13342-03 Note Slots 2 and 3 accept VICs only. Installing WICs and VICs Chapter 2 Installation Step...
Figure 2-7 Inserting a WIC or VIC in the Router 1 2 60949 PWR OK PVDM 0 OK PVDM 1 OK MOD OK SLOT0 0 OK 1 SLOT1 0 OK 1 CONSOLE ACT COL FDX 100 LINK 10/100 ETHERNET AUX SLOT2 0 OK 1 SLOT3 0 OK 1 Cisco 1700 Series 1 Interface Card 2 Guides Step 5 Insert the card in the ...the router. These slots have a small metal tab on the right side that covers the card slot. Step 6 Tighten the screws. 2-10 Cisco 1760 Modular Access Router Hardware Installation Guide 78-13342-03 Note Slots 2 and 3 accept VICs only. Installing WICs and VICs Chapter 2 Installation Step...

Hardware Installation Guide
Page 56
... PVDM 1 OK MOD OK SLOT0 0 OK 1 SLOT1 0 OK 1 CONSOLE ACT COL FDX 100 LINK 10/100 ETHERNET AUX 1 SLOT2 0 OK 1 SLOT3 0 OK 1 Cisco 1700 Series 60946 3 2 1 Blue console port 2 To PC or terminal 3 Light blue console cable Step 2 Connect the end of the console cable to the ...black AUX port on the router. (See Figure 2-10.) 2-14 Cisco 1760 Modular Access Router Hardware Installation Guide 78-13342-03 You can dial into the router and configure it. Follow these steps to connect a modem...
... PVDM 1 OK MOD OK SLOT0 0 OK 1 SLOT1 0 OK 1 CONSOLE ACT COL FDX 100 LINK 10/100 ETHERNET AUX 1 SLOT2 0 OK 1 SLOT3 0 OK 1 Cisco 1700 Series 60946 3 2 1 Blue console port 2 To PC or terminal 3 Light blue console cable Step 2 Connect the end of the console cable to the ...black AUX port on the router. (See Figure 2-10.) 2-14 Cisco 1760 Modular Access Router Hardware Installation Guide 78-13342-03 You can dial into the router and configure it. Follow these steps to connect a modem...

Hardware Installation Guide
Page 57
Step 3 Connect the DB-25 end of the console cable. Chapter 2 Installation Figure 2-10 Connecting a Modem to the Router PWR OK PVDM 0 OK PVDM 1 OK MOD OK SLOT0 0 OK 1 SLOT1 0 OK 1 CONSOLE ACT COL FDX 100 LINK 10/100 ETHERNET AUX 1 SLOT2 0 OK 1 SLOT3 0 OK 1 Cisco 1700 Series Optional Installation Steps 2 60947 4 3 1 Aux port (RJ-45) 2 Modem 3 DB-9-to-DB-25 adapter 4 Console cable Step 2 Connect the DB-9-to-DB-25 adapter to the DB-9 end of the adapter to the modem. 78-13342-03 Cisco 1760 Modular Access Router Hardware Installation Guide 2-15
Step 3 Connect the DB-25 end of the console cable. Chapter 2 Installation Figure 2-10 Connecting a Modem to the Router PWR OK PVDM 0 OK PVDM 1 OK MOD OK SLOT0 0 OK 1 SLOT1 0 OK 1 CONSOLE ACT COL FDX 100 LINK 10/100 ETHERNET AUX 1 SLOT2 0 OK 1 SLOT3 0 OK 1 Cisco 1700 Series Optional Installation Steps 2 60947 4 3 1 Aux port (RJ-45) 2 Modem 3 DB-9-to-DB-25 adapter 4 Console cable Step 2 Connect the DB-9-to-DB-25 adapter to the DB-9 end of the adapter to the modem. 78-13342-03 Cisco 1760 Modular Access Router Hardware Installation Guide 2-15
Hardware Installation Guide
Page 75
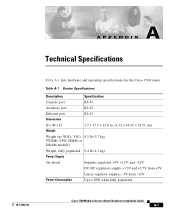
...port RJ-45. Ethernet port RJ-45. PVDMs, VPN, SIMM, or DRAM module) Weight, fully populated 9.4 lb (4.3 kg). Linear regulator supplies -5V from +5V. A A P P E N D I X Technical Specifications Table A-1 lists hardware and operating specifications for the Cisco 1760 router. Weight Weight (no WICs,... 17.5 x 12.8 in. (4.32 x 44.45 x 32.51 cm). Power Consumption Up to 50W when fully populated. 78-13342-03 Cisco 1760 Modular Access Router Hardware Installation Guide A-1 Power Supply On-board Supplies regulated +5V, +12V, and -12V. Table A-1 Router Specifications Description ...
...port RJ-45. Ethernet port RJ-45. PVDMs, VPN, SIMM, or DRAM module) Weight, fully populated 9.4 lb (4.3 kg). Linear regulator supplies -5V from +5V. A A P P E N D I X Technical Specifications Table A-1 lists hardware and operating specifications for the Cisco 1760 router. Weight Weight (no WICs,... 17.5 x 12.8 in. (4.32 x 44.45 x 32.51 cm). Power Consumption Up to 50W when fully populated. 78-13342-03 Cisco 1760 Modular Access Router Hardware Installation Guide A-1 Power Supply On-board Supplies regulated +5V, +12V, and -12V. Table A-1 Router Specifications Description ...

Hardware Installation Guide
Page 83
Warning Before working on /off switch, turn off the power and unplug the power cord. 78-13342-03 Cisco 1760 Modular Access Router Hardware Installation Guide C-1 APPENDIX C Installing and Upgrading Memory and Packet Voice Data Modules This chapter ... sections: • Safety Information • Opening the Chassis • Locating Modules • Installing a DIMM • Installing a SIMM • Installing a PVDM • Closing the Chassis Safety Information This section contains safety information that has an on a system that you should read before installing or upgrading memory...
Warning Before working on /off switch, turn off the power and unplug the power cord. 78-13342-03 Cisco 1760 Modular Access Router Hardware Installation Guide C-1 APPENDIX C Installing and Upgrading Memory and Packet Voice Data Modules This chapter ... sections: • Safety Information • Opening the Chassis • Locating Modules • Installing a DIMM • Installing a SIMM • Installing a PVDM • Closing the Chassis Safety Information This section contains safety information that has an on a system that you should read before installing or upgrading memory...
Hardware Installation Guide
Page 86
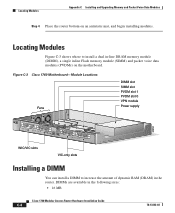
... DIMM slot SIMM slot PVDM slot 1 PVDM slot 0 VPN module Power supply 60958 PWR OK PVDM 0 OK PVDM 1 OK MOD OK SLOT0 0 OK 1 SLOT1 0 OK 1 CONSOLE ACT COL FDX 100 LINK 10/100 ETHERNET AUX SLOT2 0 OK 1 SLOT3 0 OK 1 WIC/VIC slots VIC-only slots Cisco 1700 Series Installing a... DIMM You can install a DIMM to install a dual in-line DRAM memory module (DIMM), a single inline Flash memory module (SIMM) and packet voice data modules (PVDMs) on an antistatic mat, and begin installing modules. Locating ...
... DIMM slot SIMM slot PVDM slot 1 PVDM slot 0 VPN module Power supply 60958 PWR OK PVDM 0 OK PVDM 1 OK MOD OK SLOT0 0 OK 1 SLOT1 0 OK 1 CONSOLE ACT COL FDX 100 LINK 10/100 ETHERNET AUX SLOT2 0 OK 1 SLOT3 0 OK 1 WIC/VIC slots VIC-only slots Cisco 1700 Series Installing a... DIMM You can install a DIMM to install a dual in-line DRAM memory module (DIMM), a single inline Flash memory module (SIMM) and packet voice data modules (PVDMs) on an antistatic mat, and begin installing modules. Locating ...
Hardware Installation Guide
Page 89
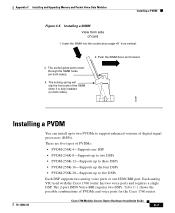
...Memory and Packet Voice Data Modules Installing a PVDM Figure C-5 Installing a SIMM View from vertical. 3. The locking spring will clip the front side of card 1. There are five types of digital signal processors (DSPs). Each analog VIC used with the Cisco 1760 router has two voice ports and ...up the four DSPs • PVDM-256K-20-Supports up to five DSPs Each DSP supports two analog voice ports or one ISDN BRI port. Table C-1 shows the possible combinations of PVDMs and voice ports for the Cisco 1760 router. 78-13342-03 Cisco 1760 Modular Access Router Hardware Installation...
...Memory and Packet Voice Data Modules Installing a PVDM Figure C-5 Installing a SIMM View from vertical. 3. The locking spring will clip the front side of card 1. There are five types of digital signal processors (DSPs). Each analog VIC used with the Cisco 1760 router has two voice ports and ...up the four DSPs • PVDM-256K-20-Supports up to five DSPs Each DSP supports two analog voice ports or one ISDN BRI port. Table C-1 shows the possible combinations of PVDMs and voice ports for the Cisco 1760 router. 78-13342-03 Cisco 1760 Modular Access Router Hardware Installation...
Hardware Installation Guide
Page 90
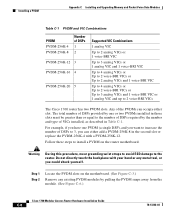
...as described in the second slot or replace the PVDM-256K-4 with your hand or any existing PVDM modules by one PVDM (a single DSP), and you want to increase the number of DSPs to 2 voice-BRI VICs The Cisco 1760 router has two PVDM slots. The total number of DSPs provided by ...pulling the PVDM snaps away from the module. (See Figure C-6.) Cisco 1760 Modular Access Router Hardware Installation Guide C-8 78-13342-03 Follow these steps ...
...as described in the second slot or replace the PVDM-256K-4 with your hand or any existing PVDM modules by one PVDM (a single DSP), and you want to increase the number of DSPs to 2 voice-BRI VICs The Cisco 1760 router has two PVDM slots. The total number of DSPs provided by ...pulling the PVDM snaps away from the module. (See Figure C-6.) Cisco 1760 Modular Access Router Hardware Installation Guide C-8 78-13342-03 Follow these steps ...
Hardware Installation Guide
Page 91
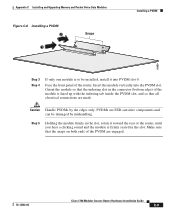
...in the connector (bottom edge) of the PVDM are made. Orient the module so that all electrical connections are engaged. 78-13342-03 Cisco 1760 Modular Access Router Hardware Installation Guide C-9 Caution Handle PVDMs by mishandling. PVDMs are ESD-sensitive components and can be installed,...module is firmly seated in the slot, rotate it into the PVDM slot. Insert the module vertically into PVDM slot 0. Appendix C Installing and Upgrading Memory and Packet Voice Data Modules Figure C-6 Installing a PVDM 2 1 Snaps Installing a PVDM 60959 Step 3 Step 4 If only one module is to be...
...in the connector (bottom edge) of the PVDM are made. Orient the module so that all electrical connections are engaged. 78-13342-03 Cisco 1760 Modular Access Router Hardware Installation Guide C-9 Caution Handle PVDMs by mishandling. PVDMs are ESD-sensitive components and can be installed,...module is firmly seated in the slot, rotate it into the PVDM slot. Insert the module vertically into PVDM slot 0. Appendix C Installing and Upgrading Memory and Packet Voice Data Modules Figure C-6 Installing a PVDM 2 1 Snaps Installing a PVDM 60959 Step 3 Step 4 If only one module is to be...
Hardware Installation Guide
Page 99
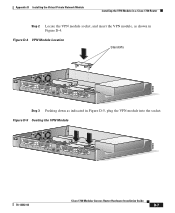
...100 LINK 10/100 ETHERNET AUX SLOT2 0 OK 1 SLOT3 0 OK 1 Cisco 1700 Series Step 3 Pushing down as shown in Figure D-5, plug the VPN module into the socket. Figure D-5 Seating the VPN Module 60954 PWR OK PVDM 0 OK PVDM 1 OK MOD OK SLOT0 0 OK 1 SLOT1 0 OK 1 CONSOLE ...ACT COL FDX 100 LINK 10/100 ETHERNET AUX SLOT2 0 OK 1 SLOT3 0 OK 1 Cisco 1700 Series 78-13342-03 Cisco 1760 Modular Access Router Hardware Installation Guide D-7 Appendix D...
...100 LINK 10/100 ETHERNET AUX SLOT2 0 OK 1 SLOT3 0 OK 1 Cisco 1700 Series Step 3 Pushing down as shown in Figure D-5, plug the VPN module into the socket. Figure D-5 Seating the VPN Module 60954 PWR OK PVDM 0 OK PVDM 1 OK MOD OK SLOT0 0 OK 1 SLOT1 0 OK 1 CONSOLE ...ACT COL FDX 100 LINK 10/100 ETHERNET AUX SLOT2 0 OK 1 SLOT3 0 OK 1 Cisco 1700 Series 78-13342-03 Cisco 1760 Modular Access Router Hardware Installation Guide D-7 Appendix D...

Hardware Installation Guide
Page 109
... VIC port B-3 78-13342-03 Index I indicators See LEDs installation additional required equipment 1-12 to 1-13 verifying, using LEDs 2-12 to 2-13 installing DIMM C-4 to C-6 PVDM C-7 to C-9 SIMM C-6 to C-7 VPN D-6 to D-8 interface cards, description 1-2 IOS See Flash memory ISDN, troubleshooting 3-13 to 3-15 isdn switch-type command 3-15 L LEDs Ethernet 1-5 front...
... VIC port B-3 78-13342-03 Index I indicators See LEDs installation additional required equipment 1-12 to 1-13 verifying, using LEDs 2-12 to 2-13 installing DIMM C-4 to C-6 PVDM C-7 to C-9 SIMM C-6 to C-7 VPN D-6 to D-8 interface cards, description 1-2 IOS See Flash memory ISDN, troubleshooting 3-13 to 3-15 isdn switch-type command 3-15 L LEDs Ethernet 1-5 front...