

Quick Start Guide
Page 1
Quick Start Guide Cisco PIX 515E Firewall 1 Check Items Included 2 Install the PIX 515E 3 Configure the PIX 515E 4 Example Configurations 5 Optional Maintenance and Upgrade Procedures
Quick Start Guide Cisco PIX 515E Firewall 1 Check Items Included 2 Install the PIX 515E 3 Configure the PIX 515E 4 Example Configurations 5 Optional Maintenance and Upgrade Procedures
Quick Start Guide
Page 2
... highly resilient network security services via award-winning stateful failover on certain PIX 515E models 2 Hardware Features Software Features • 433-MHz Intel Celeron processor • 32-MB RAM with the restricted (R) license; 64-MB RAM with the unrestricted (UR) and failover...connections • Supports up to 130 Mbps of firewall throughput with demilitarized zone (DMZ) support. 99550 About the Cisco PIX 515E Firewall The Cisco PIX 515E delivers enterprise-class security for power, failover, and network status • Up to 188-Mbps firewall throughput •...
... highly resilient network security services via award-winning stateful failover on certain PIX 515E models 2 Hardware Features Software Features • 433-MHz Intel Celeron processor • 32-MB RAM with the restricted (R) license; 64-MB RAM with the unrestricted (UR) and failover...connections • Supports up to 130 Mbps of firewall throughput with demilitarized zone (DMZ) support. 99550 About the Cisco PIX 515E Firewall The Cisco PIX 515E delivers enterprise-class security for power, failover, and network status • Up to 188-Mbps firewall throughput •...

Quick Start Guide
Page 3
... NOT INSTALL INTERFACE CARDS WITH POWER APPLIED 100 Mbps Link FDX 100 Mbps Link FDX 10/100 ETHERNET 1 10/100 ETHERNET 0 PIX 515E FAILOVER CONSOLE Blue console cable (72-1259-01) Yellow Ethernet cable (72-1482-01) Failover serial cable (74-1213-01) Power cable Rubber feet Mounting ...
... NOT INSTALL INTERFACE CARDS WITH POWER APPLIED 100 Mbps Link FDX 100 Mbps Link FDX 10/100 ETHERNET 1 10/100 ETHERNET 0 PIX 515E FAILOVER CONSOLE Blue console cable (72-1259-01) Yellow Ethernet cable (72-1482-01) Failover serial cable (74-1213-01) Power cable Rubber feet Mounting ...
Quick Start Guide
Page 4
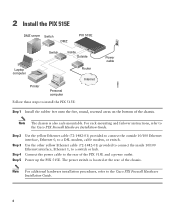
...or hub. Note The chassis is located at the rear of the chassis. 2 Install the PIX 515E DMZ server Switch DMZ PIX 515E Switch Inside Outside Laptop computer Printer Personal computer Follow these steps to install the PIX 515E: Router Internet Power cable 97998 Step 1 Install the rubber feet onto the five, round, ... 10/100 Ethernet interface, Ethernet 1, to a DSL modem, cable modem, or switch. Note For additional hardware installation procedures, refer to the Cisco PIX Firewall Hardware Installation Guide. For rack-mounting and failover instructions, refer to the...
...or hub. Note The chassis is located at the rear of the chassis. 2 Install the PIX 515E DMZ server Switch DMZ PIX 515E Switch Inside Outside Laptop computer Printer Personal computer Follow these steps to install the PIX 515E: Router Internet Power cable 97998 Step 1 Install the rubber feet onto the five, round, ... 10/100 Ethernet interface, Ethernet 1, to a DSL modem, cable modem, or switch. Note For additional hardware installation procedures, refer to the Cisco PIX Firewall Hardware Installation Guide. For rack-mounting and failover instructions, refer to the...

Quick Start Guide
Page 5
... set up solid green. 5 For more information on the switch or hub lights up the PIX Firewall. The PIX 515E contains an integrated web-based configuration tool called the Cisco PIX Device Manager (PDM), that is designed to help you to efficiently create a basic configuration that...to use DHCP (to receive an IP address automatically from the PIX 515E) or assign a static IP address to the outside interface. Follow these steps to the Cisco PIX Firewall Command Reference. Refer to the Cisco PIX Device Manager Installation Guide for simplified initial configuration of your web browser...
... set up solid green. 5 For more information on the switch or hub lights up the PIX Firewall. The PIX 515E contains an integrated web-based configuration tool called the Cisco PIX Device Manager (PDM), that is designed to help you to efficiently create a basic configuration that...to use DHCP (to receive an IP address automatically from the PIX 515E) or assign a static IP address to the outside interface. Follow these steps to the Cisco PIX Firewall Command Reference. Refer to the Cisco PIX Device Manager Installation Guide for simplified initial configuration of your web browser...

Quick Start Guide
Page 6
...is a neutral zone between HTTP clients and web servers. 6 This public address allows external clients HTTP access to quickly configure your PIX 515E for secure communications between private (inside) and public (outside interface (209.165.156.10) and one for all other business partners... private network resources that the range of the Startup Wizard window. 4 Example Configurations The following section provides configuration examples for two common PIX 515E configuration scenarios: hosting a web server on the public Internet; The illustration below , an HTTP client (10.10.10.10) on...
...is a neutral zone between HTTP clients and web servers. 6 This public address allows external clients HTTP access to quickly configure your PIX 515E for secure communications between private (inside) and public (outside interface (209.165.156.10) and one for all other business partners... private network resources that the range of the Startup Wizard window. 4 Example Configurations The following section provides configuration examples for two common PIX 515E configuration scenarios: hosting a web server on the public Internet; The illustration below , an HTTP client (10.10.10.10) on...

Quick Start Guide
Page 7
... and easily to communicate with any device on the Internet. Click the Configuration button at the top of the PDM window. 7 Launch PDM. b. a. HTTP client PIX 515E Inside 10.10.10.0 Outside 209.165.156.10 10.10.10.10 DMZ 30.30.30.0 Internet HTTP client HTTP client 97999 Web server...
... and easily to communicate with any device on the Internet. Click the Configuration button at the top of the PDM window. 7 Launch PDM. b. a. HTTP client PIX 515E Inside 10.10.10.0 Outside 209.165.156.10 10.10.10.10 DMZ 30.30.30.0 Internet HTTP client HTTP client 97999 Web server...
Quick Start Guide
Page 9
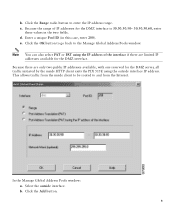
....30.30.50- 30.30.30.60, enter these values in this case, enter 200). This allows traffic from the inside HTTP client exits the PIX 515E using the outside interface. b. Because the range of the interface if there are only two public IP addresses available, with one reserved for the DMZ...
....30.30.50- 30.30.30.60, enter these values in this case, enter 200). This allows traffic from the inside HTTP client exits the PIX 515E using the outside interface. b. Because the range of the interface if there are only two public IP addresses available, with one reserved for the DMZ...

Quick Start Guide
Page 10
Click the OK button. c. Click the Port Address Translation (PAT) using the IP address of the interface radio button. d. b. Click the Apply button in Step d above (200). Assign the same Pool ID for this pool as in the main window. 10 Click the OK button. b. When the new window comes up: a. Select outside from the Interface drop-down menu. Once the pools are configured, confirm their values before applying the rules to the PIX 515E. Confirm the configurations: a.
Click the OK button. c. Click the Port Address Translation (PAT) using the IP address of the interface radio button. d. b. Click the Apply button in Step d above (200). Assign the same Pool ID for this pool as in the main window. 10 Click the OK button. b. When the new window comes up: a. Select outside from the Interface drop-down menu. Once the pools are configured, confirm their values before applying the rules to the PIX 515E. Confirm the configurations: a.

Quick Start Guide
Page 11
... starting from being exposed on the public network. This translation prevents the private address spaces from the main PDM page: a. To configure NAT between two PIX interfaces. Step 2 Configure Address Translations on Private Networks Network Address Translation (NAT) replaces the source IP addresses of network traffic traversing between the inside and...
... starting from being exposed on the public network. This translation prevents the private address spaces from the main PDM page: a. To configure NAT between two PIX interfaces. Step 2 Configure Address Translations on Private Networks Network Address Translation (NAT) replaces the source IP addresses of network traffic traversing between the inside and...

Quick Start Guide
Page 14
The configurations should now indicate the interface PAT keywords. Check the displayed configuration for accuracy. Click the Apply button to configure interface PAT between the inside and outside interface and the Dynamic address pool should display as shown below: 14 Click the Proceed button. Click the OK button. Repeat the steps to configure the PIX Firewall. The procedure remains the same, except the interface on which the translation is required is now the outside interfaces. j. k. l.
The configurations should now indicate the interface PAT keywords. Check the displayed configuration for accuracy. Click the Apply button to configure interface PAT between the inside and outside interface and the Dynamic address pool should display as shown below: 14 Click the Proceed button. Click the OK button. Repeat the steps to configure the PIX Firewall. The procedure remains the same, except the interface on which the translation is required is now the outside interfaces. j. k. l.

Quick Start Guide
Page 17
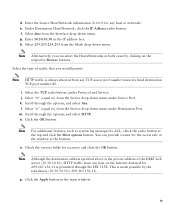
b. Select the Access rules tab. In the table, right click and select Add. 17 c. Click the Configuration button at the top of the PDM window. To configure access lists for HTTP traffic originating from the public networks. Step 4 Provide HTTP Access to the DMZ Web Server In addition to configuring address translations, you must configure the PIX 515E to allow the specific traffic types from any client on the Internet to the DMZ web server, complete the following: a.
b. Select the Access rules tab. In the table, right click and select Add. 17 c. Click the Configuration button at the top of the PDM window. To configure access lists for HTTP traffic originating from the public networks. Step 4 Provide HTTP Access to the DMZ Web Server In addition to configuring address translations, you must configure the PIX 515E to allow the specific traffic types from any client on the Internet to the DMZ web server, complete the following: a.
Quick Start Guide
Page 19
... Hosts/Networks in the window at the top and click the More options button. Note Although the destination address specified above is permitted through the PIX 515E.
... Hosts/Networks in the window at the top and click the More options button. Note Although the destination address specified above is permitted through the PIX 515E.

Quick Start Guide
Page 20
... A VPN connection allows you to send data from one location to another over a secure connection, or "tunnel," by the PIX 515E enable businesses to securely extend their networks across low-cost public Internet connections to -site VPN (Virtual Private Networking) features provided by... first strongly authenticating both ends of the PIX 515E include a VPN Accelerator Card+ (VAC+), which provides significantly improved VPN throughput. Some models of the connection, and then automatically ...
... A VPN connection allows you to send data from one location to another over a secure connection, or "tunnel," by the PIX 515E enable businesses to securely extend their networks across low-cost public Internet connections to -site VPN (Virtual Private Networking) features provided by... first strongly authenticating both ends of the PIX 515E include a VPN Accelerator Card+ (VAC+), which provides significantly improved VPN throughput. Some models of the connection, and then automatically ...

Quick Start Guide
Page 21
...In the main PDM page, select the VPN Wizard option from the drop-down menu. Site A Site B 98000 Inside 10.10.10.0 PIX 1 Outside 1.1.1.1 Internet Outside 2.2.2.2 PIX 2 Inside 20.20.20.0 Step 1 Start the VPN Wizard Use PDM to Site VPN option. This opens the VPN Wizard page. The... illustration below shows an example VPN tunnel between two PIX 515E, and will be referenced in five simple steps. b. PDM provides an easy-to-use VPN Wizard that can include PIX Firewalls, VPN concentrators, or other devices that support site-to-site IPSec connectivity....
...In the main PDM page, select the VPN Wizard option from the drop-down menu. Site A Site B 98000 Inside 10.10.10.0 PIX 1 Outside 1.1.1.1 Internet Outside 2.2.2.2 PIX 2 Inside 20.20.20.0 Step 1 Start the VPN Wizard Use PDM to Site VPN option. This opens the VPN Wizard page. The... illustration below shows an example VPN tunnel between two PIX 515E, and will be referenced in five simple steps. b. PDM provides an easy-to-use VPN Wizard that can include PIX Firewalls, VPN concentrators, or other devices that support site-to-site IPSec connectivity....

Quick Start Guide
Page 22
... authentication, check the Certificate radio button and the applicable option for IPSec negotiations between both PIX 515E units. Click the Next button to continue. 22 Enter the Peer IP Address (PIX 2) and select an authentication key (for example,"CisCo"), which is its FQDN, enter the exact name in the text field. b. Step 2 Configure the...
... authentication, check the Certificate radio button and the applicable option for IPSec negotiations between both PIX 515E units. Click the Next button to continue. 22 Enter the Peer IP Address (PIX 2) and select an authentication key (for example,"CisCo"), which is its FQDN, enter the exact name in the text field. b. Step 2 Configure the...

Quick Start Guide
Page 24
... each of VPN tunnel failures and can slow down the process. Note When configuring PIX 2, enter the exact values for PIX 1. Select the Encryption (DES/3DES/AES), Authentication algorithms (MD5/SHA), and the Diffie-Hellman group (1/2/5) used by the PIX 515E during an IKE security association. Encryption mismatches are sufficient to the next window...
... each of VPN tunnel failures and can slow down the process. Note When configuring PIX 2, enter the exact values for PIX 1. Select the Encryption (DES/3DES/AES), Authentication algorithms (MD5/SHA), and the Diffie-Hellman group (1/2/5) used by the PIX 515E during an IKE security association. Encryption mismatches are sufficient to the next window...

Quick Start Guide
Page 25
In the second window, select the Encryption algorithm (DES/3DES/AES) and Authentication algorithm (MD5/SHA). 2. Note When configuring PIX 2, enter the exact same values for each of VPN tunnel failures and can slow down the process. b. Encryption and algorithm mismatches are a common cause of the options that you selected for PIX 1. Click the Next button to the next window. a. Configure the IPSec parameters. Confirm all values before continuing to continue. 25
In the second window, select the Encryption algorithm (DES/3DES/AES) and Authentication algorithm (MD5/SHA). 2. Note When configuring PIX 2, enter the exact same values for each of VPN tunnel failures and can slow down the process. b. Encryption and algorithm mismatches are a common cause of the options that you selected for PIX 1. Click the Next button to the next window. a. Configure the IPSec parameters. Confirm all values before continuing to continue. 25

Quick Start Guide
Page 26
Note Use the Browse button to select from the selected panel by clicking on the >> or Add or remove networks dynamically from preconfigured groups. Select the Local Host/Network based on the local PIX 515E encrypted through the VPN tunnel. Select network traffic on the IP Address, Name, or Group. a. Step 4 Configure Internal Traffic This step is comprised of two windows: 1.
Note Use the Browse button to select from the selected panel by clicking on the >> or Add or remove networks dynamically from preconfigured groups. Select the Local Host/Network based on the local PIX 515E encrypted through the VPN tunnel. Select network traffic on the IP Address, Name, or Group. a. Step 4 Configure Internal Traffic This step is comprised of two windows: 1.

Quick Start Guide
Page 27
a. Note When configuring PIX 2, ensure that the values are correctly entered. b. The remote network for PIX 1 is permitted through the tunnel. Click the Finish button to complete the configuration. 27 2. In the second window, select VPN traffic for PIX 2 and vice versa. Select traffic permitted from this tunnel is the local network for remote network configuration. For PIX 1, the remote network is Network B (20.20.20.0) so traffic encrypted from the remote PIX Firewall.
a. Note When configuring PIX 2, ensure that the values are correctly entered. b. The remote network for PIX 1 is permitted through the tunnel. Click the Finish button to complete the configuration. 27 2. In the second window, select VPN traffic for PIX 2 and vice versa. Select traffic permitted from this tunnel is the local network for remote network configuration. For PIX 1, the remote network is Network B (20.20.20.0) so traffic encrypted from the remote PIX Firewall.


