
Quick Start Guide
Page 7
... LED on the security appliance, follow these steps: Step 1 Step 2 If you have not already done so, connect the inside interface of the window. 7 Press Enter. Follow the instructions in the Startup Wizard to your PC by selecting an address out of the 192.168.1.0 network. (Valid...255.0 and default route of 192.168.1.1.) Note The inside Ethernet 1 interface of 192.168.1.1. Step 5 Step 6 Step 7 Step 8 In the popup window that requires a username and password, leave both fields empty. Click Yes for configuring the security appliance. To this same switch, connect a PC for any ...
... LED on the security appliance, follow these steps: Step 1 Step 2 If you have not already done so, connect the inside interface of the window. 7 Press Enter. Follow the instructions in the Startup Wizard to your PC by selecting an address out of the 192.168.1.0 network. (Valid...255.0 and default route of 192.168.1.1.) Note The inside Ethernet 1 interface of 192.168.1.1. Step 5 Step 6 Step 7 Step 8 In the popup window that requires a username and password, leave both fields empty. Click Yes for configuring the security appliance. To this same switch, connect a PC for any ...
Quick Start Guide
Page 9
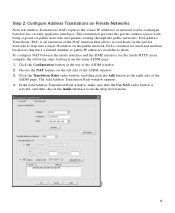
... clients would access any device on the Internet. Similarly, an IP pool for the inside the DMZ. (Clients on the left side of the ASDM window. 3. Use ASDM to manage IP pools efficiently and to a public (routable) IP address. Click the Configuration button at the top of the ASDM... window. 9 Set up the security appliance interface for your DMZ by entering this DMZ scenario, the security appliance already has an outside interface (209.165.156....
... clients would access any device on the Internet. Similarly, an IP pool for the inside the DMZ. (Clients on the left side of the ASDM window. 3. Use ASDM to manage IP pools efficiently and to a public (routable) IP address. Click the Configuration button at the top of the ASDM... window. 9 Set up the security appliance interface for your DMZ by entering this DMZ scenario, the security appliance already has an outside interface (209.165.156....
Quick Start Guide
Page 10
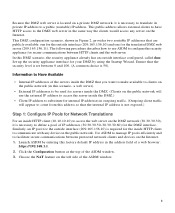
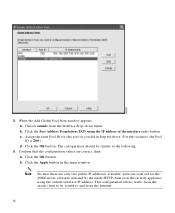
In the Manage Global Address Pools window: a. Click the Add button. The Manage Global Address Pools window appears, allowing you to the less secure, or public, interfaces. 5. b. The Add Global Pool Item window appears. 10 Choose the dmz interface. 4. Click the Manage Pools button at the bottom of the ASDM window. Note For most configurations, global pools are added to add or edit global address pools.
In the Manage Global Address Pools window: a. Click the Add button. The Manage Global Address Pools window appears, allowing you to the less secure, or public, interfaces. 5. b. The Add Global Pool Item window appears. 10 Choose the dmz interface. 4. Click the Manage Pools button at the bottom of the ASDM window. Note For most configurations, global pools are added to add or edit global address pools.
Quick Start Guide
Page 11
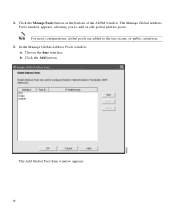
... 30.30.30.50 to 30.30.30.60. c. Click the Add button. In the Add Global Pool Item window: a. In the Manage Global Address Pools window: a. The Add Global Pool Item window appears. 11 Enter the range of the interface if there are limited IP addresses available for the DMZ interface. Enter... a unique Pool ID. (For this scenario, the range is 200.) e. Choose the outside interface. Click the Range radio button to the Manage Global Address Pools window. Click the OK button to go back to enter the IP address range. d. Choose dmz from the Interface drop-down menu. 6.
... 30.30.30.50 to 30.30.30.60. c. Click the Add button. In the Add Global Pool Item window: a. In the Manage Global Address Pools window: a. The Add Global Pool Item window appears. 11 Enter the range of the interface if there are limited IP addresses available for the DMZ interface. Enter... a unique Pool ID. (For this scenario, the range is 200.) e. Choose the outside interface. Click the Range radio button to the Manage Global Address Pools window. Click the OK button to go back to enter the IP address range. d. Choose dmz from the Interface drop-down menu. 6.
Quick Start Guide
Page 12
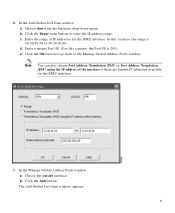
... following: 9. Confirm that the configuration values are only two public IP addresses available, with one reserved for this pool as you did in the main window. This configuration allows traffic from the inside HTTP client exits the security appliance using the IP address of the interface radio button. 8. Click the OK... button. Note Because there are correct, then: a. When the Add Global Pool Item window appears: a. b. Click the Apply button in Step 6d above. (For this scenario, the Pool ID is 200.) d.
... following: 9. Confirm that the configuration values are only two public IP addresses available, with one reserved for this pool as you did in the main window. This configuration allows traffic from the inside HTTP client exits the security appliance using the IP address of the interface radio button. 8. Click the OK... button. Note Because there are correct, then: a. When the Add Global Pool Item window appears: a. b. Click the Apply button in Step 6d above. (For this scenario, the Pool ID is 200.) d.
Quick Start Guide
Page 13
.... 13 Choose the NAT feature on the left side of the NAT function that the Use NAT radio button is an extension of the ASDM window. 3. To configure NAT between two security appliance interfaces. Click the Translation Rules radio button, and then click the Add button at the top of the...
.... 13 Choose the NAT feature on the left side of the NAT function that the Use NAT radio button is an extension of the ASDM window. 3. To configure NAT between two security appliance interfaces. Click the Translation Rules radio button, and then click the Add button at the top of the...
Quick Start Guide
Page 14
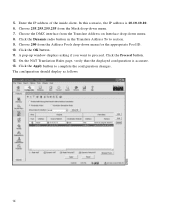
... IP address of the inside client. Click the Dynamic radio button in the Translate Address To to proceed. Click the OK button. 11. A pop-up window displays asking if you want to section. 9. The configuration should display as follows: 14 5. Click the Proceed button. 12. On the NAT Translation Rules page...
... IP address of the inside client. Click the Dynamic radio button in the Translate Address To to proceed. Click the OK button. 11. A pop-up window displays asking if you want to section. 9. The configuration should display as follows: 14 5. Click the Proceed button. 12. On the NAT Translation Rules page...
Quick Start Guide
Page 15
... dmz interface from the Mask drop-down menu of connections per static entry and DNS rewrites. Verify the values that it unaware of the ASDM window. 2. Complete the following steps to map the web server IP address (30.30.30.30) statically to select the server. 5. Choose 255.255.255....255 from the drop-down menu. Then click the OK button. 7. Then click the Add button at the top of the ASDM window. The Advanced button allows you entered. Then click the Static radio button. 6. Choose the outside HTTP clients to configure features such as follows: 15 Click...
... dmz interface from the Mask drop-down menu of connections per static entry and DNS rewrites. Verify the values that it unaware of the ASDM window. 2. Complete the following steps to map the web server IP address (30.30.30.30) statically to select the server. 5. Choose 255.255.255....255 from the drop-down menu. Then click the OK button. 7. Then click the Add button at the top of the ASDM window. The Advanced button allows you entered. Then click the Static radio button. 6. Choose the outside HTTP clients to configure features such as follows: 15 Click...
Quick Start Guide
Page 16
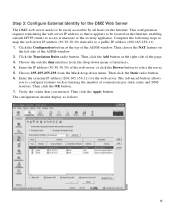
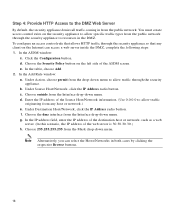
... allows HTTP traffic through the security appliance so that any host or network.) e. Click the Configuration button. In the table, choose Add. 2. c. In the ASDM window: c. e. b. Under Source Host/Network, click the IP Address radio button. Choose outside from the Mask drop-down menu. Choose 255.255.255.255 from the... the following steps: 1. Choose the Security Policy button on the left side of the web server is 30.30.30.30.) h. In the Add Rule window: a. Under Destination Host/Network, click the IP Address radio button.
... allows HTTP traffic through the security appliance so that any host or network.) e. Click the Configuration button. In the table, choose Add. 2. c. In the ASDM window: c. e. b. Under Source Host/Network, click the IP Address radio button. Choose outside from the Mask drop-down menu. Choose 255.255.255.255 from the... the following steps: 1. Choose the Security Policy button on the left side of the web server is 30.30.30.30.) h. In the Add Rule window: a. Under Destination Host/Network, click the IP Address radio button.

Quick Start Guide
Page 18
... as follows: The HTTP clients on the Internet destined for the access rule in the main window. Verify that the information you entered is permitted through the security appliance. Click the Apply button in the window at the top of the DMZ web server (30.30.30.30), HTTP traffic from any...
... as follows: The HTTP clients on the Internet destined for the access rule in the main window. Verify that the information you entered is permitted through the security appliance. Click the Apply button in the window at the top of the DMZ web server (30.30.30.30), HTTP traffic from any...