
Quick Start Guide
Page 5
...security appliance is configured with a factory-default configuration that is necessary. You can then configure and manage the security appliance using ASDM. • The outbound interface is configured to deny all ICMP traffic through the outside interface or any other interface that enables ... interface is configured as follows: • The inside network to the appliance. About the Factory Default Configuration Cisco security appliances are shipped with a default DHCP address pool. Note To run the ASDM, you should also consider configuring the security appliance to the...
...security appliance is configured with a factory-default configuration that is necessary. You can then configure and manage the security appliance using ASDM. • The outbound interface is configured to deny all ICMP traffic through the outside interface or any other interface that enables ... interface is configured as follows: • The inside network to the appliance. About the Factory Default Configuration Cisco security appliances are shipped with a default DHCP address pool. Note To run the ASDM, you should also consider configuring the security appliance to the...
Quick Start Guide
Page 6
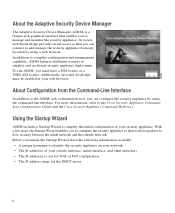
... or PAT configuration. • The IP address range for the DHCP server. 6 About Configuration from the Command-Line Interface In addition to the ASDM web configuration tool, you can connect to and manage the security appliance from any location by using a web browser. Using the Startup Wizard... Before you launch the Startup Wizard, have a DES license or a 3DES-AES license. About the Adaptive Security Device Manager The Adaptive Security Device Manager (ASDM) is a feature-rich graphical interface that enables you to the Cisco Security Appliance Command Line Configuration Guide and the...
... or PAT configuration. • The IP address range for the DHCP server. 6 About Configuration from the Command-Line Interface In addition to the ASDM web configuration tool, you can connect to and manage the security appliance from any location by using a web browser. Using the Startup Wizard... Before you launch the Startup Wizard, have a DES license or a 3DES-AES license. About the Adaptive Security Device Manager The Adaptive Security Device Manager (ASDM) is a feature-rich graphical interface that enables you to the Cisco Security Appliance Command Line Configuration Guide and the...
Quick Start Guide
Page 7
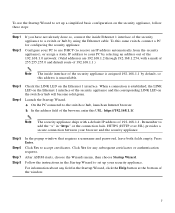
.... To this URL: https://192.168.1.1/. On the PC connected to accept certificates. Click Yes to the switch or hub, launch an Internet browser. After ASDM starts, choose the Wizards menu, then choose Startup Wizard. HTTPS (HTTP over SSL) provides a secure connection between your browser and the security appliance. Step 5 Step...
.... To this URL: https://192.168.1.1/. On the PC connected to accept certificates. Click Yes to the switch or hub, launch an Internet browser. After ASDM starts, choose the Wizards menu, then choose Startup Wizard. HTTPS (HTTP over SSL) provides a secure connection between your browser and the security appliance. Step 5 Step...
Quick Start Guide
Page 9
... Configure IP Pools for Network Translations For an inside the DMZ. (Clients on the public network will appear to substitute for the DMZ interface. Use ASDM to manage IP pools efficiently and to define a pool of a web browser: https://192.168.1.1. 2. In this address so that you want to...IP addresses in Figure 2, provides two routable IP addresses that the security level is set between 0 and 100. (A common choice is 50). Launch ASDM by using the Startup Wizard. The following procedure describes how to use the external IP address to access the server inside HTTP client to configure...
... Configure IP Pools for Network Translations For an inside the DMZ. (Clients on the public network will appear to substitute for the DMZ interface. Use ASDM to manage IP pools efficiently and to define a pool of a web browser: https://192.168.1.1. 2. In this address so that you want to...IP addresses in Figure 2, provides two routable IP addresses that the security level is set between 0 and 100. (A common choice is 50). Launch ASDM by using the Startup Wizard. The following procedure describes how to use the external IP address to access the server inside HTTP client to configure...
Quick Start Guide
Page 10
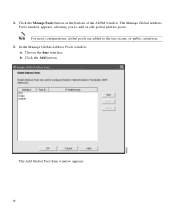
The Manage Global Address Pools window appears, allowing you to the less secure, or public, interfaces. 5. b. Click the Add button. The Add Global Pool Item window appears. 10 Note For most configurations, global pools are added to add or edit global address pools. In the Manage Global Address Pools window: a. Choose the dmz interface. 4. Click the Manage Pools button at the bottom of the ASDM window.
The Manage Global Address Pools window appears, allowing you to the less secure, or public, interfaces. 5. b. Click the Add button. The Add Global Pool Item window appears. 10 Note For most configurations, global pools are added to add or edit global address pools. In the Manage Global Address Pools window: a. Choose the dmz interface. 4. Click the Manage Pools button at the bottom of the ASDM window.
Quick Start Guide
Page 13
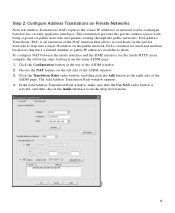
... To configure NAT between two security appliance interfaces. The Add Address Translation Rule window appears. 4. This translation prevents the private address spaces from the main ASDM page: 1. Port Address Translation (PAT) is an extension of the NAT function that have a limited number of public IP addresses available to map into a.... PAT is selected, and then choose the inside HTTP client, complete the following steps starting from being exposed on the left side of the ASDM window. 2. Click the Translation Rules radio button, and then click the Add button at the top of the...
... To configure NAT between two security appliance interfaces. The Add Address Translation Rule window appears. 4. This translation prevents the private address spaces from the main ASDM page: 1. Port Address Translation (PAT) is an extension of the NAT function that have a limited number of public IP addresses available to map into a.... PAT is selected, and then choose the inside HTTP client, complete the following steps starting from being exposed on the left side of the ASDM window. 2. Click the Translation Rules radio button, and then click the Add button at the top of the...
Quick Start Guide
Page 15
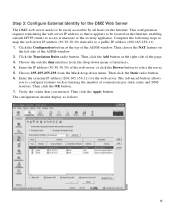
Click the Configuration button at the right side of the ASDM window. Then click the Static radio button. 6. Then click the OK button. 7. Then choose the NAT feature on the Internet. Choose the outside HTTP clients ...to access it appears to configure features such as follows: 15 The configuration should display as limiting the number of the ASDM window. 2. Step 3: Configure External Identity for the web server. Click the Translation Rules radio button. Choose 255.255.255.255 from the drop-down menu...
Click the Configuration button at the right side of the ASDM window. Then click the Static radio button. 6. Then click the OK button. 7. Then choose the NAT feature on the Internet. Choose the outside HTTP clients ...to access it appears to configure features such as follows: 15 The configuration should display as limiting the number of the ASDM window. 2. Step 3: Configure External Identity for the web server. Click the Translation Rules radio button. Choose 255.255.255.255 from the drop-down menu...
Quick Start Guide
Page 16
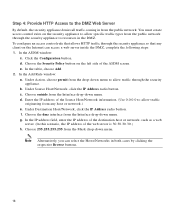
... the Security Policy button on the Internet can select the Hosts/Networks in the DMZ. e. Choose outside from the Interface drop-down menu. In the ASDM window: c. Click the Configuration button. Under Action, choose permit from the drop-down menu. f. In the IP address field, enter the IP address ...of the destination host or network, such as a web server. (In this scenario, the IP address of the ASDM screen. c. Under Destination Host/Network, click the IP Address radio button. Choose 255.255.255.255 from any client on the left side of ...
... the Security Policy button on the Internet can select the Hosts/Networks in the DMZ. e. Choose outside from the Interface drop-down menu. In the ASDM window: c. Click the Configuration button. Under Action, choose permit from the drop-down menu. f. In the IP address field, enter the IP address ...of the destination host or network, such as a web server. (In this scenario, the IP address of the ASDM screen. c. Under Destination Host/Network, click the IP Address radio button. Choose 255.255.255.255 from any client on the left side of ...
Quick Start Guide
Page 19
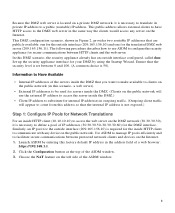
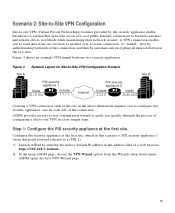
...VPN Configuration Scenario Site A Site B PIX security appliance 1 Inside 10.10.10.0 Outside 1.1.1.1 Internet PIX security appliance 2 Outside 2.2.2.2 Inside 20.20.20.0 132067 Creating a VPN connection such as PIX 1). 1. Launch ASDM by authenticating both ends of the connection. ASDM opens the first VPN Wizard page. ...two security appliances. In the main ASDM page, choose the VPN Wizard option from one location to another over a secure connection, or "tunnel," first by entering the factory default IP address in this scenario is PIX security appliance 1 (from this point...
...VPN Configuration Scenario Site A Site B PIX security appliance 1 Inside 10.10.10.0 Outside 1.1.1.1 Internet PIX security appliance 2 Outside 2.2.2.2 Inside 20.20.20.0 132067 Creating a VPN connection such as PIX 1). 1. Launch ASDM by authenticating both ends of the connection. ASDM opens the first VPN Wizard page. ...two security appliances. In the main ASDM page, choose the VPN Wizard option from one location to another over a secure connection, or "tunnel," first by entering the factory default IP address in this scenario is PIX security appliance 1 (from this point...
Quick Start Guide
Page 22
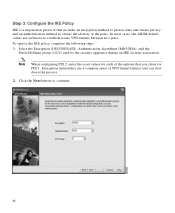
... button to establish secure VPN tunnels between two peers. To specify the IKE policy, complete the following steps: 1. Note When configuring PIX 2, enter the exact values for each of the options that includes an encryption method to protect data and ensure privacy, and an ...Authentication algorithms (MD5/SHA), and the Diffie-Hellman group (1/2/5) used by the security appliance during an IKE security association. In most cases, the ASDM default values are a common cause of the peers. Encryption mismatches are sufficient to continue. 22 Step 3: Configure the IKE Policy IKE is a ...
... button to establish secure VPN tunnels between two peers. To specify the IKE policy, complete the following steps: 1. Note When configuring PIX 2, enter the exact values for each of the options that includes an encryption method to protect data and ensure privacy, and an ...Authentication algorithms (MD5/SHA), and the Diffie-Hellman group (1/2/5) used by the security appliance during an IKE security association. In most cases, the ASDM default values are a common cause of the peers. Encryption mismatches are sufficient to continue. 22 Step 3: Configure the IKE Policy IKE is a ...
Quick Start Guide
Page 27
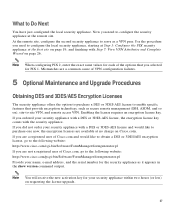
...website: http://www.cisco.com/pcgi-bin/Software/FormManager/formgenerator.pl Provide your security appliance with Step 7: View VPN Attributes and Complete Wizard on page 26. If you are a registered user of the options that provide encryption technology, such as secure remote management (SSH, ASDM, and so ... DES or 3DES/AES encryption license, go to the following website: http://www.cisco.com/cgi-bin/Software/FormManager/formgenerator.pl If you did not order your name, e-mail address, and the serial number for PIX 1. Now you ordered your security appliance within two hours (or less) on...
...website: http://www.cisco.com/pcgi-bin/Software/FormManager/formgenerator.pl Provide your security appliance with Step 7: View VPN Attributes and Complete Wizard on page 26. If you are a registered user of the options that provide encryption technology, such as secure remote management (SSH, ASDM, and so ... DES or 3DES/AES encryption license, go to the following website: http://www.cisco.com/cgi-bin/Software/FormManager/formgenerator.pl If you did not order your name, e-mail address, and the serial number for PIX 1. Now you ordered your security appliance within two hours (or less) on...