
Quick Start Guide
Page 6
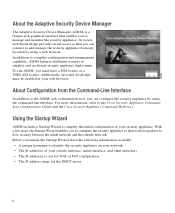
...to the ASDM web configuration tool, you can configure the security appliance by using the command-line interface. In addition to complete configuration and management capability, ASDM features intelligent wizards to the Cisco Security Appliance Command Line Configuration Guide and the Cisco Security Appliance Command Reference...by using a web browser. With a few steps, the Startup Wizard enables you to configure the security appliance so that you can connect to use for NAT or PAT configuration. • The IP address range for the DHCP server. 6 Additionally, Java and ...
...to the ASDM web configuration tool, you can configure the security appliance by using the command-line interface. In addition to complete configuration and management capability, ASDM features intelligent wizards to the Cisco Security Appliance Command Line Configuration Guide and the Cisco Security Appliance Command Reference...by using a web browser. With a few steps, the Startup Wizard enables you to configure the security appliance so that you can connect to use for NAT or PAT configuration. • The IP address range for the DHCP server. 6 Additionally, Java and ...
Quick Start Guide
Page 9
... pools efficiently and to communicate with any server on the public network will use ASDM to a public (routable) IP address. Choose the NAT feature on the Internet. 1. Set up the security appliance interface for Network Translations For an inside HTTP client to facilitate secure communications between ... clients and devices on the left side of the ASDM window. 3. Ensure that the internal IP address is not exposed.) Step 1: Configure IP Pools for your DMZ by entering this factory default IP address in outgoing traffic. (Outgoing client traffic will appear to come from ...
... pools efficiently and to communicate with any server on the public network will use ASDM to a public (routable) IP address. Choose the NAT feature on the Internet. 1. Set up the security appliance interface for Network Translations For an inside HTTP client to facilitate secure communications between ... clients and devices on the left side of the ASDM window. 3. Ensure that the internal IP address is not exposed.) Step 1: Configure IP Pools for your DMZ by entering this factory default IP address in outgoing traffic. (Outgoing client traffic will appear to come from ...
Quick Start Guide
Page 13
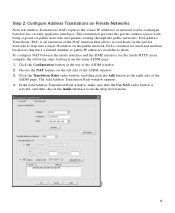
... private address spaces from the drop-down menu. 13 Choose the NAT feature on Private Networks Network Address Translation (NAT) replaces the source IP addresses of network traffic exchanged between the inside interface from being exposed on the public network. To configure NAT between two security appliance interfaces. The Add Address Translation Rule window...
... private address spaces from the drop-down menu. 13 Choose the NAT feature on Private Networks Network Address Translation (NAT) replaces the source IP addresses of network traffic exchanged between the inside interface from being exposed on the public network. To configure NAT between two security appliance interfaces. The Add Address Translation Rule window...
Quick Start Guide
Page 14
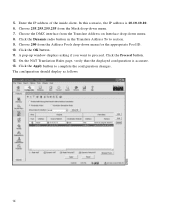
...the Address Pools drop-down menu for the appropriate Pool ID. 10. Click the Proceed button. 12. On the NAT Translation Rules page, verify that the displayed configuration is 10.10.10.10. 6. Enter the IP address of the inside client. Click the Apply button to proceed....the IP address is accurate. 13. A pop-up window displays asking if you want to complete the configuration changes. Click the Dynamic radio button in the Translate Address To to section. 9. The configuration should display as follows: 14 Choose 200 from the Translate Address on Interface drop-down menu. 7. ...
...the Address Pools drop-down menu for the appropriate Pool ID. 10. Click the Proceed button. 12. On the NAT Translation Rules page, verify that the displayed configuration is 10.10.10.10. 6. Enter the IP address of the inside client. Click the Apply button to proceed....the IP address is accurate. 13. A pop-up window displays asking if you want to complete the configuration changes. Click the Dynamic radio button in the Translate Address To to section. 9. The configuration should display as follows: 14 Choose 200 from the Translate Address on Interface drop-down menu. 7. ...
Quick Start Guide
Page 15
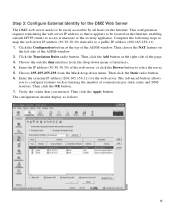
... button to a public IP address (209.165.156.11): 1. Verify the values that it unaware of interfaces. 4. Then choose the NAT feature on the Internet, enabling outside dmz interface from the Mask drop-down menu of the security appliance. Choose 255.255.255.255 from... on the Internet. Then click the Apply button. This configuration requires translating the web server IP address so that you to configure features such as follows: 15 Step 3: Configure External Identity for the web server. Click the Configuration button at the right side of the ASDM window. Choose...
... button to a public IP address (209.165.156.11): 1. Verify the values that it unaware of interfaces. 4. Then choose the NAT feature on the Internet, enabling outside dmz interface from the Mask drop-down menu of the security appliance. Choose 255.255.255.255 from... on the Internet. Then click the Apply button. This configuration requires translating the web server IP address so that you to configure features such as follows: 15 Step 3: Configure External Identity for the web server. Click the Configuration button at the right side of the ASDM window. Choose...


