
Quick Start Guide
Page 2
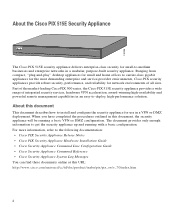
... use in an easy-to-deploy, high-performance solution. About the Cisco PIX 515E Security Appliance 132235 POWER ACT NETWORK PIX Firewall SERIES The Cisco PIX 515E security appliance delivers enterprise-class security for small-to-medium businesses and... enterprise networks in this document, the security appliance will be running with a basic configuration. The document provides only enough information to get the security appliance up and running a basic VPN...
... use in an easy-to-deploy, high-performance solution. About the Cisco PIX 515E Security Appliance 132235 POWER ACT NETWORK PIX Firewall SERIES The Cisco PIX 515E security appliance delivers enterprise-class security for small-to-medium businesses and... enterprise networks in this document, the security appliance will be running with a basic configuration. The document provides only enough information to get the security appliance up and running a basic VPN...
Quick Start Guide
Page 8
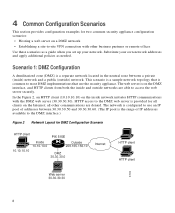
...) on the inside network initiates HTTP communications with other communications are able to the DMZ interface.) Figure 2 Network Layout for DMZ Configuration Scenario HTTP client PIX 515E Inside 10.10.10.0 Outside 209.165.156.10 10.10.10.10 DMZ 30.30.30.0 Internet HTTP client HTTP client 97999 Web... Scenarios This section provides configuration examples for two common security appliance configuration scenarios: • Hosting a web server on a DMZ network • Establishing a site-to-site VPN connection with the DMZ web server (30.30.30.30). Substitute your network.
...) on the inside network initiates HTTP communications with other communications are able to the DMZ interface.) Figure 2 Network Layout for DMZ Configuration Scenario HTTP client PIX 515E Inside 10.10.10.0 Outside 209.165.156.10 10.10.10.10 DMZ 30.30.30.0 Internet HTTP client HTTP client 97999 Web... Scenarios This section provides configuration examples for two common security appliance configuration scenarios: • Hosting a web server on a DMZ network • Establishing a site-to-site VPN connection with the DMZ web server (30.30.30.30). Substitute your network.
Quick Start Guide
Page 19
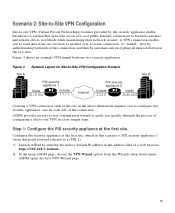
Figure 3 Network Layout for Site-to-Site VPN Configuration Scenario Site A Site B PIX security appliance 1 Inside 10.10.10.0 Outside 1.1.1.1 Internet PIX security appliance 2 Outside 2.2.2.2 Inside 20.20.20.0 132067 Creating a VPN connection such as PIX 1). 1. Launch ASDM by the security appliance enable ....1.1/admin. 2. Figure 3 shows an example VPN tunnel between the two sites. Configure the security appliance at the first site. Step 1: Configure the PIX security appliance at the first site, which in this scenario is PIX security appliance 1 (from this point forward ...
Figure 3 Network Layout for Site-to-Site VPN Configuration Scenario Site A Site B PIX security appliance 1 Inside 10.10.10.0 Outside 1.1.1.1 Internet PIX security appliance 2 Outside 2.2.2.2 Inside 20.20.20.0 132067 Creating a VPN connection such as PIX 1). 1. Launch ASDM by the security appliance enable ....1.1/admin. 2. Figure 3 shows an example VPN tunnel between the two sites. Configure the security appliance at the first site. Step 1: Configure the PIX security appliance at the first site, which in this scenario is PIX security appliance 1 (from this point forward ...
Quick Start Guide
Page 20
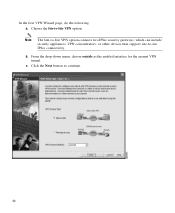
c. In the first VPN Wizard page, do the following: a. From the drop-down menu, choose outside as the enabled interface for the current VPN tunnel. Choose the Site-to continue. 20 b. Click the Next button to -Site VPN option. Note The Site-to-Site VPN option connects two IPSec security gateways, which can include security appliances, VPN concentrators, or other devices that support site-to-site IPSec connectivity.
c. In the first VPN Wizard page, do the following: a. From the drop-down menu, choose outside as the enabled interface for the current VPN tunnel. Choose the Site-to continue. 20 b. Click the Next button to -Site VPN option. Note The Site-to-Site VPN option connects two IPSec security gateways, which can include security appliances, VPN concentrators, or other devices that support site-to-site IPSec connectivity.

Quick Start Guide
Page 21
... the drop-down menu. 3. Provide information about the VPN peer. To use here. - Click the Next button to enter the same Pre-shared Key (CisCo) that you configure the PIX 2 at a remote site. Step 2: Provide information about the VPN peer. The VPN peer is PIX 1. Note When you want to as PIX 2). 1. Be sure to continue. 21
... the drop-down menu. 3. Provide information about the VPN peer. To use here. - Click the Next button to enter the same Pre-shared Key (CisCo) that you configure the PIX 2 at a remote site. Step 2: Provide information about the VPN peer. The VPN peer is PIX 1. Note When you want to as PIX 2). 1. Be sure to continue. 21
Quick Start Guide
Page 22
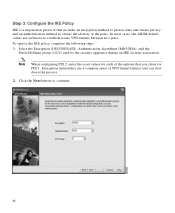
Note When configuring PIX 2, enter the exact values for PIX 1. In most cases, the ASDM default values are a common cause of VPN tunnel failures and can slow down the process. 2. To specify the IKE policy, complete the following steps: 1. Click the Next button ...MD5/SHA), and the Diffie-Hellman group (1/2/5) used by the security appliance during an IKE security association. Encryption mismatches are sufficient to establish secure VPN tunnels between two peers. Step 3: Configure the IKE Policy IKE is a negotiation protocol that includes an encryption method to protect data and ensure...
Note When configuring PIX 2, enter the exact values for PIX 1. In most cases, the ASDM default values are a common cause of VPN tunnel failures and can slow down the process. 2. To specify the IKE policy, complete the following steps: 1. Click the Next button ...MD5/SHA), and the Diffie-Hellman group (1/2/5) used by the security appliance during an IKE security association. Encryption mismatches are sufficient to establish secure VPN tunnels between two peers. Step 3: Configure the IKE Policy IKE is a negotiation protocol that includes an encryption method to protect data and ensure...
Quick Start Guide
Page 23
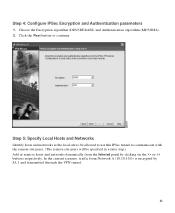
Choose the Encryption algorithm (DES/3DES/AES) and Authentication algorithm (MD5/SHA). 2. Click the Next button to communicate with the remote-site peers. (The remote-site peers will be specified in a later step.) Add or remove hosts and networks dynamically from the Selected panel by clicking on the >> or Step 4: Configure IPSec Encryption and Authentication parameters 1. Step 5: Specify Local Hosts and Networks Identify hosts and networks at the local site to be allowed to use this IPSec tunnel to continue.
Choose the Encryption algorithm (DES/3DES/AES) and Authentication algorithm (MD5/SHA). 2. Click the Next button to communicate with the remote-site peers. (The remote-site peers will be specified in a later step.) Add or remove hosts and networks dynamically from the Selected panel by clicking on the >> or Step 4: Configure IPSec Encryption and Authentication parameters 1. Step 5: Specify Local Hosts and Networks Identify hosts and networks at the local site to be allowed to use this IPSec tunnel to continue.
Quick Start Guide
Page 26
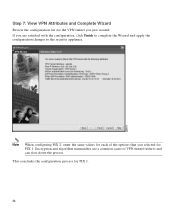
This concludes the configuration process for PIX 1. 26 Note When configuring PIX 2, enter the same values for each of VPN tunnel failures and can slow down the process. Encryption and algorithm mismatches are satisfied with the configuration, click Finish to complete the Wizard and apply the configuration changes to the security appliance. Step 7: View VPN Attributes and Complete Wizard Review the configuration list for the VPN tunnel you selected for PIX 1. If you are a common cause of the options that you just created.
This concludes the configuration process for PIX 1. 26 Note When configuring PIX 2, enter the same values for each of VPN tunnel failures and can slow down the process. Encryption and algorithm mismatches are satisfied with the configuration, click Finish to complete the Wizard and apply the configuration changes to the security appliance. Step 7: View VPN Attributes and Complete Wizard Review the configuration list for the VPN tunnel you selected for PIX 1. If you are a common cause of the options that you just created.
Quick Start Guide
Page 27
...you used to Do Next You have just configured the local security appliance. If you are a common cause of Cisco.com, go to the following website: http://www.cisco.com/cgi-bin/Software/FormManager/formgenerator.pl If you ordered your security appliance within two hours (or less) on requesting... the license upgrade. 27 What to configure the local security appliance, starting at Step 1: Configure the PIX security appliance at the first site on page 19, and finishing with Step 7: View VPN Attributes and Complete Wizard on page 26. If you did not order your security appliance with a DES...
...you used to Do Next You have just configured the local security appliance. If you are a common cause of Cisco.com, go to the following website: http://www.cisco.com/cgi-bin/Software/FormManager/formgenerator.pl If you ordered your security appliance within two hours (or less) on requesting... the license upgrade. 27 What to configure the local security appliance, starting at Step 1: Configure the PIX security appliance at the first site on page 19, and finishing with Step 7: View VPN Attributes and Complete Wizard on page 26. If you did not order your security appliance with a DES...

