
Owners Guide
Page 3
... and Test 16 Selectable starter/ignition interrupt 16 1 Table of Contents Standard Features of the Cyber 9 3 Welcome 9 Your 4-button/12-channel remote controls 10 How to use your keychain remote control 10 What each button/channel does 11 How to interpret the chirps and parking light flashes 12 Anti-CodeGrabbing™ (ACG...
... and Test 16 Selectable starter/ignition interrupt 16 1 Table of Contents Standard Features of the Cyber 9 3 Welcome 9 Your 4-button/12-channel remote controls 10 How to use your keychain remote control 10 What each button/channel does 11 How to interpret the chirps and parking light flashes 12 Anti-CodeGrabbing™ (ACG...
Owners Guide
Page 12
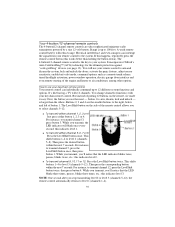
... lock and unlock - For instance, to level 3 (channels 9-12). This shifts buttons 1-4 to transmit channel 3, press button 3. It incorporates Clifford's Anti-CodeGrabbing™ (ACG) technology for the ultimate protection against "code-grabbing" devices (see page 13). How to use your remote control ...shifts buttons 1-4 to transmit channel 12, press the LevelShift button twice, then press button 4. n To transmit channel 9, 10, 11 or 12: Press the LevelShift button twice. For instance, to level 2 (channels 5-8). A weak remote control battery will reduce range.
... lock and unlock - For instance, to level 3 (channels 9-12). This shifts buttons 1-4 to transmit channel 3, press button 3. It incorporates Clifford's Anti-CodeGrabbing™ (ACG) technology for the ultimate protection against "code-grabbing" devices (see page 13). How to use your remote control ...shifts buttons 1-4 to transmit channel 12, press the LevelShift button twice, then press button 4. n To transmit channel 9, 10, 11 or 12: Press the LevelShift button twice. For instance, to level 2 (channels 5-8). A weak remote control battery will reduce range.
Owners Guide
Page 13
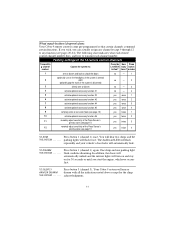
...arm or disarm no - 3 4 activate optional accessory function #1 no - 1 optionally turn on for the chirp THE SYSTEM acknowledgments. 11 In addition, the doors will automatically unlock and the interior lights will arm or ARM OR DISARM disarm with all the indications noted ... remotely adjust sensitivity of the 12 remote control channels Transmittin g channel number: Causes the system to transmit each button/channel does Your Cyber 9 remote controls come pre-programmed so that certain channels command certain functions. number 1 arm or disarm and lock or unlock the doors...
...arm or disarm no - 3 4 activate optional accessory function #1 no - 1 optionally turn on for the chirp THE SYSTEM acknowledgments. 11 In addition, the doors will automatically unlock and the interior lights will arm or ARM OR DISARM disarm with all the indications noted ... remotely adjust sensitivity of the 12 remote control channels Transmittin g channel number: Causes the system to transmit each button/channel does Your Cyber 9 remote controls come pre-programmed so that certain channels command certain functions. number 1 arm or disarm and lock or unlock the doors...

Owners Guide
Page 14
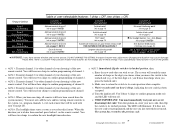
... when the system is disarmed, such as the IntelliStart remote engine starter, remote power ALARM STATE window control, electric garage door and entry gate opener(s), Cyber 9 systems on page 17) Disarmed but there was a 10-sec. delay) (see page 15) Your system is a door open the trunk. Pressing...your other vehicles, etc. Button 2 (channel 2) can activate accessories REGARDLESS OF such as an optional remote trunk release. What about Channels 9, 11 and 12 control remote valet mode entry/exit (see channels page 15) and remote adjustment of each of the two Piezo Sensor...
... when the system is disarmed, such as the IntelliStart remote engine starter, remote power ALARM STATE window control, electric garage door and entry gate opener(s), Cyber 9 systems on page 17) Disarmed but there was a 10-sec. delay) (see page 15) Your system is a door open the trunk. Pressing...your other vehicles, etc. Button 2 (channel 2) can activate accessories REGARDLESS OF such as an optional remote trunk release. What about Channels 9, 11 and 12 control remote valet mode entry/exit (see channels page 15) and remote adjustment of each of the two Piezo Sensor...

Owners Guide
Page 16
..., you can disarm the system by a valet. The switch has three positions: 1.) Latched 2.) Center 3.) Spring-loaded momentary. When you will not accept any number between 11-99 (excluding those that absolutely ensure a thief cannot enable the valet mode as described in its center position. 14 n Entering a code: If your code has...
..., you can disarm the system by a valet. The switch has three positions: 1.) Latched 2.) Center 3.) Spring-loaded momentary. When you will not accept any number between 11-99 (excluding those that absolutely ensure a thief cannot enable the valet mode as described in its center position. 14 n Entering a code: If your code has...

Owners Guide
Page 19
...individually test and adjust the settings of each step. To test the current sensitivity setting: a. Warning zone: "Thump" the window pillar with Cyber 9. Repeat steps 2 and 3 until you wish to arm the system. You may now either repeat steps 1-4 for each sensitivity decrease. ...Not so with somewhat less force. To adjust the Piezo Sensor, just use the following procedure: 1. Primary zone: Transmit channel 11 (LevelShift twice, then button 3). To decrease it a try. Conversely, lower and lower tones confirm each of the two sensing zones. 4. ...
...individually test and adjust the settings of each step. To test the current sensitivity setting: a. Warning zone: "Thump" the window pillar with Cyber 9. Repeat steps 2 and 3 until you wish to arm the system. You may now either repeat steps 1-4 for each sensitivity decrease. ...Not so with somewhat less force. To adjust the Piezo Sensor, just use the following procedure: 1. Primary zone: Transmit channel 11 (LevelShift twice, then button 3). To decrease it a try. Conversely, lower and lower tones confirm each of the two sensing zones. 4. ...
Owners Guide
Page 25
...: on/off info on page 19 AutoArm & Lock: on/off . You will illuminate. The LED will hear two chirps to channel 4 info on page 11 NOTE 4 Erase all remotes will turn off . Wait 3 seconds until you accidentally select column 4, turn off info on page 13 D Set headlight duration: ... DO NOT CHANGE THIS SETTING: it does not, the new code you programmed and the one chirp to the previous code. 23 24 © Copyright Clifford Electronics, Inc., 1997 31-900A/Cy9OM/197 d. You'll hear 3 chirps to its latched position, then: a. VERY IMPORTANT: You must now add ...
...: on/off info on page 19 AutoArm & Lock: on/off . You will illuminate. The LED will hear two chirps to channel 4 info on page 11 NOTE 4 Erase all remotes will turn off . Wait 3 seconds until you accidentally select column 4, turn off info on page 13 D Set headlight duration: ... DO NOT CHANGE THIS SETTING: it does not, the new code you programmed and the one chirp to the previous code. 23 24 © Copyright Clifford Electronics, Inc., 1997 31-900A/Cy9OM/197 d. You'll hear 3 chirps to its latched position, then: a. VERY IMPORTANT: You must now add ...