
Instruction Manual
Page 11
...slide and hold the Power/Lock switch to the Setup section for details). To charge your player's USB Charge option to "On" (refer to the right until you see the "Goodbye...the power plug with the AC Adapter. 1. Set your player: • AC Adapter: Plug one end of the USB cable into the USB MSC Port and plug the other end ...into the USB port of a powered-on computer. AC 100-240V Wall Outlet WARNING: • The battery used in this may present a fire or chemical burn if mistreated. Doing so may case a fire or damage the player...
...slide and hold the Power/Lock switch to the Setup section for details). To charge your player's USB Charge option to "On" (refer to the right until you see the "Goodbye...the power plug with the AC Adapter. 1. Set your player: • AC Adapter: Plug one end of the USB cable into the USB MSC Port and plug the other end ...into the USB port of a powered-on computer. AC 100-240V Wall Outlet WARNING: • The battery used in this may present a fire or chemical burn if mistreated. Doing so may case a fire or damage the player...
Instruction Manual
Page 13
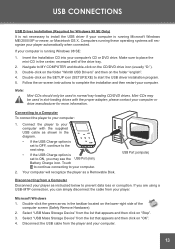
... (Required for more information. Computers running these operating systems will recognize the player as a Removable Disk. Note: Mini-CDs should only be used in slot-loading drives with the supplied USB cable as instructed below to complete the installation and then restart your computer with the... recessed well of the computer screen (Safely Remove Hardware). 2. Touch to continue connecting to ON, you can simply disconnect the cable from the player and your player. If you are using a USB-MTP connection, you may be used in normal tray-loading CD/DVD drives. Double-click ...
... (Required for more information. Computers running these operating systems will recognize the player as a Removable Disk. Note: Mini-CDs should only be used in slot-loading drives with the supplied USB cable as instructed below to complete the installation and then restart your computer with the... recessed well of the computer screen (Safely Remove Hardware). 2. Touch to continue connecting to ON, you can simply disconnect the cable from the player and your player. If you are using a USB-MTP connection, you may be used in normal tray-loading CD/DVD drives. Double-click ...
Instruction Manual
Page 14
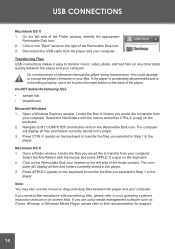
... com- If you selected in the player. 3. Press CTRL-V (paste) on the back of the Finder window, identify the appropriate Removable Disk icon. 2. USB CONNECTIONS Macintosh OS X 1. On the left side of the Removable Disk icon. 3. Disconnect the USB cable from your computer. Select the files/...folders with the mouse and press APPLE-C (copy) on the right of the finder window. If the player is accidentally disconnected and is not working properly, use the mouse to...
... com- If you selected in the player. 3. Press CTRL-V (paste) on the back of the Finder window, identify the appropriate Removable Disk icon. 2. USB CONNECTIONS Macintosh OS X 1. On the left side of the Removable Disk icon. 3. Disconnect the USB cable from your computer. Select the files/...folders with the mouse and press APPLE-C (copy) on the right of the finder window. If the player is accidentally disconnected and is not working properly, use the mouse to...

Instruction Manual
Page 15
... connection: 1. This makes it easy to use the MP-C951 to save the files to. Navigate to the USB HOST ROOT screen. 8. The screen will return to the Main menu. Once the file has been saved, the player will display all the files and folders on the external...USB drives directly to transfer data from your player. 15 Use the USB cable to connect the external device to confirm. 7. Upon successfully connecting, you to select a destination to save photos from a digital camera or documents from a thumb-drive while you to your player -- USB HOST CONNECTION The USB HOST ...
... connection: 1. This makes it easy to use the MP-C951 to save the files to. Navigate to the USB HOST ROOT screen. 8. The screen will return to the Main menu. Once the file has been saved, the player will display all the files and folders on the external...USB drives directly to transfer data from your player. 15 Use the USB cable to connect the external device to confirm. 7. Upon successfully connecting, you to select a destination to save photos from a digital camera or documents from a thumb-drive while you to your player -- USB HOST CONNECTION The USB HOST ...
Instruction Manual
Page 25
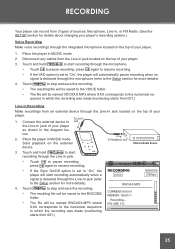
... (numbering starts from 001.) Line-In Recording Make recordings from an external device through the Line-In jack located on the top of your player. 3. Touch to stop and save the recording. • The resulting file will be saved to the ENCODE folder. • The file... or FM Radio. (See the SETUP section for details about changing your player's recording options.) Voice Recording Make voice recordings through the integrated microphone located on the top of your player as shown in the diagram below. 2. Disconnect any cables from the Line-In jack located on the external device.
... (numbering starts from 001.) Line-In Recording Make recordings from an external device through the Line-In jack located on the top of your player. 3. Touch to stop and save the recording. • The resulting file will be saved to the ENCODE folder. • The file... or FM Radio. (See the SETUP section for details about changing your player's recording options.) Voice Recording Make voice recordings through the integrated microphone located on the top of your player as shown in the diagram below. 2. Disconnect any cables from the Line-In jack located on the external device.
Instruction Manual
Page 39
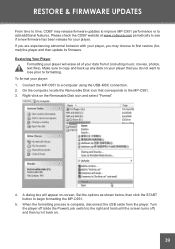
...behavior with your player: 1. When the formatting process is complete, disconnect the USB cable from it back on the Removable Disk icon and select "Format" 4. Please check the COBY website at www.cobyusa.com periodically to begin formatting the MP-C951. 5. To format your player, you do not... want to lose prior to the MP-C951. 3. Right-...
...behavior with your player: 1. When the formatting process is complete, disconnect the USB cable from it back on the Removable Disk icon and select "Format" 4. Please check the COBY website at www.cobyusa.com periodically to begin formatting the MP-C951. 5. To format your player, you do not... want to lose prior to the MP-C951. 3. Right-...
Instruction Manual
Page 41
COBY Electronics Technical Support Hours: Monday to Friday, 8:30 AM-11:00 PM EST Saturday to Sunday, 9:00 AM-11:00 PM EST Email: [email protected] Phone: 800-681-2629 or 718-416-3197 Web: www.cobyusa.com The player... or re-encoding the file yourself. • Ensure that the supplied USB cable is securely attached to the player and the PC, or try using a pin to press the Reset button...If you have connected the player through a USB hub, try connecting the player directly to your computer. • The files you are trying to transfer may contain Digital Rights Management (DRM) restric-
COBY Electronics Technical Support Hours: Monday to Friday, 8:30 AM-11:00 PM EST Saturday to Sunday, 9:00 AM-11:00 PM EST Email: [email protected] Phone: 800-681-2629 or 718-416-3197 Web: www.cobyusa.com The player... or re-encoding the file yourself. • Ensure that the supplied USB cable is securely attached to the player and the PC, or try using a pin to press the Reset button...If you have connected the player through a USB hub, try connecting the player directly to your computer. • The files you are trying to transfer may contain Digital Rights Management (DRM) restric-


