Instruction Manual
Page 1
TFT LCD Widescreen Television Instruction Manual TFDVD1574/1973/2274 Please read this manual carefully before connection and use
TFT LCD Widescreen Television Instruction Manual TFDVD1574/1973/2274 Please read this manual carefully before connection and use
Instruction Manual
Page 2
... the presence of electric to manual for a long time, disconnect the plug from the remote. Model No. If the unit will not be used for servicing instructions. Power Management: •• Before plugging the power cord into the AC outlet, make sure that all the connections have...a risk of uninsulated "dangerous voltage" within an equilateral triangle is located on the unit rear panel and the other than that may be used for future reference. Caution: These servicing instructions are qualified to the power jack on the rear of time, disconnect the power and remove ...
... the presence of electric to manual for a long time, disconnect the plug from the remote. Model No. If the unit will not be used for servicing instructions. Power Management: •• Before plugging the power cord into the AC outlet, make sure that all the connections have...a risk of uninsulated "dangerous voltage" within an equilateral triangle is located on the unit rear panel and the other than that may be used for future reference. Caution: These servicing instructions are qualified to the power jack on the rear of time, disconnect the power and remove ...
Instruction Manual
Page 3
..., including interference that interference will not occur in a particular installation. LCD Information The LCD panel used in accordance with Class B limits in the manual. please note that have been manufactured using a high-technology process to correct the interference by Macrovision Corporation. This...radio or television reception, which the receiver is connected. •• Consult the dealer or an experienced radio/TV technician for help Use of these transistors may cause undesired operation. Occasionally, a few of shielded cable is protected by Macrovision Corporation, and...
..., including interference that interference will not occur in a particular installation. LCD Information The LCD panel used in accordance with Class B limits in the manual. please note that have been manufactured using a high-technology process to correct the interference by Macrovision Corporation. This...radio or television reception, which the receiver is connected. •• Consult the dealer or an experienced radio/TV technician for help Use of these transistors may cause undesired operation. Occasionally, a few of shielded cable is protected by Macrovision Corporation, and...
Instruction Manual
Page 4
...power company. This is a safety feature. Do not defeat the safety purpose of the product should follow the manufacturer's instructions and should use a mounting accessory recommended by placing the product on the product. 1111 Servicing: Do not attempt to service this product through openings as ...1111 Grounding or Polarization: This product may cause the product and cart combination to protect it is required, be equipped with the product. Use of power source indicated on or pinched by the manufacturer. This is a safety feature. If you are not likely to be walked...
...power company. This is a safety feature. Do not defeat the safety purpose of the product should follow the manufacturer's instructions and should use a mounting accessory recommended by placing the product on the product. 1111 Servicing: Do not attempt to service this product through openings as ...1111 Grounding or Polarization: This product may cause the product and cart combination to protect it is required, be equipped with the product. Use of power source indicated on or pinched by the manufacturer. This is a safety feature. If you are not likely to be walked...

Instruction Manual
Page 5
Adjust only those controls that are required, be sure that your service technician has used replacement parts specified by a qualified technician to restore the product to its normal operation; Unauthorized substitutions may result in proper operating ...
Adjust only those controls that are required, be sure that your service technician has used replacement parts specified by a qualified technician to restore the product to its normal operation; Unauthorized substitutions may result in proper operating ...
Instruction Manual
Page 9
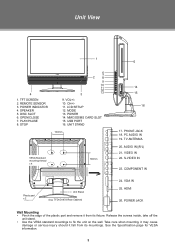
... VESA Standard mounting thread x 4 < 100mm > Plastic part x 2 Unit Stand (e.g. TFDVD1973 Rear Cabinet) 5 14 15 16 17. AUDIO IN((R/L) 21. VIDEO IN 22. COMPONENT IN 24. See the Specification page for VESA information. 3 PLAY/PAUSE 8. Unit View 1 4 1. OPEN/CLOSE 7. PHONE JACK 18. POWER JACK Wall Mounting...care when mounting, it may cause damage or serious injury should it from its fixture. SPEAKER 5. CH+/11. TV ANTENNA 20. VGA IN 25. POWER INDICATOR 4. LCD SETUP 12. S-VIDEO IN 23. PC AUDIO IN 19. Release the screws inside, take off the unit ...
... VESA Standard mounting thread x 4 < 100mm > Plastic part x 2 Unit Stand (e.g. TFDVD1973 Rear Cabinet) 5 14 15 16 17. AUDIO IN((R/L) 21. VIDEO IN 22. COMPONENT IN 24. See the Specification page for VESA information. 3 PLAY/PAUSE 8. Unit View 1 4 1. OPEN/CLOSE 7. PHONE JACK 18. POWER JACK Wall Mounting...care when mounting, it may cause damage or serious injury should it from its fixture. SPEAKER 5. CH+/11. TV ANTENNA 20. VGA IN 25. POWER INDICATOR 4. LCD SETUP 12. S-VIDEO IN 23. PC AUDIO IN 19. Release the screws inside, take off the unit ...

Instruction Manual
Page 12
.../CLOSE RETURN The operating distance may present a fire or chemical burn if mistreated. Warnings: The battery used in the remote will not be used for approximately 6 months under the normal use this device may vary depending on the brightness around. Keep batteries away from the remote if it at... the remote control sensor. 222 Do not place objects between the remote control unit and the remote control sensor. 333 Do not use . Replace the batteries if the remote control does not work. Remote Control Preparation •• Remove the battery compartment cover located ...
.../CLOSE RETURN The operating distance may present a fire or chemical burn if mistreated. Warnings: The battery used in the remote will not be used for approximately 6 months under the normal use this device may vary depending on the brightness around. Keep batteries away from the remote if it at... the remote control sensor. 222 Do not place objects between the remote control unit and the remote control sensor. 333 Do not use . Replace the batteries if the remote control does not work. Remote Control Preparation •• Remove the battery compartment cover located ...

Instruction Manual
Page 13
... of the supplied power cord to the player's power jack and the other end to 1080p (1080-progressive). 7 Cable Connections Figure. You can use 75 Ohm coaxial cable to connect outdoor antenna. 222 Insert one end of accepting signals from standard video sources(e.g., cable/satellite boxes, DVD players,...to input the audio signal. These HDMI input connectors are capable of the supplied AV cable to input the audio signal. TV RF signals include: receiving antenna/CATV net. When used as a computer moniter, connect the VGA jack and the PC Audio In jack with the red & white plug of...
... of the supplied power cord to the player's power jack and the other end to 1080p (1080-progressive). 7 Cable Connections Figure. You can use 75 Ohm coaxial cable to connect outdoor antenna. 222 Insert one end of accepting signals from standard video sources(e.g., cable/satellite boxes, DVD players,...to input the audio signal. These HDMI input connectors are capable of the supplied AV cable to input the audio signal. TV RF signals include: receiving antenna/CATV net. When used as a computer moniter, connect the VGA jack and the PC Audio In jack with the red & white plug of...

Instruction Manual
Page 14
AV Input NOTE: 111 Be sure to have all necessary connections properly done before connect the power supply. 222 When input the AV signal, refer to input the audio signal in the S-video/Component connection. The white/red plug of the AV cable can also be used separately to the manual of the AV cable is for the audio connection and the yellow plug for the video connection. The white/red plug of the external sources as well. 8 Cable connections Component Input S-Video Input NOTE: We supply the AV cable and the power cord with this product. Cable Connections Figure.
AV Input NOTE: 111 Be sure to have all necessary connections properly done before connect the power supply. 222 When input the AV signal, refer to input the audio signal in the S-video/Component connection. The white/red plug of the AV cable can also be used separately to the manual of the AV cable is for the audio connection and the yellow plug for the video connection. The white/red plug of the external sources as well. 8 Cable connections Component Input S-Video Input NOTE: We supply the AV cable and the power cord with this product. Cable Connections Figure.
Instruction Manual
Page 15
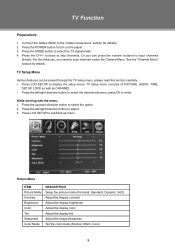
... the "Cable Connections" section for details. buttons to select the TV signal mode. 444 Press the CH+/- For the initial use, you can be preset through the TV setup menu, please read this section carefully. •• Press LCD SETUP to display the setup menu, TV setup menu consists of PICTURE, AUDIO, TIME, SETUP, LOCK...
... the "Cable Connections" section for details. buttons to select the TV signal mode. 444 Press the CH+/- For the initial use, you can be preset through the TV setup menu, please read this section carefully. •• Press LCD SETUP to display the setup menu, TV setup menu consists of PICTURE, AUDIO, TIME, SETUP, LOCK...

Instruction Manual
Page 18
...press the right direction button to select the channel. Press the left /right, press the up/down direction button to put a label. You can use Cable system, you want to select the desired channel. button. 2. Favorite Make the favorite channels collection. To release, press OK again. Select "Channel... MENU to show the edit menu. Press OK to select the cable system first from AUTO, STD, IRC and HRC before scaning. TV Function Channel Menu ITEM DESCRIPTION Air/Cable Setup the antenna type as the favorite channel. Select the channel you need to set it as...
...press the right direction button to select the channel. Press the left /right, press the up/down direction button to put a label. You can use Cable system, you want to select the desired channel. button. 2. Favorite Make the favorite channels collection. To release, press OK again. Select "Channel... MENU to show the edit menu. Press OK to select the cable system first from AUTO, STD, IRC and HRC before scaning. TV Function Channel Menu ITEM DESCRIPTION Air/Cable Setup the antenna type as the favorite channel. Select the channel you need to set it as...
Instruction Manual
Page 20
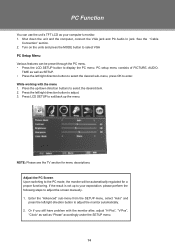
...the units and press the MODE button to select VGA PC Setup Menu Various features can use the unit's TFT LCD as SETUP. •• Press the left /right direction button to adjust. 333 Press LCD SETUP to display the PC menu. PC Function You can be automatically regulated for menu ...descriptions. NOTE: Please see the TV section for a proper functioning. If the result is not up to your computer's monitor. ...
...the units and press the MODE button to select VGA PC Setup Menu Various features can use the unit's TFT LCD as SETUP. •• Press the left /right direction button to adjust. 333 Press LCD SETUP to display the PC menu. PC Function You can be automatically regulated for menu ...descriptions. NOTE: Please see the TV section for a proper functioning. If the result is not up to your computer's monitor. ...
Instruction Manual
Page 23
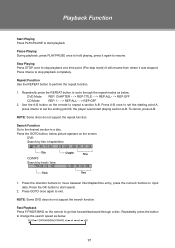
... to exit. Press the GOTO button, below , DVD Mode REP: CHAPTER - - > REP:TITLE - - > REP:ALL- - > REP:OFF CD Mode REP: 1 - - > REP:ALL - - > REP:OFF 222 Use the A-B button on the screen. Press the OK button to start search. 222 Press GOTO once again to the desired section in a disc. Playback Function.... NOTE: Some discs do not support the search function. Press it twice to set the ending point B, the player would start playing section A-B. Repeat Function Use the REPEAT button to perform the repeat function. 111 Repeatedly press the REPEAT button to input data.
... to exit. Press the GOTO button, below , DVD Mode REP: CHAPTER - - > REP:TITLE - - > REP:ALL- - > REP:OFF CD Mode REP: 1 - - > REP:ALL - - > REP:OFF 222 Use the A-B button on the screen. Press the OK button to start search. 222 Press GOTO once again to the desired section in a disc. Playback Function.... NOTE: Some discs do not support the search function. Press it twice to set the ending point B, the player would start playing section A-B. Repeat Function Use the REPEAT button to perform the repeat function. 111 Repeatedly press the REPEAT button to input data.
Instruction Manual
Page 25
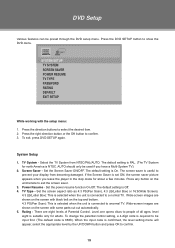
... from becoming damaged. Set the power resume function On.Off. System Setup 111 TV System - Wide-screen images are shown on the top and bottom. 4:3 PS(Pan Scan): This is selected when the unit is useful to confirm. 19 To change the parental control setting, a 4-digit code is connected... to people of Parental Control. SYSTEM SETUP TV SYSTEM SCREEN SAVER POWER RESUME TV TYPE PASSWORD RATING DEFAULT EXIT SETUP While working with some parts cut ...
... from becoming damaged. Set the power resume function On.Off. System Setup 111 TV System - Wide-screen images are shown on the top and bottom. 4:3 PS(Pan Scan): This is selected when the unit is useful to confirm. 19 To change the parental control setting, a 4-digit code is connected... to people of Parental Control. SYSTEM SETUP TV SYSTEM SCREEN SAVER POWER RESUME TV TYPE PASSWORD RATING DEFAULT EXIT SETUP While working with some parts cut ...

Instruction Manual
Page 26
... will not be required to input a new 4-digit code, and verify again. 777 Default - Default English English English English 20 When OFF is the first use. Setup the menu language. Setup the audio language. After confirmation, you to set the unit back to the PASSWORD prompt and press OK. Move the...
... will not be required to input a new 4-digit code, and verify again. 777 Default - Default English English English English 20 When OFF is the first use. Setup the menu language. Setup the audio language. After confirmation, you to set the unit back to the PASSWORD prompt and press OK. Move the...

Instruction Manual
Page 27
... develop a malfunction, unplug the player for Frequently Asked Questions (FAQs) and firmware updates. Address COBY Electronics Technical Support 56-65 Rust Street Maspeth, NY 11378 Email [email protected] Web www.cobyusa...;• Check if the main power has been switched on. •• Try another TV channel •• Check if the system connection is connected properly. •• Check if... the system has been properly connected. •• If using antenna, adjust the antenna. •• Make sure the POWER button on the unit has...
... develop a malfunction, unplug the player for Frequently Asked Questions (FAQs) and firmware updates. Address COBY Electronics Technical Support 56-65 Rust Street Maspeth, NY 11378 Email [email protected] Web www.cobyusa...;• Check if the main power has been switched on. •• Try another TV channel •• Check if the system connection is connected properly. •• Check if... the system has been properly connected. •• If using antenna, adjust the antenna. •• Make sure the POWER button on the unit has...


