
Operating Instructions
Page 3
... sufficient magnitude to constitute a risk of electric shock to the presence of important operating and maintenance (servicing) instruction in hazardous radiation exposure. No user serviceable parts inside. The lightning flash with arrowhead symbol, with in an equilateral triangle, is intended ! CAUTION RISK OF ELECTRIC SHOCK. Refer servicing to the presence of...
... sufficient magnitude to constitute a risk of electric shock to the presence of important operating and maintenance (servicing) instruction in hazardous radiation exposure. No user serviceable parts inside. The lightning flash with arrowhead symbol, with in an equilateral triangle, is intended ! CAUTION RISK OF ELECTRIC SHOCK. Refer servicing to the presence of...

Operating Instructions
Page 4
... Macrovision. Copyright 1992-1997 Dolby Laboratories. Reverse engineering or disassembly is intended for home and other intellectual property rights. FCC NOTICE: This device complies with part 15 of Dolby Laboratories. Confidential unpublished works. patents and other limited viewing uses only unless otherwise authorized by Macrovision, and is prohibited.
... Macrovision. Copyright 1992-1997 Dolby Laboratories. Reverse engineering or disassembly is intended for home and other intellectual property rights. FCC NOTICE: This device complies with part 15 of Dolby Laboratories. Confidential unpublished works. patents and other limited viewing uses only unless otherwise authorized by Macrovision, and is prohibited.

Operating Instructions
Page 5
... BATTERY PACK OPERATION 8 Operation of the battery pack 8 Storage 8 Service life and disposal 8 TYPES OF DISCS PLAYABLE ON THIS PLAYER 9 Marks indicated on DVDs 9 Disc structure 10 USING THESE OPERATING INSTRUCTIONS 1 1 BEFORE USING CHECKING THE ACCESSORIES 1 2 REMOTE CONTROL UNIT AND MAIN UNIT PREPARATIONS...Main unit bottom side 18 Remote control unit (frequently used buttons 19 Remote control unit (other buttons 20 Names of battery parts and their functions 21 CONNECTING THE PLAYER TO OTHER DEVICES 2 2 Connecting to a TV 22 Connecting to a Dolby Digital/ DTS/ MPEG decoder or an ...
... BATTERY PACK OPERATION 8 Operation of the battery pack 8 Storage 8 Service life and disposal 8 TYPES OF DISCS PLAYABLE ON THIS PLAYER 9 Marks indicated on DVDs 9 Disc structure 10 USING THESE OPERATING INSTRUCTIONS 1 1 BEFORE USING CHECKING THE ACCESSORIES 1 2 REMOTE CONTROL UNIT AND MAIN UNIT PREPARATIONS...Main unit bottom side 18 Remote control unit (frequently used buttons 19 Remote control unit (other buttons 20 Names of battery parts and their functions 21 CONNECTING THE PLAYER TO OTHER DEVICES 2 2 Connecting to a TV 22 Connecting to a Dolby Digital/ DTS/ MPEG decoder or an ...

Operating Instructions
Page 8
... liquid crystal display cleaner. When using a soft, dry cloth. Note that leaving water droplets on Using this may result in 5 to 6 parts water to peel off the dirt, then wipe the player with a soft, dry cloth(such as an eyeglass cleaning cloth). Note that alcohol, thinner, benzene, insecticides, etc., may cause the...
... liquid crystal display cleaner. When using a soft, dry cloth. Note that leaving water droplets on Using this may result in 5 to 6 parts water to peel off the dirt, then wipe the player with a soft, dry cloth(such as an eyeglass cleaning cloth). Note that alcohol, thinner, benzene, insecticides, etc., may cause the...

Operating Instructions
Page 16
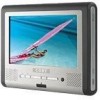
Red: The player is on the remote control unit. Main unit control section ON OFF 1 2 3 4 -15- 5 6 Turn on the power using ON button on the main unit or the STANDBY button on . Blue:The player is set to standby mode. Parts and Functions Liquid crystal display The portable DVD player is equipped with a liquid crystal display. 1 2 1 Liquid crystal display 34 5 2 Speakers 3 Control section Control buttons 4 Remote sensor The remote control signals are received here. 5 Power indicator Off: No power connection.
Red: The player is on the remote control unit. Main unit control section ON OFF 1 2 3 4 -15- 5 6 Turn on the power using ON button on the main unit or the STANDBY button on . Blue:The player is set to standby mode. Parts and Functions Liquid crystal display The portable DVD player is equipped with a liquid crystal display. 1 2 1 Liquid crystal display 34 5 2 Speakers 3 Control section Control buttons 4 Remote sensor The remote control signals are received here. 5 Power indicator Off: No power connection.

Operating Instructions
Page 17
... adjust after entering one mode. Keep pressing the button about 1.5 seconds during playback mode, pause mode is set. TFT MODE: switch screen between 16:9 and 4:3. Parts and Functions 1 Play/pause button Press it to turn off the unit (standby status). 3 Previous/next buttons Use it to 8. When pressing during playback to...
... adjust after entering one mode. Keep pressing the button about 1.5 seconds during playback mode, pause mode is set. TFT MODE: switch screen between 16:9 and 4:3. Parts and Functions 1 Play/pause button Press it to turn off the unit (standby status). 3 Previous/next buttons Use it to 8. When pressing during playback to...

Operating Instructions
Page 18
... included AV cable or optical digital cable is connected here. 4 Audio in/out and optical output jack Input or output audio signals to connected device. Parts and Functions 1 Phone jack For connecting stereo headphone or an amplifier. 2 Volume control Use it to adjust the volume of the speakers or headphone. 3 Video...
... included AV cable or optical digital cable is connected here. 4 Audio in/out and optical output jack Input or output audio signals to connected device. Parts and Functions 1 Phone jack For connecting stereo headphone or an amplifier. 2 Volume control Use it to adjust the volume of the speakers or headphone. 3 Video...

Operating Instructions
Page 19
BATTERY CONNECTOR after using the battery pack. -18- UNLOCK UNLOCK LOCK LOCK 1 2 3 Main unit bottom side 1 Hole for Battery Pack 2 Nut for Battery Pack 3 Battery connector 13 2 1 Note: Remember to insert back the rubber cover to lock it to open the tray. 1 2 Support The unit can stand with this device. 1 2 2 How to stand 1 Pull out the support. 2 Draw out the support to a proper position . 3 Pull down the button to 3. Parts and Functions Main unit rear side 1 Open-stick You can use it .
BATTERY CONNECTOR after using the battery pack. -18- UNLOCK UNLOCK LOCK LOCK 1 2 3 Main unit bottom side 1 Hole for Battery Pack 2 Nut for Battery Pack 3 Battery connector 13 2 1 Note: Remember to insert back the rubber cover to lock it to open the tray. 1 2 Support The unit can stand with this device. 1 2 2 How to stand 1 Pull out the support. 2 Draw out the support to a proper position . 3 Pull down the button to 3. Parts and Functions Main unit rear side 1 Open-stick You can use it .

Operating Instructions
Page 20
... of tracks or chapters. : Backward direction : Forward direction 7 STEP/SLOW buttons( ) Press this button to display the DVD's title. 3 Scan buttons ( and Use these buttons to stop playback. Parts and Functions Remote control unit (frequently used buttons) ( ( ( ( AUDIO SUBTITLE OPEN 1 SETUP ANGLE OSD SEARCH PREV ...direction : Backward direction 4 PLAY/PAUSE button ( Use this button to play or pause playback. 5 MENU button Press this button to display the DVD's menu screen. 6 STOP button ( Press this button to switch playing speed of playing forward or backward. -19-
... of tracks or chapters. : Backward direction : Forward direction 7 STEP/SLOW buttons( ) Press this button to display the DVD's title. 3 Scan buttons ( and Use these buttons to stop playback. Parts and Functions Remote control unit (frequently used buttons) ( ( ( ( AUDIO SUBTITLE OPEN 1 SETUP ANGLE OSD SEARCH PREV ...direction : Backward direction 4 PLAY/PAUSE button ( Use this button to play or pause playback. 5 MENU button Press this button to display the DVD's menu screen. 6 STOP button ( Press this button to switch playing speed of playing forward or backward. -19-

Operating Instructions
Page 21
...button to switch number & function. (Defaut: function) 11 OPEN Open the tray and replace/take disk. 12 SUBTITLE button Press it to switch the DVD's subtitle language. 13 OSD button Press this button to display the disc information. 14 ANGLE button Press it to return back the previous item. (...when at stop status. For CDs, use this button to switch angle. 15 SEARCH button Locate a title/ chapter/ time and play titles or chapters repeatedly. Parts and Functions Remote control unit (other buttons) AUDIO SUBTITLE OPEN 1 SETUP 2 ANGLE OSD 3 4 PREV SEARCH NEXT STOP 11 12 13 14 15 REV ...
...button to switch number & function. (Defaut: function) 11 OPEN Open the tray and replace/take disk. 12 SUBTITLE button Press it to switch the DVD's subtitle language. 13 OSD button Press this button to display the disc information. 14 ANGLE button Press it to return back the previous item. (...when at stop status. For CDs, use this button to switch angle. 15 SEARCH button Locate a title/ chapter/ time and play titles or chapters repeatedly. Parts and Functions Remote control unit (other buttons) AUDIO SUBTITLE OPEN 1 SETUP 2 ANGLE OSD 3 4 PREV SEARCH NEXT STOP 11 12 13 14 15 REV ...

Operating Instructions
Page 22
When the LED becomes green, means finishing recharge. 4 Player terminals Supply power to tighten/detach the battery pack. 3 Battery indicator LED. When recharging the battery, LED is off. CAUTION: Do not short-circuit the terminals. -21- When the battery is discharging, LED is red. Parts and Functions Names of battery parts and their functions 12 3 4 1 DC IN connector Connect the power adapter to recharge. 2 Battery knob Twist to the player.
When the LED becomes green, means finishing recharge. 4 Player terminals Supply power to tighten/detach the battery pack. 3 Battery indicator LED. When recharging the battery, LED is off. CAUTION: Do not short-circuit the terminals. -21- When the battery is discharging, LED is red. Parts and Functions Names of battery parts and their functions 12 3 4 1 DC IN connector Connect the power adapter to recharge. 2 Battery knob Twist to the player.