
Instruction Manual
Page 2
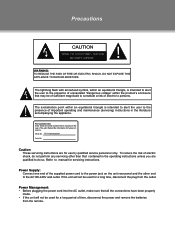
... on the rear of important operating and maintenance (servicing) instructions in the operating instructions unless you are for a long time, disconnect the plug from the remote. Power Supply: Connect one end of electric to manual for future reference. The exclamation point within the product's enclosure that is intended to alert the...
... on the rear of important operating and maintenance (servicing) instructions in the operating instructions unless you are for a long time, disconnect the plug from the remote. Power Supply: Connect one end of electric to manual for future reference. The exclamation point within the product's enclosure that is intended to alert the...
Instruction Manual
Page 8
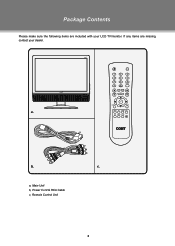
b. If any items are included with your dealer. c. a, Main Unit b, Power Cord & RCA Cable c, Remote Control Unit 2 Package Contents Please make sure the following items are missing, contact your LCD TV/monitor. a.
b. If any items are included with your dealer. c. a, Main Unit b, Power Cord & RCA Cable c, Remote Control Unit 2 Package Contents Please make sure the following items are missing, contact your LCD TV/monitor. a.
Instruction Manual
Page 9
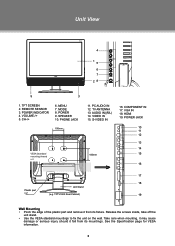
... 9. SPEAKER 10. Release the screws inside, take off the unit stand. •• Use the VESA standard mountings to fix the unit on the wall. REMOTE SENSOR 3. MODE 8. PHONE JACK 100mm 11. Unit View 4 15 6 7 28 9 3 1. VOLUME-/+ 5. S-VIDEO IN < > > VESA Standard mounting thread x 4 < 100mm > Plastic part x... care when mounting, it may cause damage or serious injury should it from its fixture. See the Specification page for VESA informaiton. 3 TV ANTENNA 13. VIDEO IN 15. POWER INDICATOR 4. TFTV1923 Rear Cabinet) 16. VGA IN 18. POWER JACK 10 11 12 13 14 ...
... 9. SPEAKER 10. Release the screws inside, take off the unit stand. •• Use the VESA standard mountings to fix the unit on the wall. REMOTE SENSOR 3. MODE 8. PHONE JACK 100mm 11. Unit View 4 15 6 7 28 9 3 1. VOLUME-/+ 5. S-VIDEO IN < > > VESA Standard mounting thread x 4 < 100mm > Plastic part x... care when mounting, it may cause damage or serious injury should it from its fixture. See the Specification page for VESA informaiton. 3 TV ANTENNA 13. VIDEO IN 15. POWER INDICATOR 4. TFTV1923 Rear Cabinet) 16. VGA IN 18. POWER JACK 10 11 12 13 14 ...
Instruction Manual
Page 10
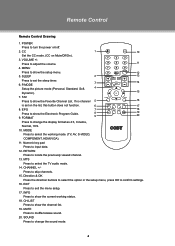
... Press to show the Favorite Channel List. MTS Press to set on Mute/Off/On). 3. CHANNEL +/- SLEEP 2 13 Press to select the TV audio mode. 14. FAV Press to change the sound mode. 4 FORMAT 9 19 20 Press to show the setup menu. 12 5. EXIT ...to turn the power on/off. 2. POWER Press to exit the menu setup. 17. MODE Press to show the channel list. 19. Remote Control Remote Control Drawing 1. If no channel 5 16 is set the sleep timer. 3 14 6. Press to muffle/release sound. 20. MUTE Press...
... Press to show the Favorite Channel List. MTS Press to set on Mute/Off/On). 3. CHANNEL +/- SLEEP 2 13 Press to select the TV audio mode. 14. FAV Press to change the sound mode. 4 FORMAT 9 19 20 Press to show the setup menu. 12 5. EXIT ...to turn the power on/off. 2. POWER Press to exit the menu setup. 17. MODE Press to show the channel list. 19. Remote Control Remote Control Drawing 1. If no channel 5 16 is set the sleep timer. 3 14 6. Press to muffle/release sound. 20. MUTE Press...
Instruction Manual
Page 11
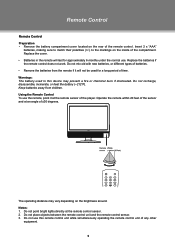
.... Insert 2 x "AAA" batteries, making sure to match their polarities (+/-) to the markings on the brightness around. Warnings: The battery used in the remote will not be used for approximately 6 months under the normal use. Notes: 111 Do not point bright lights directly at the... remote control sensor. 222 Do not place objects between the remote control unit and the remote control sensor. 333 Do not use the remote, point it will last for a long period of ±30 degrees. 7 s MODE RETURN...
.... Insert 2 x "AAA" batteries, making sure to match their polarities (+/-) to the markings on the brightness around. Warnings: The battery used in the remote will not be used for approximately 6 months under the normal use. Notes: 111 Do not point bright lights directly at the... remote control sensor. 222 Do not place objects between the remote control unit and the remote control sensor. 333 Do not use the remote, point it will last for a long period of ±30 degrees. 7 s MODE RETURN...
Instruction Manual
Page 15
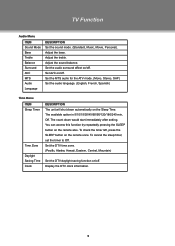
... Saving Time Clock DESCRIPTION The unit will shut down would start immediately after setting. To check the timer left, press the SLEEP button on the remote also. Set the audio surround effect on /off . Adjust the sound balance. The available option is 5/10/15/30/45/60/90/120/...180/240 min, Off. You can access this function by repeatedly pressing the SLEEP button on the remote once. TV Function Audio Menu ITEM Sound Mode Bass Treble Balance Surround AVC MTS Audio Language DESCRIPTION Set the sound mode. (Standard, Music, Movie, Personal)....
... Saving Time Clock DESCRIPTION The unit will shut down would start immediately after setting. To check the timer left, press the SLEEP button on the remote also. Set the audio surround effect on /off . Adjust the sound balance. The available option is 5/10/15/30/45/60/90/120/...180/240 min, Off. You can access this function by repeatedly pressing the SLEEP button on the remote once. TV Function Audio Menu ITEM Sound Mode Bass Treble Balance Surround AVC MTS Audio Language DESCRIPTION Set the sound mode. (Standard, Music, Movie, Personal)....
Instruction Manual
Page 20
... problem with correct polarities. •• Replace the batteries of the remote control. •• Should the player develop a malfunction, unplug the player for Frequently Asked Questions (FAQs) and firmware updates. Address COBY Electronics Technical Support 56-65 Rust Street Maspeth, NY 11378 Email [email protected] properly connected to the power outlet. •• Check if the main power has been switched on. •• Try another TV channel •• Check if the system connection is proper and secure. •• Check if the connection cables are damaged. &#...
... problem with correct polarities. •• Replace the batteries of the remote control. •• Should the player develop a malfunction, unplug the player for Frequently Asked Questions (FAQs) and firmware updates. Address COBY Electronics Technical Support 56-65 Rust Street Maspeth, NY 11378 Email [email protected] properly connected to the power outlet. •• Check if the main power has been switched on. •• Try another TV channel •• Check if the system connection is proper and secure. •• Check if the connection cables are damaged. &#...


