Wireless (Select Models Only) - Windows Vista
Page 14
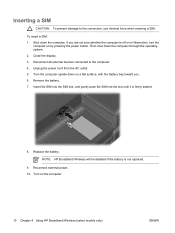
.... 3. To insert a SIM: 1. Insert the SIM into the SIM slot, and gently push the SIM into the slot until it is not replaced. 9. Then shut down the computer through the operating system. 2. Reconnect external power. 10. Inserting a SIM CAUTION: To prevent damage to the computer.... 4. If you . 6. Remove the battery. 7. Turn on by pressing the power button. Disconnect all external devices connected to the connectors, use minimal force when inserting a SIM. Unplug...
.... 3. To insert a SIM: 1. Insert the SIM into the SIM slot, and gently push the SIM into the slot until it is not replaced. 9. Then shut down the computer through the operating system. 2. Reconnect external power. 10. Inserting a SIM CAUTION: To prevent damage to the computer.... 4. If you . 6. Remove the battery. 7. Turn on by pressing the power button. Disconnect all external devices connected to the connectors, use minimal force when inserting a SIM. Unplug...
Wireless (Select Models Only) - Windows Vista
Page 15
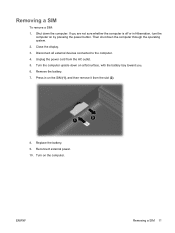
Turn the computer upside down on a flat surface, with the battery bay toward you are not sure whether the computer is off or in on the SIM (1), and then remove it from the AC outlet. 5. Reconnect ... a SIM To remove a SIM: 1. Disconnect all external devices connected to the computer. 4. Remove the battery. 7. Shut down the computer through the operating system. 2. Close the display. 3. If you . 6. Press in Hibernation, turn the computer on the computer. Replace the battery. 9. ENWW Removing a SIM 11 Unplug the power cord from the slot (2). 8. Then shut...
Turn the computer upside down on a flat surface, with the battery bay toward you are not sure whether the computer is off or in on the SIM (1), and then remove it from the AC outlet. 5. Reconnect ... a SIM To remove a SIM: 1. Disconnect all external devices connected to the computer. 4. Remove the battery. 7. Shut down the computer through the operating system. 2. Close the display. 3. If you . 6. Press in Hibernation, turn the computer on the computer. Replace the battery. 9. ENWW Removing a SIM 11 Unplug the power cord from the slot (2). 8. Then shut...

Computer Setup - Windows XP and Windows Vista
Page 10
... provide an overview of the Computer Setup menu items listed in this ● View identification information for the computer and the batteries in Computer Setup with the original factory settings. (Password settings and security settings are not changed when you restore the factory settings...System information Restore defaults Ignore changes and exit Save changes and exit To do this chapter may not be supported by your computer. Replace the configuration settings in the system. ● View specification information for the processor, cache and memory size, system ROM, video revision...
... provide an overview of the Computer Setup menu items listed in this ● View identification information for the computer and the batteries in Computer Setup with the original factory settings. (Password settings and security settings are not changed when you restore the factory settings...System information Restore defaults Ignore changes and exit Save changes and exit To do this chapter may not be supported by your computer. Replace the configuration settings in the system. ● View specification information for the processor, cache and memory size, system ROM, video revision...

Drives - Windows XP
Page 5
... DriveGuard(select models only) Identifying HP 3D DriveGuard status 5 Using HP 3D DriveGuard software ...6 5 Replacing a hard drive 6 Using an optical drive (select models only) Inserting an optical disc ...14 Removing an optical disc when running on battery or external power 15 Removing an optical disc when no computer power is available 16...
... DriveGuard(select models only) Identifying HP 3D DriveGuard status 5 Using HP 3D DriveGuard software ...6 5 Replacing a hard drive 6 Using an optical drive (select models only) Inserting an optical disc ...14 Removing an optical disc when running on battery or external power 15 Removing an optical disc when no computer power is available 16...

Drives - Windows XP
Page 13
...in Hibernation, turn the computer on , in Standby, or in Hibernation. If you . 6. Unplug the power cord from the computer. 7. Remove the battery from the AC outlet. 5. Lift the hard drive cover away from the hard drive bay. Shut down on a flat surface, with the hard drive bay... before removing the hard drive from the computer (2). 9. Disconnect all external hardware devices connected to the computer. 4. Save your work. 2. ENWW 7 5 Replacing a hard drive CAUTION: To prevent information loss or an unresponsive system: Shut down the computer through the operating system.
...in Hibernation, turn the computer on , in Standby, or in Hibernation. If you . 6. Unplug the power cord from the computer. 7. Remove the battery from the AC outlet. 5. Lift the hard drive cover away from the hard drive bay. Shut down on a flat surface, with the hard drive bay... before removing the hard drive from the computer (2). 9. Disconnect all external hardware devices connected to the computer. 4. Save your work. 2. ENWW 7 5 Replacing a hard drive CAUTION: To prevent information loss or an unresponsive system: Shut down the computer through the operating system.
Memory Modules - Windows Vista
Page 7
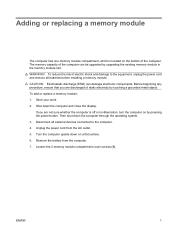
... in the memory module slot. The memory capacity of static electricity by touching a grounded metal object. Remove the battery from the AC outlet. 5. Unplug the power cord from the computer. 7. To add or replace a memory module: 1. Then shut down the computer and close the display. Loosen the 2 memory module compartment cover screws...
... in the memory module slot. The memory capacity of static electricity by touching a grounded metal object. Remove the battery from the AC outlet. 5. Unplug the power cord from the computer. 7. To add or replace a memory module: 1. Then shut down the computer and close the display. Loosen the 2 memory module compartment cover screws...
Memory Modules - Windows Vista
Page 9
... at a 45-degree angle from the surface of the memory module with the notches on the memory module and do not bend the memory module. c. Replace the battery.
... at a 45-degree angle from the surface of the memory module with the notches on the memory module and do not bend the memory module. c. Replace the battery.
Memory Modules - Windows XP
Page 7
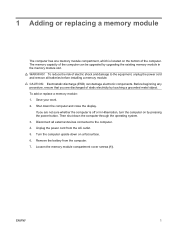
...the bottom of static electricity by touching a grounded metal object. Then shut down on by pressing the power button. Remove the battery from the AC outlet. 5. The memory capacity of electric shock and damage to the equipment, unplug the power cord and ... can damage electronic components. Turn the computer upside down the computer through the operating system. 3. To add or replace a memory module: 1. Save your work. 2. Disconnect all batteries before installing a memory module. Loosen the memory module compartment cover screws (1). Shut down the computer and close the...
...the bottom of static electricity by touching a grounded metal object. Then shut down on by pressing the power button. Remove the battery from the AC outlet. 5. The memory capacity of electric shock and damage to the equipment, unplug the power cord and ... can damage electronic components. Turn the computer upside down the computer through the operating system. 3. To add or replace a memory module: 1. Save your work. 2. Disconnect all batteries before installing a memory module. Loosen the memory module compartment cover screws (1). Shut down the computer and close the...

Memory Modules - Windows XP
Page 9
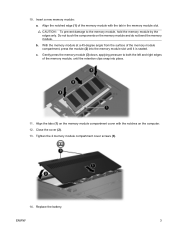
... at a 45-degree angle from the surface of the memory module, until the retention clips snap into the memory module slot until it is seated. Replace the battery. Align the tabs (1) on the memory module and do not bend the memory module. 10. c. CAUTION: To prevent damage to both the left and...
... at a 45-degree angle from the surface of the memory module, until the retention clips snap into the memory module slot until it is seated. Replace the battery. Align the tabs (1) on the memory module and do not bend the memory module. 10. c. CAUTION: To prevent damage to both the left and...

Drives Windows XP
Page 5
... Improving hard drive performance Using Disk Defragmenter ...3 Using Disk Cleanup ...3 4 HP 3D DriveGuard HP 3D DriveGuard status ...5 HP 3D DriveGuard software ...6 5 Replacing a hard drive 6 MultiBay II drive MulitBay II security screw ...11 MultiBay II hard drive ...12 Inserting a hard drive module 12 Removing a hard ...Removing an optical drive 13 7 Using an optical drive Inserting an optical disc ...16 Removing an optical disc when running on battery or external power 17 Removing an optical disc when no computer power is available 18 8 Using external drives Optional external devices ......
... Improving hard drive performance Using Disk Defragmenter ...3 Using Disk Cleanup ...3 4 HP 3D DriveGuard HP 3D DriveGuard status ...5 HP 3D DriveGuard software ...6 5 Replacing a hard drive 6 MultiBay II drive MulitBay II security screw ...11 MultiBay II hard drive ...12 Inserting a hard drive module 12 Removing a hard ...Removing an optical drive 13 7 Using an optical drive Inserting an optical disc ...16 Removing an optical disc when running on battery or external power 17 Removing an optical disc when no computer power is available 18 8 Using external drives Optional external devices ......

Drives Windows XP
Page 13
... the AC outlet. 5. Save your work. 2. Loosen the hard drive screw (1). Do not remove the hard drive while the computer is off or in Hibernation. 5 Replacing a hard drive CAUTION: To prevent information loss or an unresponsive system: Shut down the computer before removing the hard drive from the computer. 7. Remove the...
... the AC outlet. 5. Save your work. 2. Loosen the hard drive screw (1). Do not remove the hard drive while the computer is off or in Hibernation. 5 Replacing a hard drive CAUTION: To prevent information loss or an unresponsive system: Shut down the computer before removing the hard drive from the computer. 7. Remove the...

Drives - Windows Vista
Page 5
... HP 3D DriveGuard(select models only) Identifying HP 3D DriveGuard status 5 Using HP 3D DriveGuard software ...6 5 Replacing a hard drive 6 Using an optical drive Inserting an optical disc ...13 Removing an optical disc when running on battery or external power 14 Removing an optical disc when no computer power is available 15 7 Using...
... HP 3D DriveGuard(select models only) Identifying HP 3D DriveGuard status 5 Using HP 3D DriveGuard software ...6 5 Replacing a hard drive 6 Using an optical drive Inserting an optical disc ...13 Removing an optical disc when running on battery or external power 14 Removing an optical disc when no computer power is available 15 7 Using...

Drives - Windows Vista
Page 13
... before removing the hard drive from the computer. 7. ENWW 7 Lift the hard drive cover away from the AC outlet. 5. Loosen the 2 hard drive cover screws (1). 8. 5 Replacing a hard drive CAUTION: To prevent information loss or an unresponsive system: Shut down on a flat surface, with the hard drive bay toward you are not... sure whether the computer is on by pressing the power button. Disconnect all external hardware devices connected to the computer. 4. Remove the battery from the hard drive bay.
... before removing the hard drive from the computer. 7. ENWW 7 Lift the hard drive cover away from the AC outlet. 5. Loosen the 2 hard drive cover screws (1). 8. 5 Replacing a hard drive CAUTION: To prevent information loss or an unresponsive system: Shut down on a flat surface, with the hard drive bay toward you are not... sure whether the computer is on by pressing the power button. Disconnect all external hardware devices connected to the computer. 4. Remove the battery from the hard drive bay.


