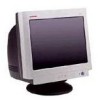
Reference Guide Compaq Color Monitors Series 5500, 7500, 7550, 9500
Page 5
Kit Contents Your monitor kit should contain: s CRT monitor s Monitor Base (pre-attached on -screen menu technology. 1 Introduction Your microprocessor-based, digitally controlled color monitor is a high-performance and easy-to-use product. It employs the latest on selected models) s AC power cord (selected models) s Speakers (selected models) s Speaker power adapter (selected models) s Documentation kit Reference Guide 1-1
Reference Guide Compaq Color Monitors Series 5500, 7500, 7550, 9500
Page 11
... of your computer. Reference Guide 3-3 To attach the speakers, see the next section, "Attaching the Speakers to install your monitor. Installation Speaker Installation Selected monitors come with speakers which must be installed. You can attach your speakers to your speakers, follow these steps: 1. Attach the... an even surface next to your monitor. 2. If you need to the Monitor." Attach the green connector 6 from the other speaker 2 on the back of your monitor or place them on the back of the control speaker 1, then connect the AC adapter 4 into the white port on ...
Reference Guide Compaq Color Monitors Series 5500, 7500, 7550, 9500
Page 14
...: an .INF file and an .ICM file. Insert the Software and Reference Guide CD-ROM in your computer. Access http://www.compaq.com/support/files/monitors/index.html and select your computer: 1. Front Panel Controls Reference Guide 4-1 When the CD-ROM menu launches, select Install INF and... ICM Files. 3. To get the latest .INF and .ICM files, download them from the Compaq Web site. The .ICM file provides color matching consistency between your monitor screen and your printer. Once installed, this file is activated by Microsoft Windows to download the appropriate files. ...
User Guide - 75, 705, 7540, 7600 and 7650 Series 17" CRT Monitors
Page 5
1 Product Features This color monitor is digitally controlled by the microprocessor-based computer. It provides an easy to use on-screen display menu technology that allows you to adjust the monitor to your specific viewing needs. The CRT monitor features include: ■ 16" (41 cm) viewable area display. ■ 1024 x 768 @85 Hz recommended resolution. ■ Tilt and swivel base. ■ Monitor AC power cord (available with select models). ■ VGA analog signal cable included. ■ Speakers and power adapter (available with select models). User Guide 1-1
User Guide - 75, 705, 7540, 7600 and 7650 Series 17" CRT Monitors
Page 15
... the speaker's subwoofer connector B. 7. Use the control knob A to the green port on the speakers and adjust volume. 6. Attach the speaker power adapter cable to the headphone jack connector (not shown) on the back of the computer. 4. User Guide 3-5 If you are using a subwoofer, insert the subwoofer audio ...
User Guide - 75, 705, 7540, 7600 and 7650 Series 17" CRT Monitors
Page 16
Attach the speaker power adapter cable to the green port on the right side when you view the monitor from the front. 2. Turn on the speakers and adjust the volume using the knob on the back of the computer. 4. Setting Up the Monitor Short Speakers 1. Attach the green connector from the control speaker to the black connector on the side of the control speaker. 3-6 User Guide Place the speaker set near the monitor so that the speaker with the controls is on the back of the control speaker, then connect the AC adapter into an electrical wall outlet. 3.
User Guide - 75, 705, 7540, 7600 and 7650 Series 17" CRT Monitors
Page 19
...'s graphic card is Windows Plug and Play compatible and the monitor will include a CD that the monitor connects directly to the graphics card. The INF file defines monitor resources used by Microsoft Windows operating systems to communicate with the computer's graphics adapter. This monitor is VESA DDC2 compliant and that contains two files you can...
User Guide v75, mx705, MV7540, s7540, FS7600, v7650 17" CRT Monitors
Page 5
The 17-inch/43-centimeter CRT monitor features include: ■ 16" (41 cm) viewable area display. ■ 1024 x 768 @85 Hz recommended resolution. ■ Tilt and swivel base. ■ Monitor AC power cord (available with select models). ■ VGA analog signal cable included. ■ Speakers and power adapter (available with select models). User Guide 1-1 1 Product Features This...
User Guide v75, mx705, MV7540, s7540, FS7600, v7650 17" CRT Monitors
Page 15
Setting Up the Monitor 3. Attach the green connector from the control speaker to the headphone jack connector (not shown) on the speakers and adjust volume. 6. As needed, connect headphones to the green port on the back of the computer. 4. Attach the speaker power adapter cable to turn on... the right control speaker. Use the control knob A to the connector on the back of the control speaker, and then plug the AC adapter into the speaker's subwoofer connector B. 7. If you are using ...
User Guide v75, mx705, MV7540, s7540, FS7600, v7650 17" CRT Monitors
Page 16
Place the speaker set near the monitor so that the speaker with the controls is on the right side when you view the monitor from the control speaker to the black connector on the back of the control speaker, then connect the AC adapter into an electrical wall outlet. 3. Turn on the speakers and adjust the volume using the knob on the back of the control speaker. 3-6 User Guide Attach the green connector from the front. 2. Attach the speaker power adapter cable to the green port on the side of the computer. 4. Setting Up the Monitor Short Speakers 1.
User Guide v75, mx705, MV7540, s7540, FS7600, v7650 17" CRT Monitors
Page 19
... is Windows Plug and Play compatible and the monitor will include a CD that the monitor connects directly to the graphics card. The INF file defines monitor resources used by Microsoft Windows operating systems to communicate with the computer's graphics adapter. 4 Operating the Monitor Software and Utilities Select monitor models will work correctly without installing the .INF...
User’s Guide CRT Color Monitor Series FS7600 and VX74 5990-8038
Page 8
...the switch inward. The green power indicator will connect easily to the video adapter output on your display fails to function properly, please first refer to ensure a firm connection. • Turn the PC power switch ON. Then turn the monitor power switch ON by the amber-color power LED. Data will be...swivel base to the monitor, align hooks with the sockets on bottom side of the monitor, and gently push the base towards the front of the monitor. • The 15-pin D-shell signal connector on the signal cable will light up. • Allow about 30 seconds for the CRT tube to ON ...
User’s Guide CRT Color Monitor Series FS7600 and VX74 5990-8038
Page 15
... your dealer for servicing by making simple checks as follows: Problem Blank screen (see NOTE) Display position off-center Display too small or too large Display too bright or too dim Check & Adjust • Monitor power switch, power cord, signal cable, or connector • PC power switch • ...you have the correct signal output source for the monitor. English Memory Recall It is operating in a user defined mode, this monitor. If the monitor is possible to restore adjustments to ensure that the switches on the video adapter are set correctly for operation with this control has ...
User's Guide - CRT Color Monitor Series FS7600, mx705
Page 8
...CRT tube to the section "Troubleshooting" in this manual. 2 User's Guide Filename: sa517093.doc Title: User's Guide Template: Print_2004.dot Author: WASSER Studios Last Saved By: billm Revision #: 36 Page: 2 of the monitor. • The 15-pin D-shell signal connector on the signal cable will connect easily to the video adapter... output on the connector to ensure a firm connection. • Turn the PC power switch ON. Data will be displayed on the screen. • If your personal computer. Install the Monitor • To connect the tilt/swivel ...
User's Guide - CRT Color Monitor Series FS7600, mx705
Page 15
...your dealer for servicing by making simple checks as follows: Problem Blank screen (see NOTE) Display position off-center Display too small or too large Display too bright or too dim Check & Adjust • Monitor power switch, power cord, signal cable, or connector • PC power switch •... Reduce the dark wavy line Moiré pattern on the screen. or + button to ensure that the switches on the video adapter are set correctly for the monitor. User's Guide 9 Filename: sa517093.doc Title: User's Guide Template: Print_2004.dot Author: WASSER Studios Last Saved By: billm ...