
Wireless Setup Guide
Page 4
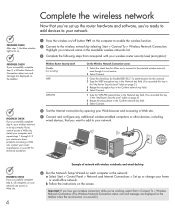
... Connection status icon and message are displayed on the taskbar. Wireless Router Security Level Disable (no security) WEP WPA-PSK On the Wireless Network Connection screen: 1 Select the check box for this network. 2 Type the WEP encryption key in the Network key field. (You recorded this key in the "My Router... Connect. 1 Type the WPA-PSK pass phrase in the Network key field. (You recorded this key in the "My Router Security Level" table on the screen.
... Connection status icon and message are displayed on the taskbar. Wireless Router Security Level Disable (no security) WEP WPA-PSK On the Wireless Network Connection screen: 1 Select the check box for this network. 2 Type the WEP encryption key in the Network key field. (You recorded this key in the "My Router... Connect. 1 Type the WPA-PSK pass phrase in the Network key field. (You recorded this key in the "My Router Security Level" table on the screen.

HP USB Digital Drive
Page 9
Select the Digital Drive and wait until the "Safe to remove the Digital Drive when the status light on the Digital Drive is in the extended position, return it on your screen. 3. Gently unplug the Digital Drive from the USB port. ✎ If the USB connector cable is flashing. 1. A dialog box displays a list of connected devices. 2. Select the "Safely Remove Hardware" icon on its track for safe storage. 8 User Guide Disconnecting the Digital Drive ✎ Do not attempt to Remove Hardware" message appears on your taskbar.
Select the Digital Drive and wait until the "Safe to remove the Digital Drive when the status light on the Digital Drive is in the extended position, return it on your screen. 3. Gently unplug the Digital Drive from the USB port. ✎ If the USB connector cable is flashing. 1. A dialog box displays a list of connected devices. 2. Select the "Safely Remove Hardware" icon on its track for safe storage. 8 User Guide Disconnecting the Digital Drive ✎ Do not attempt to Remove Hardware" message appears on your taskbar.
Bluetooth Wireless Technology Basics
Page 6
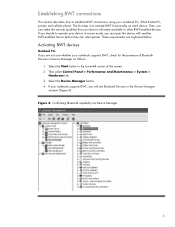
... notebook supports BWT, you will make available to activate BWT functionality on each device. If your notebook supports BWT, check for the presence of the screen. 2. Select the Start button in the lower-left corner of Bluetooth Devices in the Device Manager window (Figure 4). Then, you can interoperate. If you decide...
... notebook supports BWT, you will make available to activate BWT functionality on each device. If your notebook supports BWT, check for the presence of the screen. 2. Select the Start button in the lower-left corner of Bluetooth Devices in the Device Manager window (Figure 4). Then, you can interoperate. If you decide...
Bluetooth Wireless Technology Basics
Page 7
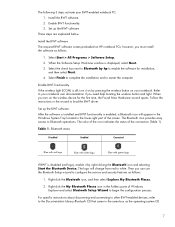
Select Start > All Programs > Software Setup. 2. The color of the icon indicates the status of the screen. The following 3 steps activate your notebook user documentation if you turn it by pressing the wireless button on HP notebook PCs; Enable BWT functionality. 3. Install ...
Select Start > All Programs > Software Setup. 2. The color of the icon indicates the status of the screen. The following 3 steps activate your notebook user documentation if you turn it by pressing the wireless button on HP notebook PCs; Enable BWT functionality. 3. Install ...
Bluetooth Wireless Technology Basics
Page 8
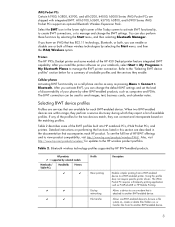
..., and h3900 Series iPAQ Pocket PCs support an optional Bluetooth Wireless Expansion Pack. Select the BWT icon in the lower right corner of the Today screen to activate BWT functionality, to create BWT connections, or to a BWT-enabled printer. Cellular phones Activating BWT functionality on , or transfer files from a BWT-enabled...
..., and h3900 Series iPAQ Pocket PCs support an optional Bluetooth Wireless Expansion Pack. Select the BWT icon in the lower right corner of the Today screen to activate BWT functionality, to create BWT connections, or to a BWT-enabled printer. Cellular phones Activating BWT functionality on , or transfer files from a BWT-enabled...

Backup and Recovery - Windows Vista
Page 6
... discs, such as CD-RW, DVD±RW, double-layer DVD±RW, and BD-RE (rewritable Blu-ray) discs, are operating the computer on -screen instructions. 2 Chapter 2 Creating recovery discs Click Recovery disc creation, and then click Next. 4. Follow the on battery power, you will be prompted to connect to...
... discs, such as CD-RW, DVD±RW, double-layer DVD±RW, and BD-RE (rewritable Blu-ray) discs, are operating the computer on -screen instructions. 2 Chapter 2 Creating recovery discs Click Recovery disc creation, and then click Next. 4. Follow the on battery power, you will be prompted to connect to...

Backup and Recovery - Windows Vista
Page 9
... a word-processing document, follow these steps: a. b. Backup suggestions ● Create a set of your preferences. c. Backup suggestions 5 The screen shot can be a time-saver if you have to disc. ● Store personal files in the Documents folder and back up this folder ...● Back up templates stored in their associated programs. ● Save customized settings in a window, toolbar, or menu bar by taking a screen shot of recovery discs using Recovery Manager. ● Create system restore points using the Windows® System Restore feature, and periodically copy them to...
... a word-processing document, follow these steps: a. b. Backup suggestions ● Create a set of your preferences. c. Backup suggestions 5 The screen shot can be a time-saver if you have to disc. ● Store personal files in the Documents folder and back up this folder ...● Back up templates stored in their associated programs. ● Save customized settings in a window, toolbar, or menu bar by taking a screen shot of recovery discs using Recovery Manager. ● Create system restore points using the Windows® System Restore feature, and periodically copy them to...

Backup and Recovery - Windows Vista
Page 10
...then change your system files and settings. Create a system restore point 1. In the left pane, click System protection. 3. Follow the on -screen instructions. 6 Chapter 3 Backing up your hard drive at a previous date and time), when the computer was functioning optimally, follow these steps... which you revert to your information In the left pane, click System Protection. 3. The System Restore window opens. 5. Follow the on -screen instructions. Click Create. Select Start > Control Panel > System and Maintenance > System. 2. Click the System Protection tab. 4. Click the System...
...then change your system files and settings. Create a system restore point 1. In the left pane, click System protection. 3. Follow the on -screen instructions. 6 Chapter 3 Backing up your hard drive at a previous date and time), when the computer was functioning optimally, follow these steps... which you revert to your information In the left pane, click System Protection. 3. The System Restore window opens. 5. Follow the on -screen instructions. Click Create. Select Start > Control Panel > System and Maintenance > System. 2. Click the System Protection tab. 4. Click the System...
Backup and Recovery - Windows Vista
Page 11
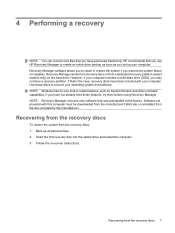
.... 3. Recovering from the disc provided by the manufacturer. Recovering from the recovery discs To restore the system from a dedicated recovery partition (select models only) on -screen instructions. Follow the on the hard drive. 4 Performing a recovery NOTE: You can recover only files that was preinstalled at the factory. HP recommends that is...
.... 3. Recovering from the disc provided by the manufacturer. Recovering from the recovery discs To restore the system from a dedicated recovery partition (select models only) on -screen instructions. Follow the on the hard drive. 4 Performing a recovery NOTE: You can recover only files that was preinstalled at the factory. HP recommends that is...

Backup and Recovery - Windows Vista
Page 12
You will not be able to it's factory condition. Recovery discs have been included for recovery" message is displayed on the screen. This restores the computer to recover using this procedure. Recovery Manager opens. 2. Click Advanced Options. 3. On some models, you may not have a partition. Then select ... 1. To restore the system from the partition, follow these discs to recover your computer includes an SSD, you can perform a recovery from the partition on -screen instructions. 8 Chapter 4 Performing a recovery Access Recovery Manager in either the Start button or f11.
You will not be able to it's factory condition. Recovery discs have been included for recovery" message is displayed on the screen. This restores the computer to recover using this procedure. Recovery Manager opens. 2. Click Advanced Options. 3. On some models, you may not have a partition. Then select ... 1. To restore the system from the partition, follow these discs to recover your computer includes an SSD, you can perform a recovery from the partition on -screen instructions. 8 Chapter 4 Performing a recovery Access Recovery Manager in either the Start button or f11.
Drives - Windows Vista
Page 10
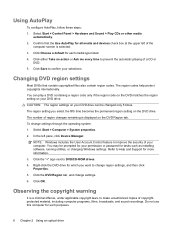
.... Click the DVD Region tab, and change settings. 6. Click either Take no action or Ask me every time to make unauthorized copies of the computer screen is displayed on the DVD drive. Confirm that contain copyrighted files also contain region codes. In the left of copyrightprotected material, including computer programs, films...
.... Click the DVD Region tab, and change settings. 6. Click either Take no action or Ask me every time to make unauthorized copies of the computer screen is displayed on the DVD drive. Confirm that contain copyrighted files also contain region codes. In the left of copyrightprotected material, including computer programs, films...

Drives - Windows Vista
Page 11
... computer while the computer is sensitive to a reliable external power source. Creating or "burning" a CD or DVD If your DVD player for a list of the screen. 4. Before writing to a disc while the computer is copied, it cannot be played only on MP3 players or on battery power. MP3 files can use...
... computer while the computer is sensitive to a reliable external power source. Creating or "burning" a CD or DVD If your DVD player for a list of the screen. 4. Before writing to a disc while the computer is copied, it cannot be played only on MP3 players or on battery power. MP3 files can use...

Drives - Windows Vista
Page 13
... do not need access to complete. 3 Improving hard drive performance Using Disk Defragmenter As you use . Disk Defragmenter consolidates the fragmented files and folders on -screen instructions. To run more information. Select Start > All Programs > Accessories > System Tools > Disk Cleanup. 2.
... do not need access to complete. 3 Improving hard drive performance Using Disk Defragmenter As you use . Disk Defragmenter consolidates the fragmented files and folders on -screen instructions. To run more information. Select Start > All Programs > Accessories > System Tools > Disk Cleanup. 2.

Drives - Windows Vista
Page 21
..., save all open files, and then continue with the restart. 7. Repeat for anything requiring drivers. To use the HP Web site: 1. On the HP Welcome screen, click Settings and select how often the utility should check for software updates on bottom of these procedures to step 6. NOTE: You can find your...
..., save all open files, and then continue with the restart. 7. Repeat for anything requiring drivers. To use the HP Web site: 1. On the HP Welcome screen, click Settings and select how often the utility should check for software updates on bottom of these procedures to step 6. NOTE: You can find your...

Drives - Windows Vista
Page 22
... to the Windows operating system and other Microsoft products. 6. If prompted to install Microsoft Update. When prompted, click Save and then select a storage location on -screen instructions to do so, restart your specific product from the models listed. 4. Follow the on your computer. 18 Chapter 5 Troubleshooting Click Install now to your...
... to the Windows operating system and other Microsoft products. 6. If prompted to install Microsoft Update. When prompted, click Save and then select a storage location on -screen instructions to do so, restart your specific product from the models listed. 4. Follow the on your computer. 18 Chapter 5 Troubleshooting Click Install now to your...
Security - Window Vista and Windows 7
Page 8
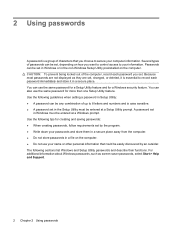
... the computer, record each password immediately and store it in a secure place. For additional information about Windows passwords, such as they are not displayed as screen-saver passwords, select Start > Help and Support. 2 Chapter 2 Using passwords 2 Using passwords A password is case sensitive. ● A password set in the Setup Utility must be...
... the computer, record each password immediately and store it in a secure place. For additional information about Windows passwords, such as they are not displayed as screen-saver passwords, select Start > Help and Support. 2 Chapter 2 Using passwords 2 Using passwords A password is case sensitive. ● A password set in the Setup Utility must be...

Security - Window Vista and Windows 7
Page 10
...Startup Menu" message is set, entered, changed, or deleted. 4 Chapter 2 Using passwords When the Startup Menu is displayed in the lower-left corner of the screen, press f10. - Use the arrow keys to select Security > Set Administrator Password, and then press enter. ● To set , change an administrator password,..., and then press enter. ● To change , or delete this password is set, it is displayed in the lower-left corner of the screen, press esc. Power-on password Your power-on or restarting the computer. A power-on password is not displayed as it must be entered each ...
...Startup Menu" message is set, entered, changed, or deleted. 4 Chapter 2 Using passwords When the Startup Menu is displayed in the lower-left corner of the screen, press f10. - Use the arrow keys to select Security > Set Administrator Password, and then press enter. ● To set , change an administrator password,..., and then press enter. ● To change , or delete this password is set, it is displayed in the lower-left corner of the screen, press esc. Power-on password Your power-on or restarting the computer. A power-on password is not displayed as it must be entered each ...

Security - Window Vista and Windows 7
Page 11
While the "Press the ESC key for Startup Menu" message is displayed in the lower-left corner of the screen, press esc. Your changes go into effect when the computer restarts. Entering a power-on or restarting the computer. After 3 unsuccessful attempts to select Exit > Exit ... these steps: 1. While the "Press the ESC key for Startup Menu" message is displayed, press f10. 2. Setting passwords in the lower-left corner of the screen, press f10. -
While the "Press the ESC key for Startup Menu" message is displayed in the lower-left corner of the screen, press esc. Your changes go into effect when the computer restarts. Entering a power-on or restarting the computer. After 3 unsuccessful attempts to select Exit > Exit ... these steps: 1. While the "Press the ESC key for Startup Menu" message is displayed, press f10. 2. Setting passwords in the lower-left corner of the screen, press f10. -

Security - Window Vista and Windows 7
Page 18
... the notification area, at this time, or you can skip this step by clicking Next. Registering fingerprints A fingerprint reader allows you to log on the screen that finger in green. 6. View the demonstration, and then click Next. or -
... the notification area, at this time, or you can skip this step by clicking Next. Registering fingerprints A fingerprint reader allows you to log on the screen that finger in green. 6. View the demonstration, and then click Next. or -

Setup Utility - Windows Vista and Windows 7
Page 5
... the computer. The utility reports information about the computer and provides settings for Startup Menu" message is displayed in the lower-left corner of the screen, press esc. 2. While the "Press the ESC key for startup, security, and other preferences. While the "Press the ESC key for Startup Menu..." message is displayed in the lower-left corner of the screen, press f10. - When the Startup Menu is not working. To start the Setup Utility: ▲ Open the Setup Utility by turning on or...
... the computer. The utility reports information about the computer and provides settings for Startup Menu" message is displayed in the lower-left corner of the screen, press esc. 2. While the "Press the ESC key for startup, security, and other preferences. While the "Press the ESC key for Startup Menu..." message is displayed in the lower-left corner of the screen, press f10. - When the Startup Menu is not working. To start the Setup Utility: ▲ Open the Setup Utility by turning on or...


