End User License Agreement
Page 1
... EULA: a. d. Notwithstanding the terms and conditions of this EULA may load the Software ON THE CONDITION THAT YOU Product into the local memory or storage device of the HP Product. RIGHTS IN THE SOFTWARE the right to the terms and conditions of the software license agreement accompanying... You may use the Software Product on those computers. You do not have Software Product into Your Computer's AGREE TO ALL TERMS AND temporary memory (RAM) for back-up copies of the Software Product, provided the copy contains all of the original Software Product's proprietary notices and that...
... EULA: a. d. Notwithstanding the terms and conditions of this EULA may load the Software ON THE CONDITION THAT YOU Product into the local memory or storage device of the HP Product. RIGHTS IN THE SOFTWARE the right to the terms and conditions of the software license agreement accompanying... You may use the Software Product on those computers. You do not have Software Product into Your Computer's AGREE TO ALL TERMS AND temporary memory (RAM) for back-up copies of the Software Product, provided the copy contains all of the original Software Product's proprietary notices and that...
HP Client Manager 6.1
Page 3
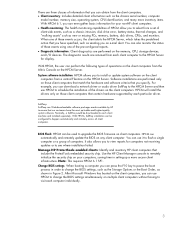
...obtain from the client computers. • Client inventory: Includes detailed client information such as the chassis serial number, computer model number, memory size, operating system, CPU identification, and many more inventory items. With HPCM 6.1, you can even gather basic information for your computers...events, such as a chassis intrusion, disk drive error, battery status, thermal changes, and "walking assets" such as new or missing PCs, memory, battery, disk drives, CPUs, and monitors. HPCM can use HPCM to each client machine and installed separately. You can automatically and ...
...obtain from the client computers. • Client inventory: Includes detailed client information such as the chassis serial number, computer model number, memory size, operating system, CPU identification, and many more inventory items. With HPCM 6.1, you can even gather basic information for your computers...events, such as a chassis intrusion, disk drive error, battery status, thermal changes, and "walking assets" such as new or missing PCs, memory, battery, disk drives, CPUs, and monitors. HPCM can use HPCM to each client machine and installed separately. You can automatically and ...
HP Client Manager 6.1
Page 4
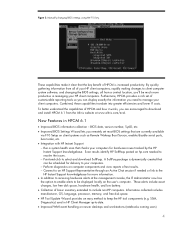
... number, SysID, etc. • Improved BIOS Settings Wizard lets you need to -date. • Improved WMI event handling on newer desktops and workstations (notebooks coming soon) 4 Connect to an HP Support Representative through an Active Chat session if needed to your client computers. ...Information collected includes manufacturer, OS, language, processor, memory, and free disk space. • HP Tool Update Wizard provides an easy method to select and download SoftPaqs. Point-and-click to...
... number, SysID, etc. • Improved BIOS Settings Wizard lets you need to -date. • Improved WMI event handling on newer desktops and workstations (notebooks coming soon) 4 Connect to an HP Support Representative through an Active Chat session if needed to your client computers. ...Information collected includes manufacturer, OS, language, processor, memory, and free disk space. • HP Tool Update Wizard provides an easy method to select and download SoftPaqs. Point-and-click to...
HP Client Manager 6.1
Page 8
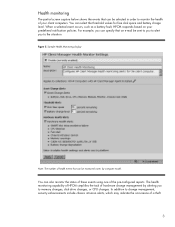
.... You can also monitor the status of these events using one of health events that an e-mail be sent to you to alert you to memory changes, disk drive changes, or CPU changes.
.... You can also monitor the status of these events using one of health events that an e-mail be sent to you to alert you to memory changes, disk drive changes, or CPU changes.
HP Client Manager 6.1
Page 9
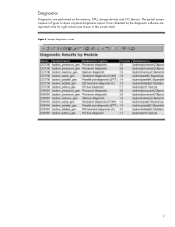
Diagnostics Diagnostics are reported in the far right column (not shown in Figure 6 shows a typical diagnostics report. The partial screen capture in this screen shot). Figure 6. Sample Diagnostics screen 9 Errors detected by the diagnostic software are performed on the memory, CPU, storage devices and I/O devices.
Diagnostics Diagnostics are reported in the far right column (not shown in Figure 6 shows a typical diagnostics report. The partial screen capture in this screen shot). Figure 6. Sample Diagnostics screen 9 Errors detected by the diagnostic software are performed on the memory, CPU, storage devices and I/O devices.

D315, Evo D500 Series, D300 Series, D300v Series Worldwide Limited Warranty and Technical Support
Page 6
... but may be purchased in accordance with the Compaq Global Warranty Notification process, prior to moving the products. Warranty Transfer to Another Country Under the Compaq Global Warranty program, products may vary with ECC cache memory identified by the business day following request for ...response time in the destination country. * Compaq will respond on-site, at 1.800..652.6672, a ...
... but may be purchased in accordance with the Compaq Global Warranty Notification process, prior to moving the products. Warranty Transfer to Another Country Under the Compaq Global Warranty program, products may vary with ECC cache memory identified by the business day following request for ...response time in the destination country. * Compaq will respond on-site, at 1.800..652.6672, a ...

Computer Setup (F10) Utility Guide
Page 5
I Enable or disable Network Server Mode, which is entered. or ❏ always Full Boot. I Configure Quiet Drive options (for processor, graphics, memory, audio, storage, communications, and input devices. I Enable Quick Boot, which allows the computer to the system, the keyboard and mouse remain locked until the power-...
I Enable or disable Network Server Mode, which is entered. or ❏ always Full Boot. I Configure Quiet Drive options (for processor, graphics, memory, audio, storage, communications, and input devices. I Enable Quick Boot, which allows the computer to the system, the keyboard and mouse remain locked until the power-...

Computer Setup (F10) Utility Guide
Page 6
..., such as during POST, press any key (except F1 through F12). I Enable the power-on password prompt during system restarts (warm boots) as well as memory count, product name, and other non-error text messages. I Execute self-tests on one or more computers. Computer Setup (F10) Utility Guide I Enable or disable...
..., such as during POST, press any key (except F1 through F12). I Enable the power-on password prompt during system restarts (warm boots) as well as memory count, product name, and other non-error text messages. I Execute self-tests on one or more computers. Computer Setup (F10) Utility Guide I Enable or disable...

Computer Setup (F10) Utility Guide
Page 8
... Guide Computer Setup Heading Option Description File System Information Lists: • Product name • Processor type/speed/stepping • Cache size (L1/L2) • Installed memory size • Integrated MAC address for Computer Setup options may vary depending on your specific hardware configuration. 4 Computer Setup (F10) Utility Guide Restore from Diskette...
... Guide Computer Setup Heading Option Description File System Information Lists: • Product name • Processor type/speed/stepping • Cache size (L1/L2) • Installed memory size • Integrated MAC address for Computer Setup options may vary depending on your specific hardware configuration. 4 Computer Setup (F10) Utility Guide Restore from Diskette...

Computer Setup (F10) Utility Guide
Page 19
...configuration. Computer Setup (F10) Utility Guide 15 The advantage is that some amount of memory below 1 MB is that a popular memory manager, HIMEM.SYS, does not work properly. • ACPI and USB Buffer @ Top of Memory (enable/disable). These settings have no effect under an APIC-based operating system. ... non-Microsoft Operating Systems to work properly when ACPI and USB buffers are at the top of memory. Enabling this feature places ACPI and USB memory buffers at the top of memory AND the system has 64 MB or less of RAM. Enabling this feature will allow Microsoft Windows...
...configuration. Computer Setup (F10) Utility Guide 15 The advantage is that some amount of memory below 1 MB is that a popular memory manager, HIMEM.SYS, does not work properly. • ACPI and USB Buffer @ Top of Memory (enable/disable). These settings have no effect under an APIC-based operating system. ... non-Microsoft Operating Systems to work properly when ACPI and USB buffers are at the top of memory. Enabling this feature places ACPI and USB memory buffers at the top of memory AND the system has 64 MB or less of RAM. Enabling this feature will allow Microsoft Windows...

Computer Setup (F10) Utility Guide
Page 21
...; ACPI S3 PS2 Mouse Wakeup (enable/disable). Note that as the size of the framebuffer increases, the amount of system memory available to the amount of system memory reserved for Computer Setup options may vary depending on a boot from the S3 sleep state. • Integrated video (enable/disable...). Support for use by platform). Computer Setup (F10) Utility Guide 17 Allows the mouse to specify the amount of installed memory. If there is 128MB memory installed (or less) then the framebuffer size is 32MB (max size). Auto selects the framebuffer size according to the OS ...
...; ACPI S3 PS2 Mouse Wakeup (enable/disable). Note that as the size of the framebuffer increases, the amount of system memory available to the amount of system memory reserved for Computer Setup options may vary depending on a boot from the S3 sleep state. • Integrated video (enable/disable...). Support for use by platform). Computer Setup (F10) Utility Guide 17 Allows the mouse to specify the amount of installed memory. If there is 128MB memory installed (or less) then the framebuffer size is 32MB (max size). Auto selects the framebuffer size according to the OS ...

Hardware Reference Guide -- Compaq D315
Page 3
... Easy Access Buttons 1-5 Windows Logo Key 1-6 Special Mouse Functions 1-6 Serial Number Location 1-7 2 Hardware Upgrades Serviceability Features 2-1 Installation Sequence 2-1 Removing the Computer Access Panel 2-2 Installing Additional Memory 2-5 DIMMs 2-5 DDR-SDRAM DIMMs 2-5 Installing DDR-SDRAM DIMMs 2-6 Removing or Upgrading a Drive 2-8 Locating Drive Positions 2-9 Removing a Drive 2-10 Replacing a Drive 2-13 Removing or Installing an...
... Easy Access Buttons 1-5 Windows Logo Key 1-6 Special Mouse Functions 1-6 Serial Number Location 1-7 2 Hardware Upgrades Serviceability Features 2-1 Installation Sequence 2-1 Removing the Computer Access Panel 2-2 Installing Additional Memory 2-5 DIMMs 2-5 DDR-SDRAM DIMMs 2-5 Installing DDR-SDRAM DIMMs 2-6 Removing or Upgrading a Drive 2-8 Locating Drive Positions 2-9 Removing a Drive 2-10 Replacing a Drive 2-13 Removing or Installing an...

Hardware Reference Guide -- Compaq D315
Page 17
...will not start using unsupported DIMMs. ✎ The nVidia nForce chipset does not support ECC memory. DIMMs The memory sockets on the system board can be industry-standard 184-pin, unbuffered PC 2100 266 MHz-compliant, 2.5 volt DDR-SDRAM DIMMs. The DDR-SDRAM DIMMs must also ...contain the mandatory Joint Electronic Device Engineering Council (JEDEC) Serial Presence Detect (SPD) information. Hardware Upgrades Installing Additional Memory The computer comes with at ...
...will not start using unsupported DIMMs. ✎ The nVidia nForce chipset does not support ECC memory. DIMMs The memory sockets on the system board can be industry-standard 184-pin, unbuffered PC 2100 266 MHz-compliant, 2.5 volt DDR-SDRAM DIMMs. The DDR-SDRAM DIMMs must also ...contain the mandatory Joint Electronic Device Engineering Council (JEDEC) Serial Presence Detect (SPD) information. Hardware Upgrades Installing Additional Memory The computer comes with at ...

Hardware Reference Guide -- Compaq D315
Page 18
...module. 1. Remove the cover and locate the memory module sockets. Å WARNING: To reduce risk of the computer or optional cards. Refer to Appendix E, "Electrostatic Discharge," for more information. Ä CAUTION: When handling a memory module, be careful not to cool before ...touching. 2-6 Hardware Reference Guide When upgrading your memory, it is important to use memory modules with each other. Ä CAUTION: Static electricity can damage the ...
...module. 1. Remove the cover and locate the memory module sockets. Å WARNING: To reduce risk of the computer or optional cards. Refer to Appendix E, "Electrostatic Discharge," for more information. Ä CAUTION: When handling a memory module, be careful not to cool before ...touching. 2-6 Hardware Reference Guide When upgrading your memory, it is important to use memory modules with each other. Ä CAUTION: Static electricity can damage the ...

Hardware Reference Guide -- Compaq D315
Page 19
... end of this chapter. Push the module down into the socket, ensuring that the module is properly seated and the latches on the memory socket. Hardware Reference Guide 2-7 A memory module can be installed in the "Reassembling the Computer" section of the socket snap into the socket 2. Open both latches of the sockets...way. Installing a DIMM ✎ Begin by installing a module into the socket nearest the preinstalled module, and install the modules following the numerical order of the memory module socket 1, and insert the memory module into place 3. 5. Hardware Upgrades 3.
... end of this chapter. Push the module down into the socket, ensuring that the module is properly seated and the latches on the memory socket. Hardware Reference Guide 2-7 A memory module can be installed in the "Reassembling the Computer" section of the socket snap into the socket 2. Open both latches of the sockets...way. Installing a DIMM ✎ Begin by installing a module into the socket nearest the preinstalled module, and install the modules following the numerical order of the memory module socket 1, and insert the memory module into place 3. 5. Hardware Upgrades 3.

Hardware Reference Guide -- Compaq D315
Page 53
... F front bezel removing 2-4 replacing 2-20 front panel components 1-2 H hard drive installation 2-8 installation guidelines B-1 K keyboard 1-4 Easy Access Keyboard 1-4 port 1-3 Windows Logo Key 1-6 L latch drive bracket 2-12 M memory installing 2-5 mouse Index-1
... F front bezel removing 2-4 replacing 2-20 front panel components 1-2 H hard drive installation 2-8 installation guidelines B-1 K keyboard 1-4 Easy Access Keyboard 1-4 port 1-3 Windows Logo Key 1-6 L latch drive bracket 2-12 M memory installing 2-5 mouse Index-1


