
Safety and Regulatory Information Desktops, Thin Clients, and Personal Workstations
Page 28
... 2-2 Toxic and Hazardous Substances and Elements Part Name Lead (Pb) Mercury (Hg) Cadmium (Cd) Hexavalent Chromium (Cr(VI)) Polybrominated biphenyls (PBB) Polybrominated diphenyl ethers (PBDE) Motherboard, processor and heat sink X O O O O O 22 Chapter 2 Regulatory Agency Notices ENWW
... 2-2 Toxic and Hazardous Substances and Elements Part Name Lead (Pb) Mercury (Hg) Cadmium (Cd) Hexavalent Chromium (Cr(VI)) Polybrominated biphenyls (PBB) Polybrominated diphenyl ethers (PBDE) Motherboard, processor and heat sink X O O O O O 22 Chapter 2 Regulatory Agency Notices ENWW

Start Here Guide
Page 10
NOTE: This Audio In connector is connected to the TV tuner. You must use the Audio In connector, which is connected to the motherboard and located on the back of the computer, to record audio only. (Select models only.) Headphones Out connector (green) to connect to ...headphones. You must use the Audio In connector, which is connected to the motherboard and located on the back of the computer, to record audio only. (Select models only.) Secondary Right audio input connector (red). Connector Icon/label...
NOTE: This Audio In connector is connected to the TV tuner. You must use the Audio In connector, which is connected to the motherboard and located on the back of the computer, to record audio only. (Select models only.) Headphones Out connector (green) to connect to ...headphones. You must use the Audio In connector, which is connected to the motherboard and located on the back of the computer, to record audio only. (Select models only.) Secondary Right audio input connector (red). Connector Icon/label...

Start Here Guide
Page 12
... documentation that came with your display device. Audio Line Out (green) to connect rear speakers in a multichannel audio configuration. Line C/Sub (gold) connector to the motherboard. Line Rear (black) connector to connect front speakers.
... documentation that came with your display device. Audio Line Out (green) to connect rear speakers in a multichannel audio configuration. Line C/Sub (gold) connector to the motherboard. Line Rear (black) connector to connect front speakers.

Start Here Guide
Page 13
Plug the other end to the motherboard. NOTE: Audio can be recorded by using this primary right audio input connector on the front of the computer. (Select models only.) TV In (TV ...
Plug the other end to the motherboard. NOTE: Audio can be recorded by using this primary right audio input connector on the front of the computer. (Select models only.) TV In (TV ...
Upgrading and Servicing Guide
Page 11
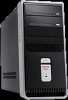
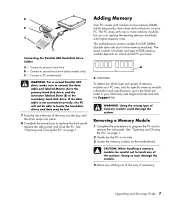
... to the secondary hard disk drive. Doing so may be careful not to the Web site listed in -line memory modules). Connect to PC motherboard WARNING: For a second Parallel ATA drive, make sure to connect the data cable end labeled Master (A) to the primary hard disk drive, ...specific memory module information and specifications, go to touch any cabling out of the contacts. See "Opening and Closing the PC" on the motherboard. A DDR DIMM To determine which model PC you can replace the existing memory module(s) with one or more memory modules, but you have. Connect to primary hard...
... to the secondary hard disk drive. Doing so may be careful not to the Web site listed in -line memory modules). Connect to PC motherboard WARNING: For a second Parallel ATA drive, make sure to connect the data cable end labeled Master (A) to the primary hard disk drive, ...specific memory module information and specifications, go to touch any cabling out of the contacts. See "Opening and Closing the PC" on the motherboard. A DDR DIMM To determine which model PC you can replace the existing memory module(s) with one or more memory modules, but you have. Connect to primary hard...
Upgrading and Servicing Guide
Page 13
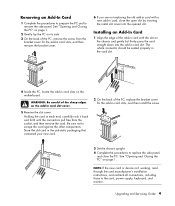
Be sure not to remove the side panel. WARNING: Be careful of the add-in card with a new add-in card, close the PC. Holding the card at each end, carefully rock it back and forth until the connectors pull free from the bracket cover for the add-in ...card slot. See "Opening and Closing the PC" on the add-in card with the slot on the motherboard. Removing an Add-In Card 1 Complete the procedures to prepare the PC and to scrape the card against the other components. Installing an Add-In Card 1 Align...
Be sure not to remove the side panel. WARNING: Be careful of the add-in card with a new add-in card, close the PC. Holding the card at each end, carefully rock it back and forth until the connectors pull free from the bracket cover for the add-in ...card slot. See "Opening and Closing the PC" on the add-in card with the slot on the motherboard. Removing an Add-In Card 1 Complete the procedures to prepare the PC and to scrape the card against the other components. Installing an Add-In Card 1 Align...
Upgrading and Servicing Guide
Page 14
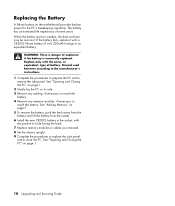
... side. 3 Remove any cabling, if necessary, to reach the battery. 4 Remove any memory modules, if necessary, to close the PC. See "Opening and Closing the PC" on the motherboard provides backup power for the PC's timekeeping capability. Replacing the Battery A lithium battery on page 1. 10 Upgrading and Servicing Guide When the battery starts to...
... side. 3 Remove any cabling, if necessary, to reach the battery. 4 Remove any memory modules, if necessary, to close the PC. See "Opening and Closing the PC" on the motherboard provides backup power for the PC's timekeeping capability. Replacing the Battery A lithium battery on page 1. 10 Upgrading and Servicing Guide When the battery starts to...


