End User License Agreement
Page 1
...of the Software Product for CONDITIONS OF THIS EULA. You do not have Software Product into Your Computer's AGREE TO ALL TERMS AND temporary memory (RAM) for use on more than one computer, you may use on more than one computer. d. The term "Software Product" means computer ...software and may load the Software ON THE CONDITION THAT YOU Product into the local memory or storage device of the HP Product. BY purposes of Rights. You may contain a EULA in its online documentation. c. Reservation of using...
...of the Software Product for CONDITIONS OF THIS EULA. You do not have Software Product into Your Computer's AGREE TO ALL TERMS AND temporary memory (RAM) for use on more than one computer, you may use on more than one computer. d. The term "Software Product" means computer ...software and may load the Software ON THE CONDITION THAT YOU Product into the local memory or storage device of the HP Product. BY purposes of Rights. You may contain a EULA in its online documentation. c. Reservation of using...

Safety and Regulatory Information Desktops, Thin Clients, and Personal Workstations
Page 29
... such as temperature and humidity. Table 2-2 Toxic and Hazardous Substances and Elements (continued) Part Name Lead (Pb) Mercury (Hg) Cadmium (Cd) Hexavalent Chromium (Cr(VI)) Memory X O O O I/O PCAs X O O O Power supply X O O O Keyboard X O O O Mouse X O O O Chassis/Other X O O O Fans X O O O Internal/External Media Reading X O O O Devices External Control Devices X O O O Cable X O O O Hard Disk Drive X O O O Display X X O O Polybrominated biphenyls (PBB) Polybrominated...
... such as temperature and humidity. Table 2-2 Toxic and Hazardous Substances and Elements (continued) Part Name Lead (Pb) Mercury (Hg) Cadmium (Cd) Hexavalent Chromium (Cr(VI)) Memory X O O O I/O PCAs X O O O Power supply X O O O Keyboard X O O O Mouse X O O O Chassis/Other X O O O Fans X O O O Internal/External Media Reading X O O O Devices External Control Devices X O O O Cable X O O O Hard Disk Drive X O O O Display X X O O Polybrominated biphenyls (PBB) Polybrominated...

Compaq Evo Workstation W4000 CMT Hardware Reference Guide
Page 3
... Cover Lock 2-2 Using the Smart Cover FailSafe Key 2-2 Removing the Computer Access Panel 2-4 Removing the Front Bezel 2-5 Removing Bezel Blanks 2-6 Installing Additional Memory 2-7 SDRAM DIMMs 2-7 DDR-SDRAM DIMMs 2-8 Memory Module Installation 2-8 Installing or Removing an Expansion Card 2-10 Removing an Expansion Slot Cover 2-10 Removing or Installing an Expansion Card 2-11 Drive...
... Cover Lock 2-2 Using the Smart Cover FailSafe Key 2-2 Removing the Computer Access Panel 2-4 Removing the Front Bezel 2-5 Removing Bezel Blanks 2-6 Installing Additional Memory 2-7 SDRAM DIMMs 2-7 DDR-SDRAM DIMMs 2-8 Memory Module Installation 2-8 Installing or Removing an Expansion Card 2-10 Removing an Expansion Slot Cover 2-10 Removing or Installing an Expansion Card 2-11 Drive...

Compaq Evo Workstation W4000 CMT Hardware Reference Guide
Page 25
... start using unsupported DIMMs. Hardware Reference Guide 2-7 They must support CAS Latency 2 or 3 (CL = 2 or CL = 3). To achieve the maximum memory support, you may be required to blink the NUMLOCK LED on the Intel 845 chipset-based system board can be industry-standard 168-pin, unbuffered... must be populated with industry-standard SDRAM or DDR-SDRAM DIMMs. These memory module slots are not supported; DIMMs constructed with x4 SDRAM are populated with at least one preinstalled memory module. For those systems that do support ECC, Compaq does not support mixing ECC and non-ECC...
... start using unsupported DIMMs. Hardware Reference Guide 2-7 They must support CAS Latency 2 or 3 (CL = 2 or CL = 3). To achieve the maximum memory support, you may be required to blink the NUMLOCK LED on the Intel 845 chipset-based system board can be industry-standard 168-pin, unbuffered... must be populated with industry-standard SDRAM or DDR-SDRAM DIMMs. These memory module slots are not supported; DIMMs constructed with x4 SDRAM are populated with at least one preinstalled memory module. For those systems that do support ECC, Compaq does not support mixing ECC and non-ECC...

Compaq Evo Workstation W4000 CMT Hardware Reference Guide
Page 26
... electricity can damage the electronic components of the computer or optional cards. Hardware Upgrades DDR-SDRAM DIMMs For proper system operation, if your memory, it is 1 GB using 512-MB memory modules. Before beginning these procedures, ensure that you have gold metal contacts. If you are discharged of static electricity by briefly touching a grounded...
... electricity can damage the electronic components of the computer or optional cards. Hardware Upgrades DDR-SDRAM DIMMs For proper system operation, if your memory, it is 1 GB using 512-MB memory modules. Before beginning these procedures, ensure that you have gold metal contacts. If you are discharged of static electricity by briefly touching a grounded...
Compaq Evo Workstation W4000 CMT Hardware Reference Guide
Page 27
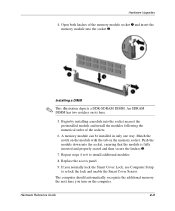
... can be installed in only one way. Match the notch on the module with the tab on the computer. If you turn on the memory socket. Begin by installing a module into the socket, ensuring that the module is fully inserted and properly seated and then secure the latches 3. 7. Repeat... Sensor. Push the module down into the socket nearest the preinstalled module and install the modules following the numerical order of the memory module socket 1 and insert the memory module into the socket 2. Open both latches of the sockets. 6. The computer should automatically recognize the additional...
... can be installed in only one way. Match the notch on the module with the tab on the computer. If you turn on the memory socket. Begin by installing a module into the socket, ensuring that the module is fully inserted and properly seated and then secure the latches 3. 7. Repeat... Sensor. Push the module down into the socket nearest the preinstalled module and install the modules following the numerical order of the memory module socket 1 and insert the memory module into the socket 2. Open both latches of the sockets. 6. The computer should automatically recognize the additional...

Compaq Evo Workstation W4000 CMT Hardware Reference Guide
Page 65
... F-1 Configuration desktop 1-7 minitower 1-10 Configuration Features 1-1 D DDR-SDRAM (double data rate synchronous dynamic random access memory) 2-7 DDR-SDRAM DIMMs installing 2-8 DIMMs (dual inline memory modules) installing 2-7 Drive positions 2-13 DVD-ROM 2-14 E Easy Access Keyboard 1-4 electrostatic discharge E-1 Index ...CD-ROM 2-14 K keyboard 1-4 Easy Access Keyboard Buttons 1-5 Windows Logo Key 1-5 M memory DDR-SDRAM 2-7 DIMMs 2-9 illustration 2-9 installing additional memory 2-7 SDRAM 2-7 metric screws 2-14 module sockets 2-7 mouse 1-6 Q Quiet Drive B-7 Hardware Reference Guide Index-1
... F-1 Configuration desktop 1-7 minitower 1-10 Configuration Features 1-1 D DDR-SDRAM (double data rate synchronous dynamic random access memory) 2-7 DDR-SDRAM DIMMs installing 2-8 DIMMs (dual inline memory modules) installing 2-7 Drive positions 2-13 DVD-ROM 2-14 E Easy Access Keyboard 1-4 electrostatic discharge E-1 Index ...CD-ROM 2-14 K keyboard 1-4 Easy Access Keyboard Buttons 1-5 Windows Logo Key 1-5 M memory DDR-SDRAM 2-7 DIMMs 2-9 illustration 2-9 installing additional memory 2-7 SDRAM 2-7 metric screws 2-14 module sockets 2-7 mouse 1-6 Q Quiet Drive B-7 Hardware Reference Guide Index-1

Compaq Evo Workstation W4000 CMT Hardware Reference Guide
Page 66
Index R Rear Panel Components 1-3 removing a drive 2-21 an expansion card 2-10, 2-11 an expansion slot cover 2-10 bezel blanks 2-6 computer access panel 2-4 front bezel 2-5 S SCSI controller B-5 SCSI device guidelines B-3 SCSISelect utility B-6 SDRAM (synchronous dynamic random access memory) 2-7 security Smart Cover Lock 2-2 security lock provisions D-1 serial number 1-7 shipping preparation F-1 Smart Cover FailSafe Key 2-2 Smart Cover Lock 2-2 software Easy Access 1-5 specifications A-1 U Ultra ATA devices B-1 Index-2 Hardware Reference Guide
Index R Rear Panel Components 1-3 removing a drive 2-21 an expansion card 2-10, 2-11 an expansion slot cover 2-10 bezel blanks 2-6 computer access panel 2-4 front bezel 2-5 S SCSI controller B-5 SCSI device guidelines B-3 SCSISelect utility B-6 SDRAM (synchronous dynamic random access memory) 2-7 security Smart Cover Lock 2-2 security lock provisions D-1 serial number 1-7 shipping preparation F-1 Smart Cover FailSafe Key 2-2 Smart Cover Lock 2-2 software Easy Access 1-5 specifications A-1 U Ultra ATA devices B-1 Index-2 Hardware Reference Guide

Evo Workstation W4000 CMT Hardware Reference Guide
Page 3
... Sequence 2-1 Smart Cover Lock 2-2 Using the Smart Cover FailSafe Key 2-2 Removing the Computer Access Panel 2-4 Removing the Front Bezel 2-5 Removing Bezel Blanks 2-6 Installing Additional Memory 2-7 DIMMs 2-7 Memory Module Installation 2-8 Installing or Removing an Expansion Card 2-10 Removing an Expansion Slot Cover 2-10 Removing or Installing an Expansion Card 2-11 Drive Positions 2-13...
... Sequence 2-1 Smart Cover Lock 2-2 Using the Smart Cover FailSafe Key 2-2 Removing the Computer Access Panel 2-4 Removing the Front Bezel 2-5 Removing Bezel Blanks 2-6 Installing Additional Memory 2-7 DIMMs 2-7 Memory Module Installation 2-8 Installing or Removing an Expansion Card 2-10 Removing an Expansion Slot Cover 2-10 Removing or Installing an Expansion Card 2-11 Drive Positions 2-13...

Evo Workstation W4000 CMT Hardware Reference Guide
Page 24
... slots are not supported; DIMMs constructed with a higher capacity DIMM. For those systems that do support ECC, Compaq does not support mixing ECC and non-ECC memory. Doing so will be required to blink the NUMLOCK LED on the keyboard continuously and, if a speaker is installed in the system, ...there will cause the system to replace the preinstalled DIMM with x4 SDRAM are populated with synchronous dynamic random access memory (SDRAM) dual inline memory modules (DIMMs). In addition, the system will not start using unsupported DIMMs. Ä CAUTION: Some models support ECC...
... slots are not supported; DIMMs constructed with a higher capacity DIMM. For those systems that do support ECC, Compaq does not support mixing ECC and non-ECC memory. Doing so will be required to blink the NUMLOCK LED on the keyboard continuously and, if a speaker is installed in the system, ...there will cause the system to replace the preinstalled DIMM with x4 SDRAM are populated with synchronous dynamic random access memory (SDRAM) dual inline memory modules (DIMMs). In addition, the system will not start using unsupported DIMMs. Ä CAUTION: Some models support ECC...

Evo Workstation W4000 CMT Hardware Reference Guide
Page 25
...before touching. 2-8 Hardware Reference Guide Remove the access panel and locate the memory module sockets. Å WARNING: To reduce risk of the computer or optional cards. When upgrading your memory, it is important to use Computer Setup to prevent corrosion and/or oxidation...briefly touching a grounded metal object. Doing so may damage the module. 1. Hardware Upgrades Memory Module Installation Ä CAUTION: Your memory module sockets have locked the Smart Cover Lock, use memory modules with each other. Ä CAUTION: Static electricity can damage the electronic components of...
...before touching. 2-8 Hardware Reference Guide Remove the access panel and locate the memory module sockets. Å WARNING: To reduce risk of the computer or optional cards. When upgrading your memory, it is important to use Computer Setup to prevent corrosion and/or oxidation...briefly touching a grounded metal object. Doing so may damage the module. 1. Hardware Upgrades Memory Module Installation Ä CAUTION: Your memory module sockets have locked the Smart Cover Lock, use memory modules with each other. Ä CAUTION: Static electricity can damage the electronic components of...

Evo Workstation W4000 CMT Hardware Reference Guide
Page 26
...ensuring that you want to install. 8. Begin by installing a module into the socket 2. Open both latches of the memory module socket 1, and insert the memory module into the socket nearest the preinstalled module, and install the modules following the numerical order of the sockets. 6. ...Hardware Reference Guide 2-9 Replace the access panel. 9. The computer should automatically recognize the additional memory the next time you normally lock the Smart Cover Lock, use Computer Setup to 6 for any additional modules that the module is...
...ensuring that you want to install. 8. Begin by installing a module into the socket 2. Open both latches of the memory module socket 1, and insert the memory module into the socket nearest the preinstalled module, and install the modules following the numerical order of the sockets. 6. ...Hardware Reference Guide 2-9 Replace the access panel. 9. The computer should automatically recognize the additional memory the next time you normally lock the Smart Cover Lock, use Computer Setup to 6 for any additional modules that the module is...

Evo Workstation W4000 CMT Hardware Reference Guide
Page 64
... 1-4 Rear Panel 1-3 computer access panel removing 2-4 computer care F-1 Configuration desktop 1-6 minitower 1-9 Configuration Features 1-1 D DIMMs (dual inline memory modules) installing 2-7 Drive Positions 2-13 DVD-ROM 2-14 E electrostatic discharge E-1 F front bezel removing 2-5 Front Panel Components 1-2 H ...drive 2-19 additional drives 2-14 an expansion card 2-11 CD-ROM 2-14 K keyboard 1-4 Windows Logo Key 1-5 M memory DIMMs 2-9 illustration 2-9 installing additional memory 2-7 SDRAM 2-7 metric screws 2-14 module sockets 2-7 mouse 1-5 Q Quiet Drive B-7 R Rear Panel Components 1-3 removing a...
... 1-4 Rear Panel 1-3 computer access panel removing 2-4 computer care F-1 Configuration desktop 1-6 minitower 1-9 Configuration Features 1-1 D DIMMs (dual inline memory modules) installing 2-7 Drive Positions 2-13 DVD-ROM 2-14 E electrostatic discharge E-1 F front bezel removing 2-5 Front Panel Components 1-2 H ...drive 2-19 additional drives 2-14 an expansion card 2-11 CD-ROM 2-14 K keyboard 1-4 Windows Logo Key 1-5 M memory DIMMs 2-9 illustration 2-9 installing additional memory 2-7 SDRAM 2-7 metric screws 2-14 module sockets 2-7 mouse 1-5 Q Quiet Drive B-7 R Rear Panel Components 1-3 removing a...


