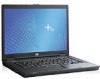
Limited Warranty and Technical Support
Page 1
..., fit, or function of the product 1 LIMITED WARRANTY AND TECHNICAL SUPPORT Your HP Limited Warranty consists of the repair or replacement of defective parts, including hard drives identified by HP Intelligent Manageability software as "HP") with "1 YR," "2 YR," or "3 YR" marked on the serial number label located on the back of the...
..., fit, or function of the product 1 LIMITED WARRANTY AND TECHNICAL SUPPORT Your HP Limited Warranty consists of the repair or replacement of defective parts, including hard drives identified by HP Intelligent Manageability software as "HP") with "1 YR," "2 YR," or "3 YR" marked on the serial number label located on the back of the...
Limited Warranty and Technical Support
Page 2
... in which it was never intended to function for legal or regulatory reasons. YOU SHOULD MAKE PERIODIC BACKUP COPIES OF THE DATA STORED ON YOUR HARD DRIVE OR OTHER STORAGE DEVICES AS A PRECAUTION AGAINST POSSIBLE FAILURES, ALTERATION, OR LOSS OF THE DATA. to make it operate in a country for which they are...
... in which it was never intended to function for legal or regulatory reasons. YOU SHOULD MAKE PERIODIC BACKUP COPIES OF THE DATA STORED ON YOUR HARD DRIVE OR OTHER STORAGE DEVICES AS A PRECAUTION AGAINST POSSIBLE FAILURES, ALTERATION, OR LOSS OF THE DATA. to make it operate in a country for which they are...
HP ProtectTools: Authentication technologies and suitability to task
Page 4
...-boot environment as well as with PKI2 deployments and provide functionality such as authenticating to the TPM during boot also unlocks Drivelock, effectively linking the hard drive to the device authentication function. TPMs lend themselves to set by the Trusted Computing Group (TCG) and uses the TPM for encrypted data Cons Lost...
...-boot environment as well as with PKI2 deployments and provide functionality such as authenticating to the TPM during boot also unlocks Drivelock, effectively linking the hard drive to the device authentication function. TPMs lend themselves to set by the Trusted Computing Group (TCG) and uses the TPM for encrypted data Cons Lost...

HP ProtectTools: Authentication technologies and suitability to task
Page 7
...token authentication Virtual tokens provide stronger authentication than passwords and are a cost effective way for individual users to achieve multi-factor authentication. Hard drive 4. Example: A user can be uniquely tied to smart cards and USB tokens. Virtual tokens are similar in a user specified ...location. The token is generated on HP Client PC's with each of security compared to utilizing a single trait. 5 Pre-boot authentication requires user authentication before the operating system is...
...token authentication Virtual tokens provide stronger authentication than passwords and are a cost effective way for individual users to achieve multi-factor authentication. Hard drive 4. Example: A user can be uniquely tied to smart cards and USB tokens. Virtual tokens are similar in a user specified ...location. The token is generated on HP Client PC's with each of security compared to utilizing a single trait. 5 Pre-boot authentication requires user authentication before the operating system is...

HP Compaq notebook single image white paper
Page 4
...the system ROM before beginning the Windows XP Professional installation. 4 Remove the primary hard drive from the nc8200. - Removal procedures are available in the Maintenance and Service Guide: "HP Compaq Business Notebook nc6100 Series." 8. The image is now ready for use on the nc8200....Maintenance and Service Guide: "HP Compaq Business Notebook nc6200 Series." 4. Remove the primary hard drive from the nc8200 into the nc4200. 13. Power down the nc6100 and remove the hard drive. 11. Insert the drive removed from the nc4200. - Insert the drive removed from the nc6100 into the ...
...the system ROM before beginning the Windows XP Professional installation. 4 Remove the primary hard drive from the nc8200. - Removal procedures are available in the Maintenance and Service Guide: "HP Compaq Business Notebook nc6100 Series." 8. The image is now ready for use on the nc8200....Maintenance and Service Guide: "HP Compaq Business Notebook nc6200 Series." 4. Remove the primary hard drive from the nc8200 into the nc4200. 13. Power down the nc6100 and remove the hard drive. 11. Insert the drive removed from the nc4200. - Insert the drive removed from the nc6100 into the ...

HP Compaq notebook single image white paper
Page 5
... component Required component Required component Recommended component Recommended component Required component (on models configured with Bluetooth) Required component (on the nc8200. 2. Remove the primary hard drive from the HP Software Support CD or the HP website at www.hp.com. Install the latest drivers and enhancements from the nc6200. 5 Remove the.... Table 1 Minimum Versions of Microsoft Windows Professional. See Table 1 for complete installation instructions. 3. Change the boot order in the Maintenance and Service Guide: "HP Compaq Business Notebook nc8200 Series." 5.
... component Required component Required component Recommended component Recommended component Required component (on models configured with Bluetooth) Required component (on the nc8200. 2. Remove the primary hard drive from the HP Software Support CD or the HP website at www.hp.com. Install the latest drivers and enhancements from the nc6200. 5 Remove the.... Table 1 Minimum Versions of Microsoft Windows Professional. See Table 1 for complete installation instructions. 3. Change the boot order in the Maintenance and Service Guide: "HP Compaq Business Notebook nc8200 Series." 5.
HP Compaq notebook single image white paper
Page 6
... from the nc6100 into the nc4200. 15. Power down the nc6100 and remove the hard drive. 13. Removal procedures are available in the Maintenance and Service Guide: "HP Compaq Business Notebook nc4200 Series." 14. The image is now ready for use with supported single image systems. 6 Removal ...the OS to enumerate all of the new devices. 8. Power down the nc6200 and remove the hard drive. 9. Removal procedures are available in the Maintenance and Service Guide: "HP Compaq Business Notebook nc6100 Series." 10. Apply power to the nc6200 and allow the OS to enumerate all of ...
... from the nc6100 into the nc4200. 15. Power down the nc6100 and remove the hard drive. 13. Removal procedures are available in the Maintenance and Service Guide: "HP Compaq Business Notebook nc4200 Series." 14. The image is now ready for use with supported single image systems. 6 Removal ...the OS to enumerate all of the new devices. 8. Power down the nc6200 and remove the hard drive. 9. Removal procedures are available in the Maintenance and Service Guide: "HP Compaq Business Notebook nc6100 Series." 10. Apply power to the nc6200 and allow the OS to enumerate all of ...
HP Compaq notebook single image white paper
Page 7
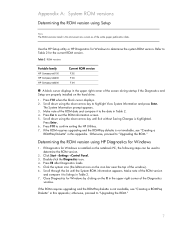
...and the ROMPaq diskette is installed on the hard drive. 1. Scroll through the list until Exit without Saving Changes is not available, see "Creating a ROMPaq Diskette" in this appendix; Table 2 ROM versions Portable family HP Compaq nc6100 HP Compaq nc6200 HP Compaq nc8200 Current ROM version F.02 F.03 ... System ROM versions Determining the ROM version using Setup Note The ROM versions listed in this document are properly installed on the notebook PC, the following steps can be used to determine the ROM version. 2. Determining the ROM version using HP Diagnostics for the...
...and the ROMPaq diskette is installed on the hard drive. 1. Scroll through the list until Exit without Saving Changes is not available, see "Creating a ROMPaq Diskette" in this appendix; Table 2 ROM versions Portable family HP Compaq nc6100 HP Compaq nc6200 HP Compaq nc8200 Current ROM version F.02 F.03 ... System ROM versions Determining the ROM version using Setup Note The ROM versions listed in this document are properly installed on the notebook PC, the following steps can be used to determine the ROM version. 2. Determining the ROM version using HP Diagnostics for the...
Hardware and Software Guide
Page 5
... 4-8 Observing the Copyright Warning 4-8 Installing Software 4-9 Enabling AutoPlay 4-10 Changing DVD Region Settings 4-10 5 Drives Drive Care 5-2 IDE Drive Light 5-3 Primary Hard Drive 5-4 Removing the Primary Hard Drive 5-4 Reinstalling the Primary Hard Drive 5-7 MultiBay II Drive 5-9 MultiBay II Security Screw 5-9 MultiBay II Hard Drive 5-10 MultiBay II Optical Drive 5-12 Removing an Optical Disc (With Power 5-15 Removing an Optical Disc (Without Power...
... 4-8 Observing the Copyright Warning 4-8 Installing Software 4-9 Enabling AutoPlay 4-10 Changing DVD Region Settings 4-10 5 Drives Drive Care 5-2 IDE Drive Light 5-3 Primary Hard Drive 5-4 Removing the Primary Hard Drive 5-4 Reinstalling the Primary Hard Drive 5-7 MultiBay II Drive 5-9 MultiBay II Security Screw 5-9 MultiBay II Hard Drive 5-10 MultiBay II Optical Drive 5-12 Removing an Optical Disc (With Power 5-15 Removing an Optical Disc (Without Power...
Hardware and Software Guide
Page 9
... Restore Points 14-10 Repairing or Reinstalling Applications 14-12 Reinstalling Applications from Your Hard Drive 14-13 Repairing the Operating System 14-13 Reinstalling the Operating System 14-14 Reinstalling Device Drivers and Other Software 14-15 15 Notebook Care Temperature 15-2 Keyboard 15-3 Display 15-4 TouchPad 15-4 Cleaning an Optional External...
... Restore Points 14-10 Repairing or Reinstalling Applications 14-12 Reinstalling Applications from Your Hard Drive 14-13 Repairing the Operating System 14-13 Reinstalling the Operating System 14-14 Reinstalling Device Drivers and Other Software 14-15 15 Notebook Care Temperature 15-2 Keyboard 15-3 Display 15-4 TouchPad 15-4 Cleaning an Optional External...
Hardware and Software Guide
Page 12
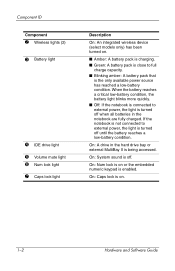
...to external power, the light is turned off when all batteries in the hard drive bay or external MultiBay II is off. When the battery reaches a critical low-battery condition, the battery light blinks more quickly. ■ Off: If the notebook is connected to external power, the light is on . 1-2 Hardware and... Software Guide On: System sound is being accessed. On: A drive in the notebook are fully charged. On: Num lock is turned off until the battery reaches a low-battery condition. On: Caps lock is on or the ...
...to external power, the light is turned off when all batteries in the hard drive bay or external MultiBay II is off. When the battery reaches a critical low-battery condition, the battery light blinks more quickly. ■ Off: If the notebook is connected to external power, the light is on . 1-2 Hardware and... Software Guide On: System sound is being accessed. On: A drive in the notebook are fully charged. On: Num lock is turned off until the battery reaches a low-battery condition. On: Caps lock is on or the ...
Hardware and Software Guide
Page 24
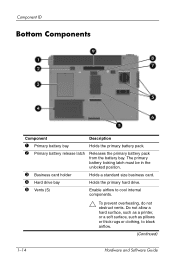
The primary battery locking latch must be in the unlocked position. 3 Business card holder Holds a standard size business card. 4 Hard drive bay Holds the primary hard drive. 5 Vents (5) Enable airflow to block airflow. (Continued) 1-14 Hardware and Software Guide Component ID Bottom Components Component Description 1 Primary battery bay Holds the primary battery ...
The primary battery locking latch must be in the unlocked position. 3 Business card holder Holds a standard size business card. 4 Hard drive bay Holds the primary hard drive. 5 Vents (5) Enable airflow to block airflow. (Continued) 1-14 Hardware and Software Guide Component ID Bottom Components Component Description 1 Primary battery bay Holds the primary battery ...
Hardware and Software Guide
Page 34
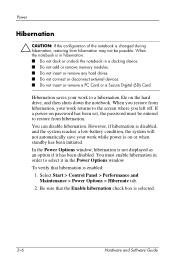
Power Hibernation Ä CAUTION: If the configuration of the notebook is enabled: 1. You can disable hibernation. You must be possible. When you restore from hibernation. If a power-on password has been set, the password ...not connect or disconnect external devices. ■ Do not insert or remove a PC Card or a Secure Digital (SD) Card. Select Start > Control Panel > Performance and Maintenance > Power Options > Hibernate tab. 2. When the notebook is on the hard drive, and then shuts down the notebook. However, if hibernation is disabled, and the system reaches a low-battery...
Power Hibernation Ä CAUTION: If the configuration of the notebook is enabled: 1. You can disable hibernation. You must be possible. When you restore from hibernation. If a power-on password has been set, the password ...not connect or disconnect external devices. ■ Do not insert or remove a PC Card or a Secure Digital (SD) Card. Select Start > Control Panel > Performance and Maintenance > Power Options > Hibernate tab. 2. When the notebook is on the hard drive, and then shuts down the notebook. However, if hibernation is disabled, and the system reaches a low-battery...

Hardware and Software Guide
Page 35
... screen and uses less power than standby. ■ Shutting down your work to the hard drive, and uses much less power than leaving the notebook on battery pack storage, refer to a hibernation file and shuts down the notebook. ■ Save your notebook. If the battery pack fails, hibernation saves your work to the "Storing a Battery...
... screen and uses less power than standby. ■ Shutting down your work to the hard drive, and uses much less power than leaving the notebook on battery pack storage, refer to a hibernation file and shuts down the notebook. ■ Save your notebook. If the battery pack fails, hibernation saves your work to the "Storing a Battery...

Hardware and Software Guide
Page 43
... that initiates standby or turns off the display or hard drive after a time interval that prompts you for password when the computer resumes from hibernation. To set a power scheme: 1. Select the check box for Prompt for a password when the notebook is running on a battery pack or on or ... or Changing a Power Scheme The Power Schemes tab in the lists on the screen. 4. You can assign different schemes depending on whether the notebook is turned on external power. Select Apply. Using a Security Password You can add a security feature that you wish to modify, and adjust ...
... that initiates standby or turns off the display or hard drive after a time interval that prompts you for password when the computer resumes from hibernation. To set a power scheme: 1. Select the check box for Prompt for a password when the notebook is running on a battery pack or on or ... or Changing a Power Scheme The Power Schemes tab in the lists on the screen. 4. You can assign different schemes depending on whether the notebook is turned on external power. Select Apply. Using a Security Password You can add a security feature that you wish to modify, and adjust ...

Hardware and Software Guide
Page 57
... disable hibernation: 1. Clear the Enable hibernation check box. 3. The notebook must remain on while the battery pack is in use the notebook occasionally during the discharge process: ❏ The monitor will not turn off automatically. ❏ Hard drive speed will not decrease automatically while the notebook is idle. ❏ System-initiated standby will not occur...
... disable hibernation: 1. Clear the Enable hibernation check box. 3. The notebook must remain on while the battery pack is in use the notebook occasionally during the discharge process: ❏ The monitor will not turn off automatically. ❏ Hard drive speed will not decrease automatically while the notebook is idle. ❏ System-initiated standby will not occur...

Hardware and Software Guide
Page 97
... or expose it to temperature extremes. ■ Do not remove the primary hard drive (the hard drive in packaging that protects it from static electricity before handling a drive by touching a grounded metal object. ❏ Avoid touching the connectors on a drive. Additional cautions are fragile notebook components that check carry-on luggage, usually while it is placed on...
... or expose it to temperature extremes. ■ Do not remove the primary hard drive (the hard drive in packaging that protects it from static electricity before handling a drive by touching a grounded metal object. ❏ Avoid touching the connectors on a drive. Additional cautions are fragile notebook components that check carry-on luggage, usually while it is placed on...

Hardware and Software Guide
Page 98
Hardware and Software Guide 5-3 Drives IDE Drive Light The IDE drive light is turned on when the primary hard drive, or a hard drive or optical drive in the MultiBay II, is being accessed.
Hardware and Software Guide 5-3 Drives IDE Drive Light The IDE drive light is turned on when the primary hard drive, or a hard drive or optical drive in the MultiBay II, is being accessed.
Hardware and Software Guide
Page 99
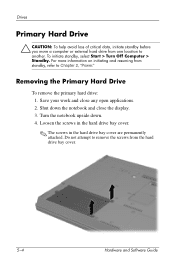
... display. 3. Loosen the screws in the hard drive bay cover. ✎ The screws in the hard drive bay cover are permanently attached. To initiate standby, select Start > Turn Off Computer > Standby. Turn the notebook upside down the notebook and close any open applications. 2. Removing the Primary Hard Drive To remove the primary hard drive: 1. Drives Primary Hard Drive Ä CAUTION: To help avoid...
... display. 3. Loosen the screws in the hard drive bay cover. ✎ The screws in the hard drive bay cover are permanently attached. To initiate standby, select Start > Turn Off Computer > Standby. Turn the notebook upside down the notebook and close any open applications. 2. Removing the Primary Hard Drive To remove the primary hard drive: 1. Drives Primary Hard Drive Ä CAUTION: To help avoid...
Hardware and Software Guide
Page 100
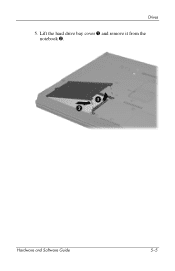
Hardware and Software Guide 5-5 Drives 5. Lift the hard drive bay cover 1 and remove it from the notebook 2.
Hardware and Software Guide 5-5 Drives 5. Lift the hard drive bay cover 1 and remove it from the notebook 2.


