
Drives
Page 6
...the operating system. ✎ Your computer may look slightly different from the hard drive bay. Disconnect all external devices connected to the computer. 4. Remove the battery from the AC outlet. 5. Then shut down the computer and close the display. 3. Do not remove the hard drive while the computer is on, in... standby, or in hibernation. ■ If you are not sure whether the computer is off or in this chapter. 3 Hard drive Replacing the hard drive Ä CAUTION: To prevent system lockup and loss of information: ■ Shut down on by pressing the power button.
...the operating system. ✎ Your computer may look slightly different from the hard drive bay. Disconnect all external devices connected to the computer. 4. Remove the battery from the AC outlet. 5. Then shut down the computer and close the display. 3. Do not remove the hard drive while the computer is on, in... standby, or in hibernation. ■ If you are not sure whether the computer is off or in this chapter. 3 Hard drive Replacing the hard drive Ä CAUTION: To prevent system lockup and loss of information: ■ Shut down on by pressing the power button.
Drives- Windows Vista
Page 6
3 Hard drive Replacing the hard drive Ä CAUTION: To prevent system lockup and loss of information: ■ Shut down the computer before removing the hard drive from the ... hard drive bay. Disconnect all external devices connected to the computer. 4. Turn the computer upside down the computer and close the display. 3. Drives 3-1 Remove the battery from the AC outlet. 5. To remove the hard drive: 1. Unplug the power cord from the computer. Do not remove the hard drive while the computer...
3 Hard drive Replacing the hard drive Ä CAUTION: To prevent system lockup and loss of information: ■ Shut down the computer before removing the hard drive from the ... hard drive bay. Disconnect all external devices connected to the computer. 4. Turn the computer upside down the computer and close the display. 3. Drives 3-1 Remove the battery from the AC outlet. 5. To remove the hard drive: 1. Unplug the power cord from the computer. Do not remove the hard drive while the computer...
Memory Modules
Page 3
Before beginning any procedure, ensure that you are discharged of static electricity by replacing the existing memory module in this guide. The memory capacity of the computer. The primary memory module compartment is located on the bottom... primary memory module slot. Å WARNING: To reduce the risk of electric shock and damage to the equipment, unplug the power cord and remove all batteries before installing a memory module. Ä CAUTION: Electrostatic discharge (ESD) can damage electronic components. Memory Modules 1-1 The expansion memory module compartment is located ...
Before beginning any procedure, ensure that you are discharged of static electricity by replacing the existing memory module in this guide. The memory capacity of the computer. The primary memory module compartment is located on the bottom... primary memory module slot. Å WARNING: To reduce the risk of electric shock and damage to the equipment, unplug the power cord and remove all batteries before installing a memory module. Ä CAUTION: Electrostatic discharge (ESD) can damage electronic components. Memory Modules 1-1 The expansion memory module compartment is located ...
Memory Modules
Page 4
...Disconnect all external devices connected to the computer. 4. Save your work. 2. Unplug the power cord from the computer. 1-2 Memory Modules Remove the battery from the AC outlet. 5. Shut down the computer and close the display. If you are not sure whether the computer is off or in the... expansion memory module slot: 1. Adding or replacing memory modules Adding or replacing a memory module in the expansion memory module slot To add or replace a memory module in hibernation, turn the computer on a flat surface. 6.
...Disconnect all external devices connected to the computer. 4. Save your work. 2. Unplug the power cord from the computer. 1-2 Memory Modules Remove the battery from the AC outlet. 5. Shut down the computer and close the display. If you are not sure whether the computer is off or in the... expansion memory module slot: 1. Adding or replacing memory modules Adding or replacing a memory module in the expansion memory module slot To add or replace a memory module in hibernation, turn the computer on a flat surface. 6.
Memory Modules
Page 8
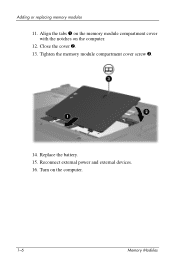
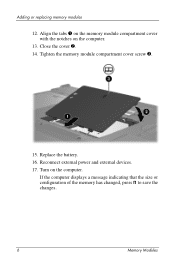
Adding or replacing memory modules 11. Tighten the memory module compartment cover screw 3. 14. Replace the battery. 15. Turn on the computer. 12. Reconnect external power and external devices. 16. Close the cover 2. 13. Align the tabs 1 on the memory module compartment cover with the notches on the computer. 1-6 Memory Modules
Adding or replacing memory modules 11. Tighten the memory module compartment cover screw 3. 14. Replace the battery. 15. Turn on the computer. 12. Reconnect external power and external devices. 16. Close the cover 2. 13. Align the tabs 1 on the memory module compartment cover with the notches on the computer. 1-6 Memory Modules
Memory Modules
Page 9
... operating system. 3. Unplug the power cord from the computer. Turn the computer upside down on by pressing the power button. Remove the battery from the AC outlet. 5. If you are not sure whether the computer is off or in the primary memory module slot: 1. Memory... Modules 1-7 Then shut down the computer. Disconnect all external devices connected to the computer. 4. Adding or replacing memory modules Replacing the memory module in the primary memory module slot To replace a memory module in hibernation, turn the computer on a flat surface. 6.
... operating system. 3. Unplug the power cord from the computer. Turn the computer upside down on by pressing the power button. Remove the battery from the AC outlet. 5. If you are not sure whether the computer is off or in the primary memory module slot: 1. Memory... Modules 1-7 Then shut down the computer. Disconnect all external devices connected to the computer. 4. Adding or replacing memory modules Replacing the memory module in the primary memory module slot To replace a memory module in hibernation, turn the computer on a flat surface. 6.
Memory Modules
Page 16
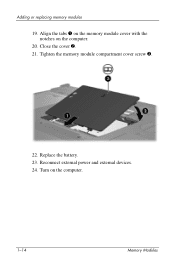
Tighten the memory module compartment cover screw 3. 22. Replace the battery. 23. Close the cover 2. 21. Turn on the computer. 20. Adding or replacing memory modules 19. Align the tabs 1 on the memory module cover with the notches on the computer. 1-14 Memory Modules Reconnect external power and external devices. 24.
Tighten the memory module compartment cover screw 3. 22. Replace the battery. 23. Close the cover 2. 21. Turn on the computer. 20. Adding or replacing memory modules 19. Align the tabs 1 on the memory module cover with the notches on the computer. 1-14 Memory Modules Reconnect external power and external devices. 24.
Memory Modules - Windows Vista
Page 3
...equipment, unplug the power cord and remove all batteries before installing a memory module. Ä CAUTION: Electrostatic discharge (ESD) can damage electronic components. The memory capacity of the computer. Memory Modules 1 Adding or replacing memory modules The computer has 2 memory module ...compartments. The primary memory module compartment is located on the bottom of the computer can be upgraded by replacing the existing memory module in this guide.
...equipment, unplug the power cord and remove all batteries before installing a memory module. Ä CAUTION: Electrostatic discharge (ESD) can damage electronic components. The memory capacity of the computer. Memory Modules 1 Adding or replacing memory modules The computer has 2 memory module ...compartments. The primary memory module compartment is located on the bottom of the computer can be upgraded by replacing the existing memory module in this guide.

Memory Modules - Windows Vista
Page 4
Turn the computer upside down on a flat surface. 7. Remove the battery from the AC outlet. 6. Close the display. 4. Adding or replacing memory modules Adding or replacing a memory module in the expansion memory module slot To add or replace a memory module in Hibernation, you must first exit Sleep or Hibernation before shutdown is possible. 2. Save your...
Turn the computer upside down on a flat surface. 7. Remove the battery from the AC outlet. 6. Close the display. 4. Adding or replacing memory modules Adding or replacing a memory module in the expansion memory module slot To add or replace a memory module in Hibernation, you must first exit Sleep or Hibernation before shutdown is possible. 2. Save your...
Memory Modules - Windows Vista
Page 8
If the computer displays a message indicating that the size or configuration of the memory has changed, press f1 to save the changes. 6 Memory Modules Reconnect external power and external devices. 17. Adding or replacing memory modules 12. Close the cover 2. 14. Replace the battery. 16. Turn on the computer. 13. Align the tabs 1 on the memory module compartment cover with the notches on the computer. Tighten the memory module compartment cover screw 3. 15.
If the computer displays a message indicating that the size or configuration of the memory has changed, press f1 to save the changes. 6 Memory Modules Reconnect external power and external devices. 17. Adding or replacing memory modules 12. Close the cover 2. 14. Replace the battery. 16. Turn on the computer. 13. Align the tabs 1 on the memory module compartment cover with the notches on the computer. Tighten the memory module compartment cover screw 3. 15.
Memory Modules - Windows Vista
Page 9
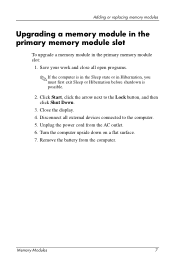
... surface. 7. Click Start, click the arrow next to the computer. 5. Unplug the power cord from the computer. Close the display. 4. Remove the battery from the AC outlet. 6. Adding or replacing memory modules Upgrading a memory module in the primary memory module slot To upgrade a memory module in Hibernation, you must first exit Sleep...
... surface. 7. Click Start, click the arrow next to the computer. 5. Unplug the power cord from the computer. Close the display. 4. Remove the battery from the AC outlet. 6. Adding or replacing memory modules Upgrading a memory module in the primary memory module slot To upgrade a memory module in Hibernation, you must first exit Sleep...
Memory Modules - Windows Vista
Page 16
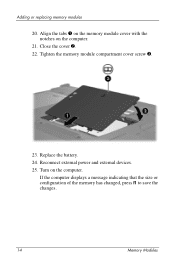
Replace the battery. 24. Close the cover 2. 22. Tighten the memory module compartment cover screw 3. 23. Turn on the computer. 21. Reconnect external power and external devices. 25. If the computer displays a message indicating that the size or configuration of the memory has changed, press f1 to save the changes. 14 Memory Modules Adding or replacing memory modules 20. Align the tabs 1 on the memory module cover with the notches on the computer.
Replace the battery. 24. Close the cover 2. 22. Tighten the memory module compartment cover screw 3. 23. Turn on the computer. 21. Reconnect external power and external devices. 25. If the computer displays a message indicating that the size or configuration of the memory has changed, press f1 to save the changes. 14 Memory Modules Adding or replacing memory modules 20. Align the tabs 1 on the memory module cover with the notches on the computer.

Power
Page 25
... computer supports up to 2 batteries: ■ One primary lithium-ion battery is included with the computer, a replacement battery provided by HP, or a compatible battery purchased as an accessory from external power for more information about leaving your work, refer to the bottom of the computer. If the computer will ...
... computer supports up to 2 batteries: ■ One primary lithium-ion battery is included with the computer, a replacement battery provided by HP, or a compatible battery purchased as an accessory from external power for more information about leaving your work, refer to the bottom of the computer. If the computer will ...
Power
Page 28
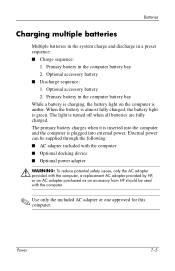
...; Optional power adapter Å WARNING: To reduce potential safety issues, only the AC adapter provided with the computer, a replacement AC adapter provided by HP, or an AC adapter purchased as an accessory from HP should be used with the computer. .... Power 7-5 Optional accessory battery 2. When the battery is almost fully charged, the battery light is turned off when all batteries are fully charged. Batteries Charging multiple batteries Multiple batteries in the system charge and discharge in the computer battery bay 2. The light is green. Primary battery in a preset sequence:...
...; Optional power adapter Å WARNING: To reduce potential safety issues, only the AC adapter provided with the computer, a replacement AC adapter provided by HP, or an AC adapter purchased as an accessory from HP should be used with the computer. .... Power 7-5 Optional accessory battery 2. When the battery is almost fully charged, the battery light is turned off when all batteries are fully charged. Batteries Charging multiple batteries Multiple batteries in the system charge and discharge in the computer battery bay 2. The light is green. Primary battery in a preset sequence:...

Power
Page 39
... or changing a power scheme." For more information, refer to temperatures above 60°C (140°F). Replace the battery only with a battery approved for battery disposal information. 7-16 Power Refer to Regulatory, Safety, and Environmental Notices for this computer. Batteries Selecting power conservation settings To set the computer to conserve power: ■ Select a short wait for...
... or changing a power scheme." For more information, refer to temperatures above 60°C (140°F). Replace the battery only with a battery approved for battery disposal information. 7-16 Power Refer to Regulatory, Safety, and Environmental Notices for this computer. Batteries Selecting power conservation settings To set the computer to conserve power: ■ Select a short wait for...
HP Compaq nx6315 and nx6325 Notebook PC - Getting Started - Enhanced for Accessibility Windows Vista
Page 19
...this document, select Start > Help and Support > User Guides. 2-6 Getting Started For more safety and regulatory information, and for battery disposal information, refer to feel warm or hot when used with the user-accessible surface temperature limits defined by the International Standard for ...60950). Å WARNING: To reduce potential safety issues, only the AC adapter or battery provided with the computer, a replacement AC adapter or battery provided by HP, or a compatible AC adapter or battery purchased as an accessory from HP should be used continuously. Also, do not block the...
...this document, select Start > Help and Support > User Guides. 2-6 Getting Started For more safety and regulatory information, and for battery disposal information, refer to feel warm or hot when used with the user-accessible surface temperature limits defined by the International Standard for ...60950). Å WARNING: To reduce potential safety issues, only the AC adapter or battery provided with the computer, a replacement AC adapter or battery provided by HP, or a compatible AC adapter or battery purchased as an accessory from HP should be used continuously. Also, do not block the...
HP Compaq nx6315 and nx6325 Notebook PC - Getting Started - Enhanced for Accessibility Windows Vista
Page 24
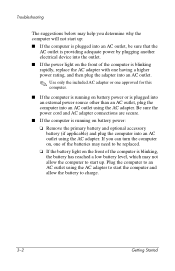
...and AC adapter connections are secure. ■ If the computer is running on battery power or is plugged into an AC outlet, be replaced. ❏ If the battery light on battery power: ❏ Remove the primary battery and optional accessory battery (if applicable) and plug the computer into an AC outlet using the AC...on the front of the computer is blinking rapidly, replace the AC adapter with one having a higher power rating, and then plug the adapter into an AC outlet. ✎ Use only the included AC adapter or one of the batteries may not allow the computer to start the computer ...
...and AC adapter connections are secure. ■ If the computer is running on battery power or is plugged into an AC outlet, be replaced. ❏ If the battery light on battery power: ❏ Remove the primary battery and optional accessory battery (if applicable) and plug the computer into an AC outlet using the AC...on the front of the computer is blinking rapidly, replace the AC adapter with one having a higher power rating, and then plug the adapter into an AC outlet. ✎ Use only the included AC adapter or one of the batteries may not allow the computer to start the computer ...
HP Compaq nx6315, nx6325 Notebook PC - Maintenance and Service Guide
Page 5
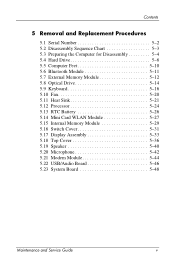
Contents 5 Removal and Replacement Procedures 5.1 Serial Number 5-2 5.2 Disassembly Sequence Chart 5-3 5.3 Preparing the Computer for Disassembly 5-4 5.4 Hard Drive 5-6 5.5 Computer Feet 5-10 5.6 Bluetooth Module 5-11 5.7 External Memory Module 5-12 5.8 Optical Drive 5-14 5.9 Keyboard 5-16 5.10 Fan 5-20 5.11 Heat Sink 5-21 5.12 Processor 5-24 5.13 RTC Battery 5-26 5.14 Mini Card WLAN Module 5-27 5.15...
Contents 5 Removal and Replacement Procedures 5.1 Serial Number 5-2 5.2 Disassembly Sequence Chart 5-3 5.3 Preparing the Computer for Disassembly 5-4 5.4 Hard Drive 5-6 5.5 Computer Feet 5-10 5.6 Bluetooth Module 5-11 5.7 External Memory Module 5-12 5.8 Optical Drive 5-14 5.9 Keyboard 5-16 5.10 Fan 5-20 5.11 Heat Sink 5-21 5.12 Processor 5-24 5.13 RTC Battery 5-26 5.14 Mini Card WLAN Module 5-27 5.15...
HP Compaq nx6315, nx6325 Notebook PC - Maintenance and Service Guide
Page 10
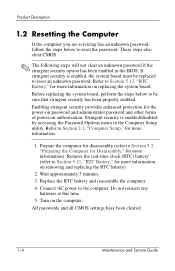
...menu in the BIOS. Prepare the computer for disassembly (refer to reset an unknown password. Replace the RTC battery and reassemble the computer. 4. Do not reinsert any batteries at this time. 5. Enabling stringent security provides enhanced protection for the power-on password and...on the computer. Connect AC power to Section 5.13, "RTC Battery," for more information on removing and replacing the RTC battery). 2. Refer to the computer. Refer to Section 5.13, "RTC Battery," for more information on replacing the system board. Wait approximately 5 minutes. 3. Turn on authorization....
...menu in the BIOS. Prepare the computer for disassembly (refer to reset an unknown password. Replace the RTC battery and reassemble the computer. 4. Do not reinsert any batteries at this time. 5. Enabling stringent security provides enhanced protection for the power-on password and...on the computer. Connect AC power to Section 5.13, "RTC Battery," for more information on removing and replacing the RTC battery). 2. Refer to the computer. Refer to Section 5.13, "RTC Battery," for more information on replacing the system board. Wait approximately 5 minutes. 3. Turn on authorization....
HP Compaq nx6315, nx6325 Notebook PC - Maintenance and Service Guide
Page 28
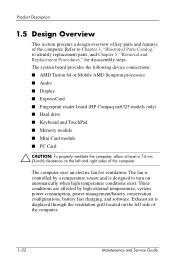
... is controlled by high external temperatures, system power consumption, power management/battery conservation configurations, battery fast charging, and software. These conditions are affected by a temperature ...Replacement Procedures," for ventilation. The system board provides the following device connections: ■ AMD Turion 64 or Mobile AMD Sempron processors ■ Audio ■ Display ■ ExpressCard ■ Fingerprint reader board (HP Compaq nx6325 models only) ■ Hard drive ■ Keyboard and TouchPad ■ Memory module ■ Mini Card module ■ PC...
... is controlled by high external temperatures, system power consumption, power management/battery conservation configurations, battery fast charging, and software. These conditions are affected by a temperature ...Replacement Procedures," for ventilation. The system board provides the following device connections: ■ AMD Turion 64 or Mobile AMD Sempron processors ■ Audio ■ Display ■ ExpressCard ■ Fingerprint reader board (HP Compaq nx6325 models only) ■ Hard drive ■ Keyboard and TouchPad ■ Memory module ■ Mini Card module ■ PC...


