
Operation Manual
Page 1
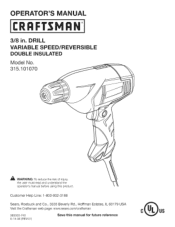
PERATOR'S MANUAL T ® 3/8 in. Customer Help Line: 1-800-932-3188 Sears, Roebuck and Co., 3333 Beverly Rd., Hoffman Estates, IL 60179 USA Visit the Craftsman web page: www.sears.com/craftsman 983000-740 6-14-06 (REV:01) Save this product. DRILL VARIABLE SPEED/REVERSIBLE DOUBLE iNSULATED Model No. 315.101070 A WARNING: To reduce the risk of injury, the user must read and understand the operator's manual before using this manual for future reference
PERATOR'S MANUAL T ® 3/8 in. Customer Help Line: 1-800-932-3188 Sears, Roebuck and Co., 3333 Beverly Rd., Hoffman Estates, IL 60179 USA Visit the Craftsman web page: www.sears.com/craftsman 983000-740 6-14-06 (REV:01) Save this product. DRILL VARIABLE SPEED/REVERSIBLE DOUBLE iNSULATED Model No. 315.101070 A WARNING: To reduce the risk of injury, the user must read and understand the operator's manual before using this manual for future reference
Operation Manual
Page 4
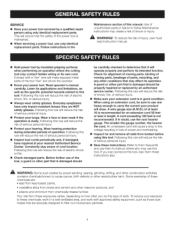
... your power tool serviced by insulated gripping surfaces when performing an operation where the cutting tool may contact hidden wiring or its own cord. Following this rule will reduce the risk of work. Wear hearing protection during extended periods of serious personal injury. [] Protect your... of these instructions. Before further use the next heavier gauge. A WARNING: Some dust created by power sanding, sawing, grinding, drilling, and other construction activities contains chemicals known to cause cancer, birth defects or other part that is recommended for and remove all ...
... your power tool serviced by insulated gripping surfaces when performing an operation where the cutting tool may contact hidden wiring or its own cord. Following this rule will reduce the risk of work. Wear hearing protection during extended periods of serious personal injury. [] Protect your... of these instructions. Before further use the next heavier gauge. A WARNING: Some dust created by power sanding, sawing, grinding, drilling, and other construction activities contains chemicals known to cause cancer, birth defects or other part that is recommended for and remove all ...
Operation Manual
Page 9
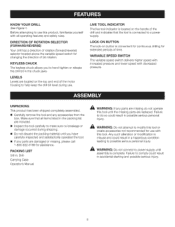
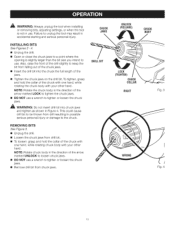
...possible serious personal injury. Any such alteration or modification is convenient for continuous drilling for use with this tool or create accessories not recommended for extended periods of bit rotation. Drill Carrying Case Operator's Manual WARNING: If any parts are damaged or missing, ... that the tool is complete. PACKING LIST 3/8 in the chuck jaws. DIRECTION OF ROTATION SELECTOR (FORWARD/REVERSE) Your drill has a direction of the drill and indicates that all operating features and safety rules. Failure to power supply until the missing parts are included. [] ...
...possible serious personal injury. Any such alteration or modification is convenient for continuous drilling for use with this tool or create accessories not recommended for extended periods of bit rotation. Drill Carrying Case Operator's Manual WARNING: If any parts are damaged or missing, ... that the tool is complete. PACKING LIST 3/8 in the chuck jaws. DIRECTION OF ROTATION SELECTOR (FORWARD/REVERSE) Your drill has a direction of the drill and indicates that all operating features and safety rules. Failure to power supply until the missing parts are included. [] ...
Operation Manual
Page 10
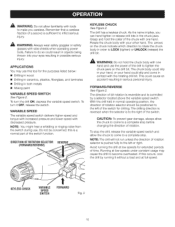
... side shields when operating power tools. To turn it without a load and at low speeds under constant usage may use this occurs, cool the drill by a selector located above the variable speed switch. NOTE: You might hear a whistling or ringing noise from the switch during use the power ...ROTATIONSELECTOR REVERSE (FORWARD/REVERSE) KEYLESS CHUCK See Figure 2. The chuck body could slip and come in order to LOCK (tighten) or UNLOCK (release) the drill bit. _b, WARNING: Do not hold the chuck body with one hand and use . The direction of bit rotation is reversible and is a normal ...
... side shields when operating power tools. To turn it without a load and at low speeds under constant usage may use this occurs, cool the drill by a selector located above the variable speed switch. NOTE: You might hear a whistling or ringing noise from the switch during use the power ...ROTATIONSELECTOR REVERSE (FORWARD/REVERSE) KEYLESS CHUCK See Figure 2. The chuck body could slip and come in order to LOCK (tighten) or UNLOCK (release) the drill bit. _b, WARNING: Do not hold the chuck body with one hand and use . The direction of bit rotation is reversible and is a normal ...
Operation Manual
Page 11
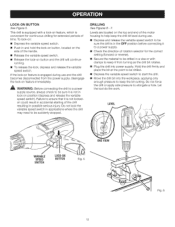
... the full length of the chuck with one hand, while rotating chuck body with your other hand. REMOVING BITS See Figure 3. [] Unplug the drill. [] Loosen the chuck jaws from falling out of the chuck with one hand, while rotating the chuck body with your other hand. CHUCK JAWS...Rotate the chuck body in accidental starting and serious personal injury. To tighten, grasp and hold the collar of the chuck jaws. [] Insert the drill bit into chuck jaws and tighten as shown in possible serious personal injury or damage to the chuck. A WARNING: Always unplug the tool when installing...
... the full length of the chuck with one hand, while rotating chuck body with your other hand. REMOVING BITS See Figure 3. [] Unplug the drill. [] Loosen the chuck jaws from falling out of the chuck with one hand, while rotating the chuck body with your other hand. CHUCK JAWS...Rotate the chuck body in accidental starting and serious personal injury. To tighten, grasp and hold the collar of the chuck jaws. [] Insert the drill bit into chuck jaws and tighten as shown in possible serious personal injury or damage to the chuck. A WARNING: Always unplug the tool when installing...
Operation Manual
Page 12
... is in the OFF position before connecting it is not in possible serious injury. Do not lock the variable speed switch in applications where the drill may need to be sure it to a power supply. [] Check the direction of rotation selector for the correct setting (forward or reverse). [] Secure ...the material to be drilled in and hold the lock-on button, located on the side of the handle. [] Release the variable speed switch. [] Release the lock-on feature, ...
... is in the OFF position before connecting it is not in possible serious injury. Do not lock the variable speed switch in applications where the drill may need to be sure it to a power supply. [] Check the direction of rotation selector for the correct setting (forward or reverse). [] Secure ...the material to be drilled in and hold the lock-on button, located on the side of the handle. [] Release the variable speed switch. [] Release the lock-on feature, ...
Operation Manual
Page 13
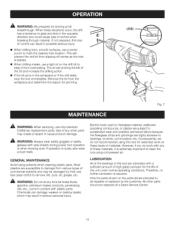
If not prepared, this tool for binding at bit breakthrough. Most plastics are intended to be repaired or replaced by their use only identical Craftsman replacement parts. AI_ WARNING: Do not at a Sears Service Center. 13 Chemicals can result in this tool are highly abrasive to bearings,... the reason for the life of the unit under normal operating conditions. LUBRICATION All of the bearings in possible serious injury. [] When drilling hard, smooth surfaces, use a light oil on the parts list are susceptible to damage from various types of commercial solvents and may ...
If not prepared, this tool for binding at bit breakthrough. Most plastics are intended to be repaired or replaced by their use only identical Craftsman replacement parts. AI_ WARNING: Do not at a Sears Service Center. 13 Chemicals can result in this tool are highly abrasive to bearings,... the reason for the life of the unit under normal operating conditions. LUBRICATION All of the bearings in possible serious injury. [] When drilling hard, smooth surfaces, use a light oil on the parts list are susceptible to damage from various types of commercial solvents and may ...
Operation Manual
Page 14
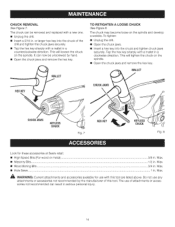
... accessories not recommended can now be removed and replaced with a mallet in . Tap the hex key sharply with a new one. [] Unplug the drill. [] Insert a 5/16 in a clockwise direction. MALLET TO RETIGHTEN A LOOSE CHUCK See Figure 8. The chuck can be unscrewed by the manufacturer of the... drill and tighten the chuck jaws securely. [] Tap the hex key sharply with this tool. To tighten: [] Unplug the drill. [] Open the chuck jaws. [] Insert a hex key into the chuck of this tool ...
... accessories not recommended can now be removed and replaced with a mallet in . Tap the hex key sharply with a new one. [] Unplug the drill. [] Insert a 5/16 in a clockwise direction. MALLET TO RETIGHTEN A LOOSE CHUCK See Figure 8. The chuck can be unscrewed by the manufacturer of the... drill and tighten the chuck jaws securely. [] Tap the hex key sharply with this tool. To tighten: [] Unplug the drill. [] Open the chuck jaws. [] Insert a hex key into the chuck of this tool ...
Operation Manual
Page 15
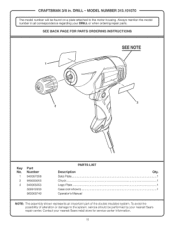
....airAlpwaaryts. mention the model SEE BACK PAGE FOR PARTS ORDERING INSTRUCTIONS SEE NOTE Key PaN No. To avoid the possibility of the double insulated system. F CRAFTSMAN 3/8 in. DRILL -
....airAlpwaaryts. mention the model SEE BACK PAGE FOR PARTS ORDERING INSTRUCTIONS SEE NOTE Key PaN No. To avoid the possibility of the double insulated system. F CRAFTSMAN 3/8 in. DRILL -


